Vestfrost Compact Manuel utilisateur

Compact Wine cabinets
GB Instructionsforuse
DE Bedienungsanleitung
FR Moded’emploi
DK Brugsanvisning
Compact wine cabinets

2
GB
In case this appliance contains hydrocar-
bon refrigerant please refer to guidelines
listed below.
As the appliance contains a ammable
refrigerant, it is essential to ensure that the
refrigerant pipes are not damaged.
Standard EN378 species that the room in
which you install your appliance must have
a volume of 1m³ per 8 g of hydrocarbon
refrigerant used in the appliances. This is
to avoid the formation of ammable gas/
air mixtures in the room where the appli-
ance is located in the event of a leak in the
refrigerant circuit. The quantity of the refrig-
erant used in your appliance is indicated on
the rating plate.
WARNING: Keep ventilation openings in
the appliance’s cabinet or in
the built-in structure clear of
obstruction
WARNING: Do not use other mechanical
devices or other means to ac-
celerate the defrosting process
than those recommended by
the manufacturer
WARNING: Do not damage the refrigerant
system
WARNING: Do not use electricalappli-
ances inside the refrigerated
storage compartment, unless
they are of a type recommend-
ed by the manufacturer
WARNING: Do not expose the appliance
to rain
WARNING: This appliance is not intended
for use by young children or
inrm persons unless they have
been adequately supervised by
a responsible person to ensure
that they can use the appliance
safely. Young children should
be supervised to ensure that
they do not play with the appli-
ance
● Always keep the keys in a separate place
and out of reach of children
● Before servicing or cleaning the appli-
ance, unplug the appliance from the
mains or disconnect the electrical power
supply
● If the supply cord is damaged, it must be
replaced by the manufacturer, its service
agent, or similarly qualied persons in
order to avoid a hazard
● RelevantforAustralia: Supply cord
tted with a plug complies with AS/NZS
3112.
● Frost formation on the interior evaporator
wall and upper parts is a natural phenom-
enon. Therefore, the appliance should
be defrosted during normal cleaning or
maintenance
● Please note that changes to the appli-
ance construction will cancel all warranty
and product liability
● This appliance is intended to be used
exclusively for the storage of wine
Warning.

3
GB
Warning.
Before operating your new appliance,
please read the following instructions care-
fully as they contain important information
on safety, installation, operation and main-
tenance. Keep the instructions for future
reference. On receipt, check to ensure that
the appliance has not been damaged dur-
ing transport. Transport damage should be
reported to the local distributor before the
wine cooler is put into use.
Remove the packaging. Clean the inside of
the cabinet using warm water with a mild
detergent. Rinse with clean water and dry
thoroughly (see cleaning instructions). Use
a soft cloth. If the appliance has been laid
down during transport, or if it has been
stored in cold surroundings (colder than
+5°C), it must stabilise in an upright position
for at least one hour before being switched
on.
Warning ..................................................2
Before use ..............................................3
Technical data.........................................3
Get to know your wine cooler. ................4
Installation and start-up ..........................4
Change of hinge side...........................6-7
Operation and function ........................8-9
Defrosting,
cleaning and maintenance....................10
Removing the shelves ..........................10
Fault nding .......................................... 11
Warranty, spare parts and service ........12
Disposal ................................................13
Thankyou for purchasing your new
wine cooler. Please note that these instruc-
tions apply to all wine coolers in the Com-
pact wine range. Illustrations and ttings
may therefore not necessarily correspond
exactly to your model.
Contents Beforeuse.
Technicaldata.
This device complies with relevant EU
directives including Low Voltage Directive
2006/95 EEC. and Electromagnetic Com-
patibility Directive 2004/108/EC
The rating plate provides various techni-
cal information as well as type and serial
number.
4
GB
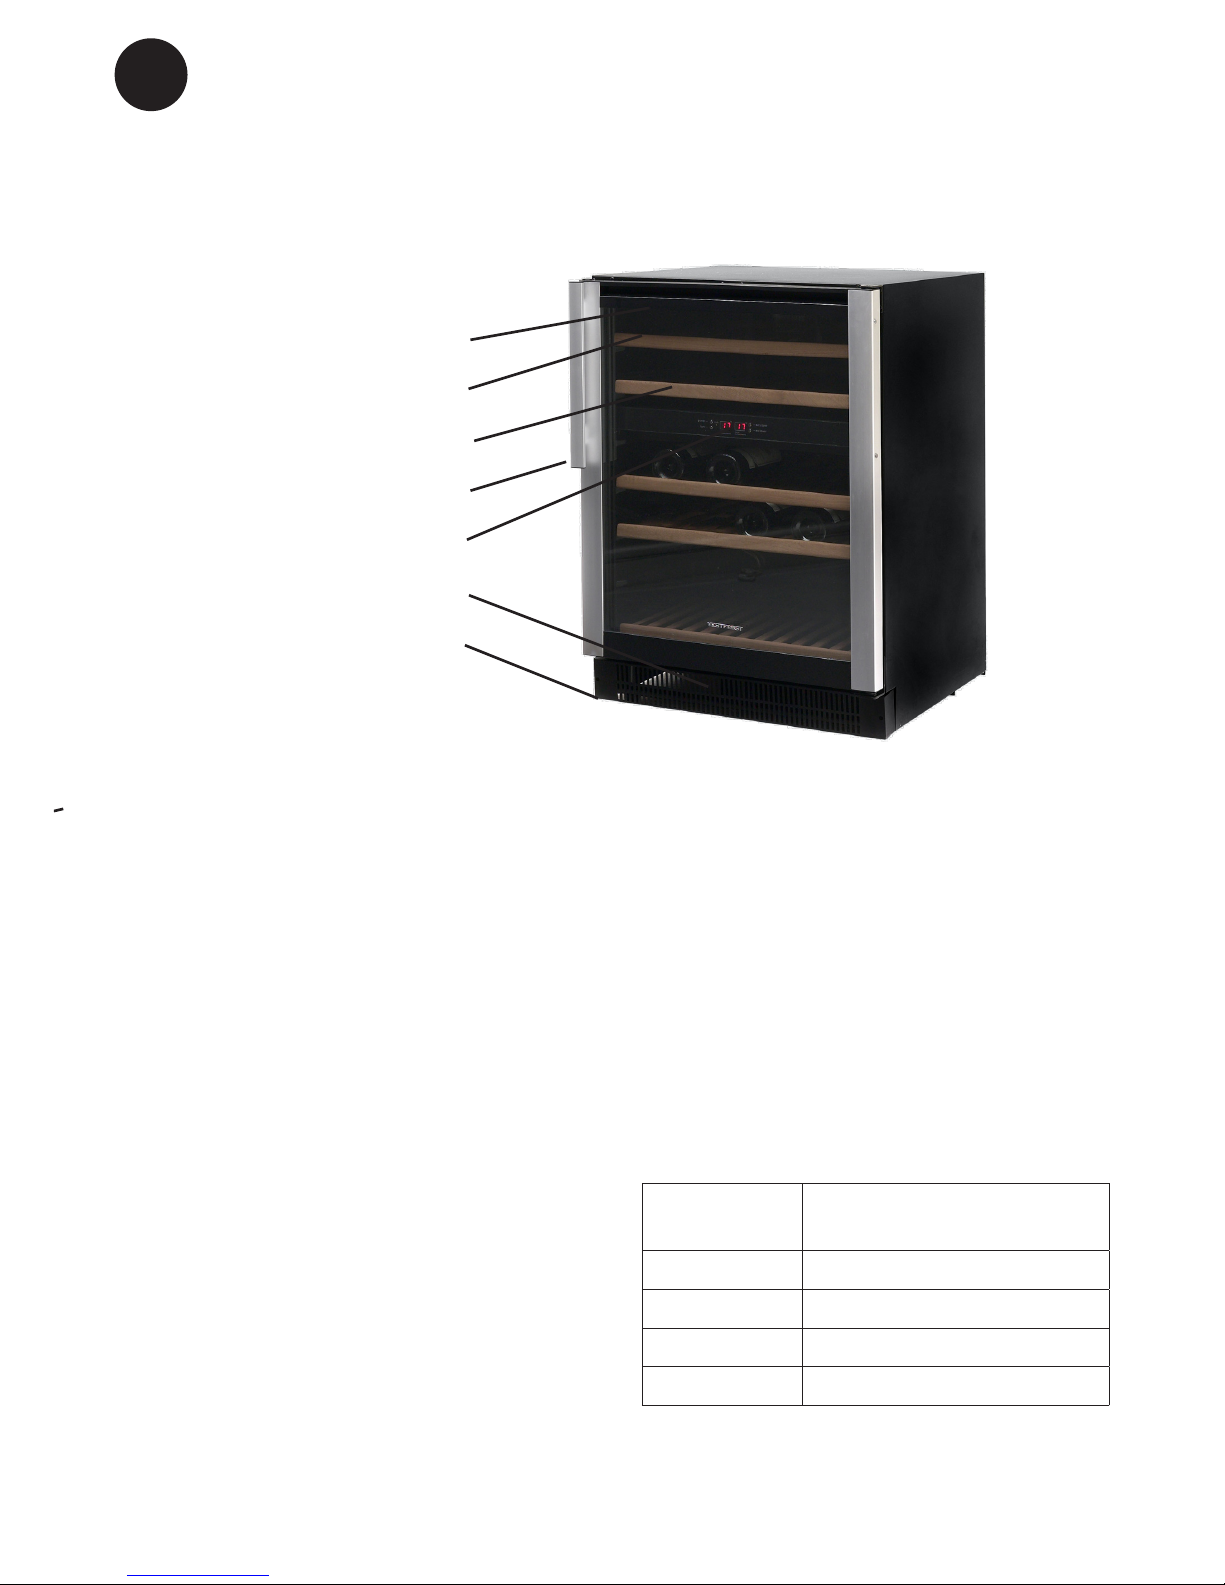
Rating plate (on the back)
Lighting
Identication plate
Wooden shelf
Door handle
Control panel
Kick plate
Adjustable feet
Gettoknowyourwinecooler.
g.1
Installationandstart-up.
Placement
For safety and operational reasons, the ap-
pliance must not be installed outdoors.
The appliance should be placed on a level
surface in a dry, well ventilated room (max.
75% relative air humidity). Never place the
appliance close to sources of heat such as
cookers or radiators, and avoid placing it in
direct sunlight.
Roomtemperature
The climate class is stated on the rating
plate (see g. 1 on page 3 and g. 11 on
page 12). This species the optimum room
temperature.
Climate
class
Optimumroomtempera-
ture
SN +10 ºC to +32 ºC
N +16 ºC to +32 ºC
ST +18 ºC to +38 ºC
T +18 ºC to +43 ºC
Compact wine cabinets

5
GB
Gettoknowyourwinecooler.
Installation
The surface on which the appliance is to be
placed must be level. Do not use a frame
or similar. It is important that the appliance
be absolutely level. It can be levelled by
screwing the adjustable feet at the front of
the appliance up or down (g. 2).
Use a spirit level to check that the appliance
is absolutely level sideways.
Build-in
W32 is only for free-standing, and suf-
cient free air around the appliance must be
ensured. (g. 4)
The appliances W45andW38 can be
installed as built-in units in kitchen elements
or be placed free-standing (g. 3).
At built-in condition ensure sufcient airow
through the kitchen base in front of the
appliance. The total cross section of the
opening must be as described in g. 3, and
individual air duct clearance must be at
least 5 mm.
Along with your new cabinet is a replace-
able kick plate which can be xed with the
two screws. These two screws are located
in the accessories bag, see gure 2_1
g. 2_1
g. 2
g. 3 g. 4
g. 3 g. 4
If needed there is a kit in the accessories
bag, see gure 2_1, for xing the cabinet up
against a table top.
g. 2

6
GB
The door can be changed from right-hinged to left-hinged and vice versa as follows:
Changeofhingeside-W32.
1. Rubber cover 2. Screw 3. Decorative cover 4 & 7 .Screw
5. Top hinge module 6.Door 8.Lower hinge module-Left 9.Cabinet’s leg long
● Pull out the screw covers and unscrew
the decorative cover. See g.5.1
● While holding the door rmly, loosen and
remove the top hinge, lift up and remove
the door. See g.5.2
● Unscrew the lower hinge(8)
● Remove the long cabinet leg (9) on the
left side, and shift it to the right end side.
See g.5.3
● Install the lower hinge and tie it with the
bolts.
● Install the door on the axe of lower hinge
(8) the same way it was removed, screw
back the top hinge on the left.
● Fix back the decorative cover and rubber
cover.
Abb. 5.3 Abb. 5.4
Abb. 5.1 Abb. 5.2

7
GB
The door can be changed from right-hinged to left-hinged and vice versa as follows:
Changeofhingeside-W45.
1) Screw 2) Bottom hinge, right 3) Door pin 4) Top hinge, right 5) Door
6) Cabinet 7) Top hinge, left 8) Bottom hinge, left
● Ensure that the cabinet is not connected
to the mains and place the cabinet on the
back
● Dismount the screws (1) SUPPORT THE
DOOR! See g. 6.1
● Dismount the door by pulling it forwards
and free from the top hinge. See g. 6.2
● Dismount the right top hinge and save it
for later use. See g. 6.3
● Mount the left top and bottom hinge en-
closed (7 + 8). See g. 6.4
● Remount the door pin previously dis-
mounted (3) in the bottom hinge
● Mount the door in the top hinge (7)
towards the door pin (3), tighten the door
pin (1)
● Lift up the cabinet again and wait 1 hour
before connecting it to the mains to avoid
oil in the cooling system
g. 6.1
g. 6.4g. 6.3
g. 6.2

8
GB
Electroniccontrol
The electronic control ensures that the set
temperatures are maintained in the cabinet
compartments. This is accomplished by
complex control of the refrigerating system,
the heating element, and the fan. Following
any power failure, the temperature setting is
reverted to factory defaults:
Upper compartment: 6°C
Lower compartment: 12°C
The electronic controls have the following
functions:
● Temperature setting
● Temperature display
● Automatic defrosting
● High and low temperature alarm
● Light on/off
● Cabinet on/off (push and hold for 3 secs)
Temperaturedisplay
The display shows the actual temperature
in the compartments. The temperature
display has a built-in lter that simulates the
actual temperature in the bottles. The dis-
played temperature is therefore not affected
by transient uctuations in air temperature.
Temperaturesetting
The temperature is set by using the two
buttons on the control panel. By pushing
a temperature button, the display changes
from actual temperature to set value. By
pushing the button repeatedly, the set value
scrolls through the available temperature
span.
The temperature in the upper compartment
is adjustable from 5-10 °C. The temperature
in the lower compartment is adjustable from
10-18 °C.
Temperaturealarm
If the temperature has deviated 3°C from
the chosen set value for at least 1 hour,
the display ashes and Lo / actual respec-
tively Hi / actual temperature are alternately
shown.
It is recommended that wine be served at a
temperature which is a couple of degrees
lower than the desired drinking temperature
as the wine will be warmed slightly when it
is poured into the glass.
OperationandfunctionW32andW45
g. 7

9
GB
Electroniccontrol
The electronic control ensures that the set
temperatures are maintained in the cabinet
compartments. This is accomplished by
complex control of the refrigerating system,
the heating element, and the fan. Following
any power failure, the temperature setting is
reverted to factory defaults:
Left compartment: 7°C
Right compartment: 12°C
The electronic controls have the following
functions:
● Temperature setting
● Temperature display
● Automatic defrosting
● High and low temperature alarm
● Light on/off
● Cabinet on/off (push and hold for 3 secs)
Temperaturedisplay
The display shows the actual temperature
in the compartments. The temperature
display has a built-in lter that simulates the
actual temperature in the bottles. The dis-
played temperature is therefore not affected
by transient uctuations in air temperature.
Temperaturesetting
The temperature is set using the two but-
tons on the control panel. When pushing
a temperature button, the display changes
from actual temperature to set value. After
this, it is possible to change the set value.
Up = temperature up
Down = temperature down
The temperature in both compartments is
adjustable from 5-18 degree Celcius.
The new set value is automatically stored
after 5 seconds of inactivity and the display
switches back and shows the actual tem-
perature again.
Temperaturealarm
If the temperature has deviated 3°C from
the chosen set value for at least 1 hour,
the display ashes and Lo / actual respec-
tively Hi / actual temperature are alternately
shown.
It is recommended that wine be served at a
temperature which is a couple of degrees
lower than the desired drinking temperature
as the wine will be warmed slightly when it
is poured into the glass.
OperationandfunctionW38.
9
10
GB
Automaticdefrosting
The wine cooler is defrosted automatically.
Defrost water runs through a pipe and is
collected in a tray above the compressor
where the heat generated by the compres-
sor causes it to evaporate.
Cleaning
Before cleaning the appliance, unplug it
from the main supply. The cabinet is best
cleaned using warm water (max. 65°C) with
a little mild detergent. Never use cleaning
agents that scour. Use a soft cloth. Rinse
with clean water and dry thoroughly. Never
use sharp or pointed implements. Avoid un-
necessary cleaning of the wooden shelves,
as these are made of untreated natural
material. Cleaning agents may discolour the
shelves.
The sealing strip around the door must be
cleaned regularly to prevent discolouration
and prolong service life. Use clean water.
After cleaning the sealing strip, check that it
continues to provide a tight seal.
Dust collecting on the condenser under-
neath the cabinet, on the compressor and
in the compressor compartment is best
removed using a vacuum cleaner.
Defrosting,cleaning,andmaintenance.
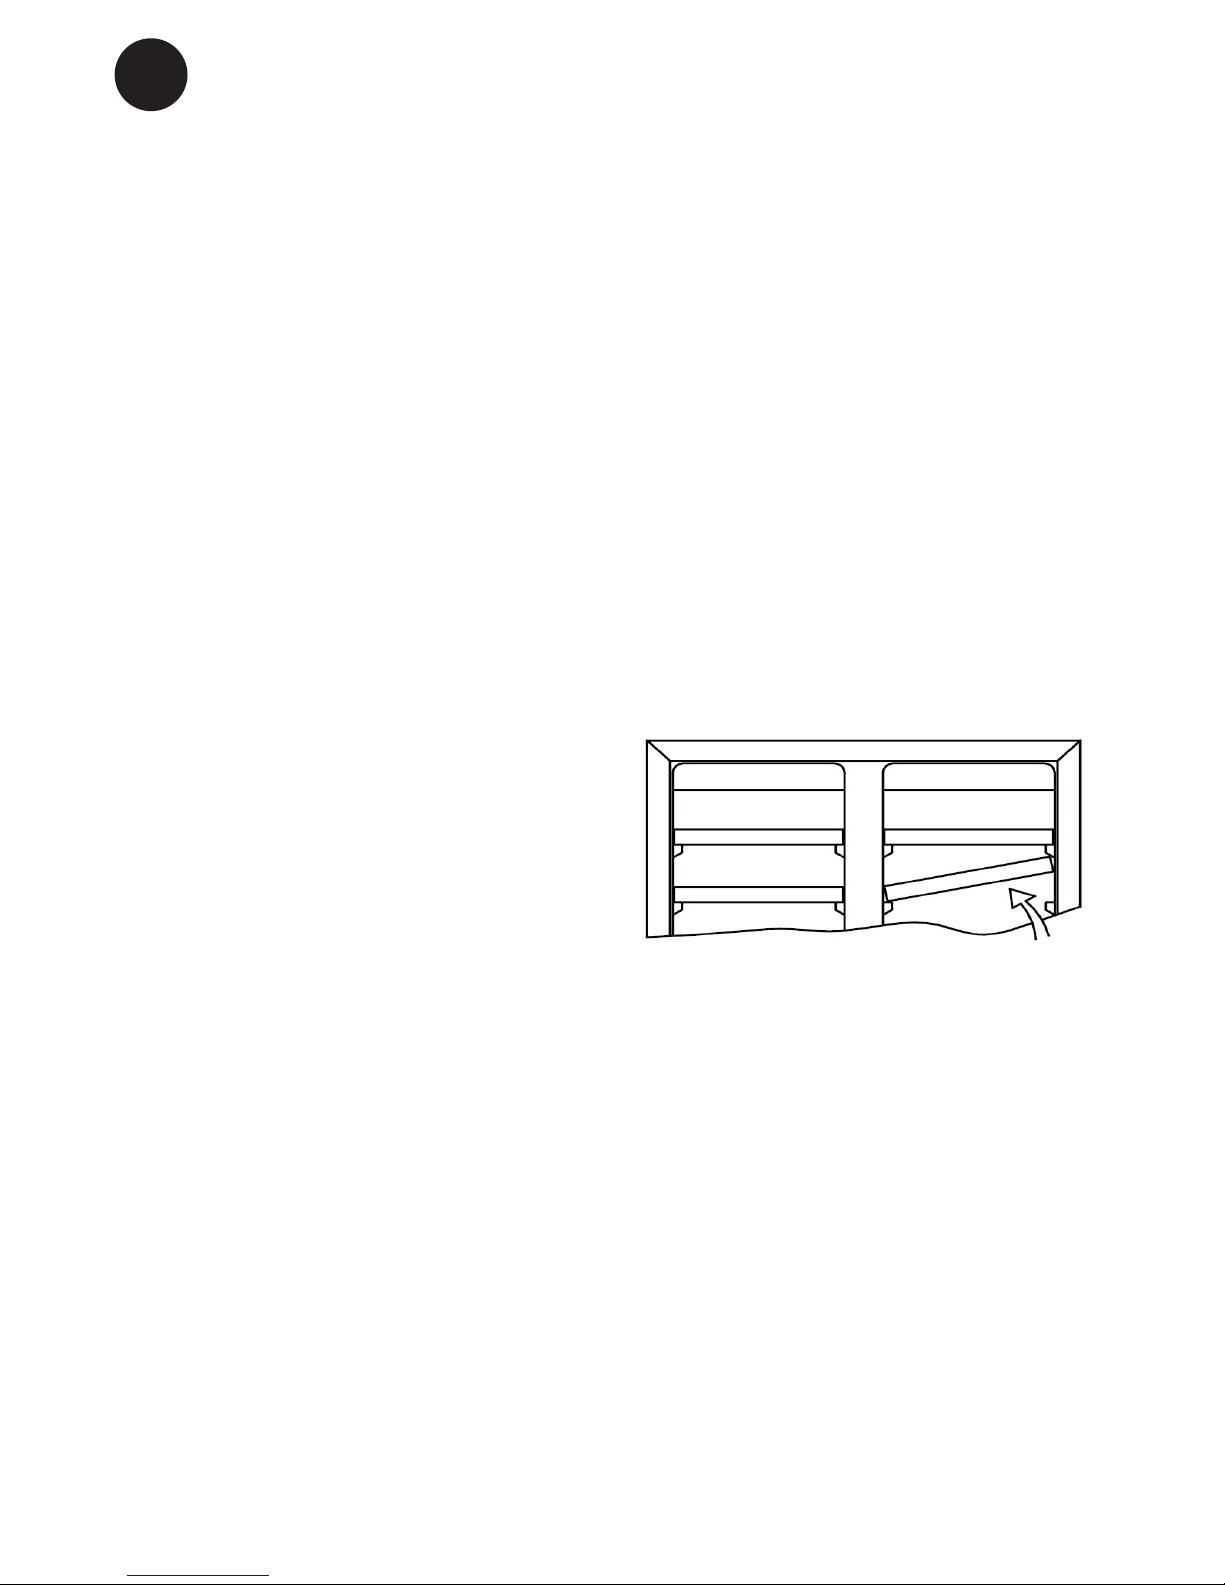
Removingtheshelves
Push the shelf all the way back and tip it. It
is now possible to remove the shelf.
Replacingthelighting
Light-emitting diodes designed to last the
entire service life of the appliance are
used. If it, however, becomes necessary
to replace the light source, please call for
service.
CLASS1LEDPRODUCT
Ce manuel convient aux modèles suivants
4
Table des matières
Langues :
Autres manuels Vestfrost Refroidisseur de vin

Vestfrost
Vestfrost Tecfrigo 32 Guide de démarrage rapide

Vestfrost
Vestfrost WFG 185 Manuel utilisateur

Vestfrost
Vestfrost FUNCTION Manuel utilisateur

Vestfrost
Vestfrost WFG 22 Manuel utilisateur

Vestfrost
Vestfrost FZ W Series Manuel utilisateur

Vestfrost
Vestfrost WFG 18 Manuel utilisateur

Vestfrost
Vestfrost FZ375W Manuel utilisateur

Vestfrost
Vestfrost WFG 185 Manuel utilisateur

Vestfrost
Vestfrost WFG48 Manuel utilisateur

Vestfrost
Vestfrost WFG46 Manuel utilisateur


