Unit Connection Technology WS037C Manuel utilisateur

1
WS037C Professional Wireless Weather Station
User Manual
1.Introduction
Thank you for your purchase of the Professional Wireless
Weather Station. The following user guide provides step by
step instructions for installation, operation and troubleshooting.
2.Warnings and Cautions
Warning: Any metal object may attract a lightning strike,
including your weather station mounting pole. Never install the
weather station in a storm.
Warning: Installing your weather station in a high location
may result in injury or death. Perform as much of the initial
check out and operation on the ground and inside a building or
home. Only install the weather station on a clear, dry day.
3.Getting Started
The professional weather station consists of a display console,
a sensor array with Integrated Outdoor Sensor, and mounting
hardware.
2
3.1 Parts List
The weather station consists of the following parts (as
referenced in Figure 1 ).
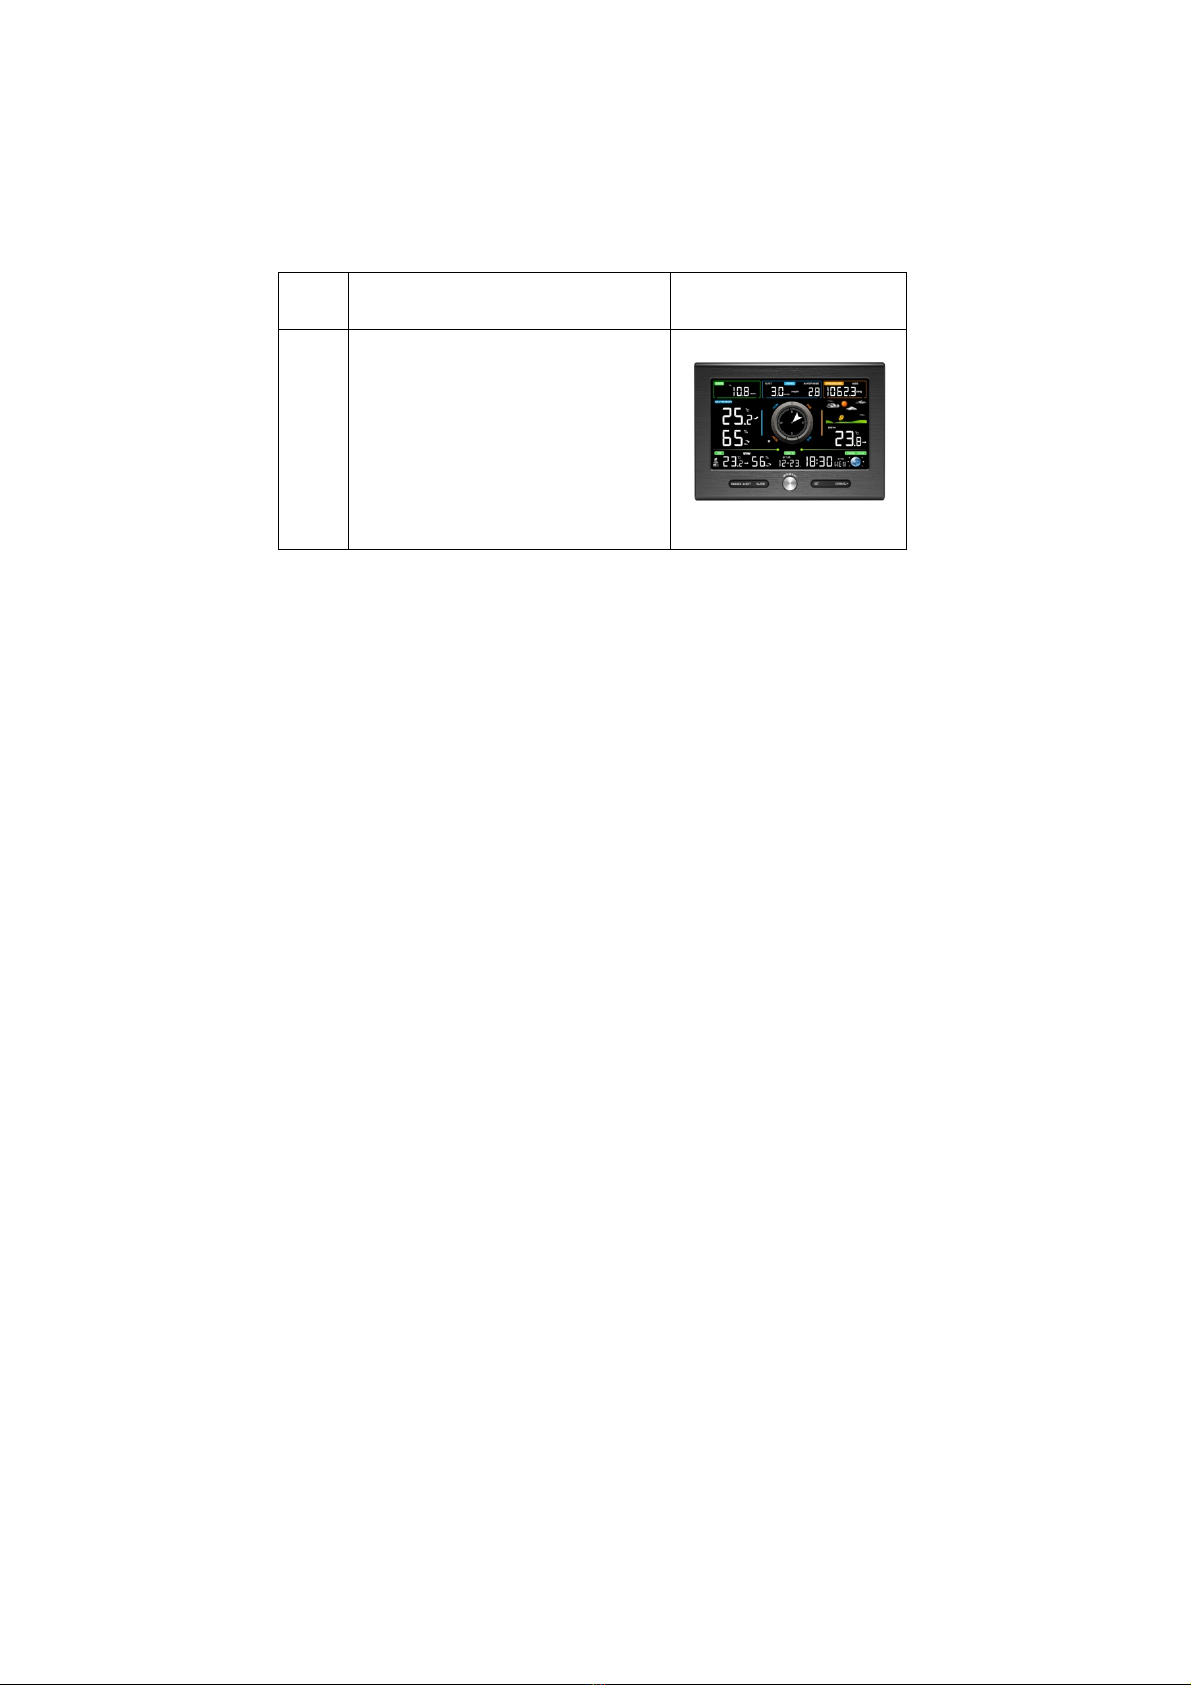
QTY Item Image
1
Display Console
Frame Dimensions (LxHxW):
7.6x5.5x1.1inch
(193X140X28mm)
LCD Dimensions (LxW):
6.3x 3.7inch (160X93mm)
3.4 Display Console
3.4.1 Layout of Display Console
The following illustration shows the segment of LCD display for
feature description purposes only in Figure 7.
.
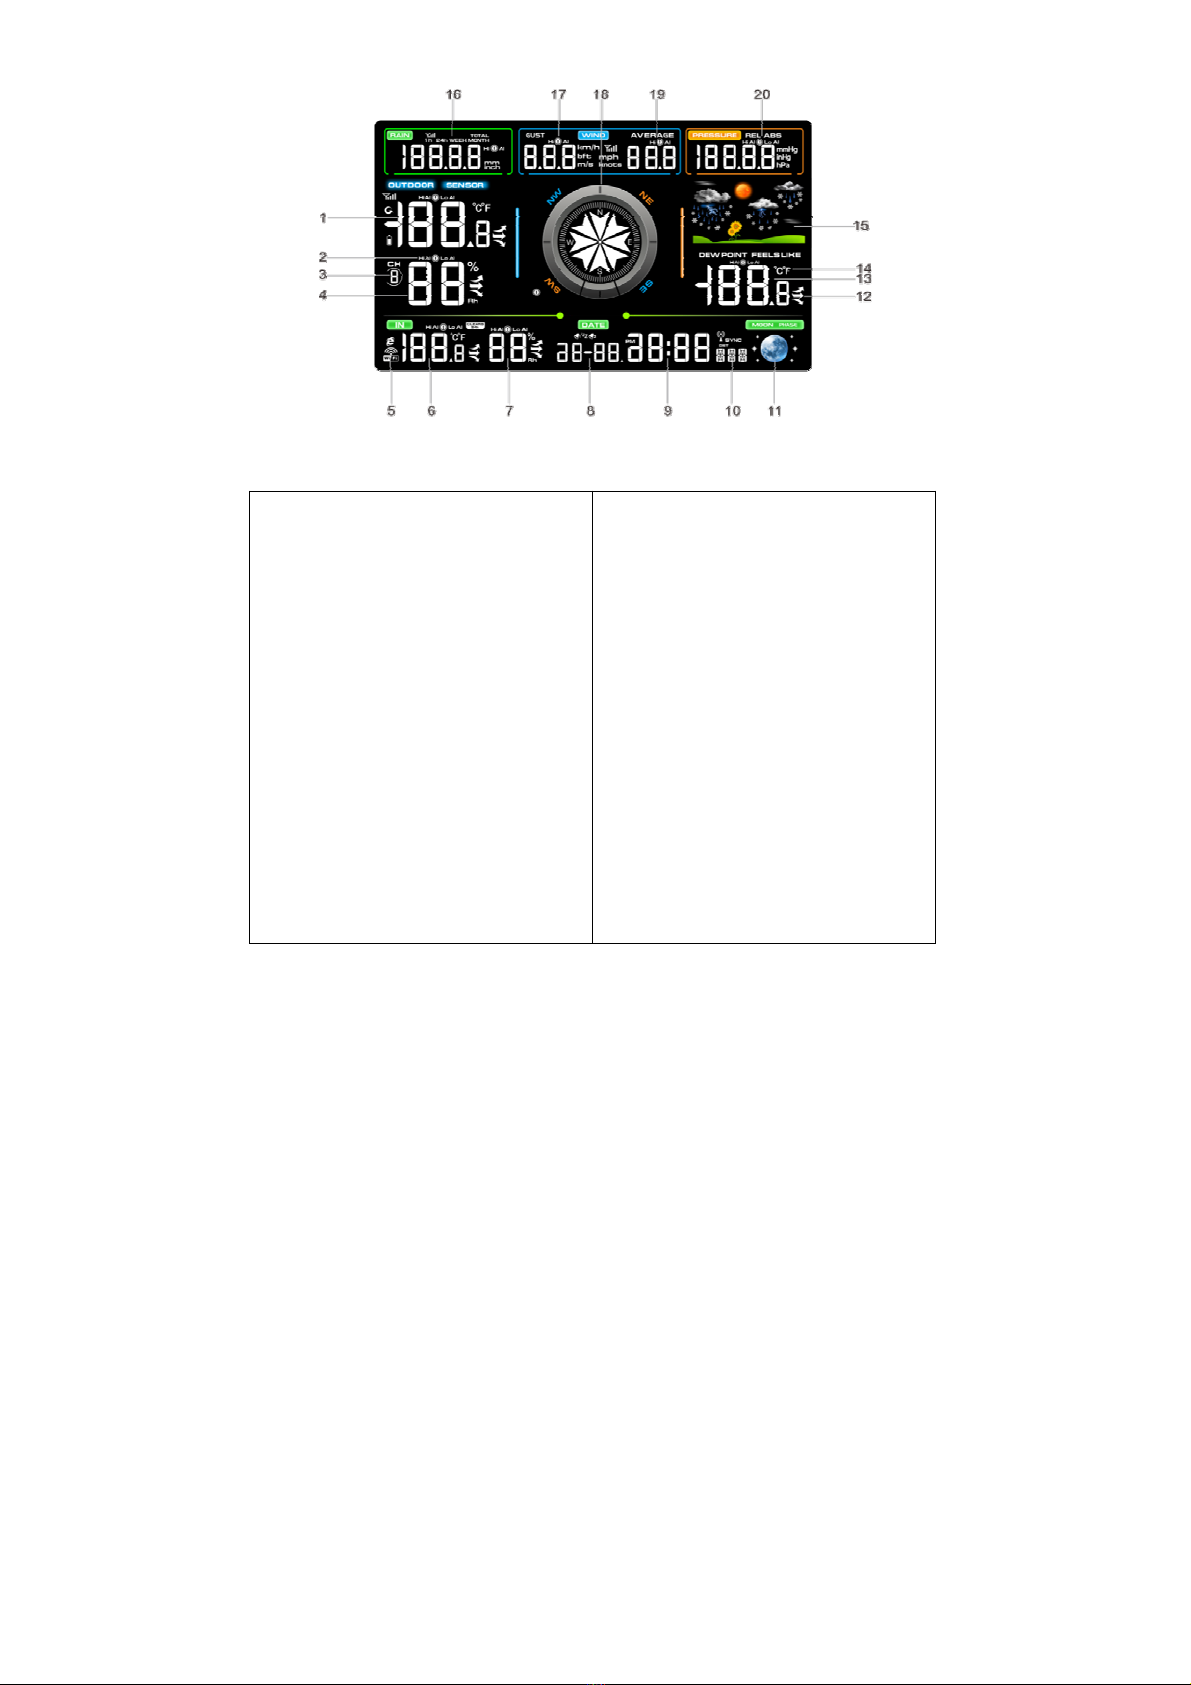
3
Figure 7
1) Outdoor temperature
display
2) Outdoor humidity HI/LO
alarm
3) Channel 1-8 indicator
4) Outdoor humidity display
5) WIFI network
6) Indoor temperature display
7) Indoor humidity display
8) Date
9) Time
10) Week
11) Moon phases
12) Outdoor temperature
change indication
13) Outdoor dew point and
feels like temperature display
14) Temperature units (°F
or °C)
15) Weather forecast
16) Rainfall units of measure
17) Wind gust HI alarm
18) Wind direction
19) Wind speed average HI
alarm
Pressure (REL and ABS)
display
3.4.2 Setup the Display Console
1. Plug in the display console with power adapter.

4
BL ON will display in the time area for three seconds when
powered up. Conversely, The AC OFF icon will display .
Note: It is recommended to plug in the power adapter to
reduce the battery consumption and extend the service life.
2. Display Console Batteries Installation
Remove the battery door on the back of the display, as shown
in Figure 8. Install three AAA (alkaline or lithium)) batteries. The
display will beep once and layout of display will light up for a
few seconds to verify all segments are operating properly.
Figure 8

5
Replace the battery door, and unfold out the desk stand to
place the console in the upright position.
Note: The battery is a back-up of weather station console,
saving console settings when powered off from adaptor
3.4.3 Connect Sensor with Display Console
Once the display console is powered up, it will automatically
scan all the nearby Integrated Outdoor sensors.
Note: Do not press any button until all the remote sensors
report in the display screen, otherwise the display console will
terminate to connect with remote sensors.
Note: While in the search mode, the remote search icon
will be constantly displayed until all the measured values
received. The console will automatically switch to the normal
mode from which all further settings can be performed.
When connected with the Integrated Outdoor Sensor, the
measured value (Indoor temperature,humidity,pressure,moon
phase,time,wind speed,wind gust,wind direction,rain,outdoor
temperature and humidity) will show up on the display console.
Note: Make sure that the distance between weather station
sensors and display console should be within 10ft (3m) to 100ft
(30m). If the weather station sensors is too close or too far
away, it may not receive a proper signal.
3.5 Sensor Operation Verification

6
The following steps verify proper operation of the sensors prior
to install the sensor array.
1. Verify proper operation of the rain gauge. Tip the
Integrated outdoor sensor back and forth several times. You
will heard a “ticking” sound within the rain gauge. Verify the rain
reading on the display console is not reading 0.00. Each
“ticking” represents 0.1 inch of rainfall.
2. Verify proper operating of the wind speed. Rotate the
wind cups manually or with a constant speed fan. Verify the
wind speed is not reading 0.0.
3. Verify proper operation of in/outdoor temperature.
Verify the indoor and outdoor temperature match closely with
the console and sensor array in the same location (about 5 to
10’ (1.5 to 3 meters) apart).The sensors should be within 4°F
/2°C (the accuracy is ± 2°F/1°C). Allow about 30 minutes for
both sensors to stabilize.
4. Verify proper operation of in/outdoor humidity. Verify
the indoor and outdoor humidity match closely with the console
and sensor array in the same location (about 5 to 10’ (1.5 to 3
meters) apart).The sensors should be within 10% (the accuracy
is ± 5%). Allow about 30 minutes for both sensors to stabilize.
7. Display Console Operation
7.1 Quick Display Mode
Note: The display console has five keys for easy operation:
CHANNEL/+ key, SET key, SNOOZE/LIGHT key, ALARM key
and MAX/MIN/- key.

7
Note: To exit the Quick Display Mode at any time, press the
SNOOZE/LIGHT key of the display console.
While in Normal Mode, press (do not hold) the SET key to enter
the Quick Display Mode as follows:
once for time, time/week and second
Twice for rainfall
three for pressure
four for sensor temperature
1. Time, Time/Week and Second. Press the CHANNEL/+ or
MAX/MIN/- key to toggle between time, time/week and second.
2. Rainfall. Press the CHANNEL/+ or MAX/MIN/- key to toggle
between 1h,24h week, month and total.
To clear the total rain, press the CHANNEL/+ or MAX/MIN/-
button until total rain is displayed. The total rain will flash. Press
and hold the SET button for five seconds until total rain reads
0.0.
3. Absolute Pressure and Relative Pressure. Press the
CHANNEL/+ or MAX/MIN/- key to toggle between absolute
pressure and relative pressure.
4. Outdoor Temperature. Press the CHANNEL/+ or
MIN/MAX/- key to toggle between dew point and feels like.
7.2 Set (Program) Mode
While in Normal Mode, press and hold the SET key for at least
three seconds to enter the Set Mode. The first setting will begin
flashing. You can press the SET key again to skip any step, as
defined below.

8
Note: In the Set mode, press the CHANNEL/+ key or
MAX/MIN/- key to change or scroll the setting value. Hold the
CHANNEL/+ key or MAX/MIN/- key for three seconds to
increase/decrease rapidly.
Note: To exit the Set mode at any time, press the
SNOOZE/LIGHT button of the display console.
1. 12/24 Hour Format (default: 24h). Press the SET key
again to adjust the 12/24 hour format setting (FMT). Press the
CHANNEL/+ key or MAX/MIN/- key to change between 12 hour
and 24 hour format.
2. Change Hour. press the SET key again to set the hour.
Press the CHANNEL/+ key or MAX/MIN/- key to adjust the hour
up or down.
3. Change Minute. Press the SET key again to set the minute.
Press the CHANNEL/+ key or MAX/MIN/- key to adjust the
minute up or down.
4. Date Format (default: D-M). Press the SET key again to
enter the Day/Month format mode. Press the CHANNEL/+ or
MAX/MIN/- key to switch between M-D, D-M.
5. Change Month. Press the SET key again to set the
calendar month. Press the CHANNEL/+ key or MAX/MIN/-
key to adjust the calendar month.
6. Change Day. Press the SET key again to set the calendar
day. Press the CHANNEL/+ key or MAX/MIN/- key to adjust the
calendar day.
7. Change Year. Press the SET key again to set the calendar
year. Press the CHANNEL/+ key or MAX/MIN/- key to adjust
the calendar year.

9
8. Max/Min Clearing (default: ON). Press the SET key again
to set the Max/Min clearing mode (CLR). The Max/Min can be
programmed to clear daily (at midnight) or manually. Press the
CHANNEL/+ key or MAX/MIN/- key to switch between ON
(Clears 24h) and OFF (Manually).
9. Temperature Units of Measure (default: °C). Press the
SET key again to change the temperature units of measure.
Press the CHANNEL/+ key or MAX/MIN/- key to switch
between °F and °C units of measure.
10. Wind Speed Units of Measure (default: m/s). Press the
SET key again to change the wind speed units of measure .
Press the CHANNEL/+ key or MAX/MIN/- key to toggle the
wind speed units between m/s, bft,knots,mph or km/h.
11. Rainfall Units of Measure (default: mm). Press the SET
key again to change the Rainfall units of measure. Press
CHANNEL/+ key or MAX/MIN/- key to toggle the rainfall units
between mm and inch.
12. Barometric Pressure Display Units(default: hPa).Press
the SET key again to change the pressure units of measure.
Press the CHANNEL/+ key or MAX/MIN/- key to toggle the
pressure units between mmHg, inHg or hPa.
13. Pressure Threshold Setting (default level 2). Press the
SET key again to change the pressure threshold. Press the
CHANNEL/+ key or MAX/MIN/- key to change pressure
threshold 2 hPa to 4 hPa. (For detailed information of this part
please refer to 10.5)
14. Weather Icons Setting (default: partly cloudy). Press
the SET key again to change the initial weather icon. Press the
CHANNEL/+ key or MAX/MIN/- key to select the initial weather

10
icon of Sunny, Cloudy, Partly Cloudy or Rainy. (For detailed
information of this part please refer to 10.2)
15. Time SYNC(default:ON). Press the SET key again to set
the network time sync. Press the [+] key or [-] key to switch
between SYNC time ON and SYNC time OFF of measure.
16. Location Division. (default: Northern Hemisphere).
Press the SET key again to change the location division. Press
the CHANNEL/+ key or MAX/MIN/- key to toggle the position of
the earth Northern Hemisphere (NOR) or Southern
Hemisphere (SOU). (Refer to 5.0 Final Installation of
Sensors)
7.3 Sensor Search Mode
If Integrated Outdoor Transmitter data is lost, press and hold
the CHANNEL/+ button for 3 seconds, the search icon will
be displayed constantly for 3 minutes. Once the signal is
reacquired, the remote search icon will turn off, and the
current values will be displayed.
7.4 Max/Min Viewing and Reset Mode
7.4.1 Max Record Viewing and Reset
In normal mode, press (do not hold) the MAX/MIN/- key,the
MAX icon will be displayed in date area.
Press the SET key to view max values of rainfall (1h, 24h, week
or month), wind gust and average, pressure (ABS or REL),
outdoor temperature and humidity (dew point or feels like) and
indoor temperature and humidity.
Table des matières
Autres manuels Unit Connection Technology Station météorologique


Manuels Station météorologique populaires d'autres marques


National Geographic
National Geographic VA Colour RC Manuel utilisateur

Renkforce
Renkforce 1208067 Manuel utilisateur

Levenhuk
Levenhuk Discovery Report WA40 Manuel utilisateur

Instant Transmission
Instant Transmission MA 10410 Manuel utilisateur

Lutron Electronics
Lutron Electronics PHB-318 Manuel utilisateur

WAREMA
WAREMA EWFS Weather station eco Manuel utilisateur