Transistor Lynx Door Transmitter Manuel utilisateur
Door Transmitter
Manual
Ordering number: 200 20 94

2
ENGLISH: Door transmitter for the Lynx system ............................. page 3
DEUTSCH: Türmelder für das Lynx System ...................................... Seite 8
FRANÇAIS: Émetteur de porte d’entrée pour le système Lynx..... page 13
ITALIANO: Trasmettitore porta per il sistema Lynx ........................ Pag. 18
NEDERLANDS: Deurbelzender voor het Lynx-systeem .................. Pag. 23
NORSK: Dørsender til Lynx-systemet ...............................................side 28
SVENSKA: Dörrsändare till vårt varseblivningssystem Lynx ............sid 33

3
ENGLISH
Door transmitter for the Lynx system
The door transmitter forms part of Lynx – our wireless alert
system for people with impaired hearing. Lynx uses various types
of transmitters and receivers that alert you to noises such as a
ringing telephone or doorbell, or the first signs of a fire.
The door transmitter is designed like a standard doorbell. When
the button is pressed, the signal is sent wirelessly to the receiver
in the system. One or more repeaters may also be installed in
order to amplify the alarm signal and thus extend its range.
Example of how the
signal is transmitted: Lynx Door Transmitter
Lynx Tactum
(receiver)
Lynx Repeater
(amplifier)
Connection options
It is simplest to place the door transmitter alongside the normal doorbell
(see next page). The normal doorbell will emit an audible signal as be-
fore and the Lynx Door Transmitter will send out an alert to the selected
receiver in the Lynx system. If you prefer to replace the old doorbell
with the Lynx Door Transmitter, there are two options:
1) Connect the Door Transmitter to the existing doorbell (see next
page).
2) Install a Lynx Repeater (amplifier) which will emit an audible signal
when someone rings the doorbell (see Repeater user manual).

4
ENGLISH
Connecting alongside the existing
doorbell
The door transmitter can either be fastened using
double-sided adhesive tape or screwed on. Screw
on the door transmitter from the front using the
through screws. Remove the plug for the upper
screw hole. NOTE: two screws on the rear must
be removed before the door transmitter can be
screwed on.
Battery-
powered
doorbell
Transformer Door transmitter
2A fuse Mains-
connected
doorbell
230V IN Max 24V OUT
Connection to mains-connected doorbell
1.
2a. 2b.
Connection to battery-
powered doorbell
Connecting to the existing doorbell
The existing doorbell will ring and the receiver in
the Lynx system will send out an alert.
1. Unscrew the door transmitter.
2. Connect the two cables which are attached in
the existing doorbell to the connecting strip in
the door transmitter.
NOTE: This connection requires a transformer which
complies with standard EN 60558-1/60558-2-6
and is fused on the door transmitter side with a 2A
fuse (see figure 2a).
Door
transmitter

5
ENGLISH
1.
2.
When the doorbell rings
When someone rings the doorbell, the receiver installed in the Lynx sys-
tem will be activated and will issue a warning by vibration and symbols,
loud noise, or flashing light, depending on the type of receiver.
Read the user manual for the receiver installed!
Battery warning
The door transmitter is powered by a battery with a normal service life
of approximately 5 years. When battery power begins to fail, the door
transmitter will send out an alert. It sends a flat-battery warning along
with the alarm to the receiver in the alerting system.
Read the user manual for the receiver installed!
Changing the battery
1. Unscrew the two screws on the
rear of the door transmitter, and
release the rear cover by lifting it
straight up.
2. Carefully push the old
battery out of the holder.
3. Replace the battery with a new
CR2032 Duracell type battery.
Note: The battery’s positive
terminal must be facing up-
wards.
4. Screw on the rear cover.
6
ENGLISH
Changing the channel setting
The door transmitter sends signals wirelessly to the receiver installed in the Lynx
system. It can transmit on a total of 16 different channels (0-9, A-F). Channel 0 is
reserved for a common fire alarm and should not be used. Transmitters and receiv-
ers in the system must be set to the same channel so that they can communicate.
They are all pre-set to channel 9, and then operate together without alteration.
In some cases, it may be necessary to change the channel setting. If two or more
users live near one another, the alarms can interfere. This can be rectified by
changing the channel settings so that they are different for everyone. Any channel
can be selected except Channel 0.
If you need to change channels on the receiver, see the receiver user manual. If
you need to change the channel on the door transmitter, proceed as follows:
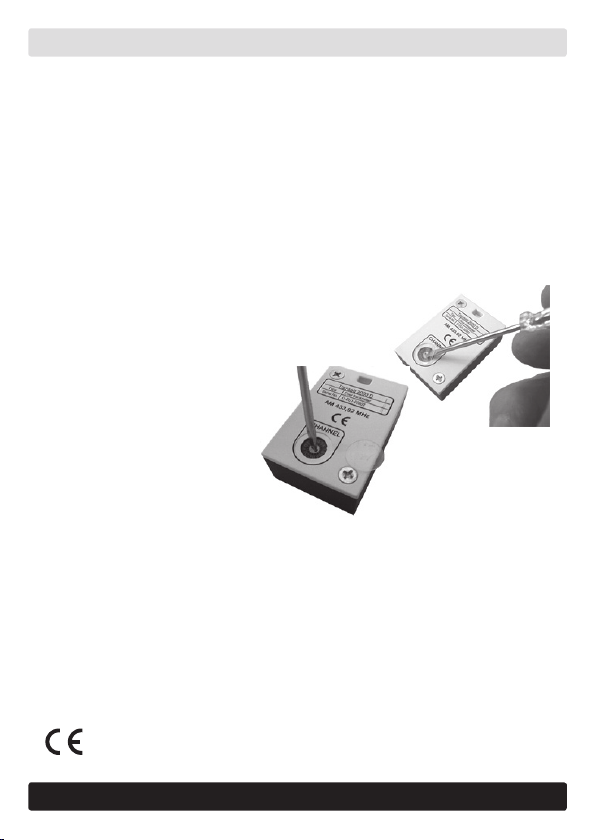
The channel selector is on the rear.
Carefully release the plastic
protection over it.
Use a small screwdriver and turn the
yellow arrow towards the required
channel. Refit the plastic protection
over the channel selector.
Technical data
Modulation: AM.
Frequency: 433.92 MHz.
Power supply: 3 V lithium battery. WARNING: Risk of explosion
if fitted incorrectly!
Service life: Approx 5 years (with 3 alarms per day).
Maximum 70,000 alarms.
Range: Up to approx. 30 m indoors.
Channels: 16.
Dimensions: 60 x 40 x 23 mm.
Weight: 35 g.
Any issues relating to the EU Medical Device Directive
93/42/EEC should be directed to AB Transistor Sweden.

7
ENGLISH
Troubleshooting
Type of fault Action
The door transmitter
gives a false alarm. Someone in the vicinity has the same system
installed. Change to another channel on all units.
Receiver fails to respond. 1. Check the range. Try to reduce the distance
between the door transmitter and the receiver or
install a Repeater to extend the range.
2. Check that the receiver’s battery is OK.
Cleaning and maintenance
Use a damp cloth to wipe it on the outside. Never use cleaning products
or solvents.
The battery will last approx. 5 years. Refer to page 5 for how to change
the battery.
Repairs
If your product malfunctions, it must be repaired by a qualified technician.
Do not attempt to open the case of the device since this would invalidate the
warranty. If your product requires service, please contact your hearing care
professional for assistance.
Waste disposal
This product contains electrical or electronic equipment and should be
disposed of carefully in the interests of your safety and the environment.
Please contact your local hearing care professional concerning disposal
of the product.
General precautions
• Low-energy radiation (eg from burglar alarms, room surveillance systems,
radio equipment, mobile telephones) will not damage the device. They could,
however, momentarily affect the sound quality or create noise in the device.
• Warning: External devices connected to the product must be safe according
the requirements of EN 60601-1-1, EN 60335-1 or EN 60065,
as appropriate.

8
DEUTSCH
Türmelder für das Lynx System
Der Türmelder ist Teil des Lynx Systems, unseres drahtlosen Alarm-
systems für hörgeschädigte Personen. Das Lynx System informiert
den Benutzer mit Hilfe verschiedener Sender und Empfänger über
Geräusche, wie das Klingeln des Telefons oder der Türklingel und
alarmiert ihn bei Gefahren, beispielsweise bei einem Brand.
Der Türmelder sieht aus wie eine gewöhnliche Türklingel. Wenn der
Knopf gedrückt wird, sendet der Türmelder ein Funksignal an den im
System installierten Empfänger. Durch die Installation von Verstärkern
kann die Reichweite des Alarmsignals erhöht werden.
Anschlussmöglichkeiten
Am einfachsten ist es, den Türmelder neben der normalen Türklingel
zu installieren (siehe nächste Seite). Die normale Türklingel erzeugt
wie bisher ein akustisches Signal und der Lynx Türmelder sendet einen
Alarm an den entsprechenden Empfänger im Lynx System.
Wenn Sie die alte Türklingel durch den Lynx Türmelder ersetzen
möchten, gibt es zwei Möglichkeiten.
1) Schließen Sie den Türmelder an die vorhandene Türklingel an (siehe
nächste Seite).
2) Installieren Sie einen Lynx Repeater (Verstärker), der ein akustisches
Signal sendet, wenn jemand die Türklingel betätigt (siehe Bedienungs-
anleitung des Verstärkers).
Beispiel für die
Signalübertragung:
Lynx Door Transmitter
(Türmelder)
Lynx Tactum
(Empfänger)
Lynx Repeater
(Verstärker)

9
DEUTSCH
Anschluss neben der vorhandenen Türklingel
Montieren Sie den Türmelder neben der normalen
Türklingel. Sie können ihn mit doppelseitigem
Klebeband oder mit Schrauben befestigen.
Schrauben Sie den Türmelder von vorne mit den
Schrauben fest. Entfernen Sie den Stecker, um an
das obere Loch zu gelangen. HINWEIS: Die bei-
den Schrauben auf der Rückseite müssen entfernt
werden, bevor der Türmelder angeschraubt wird.
Türklingel mit
Batteriebetrieb
Transformator Türmelder
2A-Sicherung Am Stromnetz
angeschlossene
Türklingel
230V
Eingang Max. 24V
Ausgang
Anschluss an Türklingel
mit Stromanschluss
1.
2a. 2b.
Anschluss an Türklingel
mit Batteriebetrieb
Anschluss an die vorhandene Türklingel
Der Türmelder kann alleine anstelle der üblichen
Türklingel oder in Verbindung mit dieser verwen-
det werden. Wenn die vorhandene Türklingel
betätigt wird, meldet der Empfänger des Lynx
Systems einen Alarm.
1. Lösen Sie die Schrauben des Türmelders.
2. Schließen Sie die beiden Kabel der Türklingel
an den Anschluss im Türmelder an.
HINWEIS: Bei diesem Anschluss muss einTransformator
verwendet werden, der der Norm EN 60558-1/60558-2-6
entspricht und mit einer 2A-Sicherung auf Seite des
Türmelders abgesichert ist (siehe Abb. 2a).
Türmelder

10
DEUTSCH
1.
2.
Batterie wechseln
1. Lösen Sie die beiden Schrauben an der
Rückseite des Türmelders und heben
Sie die Abdeckung ab.
2. Nehmen Sie die alte Batterie
vorsichtig aus der Halterung heraus.
3. Setzen Sie eine neue Batterie des Typs
Duracell CR 2032 ein.
Hinweis: Der Pluspol der
Batterie muss nach oben zeigen.
4. Schrauben Sie die Abdeckung wieder
an.
Wenn es an der Tür klingelt
Wenn die Türklingel betätigt wird, wird der im Lynx System installierte
Empfänger aktiviert. Je nach Art des installierten Empfängers wird ein
Vibrationsalarm und ein visueller Alarm, ein lautes akustisches Signal
oder ein Blitzlicht ausgelöst.
Einzelheiten hierzu finden Sie in der
Bedienungsanleitung des Empfängers!
Niedrige Batterieleistung
Der Türmelder wird über eine Batterie mit Strom versorgt, deren Lebens-
dauer normalerweise etwa 5 Jahre beträgt. Wenn die Leistung der Batterie
nachlässt, erzeugt der Türmelder ein Warnsignal. Das Warnsignal für
niedrige Batterieleistung wird zusammen mit dem Klingelsignal an den
Empfänger im Alarmsystem gesendet.
Einzelheiten hierzu finden Sie in der
Bedienungsanleitung des Empfängers!
Table des matières
Langues :
Manuels Émetteur populaires d'autres marques


Dejero
Dejero EnGo 3x Manuel utilisateur

Rosemount
Rosemount 4600 Manuel utilisateur

Speaka Professional
Speaka Professional 2342740 Manuel utilisateur

trubomat
trubomat GAB 1000 Manuel utilisateur

Teledyne Analytical Instruments
Teledyne Analytical Instruments LXT-380 Manuel utilisateur

Rondish
Rondish UT-11 Manuel utilisateur


