TH3D EZABL Pro Manuel utilisateur

If you were sent here from Creality, EBay, Aliexpress, Amazon or any other site
selling ABL kits be aware these are clones. They are NOT supported.
Buying them will directly impact our ability to continue to provide for the 3D
printing community and put food on our table.
Please click here to get a Genuine EZABL™kit from our website.
Before we start, we just wanted to thank you for choosing the TH3D EZABL™Pro kit.
We’ve been working on perfecting the easiest, well documented, and supported ABL kit
on the market. The EZABL™ Pro kit is the result of over 2 years of research and testing
done by TH3D and feedback given to us from our customers.
We pride ourselves by using the highest quality parts in the kits and doing extremely
thorough testing on every kit before packaging. Unlike other companies that use off the
shelf hardware and/or low-quality parts on their boards we only use the best and work
directly with our suppliers to bring you the best performing and reliable kits that we can.
We would not be where we are without YOU and your feedback. If you see something
that needs changing/updating or you just want to suggest a new feature, we would love
to hear from you. We can be easily reached by visiting ContactUs.TH3DStudio.com.
If something is not up to our rigorous QC standards, please let us know so we can
correct it.
TH3D gives back to the community through many ways and you supporting us allows us
to put out information for everyone as well as making donations every month to
multiple open source projects (like the Marlin project that our firmware is built on and
OctoPrint).
Thank you again for choosing TH3D and Happy Printing!
Sincerely,
~Tim Hoogland

V2.1 –1/12/2021 Need help? Visit ContactUs.TH3DStudio.com
TH3D EZABL™Pro Installation Guide -Copyright © 2021 TH3D Studio LLC –ALL RIGHTS RESERVED
2
TH3D EZABL™Pro
Installation Guide
V2.1 –1/12/2021
This guide is property of TH3D Studio LLC
Re-distribution is NOT permitted and must be downloaded from our website
ONLY FOR USE WITH EZABL™PRO KITS
Copyright © 2019 TH3D Studio LLC –ALL RIGHTS RESERVED

V2.1 –1/12/2021 Need help? Visit ContactUs.TH3DStudio.com
TH3D EZABL™Pro Installation Guide -Copyright © 2021 TH3D Studio LLC –ALL RIGHTS RESERVED
3
Getting Started
Welcome to the EZABL™Pro kit installation guide!
This will walk through the steps to install the EZABL™Pro sensor on the printer. Be sure to
follow all the steps and if you have issues or a question do not hesitate to reach out to us by
visiting http://ContactUs.TH3DStudio.com.
There are optional accessories for the EZABL™Pro Kit like AC power adapter or USB power
adapter that are not pictured below. If you ordered these options, they will be in the EZABL™
Pro kit package when you receive it.
We are always making things better so the case or sensor may look slightly different than the
below pictures.
V2.1 –1/12/2021 Need help? Visit ContactUs.TH3DStudio.com
TH3D EZABL™Pro Installation Guide -Copyright © 2021 TH3D Studio LLC –ALL RIGHTS RESERVED
4
Preparation
If you are not comfortable flashing your printer’s firmware, moving wires around, and/or taking your hotend
mount apart you should NOT be attempting this upgrade as you could damage the printer. Contact us with any
questions before hand if you are unsure of upgrading. Support covers the product itself. If you need assistance
with your slicer, tuning your machine, or other non-product related issues please check out our communities at
Community.TH3DStudio.com.
Before you begin you should have the following:
•TH3D EZABL™Pro Kit
o1x EZABL™Pro Control Box
oPower Wire
o1X EZABL™Pro or EZABL™Pro Mini Sensor (depends on your selection)
▪EZABL™Pro Mini Sensors will have 2x Adapter Rings included
o10X Zip Ties for Securing the Sensor Wiring
o1X Micro Screwdriver for Adjusting the Sensor and Screw Terminals
•Printed Parts to Mount the Sensor to your printer
oWe include a multitude of mounts in our Unified Firmware package in the
“EZABL STL Files folder”. You can also use any custom ones if you know the
sensor offset values (this is noted in the firmware).
oWe offer printed parts if you do not want to print your own.
Prices are about $10-30 (depends on the mount) for an ABS printed mount. If
you want one please contact us with the STL files for a quote.
oSmall ones like the can be purchased on the EZABL Product page or separately
on our site in the Printed Parts section.
•Latest copy of the Unified or Marlin firmware for your printer
oWe have firmware for over 20 different machines on our website for customers
–Check your order email for download info or download from
Firmware.TH3DStudio.com.
oIf you have a custom printer see the notes on the firmware section for the Marlin
setup guide.
•USB Cable to connect your printer to your PC to update the firmware
oYour board MUST have the bootloader already flashed on it to perform this
update. Check our video guide page at Bootloader.TH3DStudio.com to flash the
bootloader.
If you are missing anything from the TH3D EZABL™Pro kit please visit ContactUs.TH3DStudio.com.
Email support is included in the kit for setup, install, and firmware questions. Phone/Remote
Support is available at an additional charge.

V2.1 –1/12/2021 Need help? Visit ContactUs.TH3DStudio.com
TH3D EZABL™Pro Installation Guide -Copyright © 2021 TH3D Studio LLC –ALL RIGHTS RESERVED
5
Pre-Installation Checks
Before installing the kit, there are a few things we recommend checking to make sure the
printer is in optimal condition before installing the EZABL™Pro kit.
1. Make sure your bed is level if you are using springs still, use Loctite or superglue to lock
the nuts in place on the screws to prevent shifting.
a. You can replace springs with aluminum spacers from a hardware store. We also
sell solid mount kits that integrate bed wiring strain relief and optional camera
mounts for select models on our website.
b. Check all the wheels and eccentric nuts if your machine uses these.
2. Run through the Z axis checks that are outlined in our knowledge base.
3. Make sure the power cord your printer uses has a grounding plug. If you are using an
adapter and/or extension cord make sure they are also grounded. If it is not grounded
there can be electrical interference that can cause the sensor to not work
a. If you are using a separate power adapter, make sure the power adapter/usb
power source is on the same power strip as the printer.
4. Depending on what mount you are using, printer model, etc you may need additional
screws. Most mounts use M3 screws so it would be recommended to pick up an M3
screw assortment from TH3D, Amazon, or your local hardware store.
5. Some printers require a bootloader to load the firmware. You will need an Arduino Uno
with some jumper wires. We sell a bootloader kit in the TH3D Shop that comes with the
Uno and ALL the cables needed.
a. Any of the models with the 1284p chips require a bootloader.
b. The Anets, CR-10, Ender 2, Ender 3, Ender 5, and Wanhao i3 all use the same
process for the bootloader.
c. There is a video guide and information for flashing your bootloader at
Bootloader.TH3DStudio.com and you will need an Arduino Uno to flash the
bootloader using our guide.
Troubleshooting Information
If you should have issues with your EZABL™kit first visit our knowledge base on our website.
This is where we document all known issues with the machines these kits are used on. If you
cannot find a solution to your issue you can visit ContactUs.TH3DStudio.com.

V2.1 –1/12/2021 Need help? Visit ContactUs.TH3DStudio.com
TH3D EZABL™Pro Installation Guide -Copyright © 2021 TH3D Studio LLC –ALL RIGHTS RESERVED
6
Mounting the sensor
Once you have the new mounts you will need to install them on your hotend and then mount
the sensor to the new printed mount. When you mount the sensor, it should be about 2mm
ABOVE the tip of the nozzle for both sensor sizes. This does not have to be exact just higher
than the nozzle but not too high. Most of the flat wrenches included with the printers are about
2mm in height and can be used to set the sensor height.
If you are using the EZABL™Mini size sensor and using the standard 18mm sensor mount use
the included adapter rings to center the EZABL™Mini in the 18mm mounting hole. The smaller
side should be inside the ring of the 18mm hole to center the probe.
Once mounted make sure the nuts are tight and you check them from time to time. If the nuts
loosen the sensor will not work reliably. You can use Loctite (blue preferred) to keep them in
place if this happens to your setup frequently.
2MM higher than nozzle.

V2.1 –1/12/2021 Need help? Visit ContactUs.TH3DStudio.com
TH3D EZABL™Pro Installation Guide -Copyright © 2021 TH3D Studio LLC –ALL RIGHTS RESERVED
7
Powering the EZABL™ Pro Control Board
Connect power to the EZABL™Pro Module is easy and flexible.
You can power the kit with the included power wire to your printer power supply OR if you
ordered the AC adapter/USB adapter you can power it externally.
Do not press the self test button with a sensor connected to the EZABL control board.
It is only for use when directed to be used by our support team. This emulates the sensor
trigger signal when pressed.
EZABL™ Pro Control Board Connections/Features
Separate Power Adapter
If you are using our AC adapter or USB adapter connect the DC plug to the DC Power Input Jack
on the EZABL™ Pro Control Board.
V2.1 –1/12/2021 Need help? Visit ContactUs.TH3DStudio.com
TH3D EZABL™Pro Installation Guide -Copyright © 2021 TH3D Studio LLC –ALL RIGHTS RESERVED
8
Directly Wiring Power
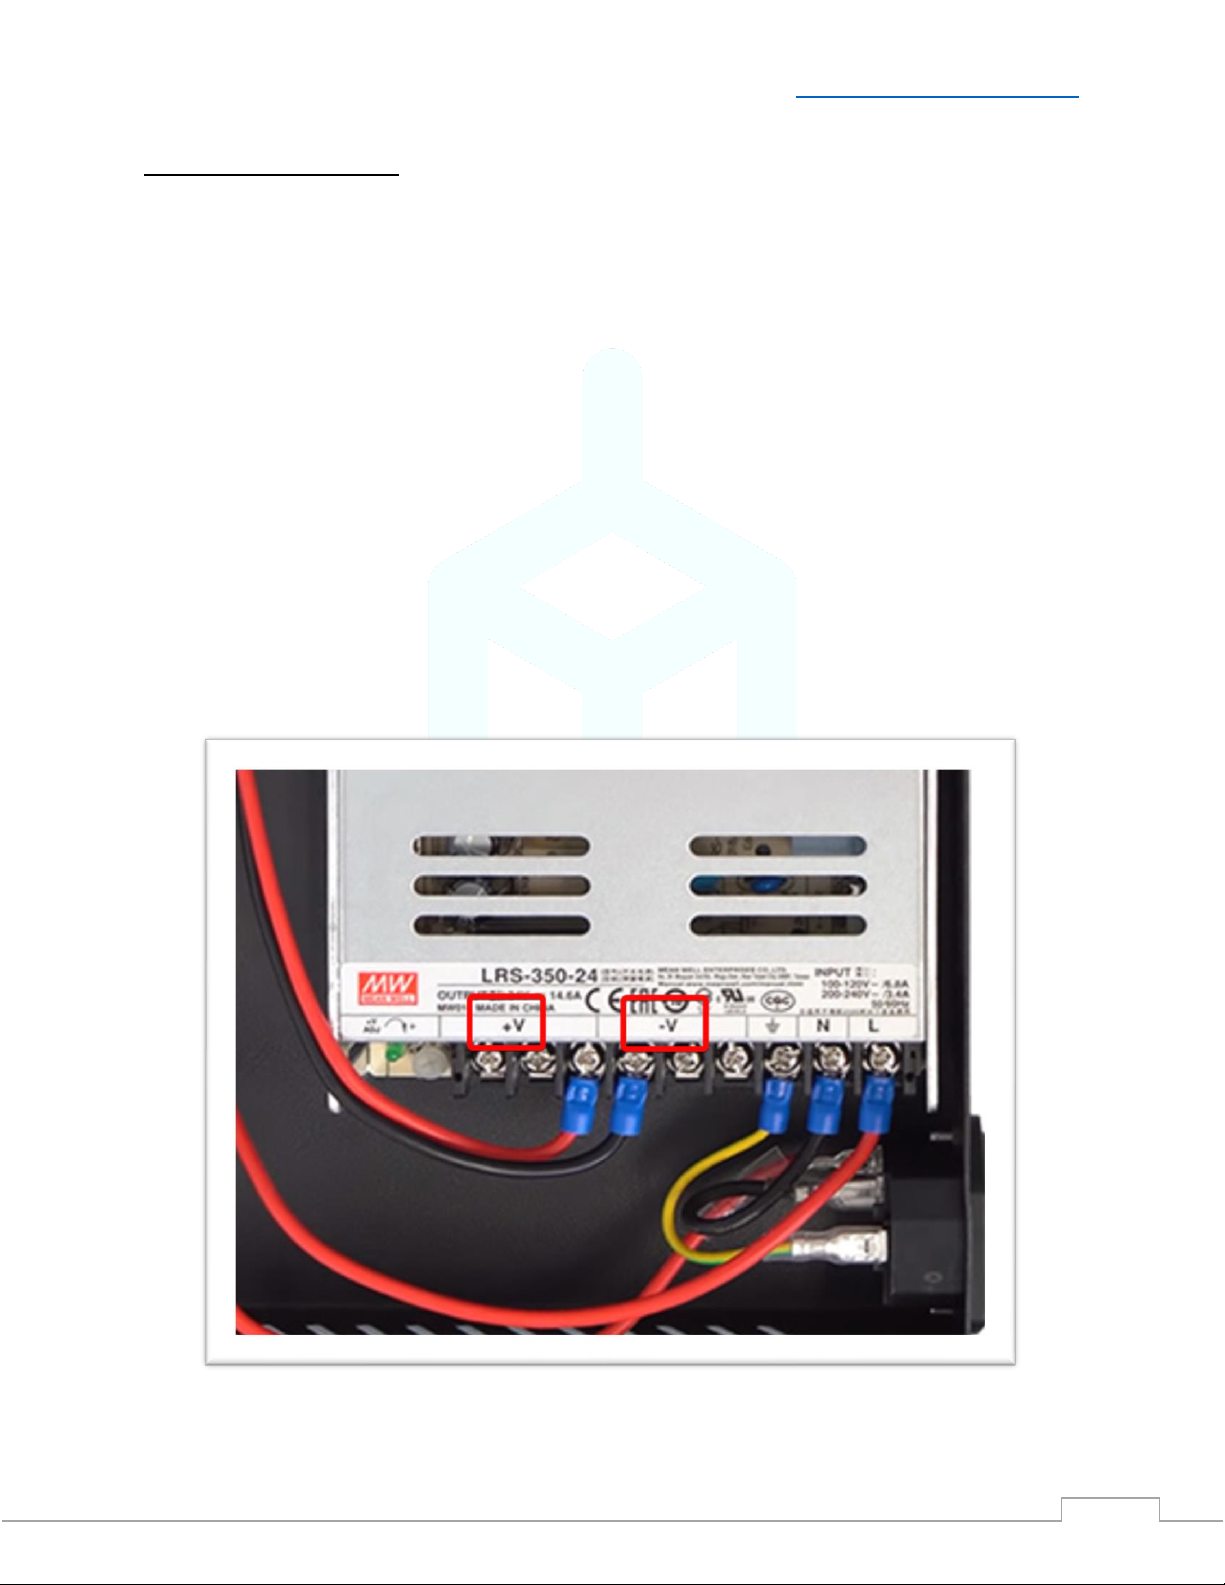
If you are wiring to your printer power supply, make sure that you match the positive and
negative connections on the power supply and EZABL™ Pro Control Board DC Power Input
Terminal. DO NOT connect to the AC lines.
The supplied wire has a red wire and a black wire contained inside the outer sheathing. Strip
this back at both ends and then strip the black and red wires at each end as well.
Positive is labeled with + on our board and usually is V+ on your power supply. Use the red wire
for this connection.
Negative is labeled with –on our board and usually is V- on your power supply. Use the black
wire for this connection.
Use the included screwdriver to secure the wires in the terminal, do NOT over tighten.
If in doubt sent a picture of the wiring to our support BEFORE you power the machine on and
we will verify proper connection

V2.1 –1/12/2021 Need help? Visit ContactUs.TH3DStudio.com
TH3D EZABL™Pro Installation Guide -Copyright © 2021 TH3D Studio LLC –ALL RIGHTS RESERVED
9
Connect your Z endstop to the EZABL™Pro Control Board
The EZABL™Pro Control board replaces your Z endstop switch. It accepts 2 types of Z endstop
connections, 2/3 Pin JST XH and stripped wires.
Printers with a 2 or 3 Pin JST XH Plug (Creality, Geeetech, Alfawise):
If you have a printer that uses a 2 or 3 pin JST XH plug then you can use the 3 pin header on the
EZABL™Pro Control Board.
If you have a 2 pin JST XH you will want to connect to pins 1 and 2.
Printers with soldered Z endstop wires:
If you have a printer with wires that are soldered to the Z endstop switch or one without a JST
plug, you will cut the wires and insert them into the black screw terminal on the right. Wire
placement does not matter. Use the included screwdriver to secure the wires in the terminal,
do NOT over tighten.
If you printer has 3 wires going to the Z endstop connection, please contact our support
BEFORE connecting. You can contact us through ContactUs.TH3DStudio.com.
For the Geeetech machines with a 3 pin endstop see our Knowledge Base for wiring the Z.
V2.1 –1/12/2021 Need help? Visit ContactUs.TH3DStudio.com
TH3D EZABL™Pro Installation Guide -Copyright © 2021 TH3D Studio LLC –ALL RIGHTS RESERVED
10
Verify Power and Test the EZABL™ Pro Sensor Detection
When you power on your printer the Power LED on the EZABL™Pro Control Board will light up
green. If the power LED is not lighting check that you have the polarity correct if directly wired
or if you are using a separate power adapter that it is plugged into a power source that is on.
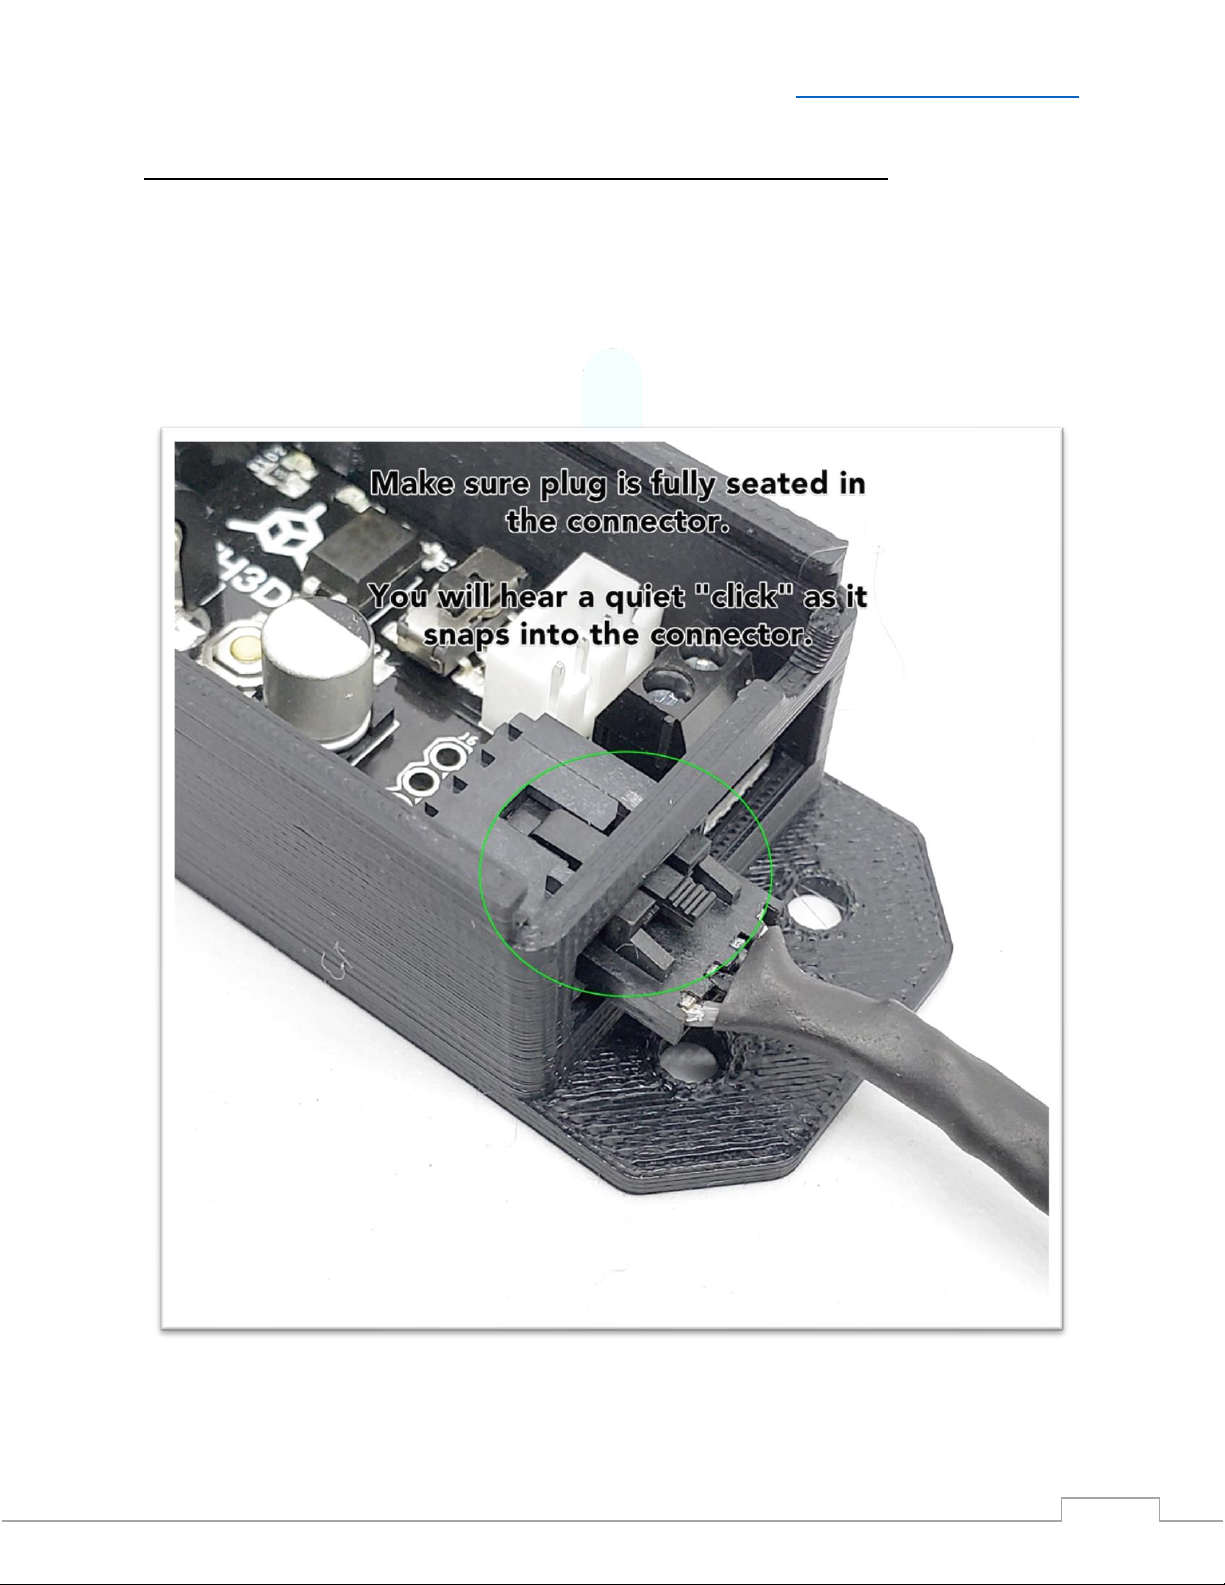
Now plug the EZABL™Pro Sensor plug into the EZABL™Pro Sensor Connector on the control
board.
Table des matières


