Stef's Engineering Prusa I3 MK3 Manuel

Custom lighting kit for the Prusa I3 MK3
Build instructions

2
Introduction
Thank you for downloading my design! The content of this manual shows the main steps of the build
of this lighting kit I designed for the Prusa I3 MK3 printer. This is my first manual and my goal is to
give global instructions for the build together with a couple of build/purchase suggestions based on
my experiences building the lights myself.
There are a couple steps in the build that are shown in more detail in the video published on
YouTube, I recommend using the combination of this manual and the video during the build. If you
have any questions please feel free to comment below the video.

3
Before we start
There are a couple of important choices to make before you start printing the parts. And ordering the
hardware and electronics. These are things I also needed to consider during the design and they are
important for the success of the build.
Materials
I’ve printed these lights in both PLA and PETG. At first I expected PLA to be sufficient but with the
build finished I did notice that the led’s get rather hot, even with the heatsinks. I recommend that
you use a material that is capable of handling a bit higher temperatures than PLA. I used PETG in the
final design and haven’t had issues yet.
Electronics
I use a meanwell LPV-35-12 powersupply, it works well and can easily handle both leds. It does
however require you to work on wiring that connects to the mains electricity in your home. If you are
unclear how this should be done, or have no experience handling these circuits I strongly recommend
not to use this or a similar powersupply but instead use a wall adapter that is capable of supplying
the leds.
The LEDs cannot be powered from the printer’s own powersupply. It is already at the upper limit of
it’s capabilities and can not safely handle the additional load from the LED panels.
There are really cheap LED dimmers available, they work but it’s better to use one that is build a bit
better when you plan to use them as additional lighting for filming. The cheap dimmers are likely to
introduce flickering in the video.
Hardware
I made the design for Metric fasteners (DIN 912) . It may be possible though to use Imperial fasteners
that are very similar in dimensions, you can try this but I cannot guarantee that it will work. If it
doesn’t you can use the CAD files that I published to change the design to fit your needs.
I understand that theaded bushings are not as easily obtainable as normal bolts and nuts. Because of
that I Added a slightly modified version of the main body STL file that has a recess to fit a common
nut (DIN 934)

4
Parts overview
For this build you will need to buy and make a couple of parts, I’ve listed them below:
Shopping list:
2x - COB LED panel (120x35mm 12V 10W) sold by many suppliers on Ebay
4x - Aluminium heatsink (150x20mm) sold by many suppliers on Ebay
1x –Powersupply 12V 3A (check chapter [][] for tips and alternatives before purchasing)
2x –LED dimmer (check chapter [][] for tips before purchasing)
1x –Power switch
1x –Length of thermal tape (to cover both LED panels) or a syringe of thermalpaste
2x - M4 Threaded Brass bushing
2x - M4 washer
2x - M4*12
4x - M4*6 (can be longer but will stick out of the base frame)
Print list:
2x –Main Body
2x –Base Frame
4x –Extrusion Clips
2x –Heatsink wedge (optional for when needed)

5
Preparation Step 1 : Print Parts
For this project you will need to print the following parts:
2x –Main Body
2x –Base Frame
4x –Extrusion Clips
2x –Heatsink wedge (optional for when needed)
Suggested basic print settings:
0.3mm layer height
2 or 3 perimiters
2 or 3 bottom solid layers
2 or 3 top solid layers
When all the parts are finished you will need to clean up the edges to ensure a correct fit. You can
check if you need the heatsink wedges by testfitting one of the aluminium heatsinks in the main
body. If it’s not a tight fit you will need to print these two to fix the led and heatsinks in place.
Preparation Step 2 : Electronics
Testfit if the led dimmer you purchased fit’s through the cable channel in the main body. If it doesn’t
you will have to solder the wires from the Dimmer to the LED panel already fed through this channel.
Solder the wires from the dimmer on each of the LED panels
Measure the length from the preferred position of the LED panel up to where you want to position
the powersupply and cut or extend the wires as needed. If you use one powersupply (As I do) I
recommend joining the wires behind the printer for a cleaner look.
Degrease the back of the led and apply the thermal tape (when used) or degrease in preparation of
the application of the thermal paste. Do not apply the thermal paste though until just before you are
ready to install the heatsinks to the back of the LED panel.
6
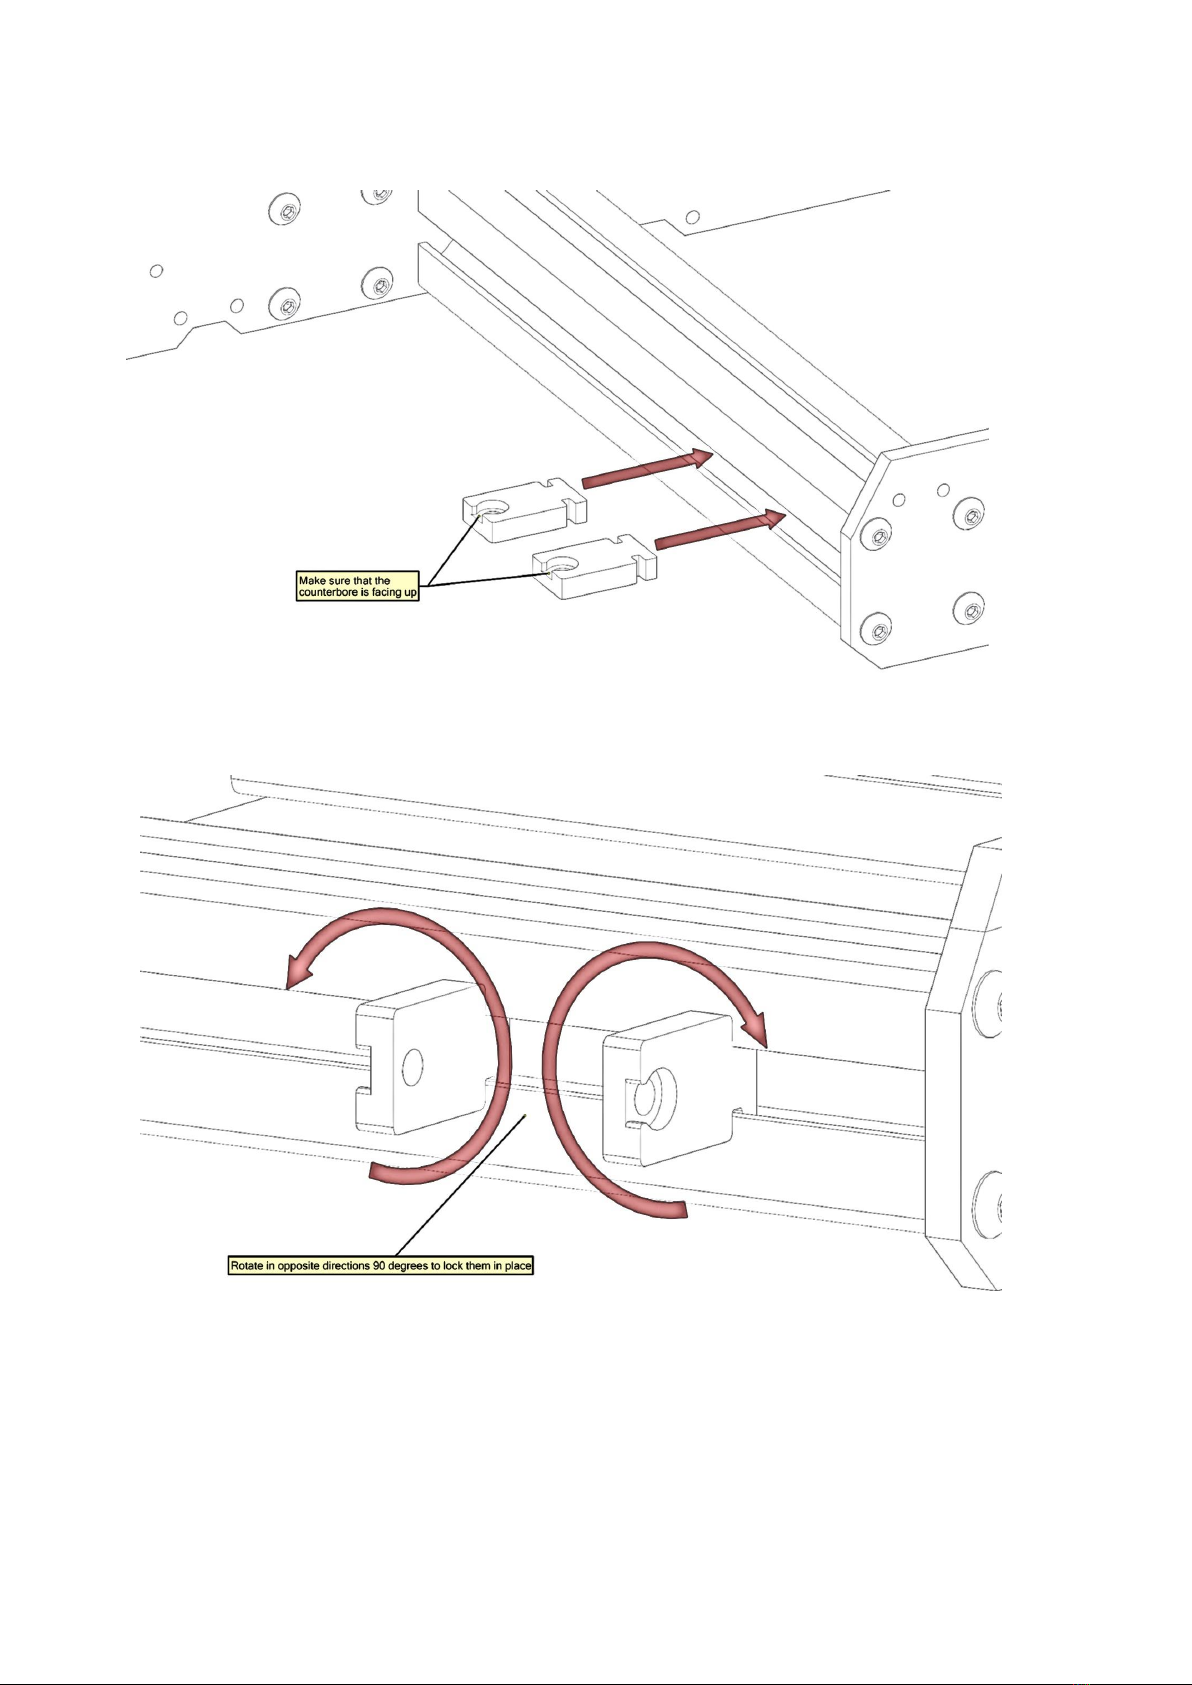
Assembly Step 1: Insert clips in frame
Assembly Step 2: Rotate clips
You should be able to insert the clips by hand without excessive force. If this not possible smooth the
surface that mates with the extrusion profile with some sandpaper, check the fit frequently.

7
Assembly Step 3: Push baseframe on lower frame printer
Assembly Step 4: Fasten M4 screws
8
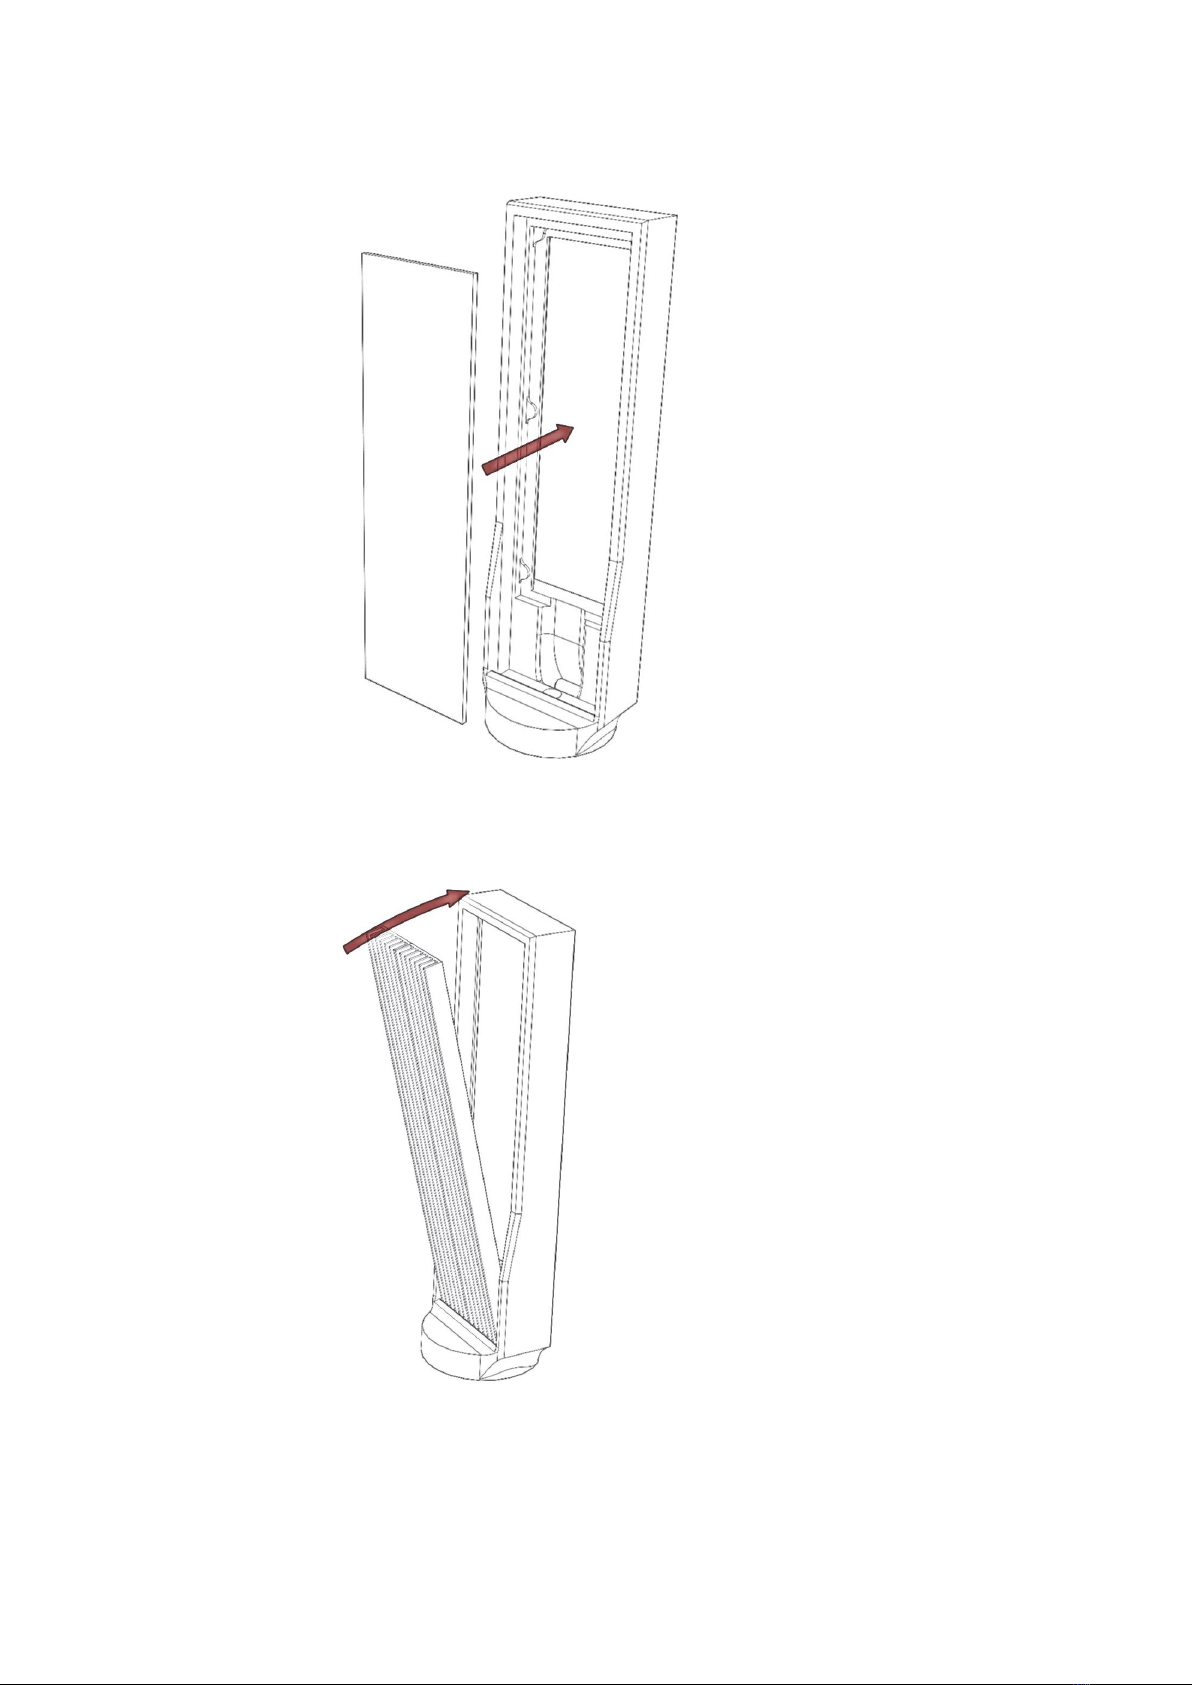
Assembly Step 5: LED placement
Guide the wires from the dimmer through the cable channel and place led in it’s recess.
Assembly Step 6: Heatsink placement
Remove the backing from the thermal tape, or apply the thermal paste to the back of the LED panel.
Ensure that it is positioned straight in the recess and gently place the heatsinks one at the time. Press
them firmly against the led to ensure a good contact with the tape or paste. When your heatsinks fit
loosely in the recess, you can now fix them in place with the wedges.

9
Assembly Step 7: Fasten your lights
Guide the wires through the base frame and screw the main body in place. Connect the wires and
the build is finished!
Enjoy!

10
Disclaimer
The content of this document is furnished for informational use only, is subject to change without notice, and should not be
construed as a commitment by Stefs Engineering. Stefs Engineering assumes no responsibility or liability for any errors or
inaccuracies that may appear in the content of this guide.
The material and information contained in this document are for general information purposes only. You should not rely
upon the material or information in this document as a basis for making any business, legal or any other decisions. Whilst
we endeavour to keep the information up to date and correct, Stefs Engineering makes no representations or warranties of
any kind, express or implied about the completeness, accuracy, reliability, suitability or availability with respect to the
document or other information. Any reliance you place on such material is therefore strictly at your own risk.
Table des matières


