SelfieWorld Cyclone Pro Manuel utilisateur

INSTRUCTIONS
Paloselfi Inalámbrico
INSTRUCCIONES
Modelo
PRODUCTO OFICIAL BLUETOOTH®
Wireless Selfie Stick
Model
OFFICIAL BLUETOOTH
®
PRODUCT

THANK YOU
Thank you for purchasing our
product.
In order to get the most out of your
new wireless Selfie Stick, we kindly
invite you to read these instructions
prior to use.
The Cyclone Pro has been designed
with maximum utility, convenience
and portability in mind.
It is compatible with virtually all major
iOS 5.0+ and Android 4.2+
cellphones including larger, wider
models.
The Cyclone Pro is manufactured with
fully certified Bluetooth®3.0 technol-
ogy made in the USA by Broadcom®
Corporation which gives you instant
pairing, reduced shutter lag as well
as reliable and secure connections
every time.
GRACIAS
Gracias por adquirir nuestro produc-
to.
A fin de obtener el máximo provecho
de su nuevo paloselfi inalámbrico, le
invitamos a leer las presentes
instrucciones antes de su empleo.
El Cyclone Pro ha sido diseñado para
ofrecer la máxima utilidad,
conveniencia y portabilidad.
Es compatible prácticamente con
todos los principales teléfonos
móviles iOS 5.0+ y Android 4.2+,
incluyendo los modelos más grandes
y anchos.
El Cyclone Pro está fabricado con
tecnología plenamente certificada
para Bluetooth®3.0 que le garantiza
un emparejamiento instantáneo, así
como conexiones fiables y seguras
en cada ocasión.

Step 1
UNPACK & UNFOLD MOUNT
The Cyclone Pro is shipped in its
folded, fully collapsed position.
By loosening the locking screw
located under the mount, rotate
approximately through 270 degrees
as shown below.
Tighten screw to secure your
preferred position.
Paso 1
DESEMBALADO Y DESPLIEGUE DEL
SOPORTE
El Cyclone Pro se envía en posición
completamente doblada y replega-
da.
Después de liberar el tornillo de
bloqueo ubicado bajo el soporte, gire
aproximadamente 270 grados según
se indica a continuación.
Apriete de nuevo el tornillo para
bloquear el dispositivo en la posición
deseada.

Step 2
MOUNT YOUR CELLPHONE
Hold your cellphone horizontally and
place its upper edge inside the top
edge of the mount.
By sufficiently pushing the phone in
an upwards direction, the
spring-loaded mount will open so
you can easily secure your phone.
Your phone will be securely held in
place by the tension in the clamp.
Paso 2
MONTE SU TELÉFONO MÓVIL
Sostenga su móvil horizontalmente y
coloque el lado superior de este
dentro del lado superior del soporte.
Al empujar con cierta fuerza el
teléfono hacia arriba, el mecanismo
de muelle del soporte permitirá su
apertura, de manera que pueda
encajar el móvil fácilmente.
Este quedará firmemente sujeto en
posición gracias a la tensión del
mecanismo.

CyclonePro
Step 3
ACTIVATE BLUETOOTH® & PAIR
WITH YOUR CELLPHONE
Activate Bluetooth®on your
cellphone in accordance with your
manufacturer’s instructions.
Hold down the Cyclone Pro shutter
button for 3 seconds to enter
Bluetooth®pairing mode. The button
will flash blue intermittently.
When your cellphone is successfully
paired with your Selfie Stick the blue
light will remain lit but cease flashing.
Paso 3
ACTIVE EL BLUETOOTH
®
Y EMPARE-
JE CON SU TELÉFONO MÓVIL
Active el Bluetooth
®
en su móvil de
acuerdo con las instrucciones del
fabricante.
Mantenga pulsado el disparador del
Cyclone Pro durante tres segundos
para entrar en el modo de empareja-
miento de Bluetooth
®
. El botón
parpadeará en azul de forma
intermitente.
Cuando su teléfono se haya empare-
jado correctamente con el paloselfi,
el piloto azul permanecerá iluminado,
pero dejará de parpadear.

• Open Camera application
• Click 'gear' icon for Settings
• Click option 'Volume Key'
• Click 'The Camera Key'
*Note that screenshots and setting may
vary according to make, model and
Android version of cellphone.
*Tenga en cuenta que las capturas de
pantalla podrían variar.
GPS tag
Volume key
Timer
White balance
The camera
key
O
Auto
0
O
Volume key
The zoom key
The camera key
The record key
Step 4
IMPORTANT STEP FOR ANDROID USERS
Android users need to check their
camera settings are configured correctly
otherwise the Selfie stick button might
operate your camera's zoom function
and not the shutter.
Follow the steps below to ensure that
your "Volume Key" is set to operate the
"Camera Key".
• Abra la aplicación Cámara
• Toque el icono del engranaje para los
Ajustes
• Toque la opción “Tecla de volumen”
• Toque la opción “La tecla de cámara”
Paso 4
PASO IMPORTANTE PARA USUARIOS DE
ANDROID
Los usuarios de Android necesitan
comprobar que los ajustes de su
cámara se encuentren correctamente
configurados, o de lo contrario el botón
del paloselfi podría accionar la función
de zoom de la cámara en lugar del
disparador.
Siga los pasos indicados a continuación
para asegurarse de que la “Tecla de
volumen” esté configurada para actuar
como “La tecla de cámara”.
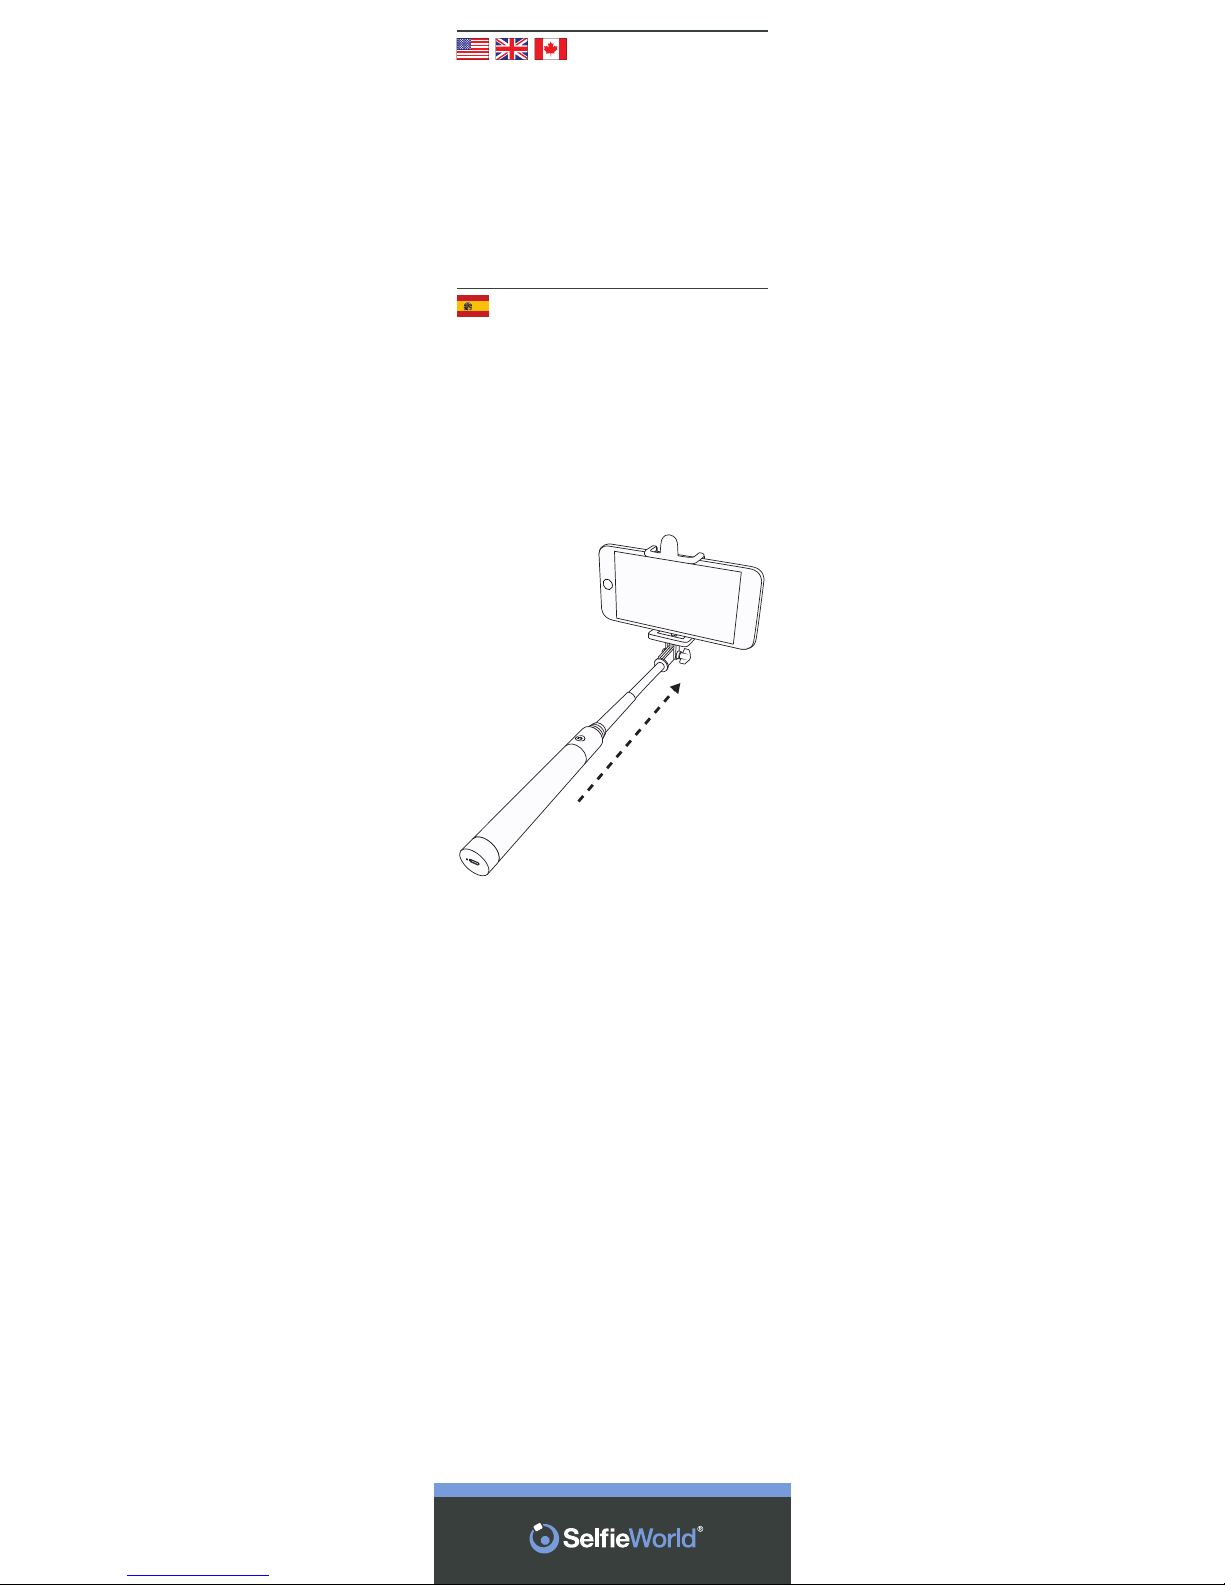
Step 5
EXTEND SELFIE STICK
Once you have successfully mounted
and paired the Cyclone Pro with your
cellphone, extend it to your preferred
length.
Paso 5
EXTIENDA EL PALOSELFI
Una vez montado y emparejado
correctamente el Cyclone Pro con su
teléfono móvil, extiéndalo hasta la
longitud deseada.

Step 6
POSE & TAKE SELFIE
Now simply pose for your Selfie and
press the shutter button on the
handle of the Cyclone Pro to remotely
take your photo.
Paso 6
POSE Y HÁGASE UN SELFI
Ahora no tiene más que posar para
su selfi y pulsar el disparador situado
en el mango del Cyclone Pro con el fin
de realizar su fotografía a distancia.

Step 7
SWITCHING OFF
When you have finished, collapse the
stick, remove your cellphone from
the mount by reversing the mounting
instructions in Step 2.
Switch off your cellphone’s
Bluetooth®function.
Hold down the Cyclone Pro shutter
button for 3 seconds to switch off
your Selfie Stick.
Paso 7
APAGADO
Cuando haya terminado, repliegue el
palo y retire el móvil del soporte
siguiendo las instrucciones de
montaje del paso 2 en orden inverso.
Desactive la función Bluetooth
®
de
su teléfono.
Mantenga pulsado el disparador del
Cyclone Pro durante tres segundos
para apagar su paloselfi.

Step 8
RECHARGING
The Cyclone Pro may require charging
prior to use.
To recharge connect the supplied
charging cable to the Selfie stick
handle and the other to your comput-
er’s USB port.
A red light in the end of the handle will
illuminate during the charging phase.
Charge for 30 minutes.
Paso 8
RECARGA
El Cyclone Pro debería venir cargado
de fábrica.
Para recargarlo, conecte un extremo
del cable de carga suministrado al
mango del paloselfi y el otro al puerto
USB de su ordenador.
Durante la fase de carga se iluminará
un piloto rojo en el extremo del
mango.
Cárguelo durante 30 minutos.
Table des matières
Autres manuels SelfieWorld Accessoires pour téléphones portables


