SeeMeCNC ERIS DELTA Manuel utilisateur

Eris® Delta 3D Printer Manual
First Edition
v1.10 – January 27th, 2017
MatterControl v1.
Copyright 2016 By Gene Buckle – [email protected]
Licensed as Creative Commons, Attribution-ShareAlike 3.0
Disclaimer text provided by LulzBot.
Official support is available through support@seemecnc.com
As a new SeeMeCNC printer owner, you’ll also find a ton of great resources on
the forums at forum . seemecnc . com
1

READ ME FIRST!
READ THIS MANUAL COMPLETELY BEFORE UNPACKING AND POWERING UP YOUR
PRINTER!
Hazards and Warnings
The SeeMeCNC Eris® Delta 3D rinter has motorized and heated arts. When the rinter is in
o eration always be aware of ossible hazards.
Electric Shock Hazard
Never o en the electronics bay of the rinter while the rinter is owered on. Before removing
the access door, always ower down the rinter and un lug the AC line cord.
Burn Hazard
Never touch the extruder nozzle or heater block without first turning off the hot end and allowing
it to com letely cool down. The hot end can take u to twenty minutes to com letely cool.
Also, never touch recently extruded lastic. The lastic can stick to your skin and cause burns.
Also before of the heated bed which can reach high tem eratures ca able of causing burns.
Fire Hazard
Never lace flammable materials or liquids on or near the rinter when owered on or in
o eration. Liquid acetone and va ors are extremely flammable.
Pinch Hazard
When the rinter is in o eration, take care to never ut your fingers in the moving arts,
including the belts, ulleys or gears. Also, tie back long hair or clothing that can get caught in
the moving arts of the rinter.
Static Charge
Make sure to ground yourself before touching the rinter, es ecially the electronics.
Electrostatic charges can damage electronic com onents. To ground yourself, touch a
grounded source.
Age Warning
For users under the age of 18, adult su ervision is recommended. Beware of choking hazards
around small children.
2

Table of Contents
1 – Unboxing your new Eris® Delta 3D Printer............................................................................4
2 – Installing MatterControl..........................................................................................................5
3 – Calibrating the Eris®............................................................................................................10
4 – Loading and Unloading Filament..........................................................................................12
5 – First Print!............................................................................................................................ 14
6 – MatterControl Basics: Slicing...............................................................................................15
7 – MatterControl Basics: Loading & Printing an Object.............................................................29
8 – Advanced MatterControl: O tions........................................................................................33
9 – Advanced MatterControl: Settings – Print............................................................................37
10 – Advanced MatterControl: Settings – Filament....................................................................47
11 – Advanced MatterControl: Settings – Printer.......................................................................50
12 – Using the 3D View and Layer View....................................................................................54
13 – A Strategy for Successful (and Great!) Prints.....................................................................62
3

1 – Unboxing your new Eris® Delta 3D Printer
If you're one of the rare eo le that downloaded the manual BEFORE o ening your new
Eris®, SeeMeCNC has a treat for you!
We've roduced a short little video that shows how to un ack your new Eris® as well as
how to load filament for the firs time!
Eris® Unboxing and Setu Video
4

2 – Installing MatterControl
MatterControl is the control rogram that you'll be using with your new Eris® rinter.
MatterControl is known as a combination host and “slicer”. It's “host” feature allow you to
control the Eris® directly – moving the axes, heating the hot end, etc. The “slicer” feature is
what converts a 3D model into a form suitable for rinting. We'll cover that shortly.
You can download MatterControl by going to the SeeMeCNC website –
htt ://seemecnc.com/ ages/downloads. Scroll down to the “Software” heading and you'll see
the links for MatterControl. Download the version for your latform and install it.
Note that the MacOS version is functionally identical to the Windows version, so I'll only
be showing exam les from Windows – the same rocedures should a ly to both versions.
You'll also want to download the Eris® Default Files from the Eris® age on the
SeeMeCNC website: htt s://www.seemecnc.com/collections/3d- rinters/ roducts/eris-deskto -
3d- rinter. Look for the link marked “DOWNLOAD ERIS SETTINGS HERE”. Un ack the files
so they're ready to use when you need them.
Start MatterControl. Below you'll see what the basic MatterControl interface looks like.
5

Your first ste will be to configure MatterControl to use the Eris®. Sim ly click the “Add
Printer” button that's located at the to of the left MatterControl ane.
When you click on the Add Printer button,
you'll be resented with the dialog you see to the
right. Click in the Printer Name field and enter the
name of your new rinter. Next, click the Select
Model button and ick “Eris”.
Click the Save & Continue button to
move on to the next ste .
Next, you'll be resented with the o tion to install
the communication driver that MatterControl needs to talk
to the Eris®. If you've used a RAMBo or Mini-RAMBo
based 3D rinter on your com uter before, you can ski
this ste . Otherwise, click the Install Driver button to
have MatterControl install the driver for you.
MatterControl will run a driver installer that will
likely ask you for ermission to continue. Please grant it
and a dialog similar to the one below will a ear. Click
on the Install button to allow the driver to install.
6
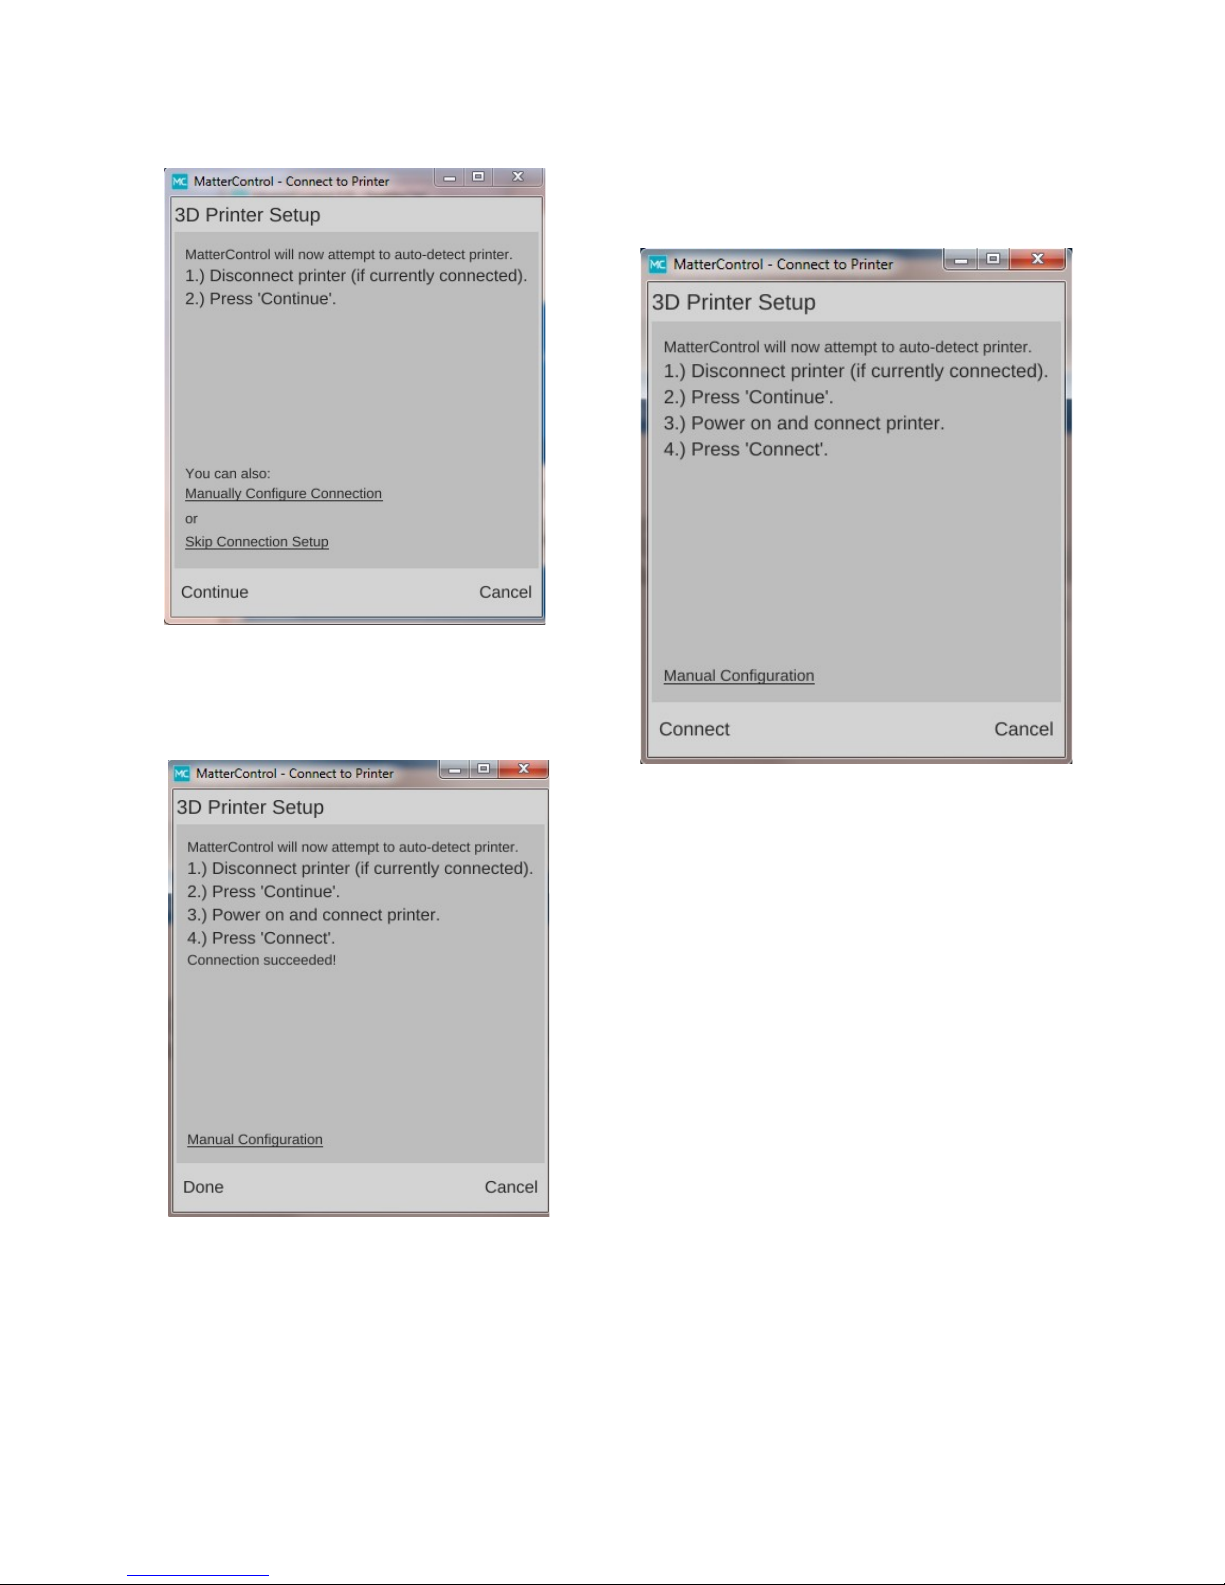
Once the installer finishes, MatterControl will
attem t to automatically configure the connection.
Please disconnect the Eris® and click the Continue
button.
Once you click on Connect, the following
dialog should a ear:
Congrats! You're all done. Click on the
Done button to continue.
7
The configuration rocess automatically loads a test object that you can rint. Let's take
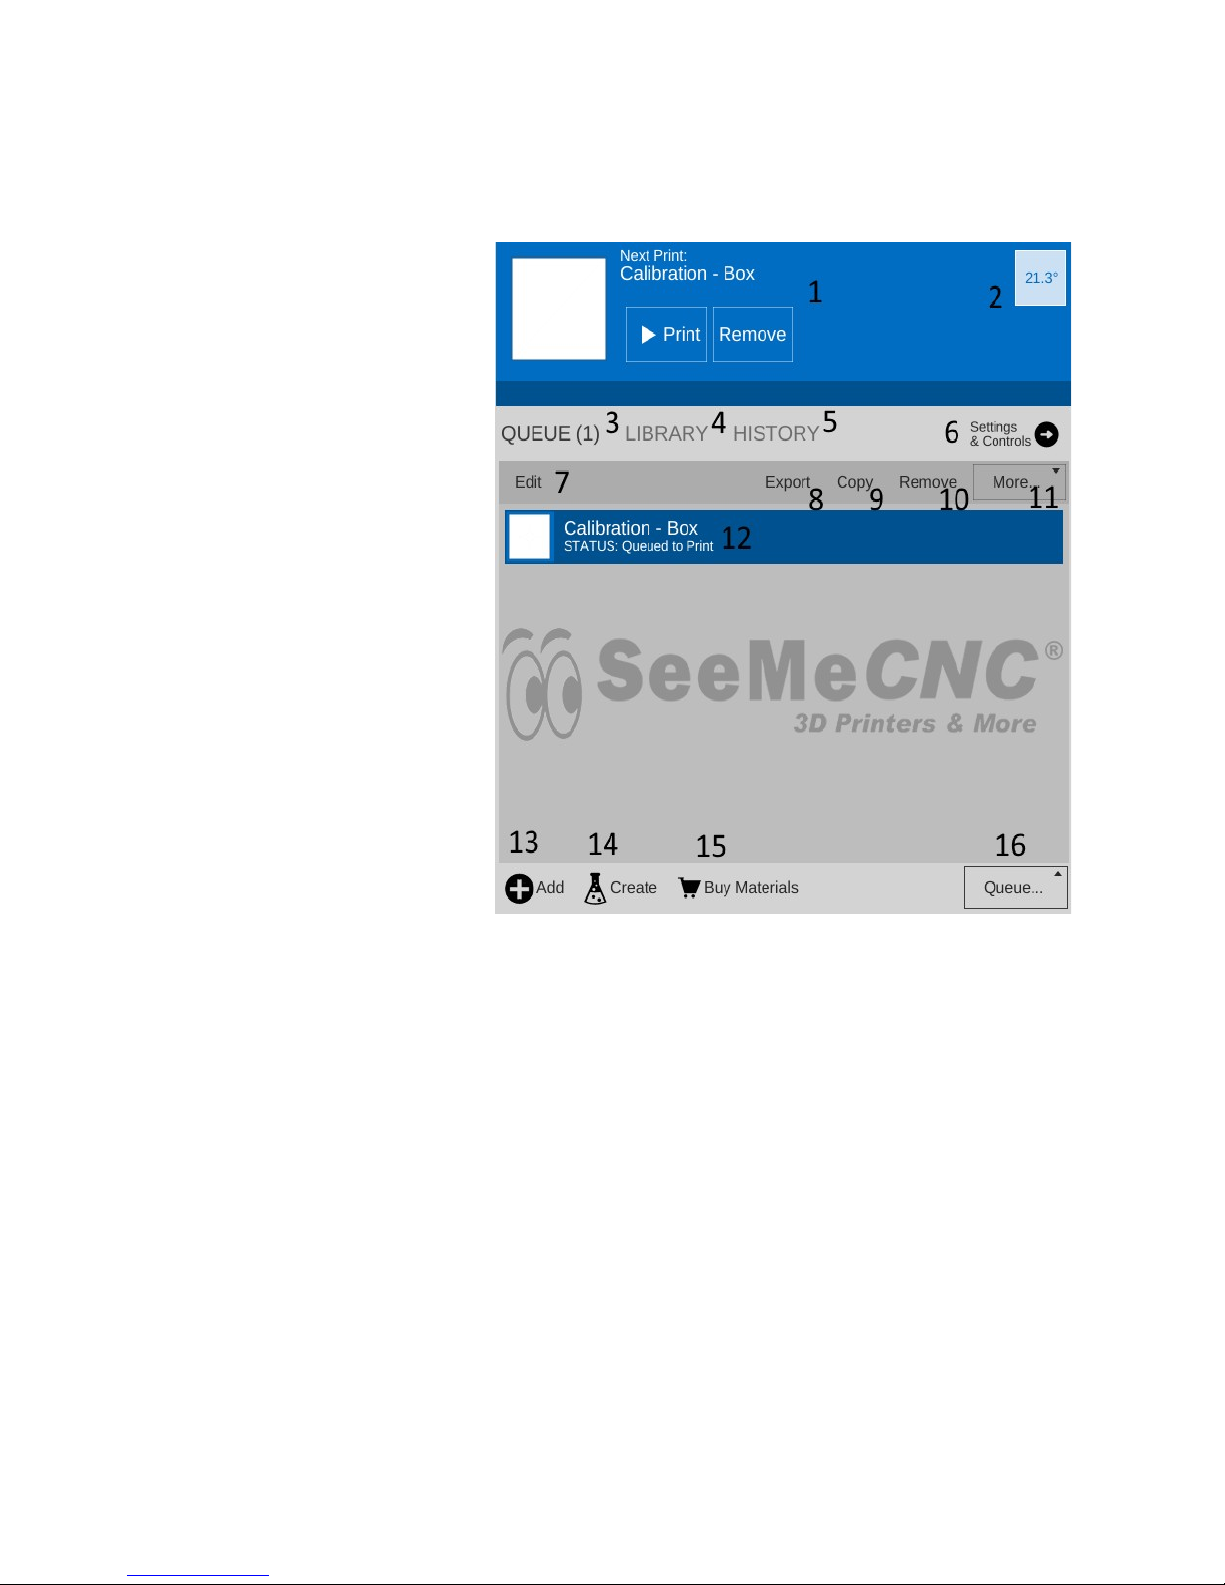
a few minutes to go over the various features of the MatterControl interface.
The MatterControl interface
is s lit into two halves. The left
half is where you can load objects
or G-code to rint, start rints, and
manually control the rinter.
1. This is the rint queue dis lay.
If nothing is queued u , you'll see
the message, “No items in the rint
queue”. To add an item, click the
“Add” button (#13). We'll cover
this in detail later. Note that you
can only select STL or GCODE
files.
2. This is the tem erature dis lay.
The figure dis layed shows the
current nozzle tem erature. If you
ever install a heated bed on your
Eris®, a second box will a ear
that will show the bed
tem erature. Both values are
shown in degrees Celsius.
3. Queue Count. This shows the
number of objects currently in the
rint queue.
4. Library – This is a list of items that you've stored in your object “library”. We'll cover this one
in detail later.
5. Print History. This will show you what you've rinted in the ast along with statistics about
each rint.
6. Settings & Controls – this is where you can edit your slicer & rinter settings as well as
manually control your Eris®
7. The Edit button will allow you to choose which items in the rint queue will be available for
rinting.
8. The Export button will allow you to ex ort the currently select item as an STL, AMF, or
GCODE file. You can use this to save GCODE if you want to share your sliced object with
another Eris® user.
9. The Copy button will make co ies of the currently selected item in the rint queue.
10. The Remove button will remove the currently selected item in the rint queue.
8

11. The More dro -down will allow you to send the currently selected item to another device, or
to the rint Library.
12. Items currently in your Queue.
13. The Add button will allow you to add objects or G-code files to the rint queue.
14. The Create button dis lays a list of available lug-ins that are used to create rintable
objects right inside of MatterControl.
15. The Buy Materials button will o en your web browser and oint it to the SeeMeCNC store.
16. The Queue button o ens a menu list that will allow you to ex ort the current file and erform
other o erations on the rint queue.
The right half of the MatterControl interface is taken u by a 3D view of your build
latform and what objects are currently loaded and ready to rint.
1. The 3D and Layer view controls allow you to switch between the 3D view (shown) and the
Layer view. The layer view shows
you the ath the rint head will
take as your art is rinted. The
layer view won't dis lay anything
until the art you want to rint has
been “sliced”.
2. View mani ulation controls –
Rotate, Pan, and Zoom. By
default, the 3D view will show a
rotating dis lay of the art. You
can sto the rotation by clicking
anywhere in the 3D view window.
3. The object currently ready to
rint.
4. This is a re resentation of the
rint bed on your Eris®. As long
as your object fits within the
circle, you can rint it!
5 & 6 The Insert and Edit buttons allow you to add and mani ulate multi le objects to the
current rint job. We'll cover this in de th later as well.
7. The Export button allows you to save the current state of the build late in a few different file
formats.
9

3 – Calibrating the Eris®
Before you can start using your new Eris®, we'll need to calibrate it first. This is really
easy to do!
Click on the Settings & Controls button and then click on the Options button.
Once you're on the Options age, click on the Show Terminal button to o en u
the serial console.
Before you roceed to the next ste , make sure that the nozzle on the hot end is free
from any filament or other debris. A clean nozzle will ensure a clean “hit” as the calibration
routine robes the bed surface. You also want to make sure that you've got the hot end cold –
the calibration rocess will not work reliably if the hot end heater is active.
Click in the in ut field
as shown and enter G29
and ress the enter key.
This will run the calibration
rocess on your Eris®!
This robing rocess
works out a few basic
arameters about your
Eris® and is considered a
“basic” calibration.
10
Table des matières
Autres manuels SeeMeCNC Imprimante 3D

SeeMeCNC
SeeMeCNC Rostock MAX v2 Manuel utilisateur

SeeMeCNC
SeeMeCNC orion delta Manuel utilisateur

SeeMeCNC
SeeMeCNC Rostock MAX v2 Manuel utilisateur

SeeMeCNC
SeeMeCNC DropLit Manuel utilisateur

SeeMeCNC
SeeMeCNC Artemis 300 Manuel utilisateur

SeeMeCNC
SeeMeCNC rostock max v2.0 Manuel utilisateur

SeeMeCNC
SeeMeCNC Delta Manuel utilisateur

SeeMeCNC
SeeMeCNC Rostock Max v3 Manuel utilisateur

SeeMeCNC
SeeMeCNC Rostock Max v3 Manuel utilisateur

SeeMeCNC
SeeMeCNC Artemis Manuel utilisateur


