Ricatech RTT77 Manuel utilisateur

USER MANUAL
GEBRUIKERSHANDLEIDING
MODE D’EMPLOI
BEDIENUNGSANLEITUNG
MANUALE D’USO
RTT77 Turntable

WARNING :
TO PREVENT FIRE OR SHOCK HAZARD, DO NOT EXPOSE THIS
APPLIANCE TO RAIN OR MOISTURE. DO NOT REMOVE COVER.
PILOT LAMPS SOLDERED IN PLACE. NO USER SERVICEABLE
PARTS INSIDE. REFER SERVICING TO QUALIFIED SERVICE
PERSONNEL.
English
“Ventilation not being impeded.”
“Do not exposed to dripping or splashing and that no objects lled with liquids, such
as vases, shall be placed on the apparatus.”
Specication
FREQUENCY : FM 88 -108 MHz
AM 530 - 1600 KHz
POWER SOURCE : AC 230V - 50Hz
ANTENNA : External antenna for FM
Built-in ferrite bar for AM
POWER CONSUMPTION : 12W
SPEAKER SIZE : 2” x 3” Dynamic type x 2
SPEAKER OHM : 4 ohm
SPEAKER WATT : 3-5W
POWER OUTPUT : 1.2W x 2
REPLACEMENT NEEDLE : NP1
* DESIGN AND SPECIFICATIONS SUBJECT TO CHANGE WITHOUT NOTICE.
The lighting ash with arrow-
head symbol, within an
equilateral triangle, is intend-
ed to alert user to the pres-
ence of uninsulated
“dangerous voltage” within the
product’s enclosure that may
be of sufcient magnitude to
constitute risk of electric
shock to persons.
CAUTION: TO REDUCE THE RISK OF
ELECTRIC SHOCK, DO NOT REMOVE
COVER (OR BACK). NO USER -
SERVICEABLE PARTS INSIDE. REFER
SERVICING TO QUALIFIED SERVICE
PERSONNEL.
The exclamation point within
an equilateral triangle is in-
tended to alert user to the
presence of important
operating and maintenance
(servicing) instruction in the
literature accompanying
the appliance.
RRIISSKK OOFF EELLEECCTTRRIICC SSHHOOCCKK
DDOO NNOOTT OOPPEENN
CAUTION

IMPORTANT SAFEGUARDS FOR AUDIO PRODUCTS
PLEASE READ CAREFULLY THE FOLLOWING IMPORTANT SAFEGUARDS THAT ARE
APPLICABLE TO YOUR EQUIPMENT.
1. Read Instructions - All the safety and operating instructions should be read before
the appliance is operated.
2. Retain Instructions - The safety and operating instructions should be retained for
future reference.
3. Heed Warnings - All warnings on the appliance and in the operating instructions
should be adhered to.
4. Follow Instructions - All operating and use instructions should be followed.
5. Water and Moisture - The appliance should not be used near water-for example, near
a bathtub,washbowl,kitchen sink,laundry tub, in a wet basement, or near a
swim ming pool and the like.
6. Carts and Stands - The appliance should be used only with a cart or stand that is
recommended by the manufacturer.
6A.An appliance and cart combination should be moved with care. Quick stops,
excessive force, and uneven surfaces may cause the appliance and cart
combination to overturn.
7. Wall or Ceiling Mounting - The appliance should be mounted to a wall or ceiling
only as recommended by the manufacturer.
8. Ventilation - The appliance should be situated so that its location or position does
not interfere with-its proper ventilation.For example, the appliance should not be
situated on a bed, sofa, rug,or similar surface that may block the ventilation
openings or, placed in a built-in installation, such as a bookcase or cabinet that may
impede the ow of air through the ventilation openings.
9. Heat - The appliance should be situated away from heat sources such as
radiators,heat registers, stoves,or other appliances (including ampliers) that
produce heat.
10.Power Sources - The appliance should be connected to a power supply only of the
type described in the operating instructions or as marked on the appliance.
11.Grounding or Polarization - Precautions should be taken so that the grounding or
polarization means of an appliance is not impeded.
12.Power - Cord Protection - Power-supply cords should be routed so that they are not
likely to be walked on or pinched by items placed upon or against them, paying
particular attention to cords at plugs, and the point where they exit from the
appliance.
13.Cleaning - The appliance should be cleaned only as recommended by the
manufacturer.
14.Antenna -This product is designed for use with the antenna attached and should not
be connected to any other external antennas.
15.Non-use Periods - The power cord of the appliance should be unplugged from the
outlet when left unused for a long period of time.
16.Object and Liquid Entry - Care should be taken so objects do not fall and liquids
are not spilled into the enclosure through openings
17.Damage Requiring Service - The appliance should be serviced by qualied service
personnel when:
A. The power-supply cord of the plug has been damaged;or
B. Objects have fallen, or liquid has been spilled into the appliance;or
C. The appliance has been exposed to rain;or
D. The appliance does not appear to operate normally or exhibits a marked change inperformance, or
E. The appliance has been dropped, or the enclosure damaged.
18.Servicing - The user should not attempt to service the appliance beyond that described
in the operating instructions. All other servicing should be referred to qualied service personnel.

EXTERNAL
FM ANTENNA
LINE OUT JAC K
LOCK HINGE
LID PIVOT POINTL ID PIVOT POINTLINE IN JACK
AC POWER PLUG
POWER INDICATOR FM.ST INDICATOR
SPEAKER
VOLUME ON/OFF KNOB
EARPHONE JACK
RADIO/ PHONO/
LINE IN SWITCH
DIAL SCALE
AM\FM\FM.ST SWITCH
TUNING KNOB
SPEAKER
LOCATION OF PARTS
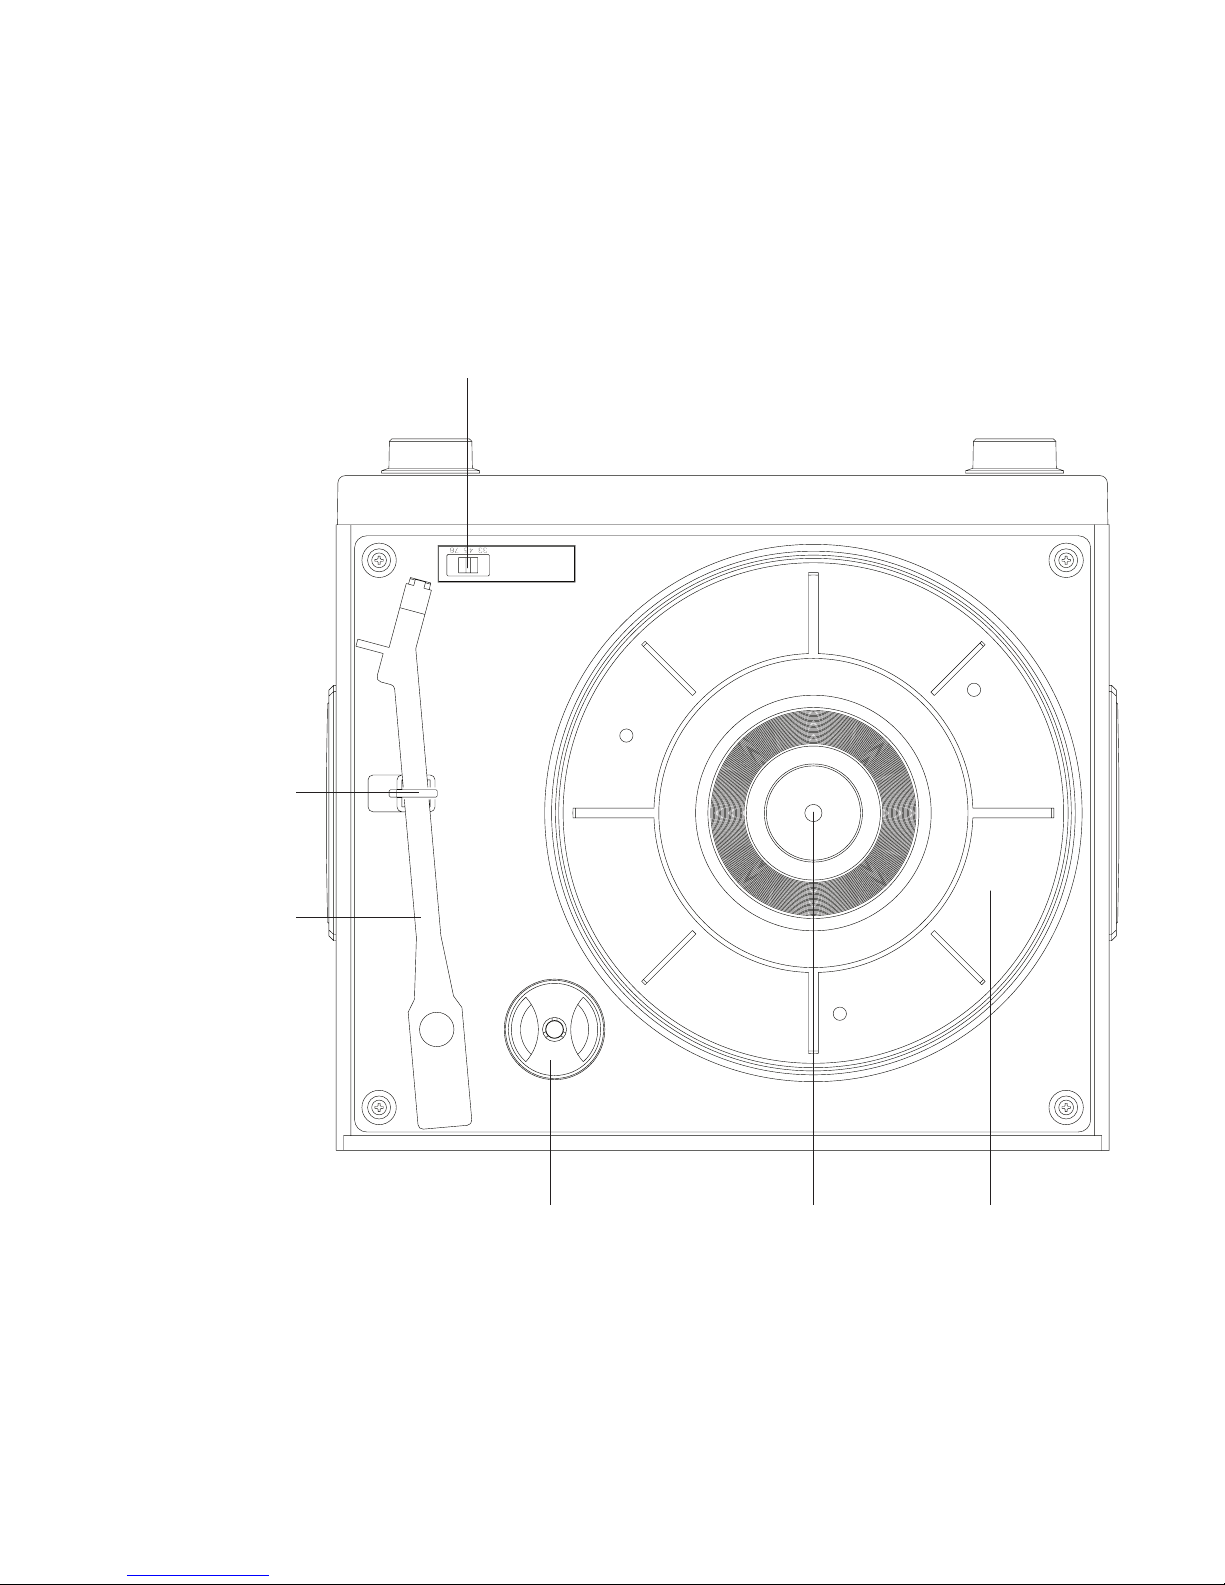
SPINDLE TURNTABLEADAPTER FOR 45 RPM RECORDS
TONE ARM
TONE ARM REST
SPEED CONTROL SWITCH
LOCATION OF PARTS

Unpacking
1 Remove packing materials from unit.
Note: Save all packing materials.
2 Remove plastic bag covering radio.
3 Remove AC Adaptor from packing.
4 Untie antenna wire on back of radio.
5 Remove black tie-wrap from under the tone arm.
6 Remove white protective needle cover by gently pulling towards the front of the unit.
7 Install the top lid onto the unit
8 Untie the FM antenna and allow it to hang down in a straight line for optimum FM reception.
If you have trouble tuning in an FM Station, move the external FM antenna for best
reception. Do not connect FM antenna to outside antenna
Power Source
1. Unwind the AC POWER CORD at the back of the unit and connect it to a power outlet.
2. Plug A/C cord into appropriate outlet.
Lid Installation
1 Flip the LID LOCK HINGE towards the back of the unit.
2 Position LID over the turntable and press the lid onto
the LOCK HINGE as shown below.
3 As you press the lid into place, align the PIVOT PINS on
the LID with the LID PIVOT POINTS as shown below.
4 Press the LID all the way in until the PIVOT PINS snap into
the LID PIVOT POINTS and the LOCK HINGE clicks into place.
click

Turntable Operation
Turn the unit on by rotating the VOLUME ON/OFF KNOB located on the front panel
to the ON position
1 Set the FUNCTION SWITCH to PHONO mode.
2 Set the SPEED CONTROL SWITCH to the desired speed (33 1/3, 45 or 78 rpm).
Place your record onto the turntable.
3 Move the TONE ARM slightly to the right side until you hear a click sound to activate the turntable.
4 Move the TONE ARM by hand over the record to the point you want the record to start. Adjust the
VOLUME ON/OFF KNOB to your desired listening level.
5 At the end of the record, the TONE ARM will stop automatically. You must return
the TONE ARM to the arm rest by hand.
ACCESSORY SUPPLIED:
Adaptor for 45 rpm records
This adaptor allows you to play 45 RPM records.
1 Place the 45 RPM adaptor over the spindle.
2 Gently place your 45 RPM record onto the turntable.
3 Follow the steps under turntable operation to your record.
Radio Operation
1 Set the FUNCTION SWITCH to RADIO mode.
2 Set the AM / FM / FM.ST SWITCH to the desired Band.
3 Select the desired radio station by rotating TUNING KNOB .
4 Adjust the VOLUME ON/OFF KNOB to the desired sound level.
Antenna
Antenna: for FM reception, the unit is provided with a FM WIRE ANTENNA , move the wire until the
reception is clear and with no interferences. For AM reception, the unit is provided with a directional
build-in ferrite antenna. Rotate the set to nd the position in which the best reception is obtained. Do
not connect the EXTERNAL FM ANTENNA to any outside antenna.

Auxiliary Output
1 You can connect your radio to different sources using the auxiliary output.
2 Plug Auxiliary cables (not supplied) into the LINE OUT JACK.
3 Connect the other end of the Auxiliary cables into the input on your desired component.
4 See the owners’ manual for the component for correction operation.
NOTE: The Auxiliary Output is a passive signal level output only and will not power speakers.
Auxiliary Input
1 You can connect external components to your unit by using the Auxiliary Input.
2 Plug Auxiliary cable into the LINE IN JACK on the back of your unit.
3 Set the FUNCTION SWITCH to LINE IN mode
4 Plug the other end of the Auxiliary cable into the output jack on your desired external componet
5 Check the volume level of your external component.
6 See operator’s manual for correct operation of the external component.
Headphone Jack Operation
1 Connect headphones to the Headphone Jack
2 Adjust volume to the desired listening level.
NOTE: When using headphones, the sound to
the unit speakers will be cut off.
NOTE: Headphones not included with unit. The sound from all speakers is cut off
Troubleshooting
There is no Power
1 Make sure radio is plugged in correctly.
2 The unit is not turned on: Rotate the VOLUME ON/OFF KNOB from the OFF
position past the “click” to turn on the unit.
There is no Sound
1 Check the volume level by turning the VOLUME ON/OFF KNOB.
2 Make sure headphones are not connected to the unit.
3 Check the position of the FUNCTION SWITCH.
Turntable will not work
1 Make sure the FUNCTION SWITCH is set to phono.
2 Try moving the tone arm to the right until you hear a click.
3 Make sure the protective needle cover is removed.
Headphone jack

Recycling
This crossed bin symbol on the appliance indicates that the product, at the end of
its life must be disposed of seperatly from domestic waste, either by taking it to a
seperate waste disposal site for electric and electronic appliance or by returning it
to your dealer when you buy another similar. The user responsible for taking the
appliance to a special waste disposal site at the end of its life. If the disused
appliance is collected correctly as separate waste, it can be recycled, treated and
disposed of ecologically,this avoids a negative impact on both the enviroment and health, and
contributed toward the recycling of the product’s materials. For further information regarding the
waste disposal service available, contact your local waste disposal agency or the place of purchase.
CUSTOMER SUPPORT
You can contact the Ricatech customer service when you have a question or a problem with your
Ricatech product. You can contact us by telephone and email.
Email
For customer support by email, please sent a email to
[email protected] Please make sure that you mention the model number and serial number of
the product, mention your name & address and describe your question or problem clearly.
Telephone
For customer support by telephone, please dial +32 3 3265694. One of our service staff will be ready
to serve you. For full procedure please visit the website of Ricatech at: www.ricatech.com
Hereby, Ricatech B.V. declares that this turntable is in compliance with the essential
requirements and other relevant provisions of Directive 1999/5/EC.
Ricatech B.V.
Cornusbaan 1
2908 KB Capelle a/d IJssel
The Netherlands

WAARSCHUWING :
STEL HET APPARAAT NIET BLOOT AAN REGEN OF VOCHT OM GEVAAR VOOR BRAND
OF EEN ELEKTRISCHE SCHOK TE VOORKOMEN. DE BEHUIZING NIET VERWIJDEREN.
CONTROLELAMPJES ZIJN OP HET APPARAAT GESOLDEERD. GEEN DOOR DE
GEBRUIKER TE ONDERHOUDEN ONDERDELEN AAN DE BINNENKANT. LAAT
ONDERHOUD OVER AAN GEKWALIFICEERD ONDERHOUDS PERSONEEL.
Nederlands
“Ventilatie niet belemmeren.”
“Niet blootstellen aan druipende of spattende vloeistoffen en geen voorwerpen met
vloeistoffen, zoals vazen, op het apparaat plaatsen.”
Specicaties
FREQUENTIE : FM 88 -108 MHz
AM 530 - 1600 KHz
VOEDINGSBRON : AC 230V - 50Hz
ANTENNE : Externe antenne voor FM
Ingebouwde ferrietstaaf voor AM
STROOMVERBRUIK : 12W
SPEAKER AFMETING : 2” x 3” Dynamisch type x 2
SPEAKER OHM : 4 ohm
SPEAKER WATT : 3-5W
UITGANGSVERMOGEN : 1.2W x 2
VERVANGINGS NAALD : NP1
*SPECIFICATIES EN UITERLIJK KUNNEN WORDEN GEWIJZIGD ZONDER KENNISGEVING.
Het symbool van de bliksemits
met pijlkop, in een gelijk
zijdige driehoek, is bedoeld om
de gebruiker attent te maken op
de aanwezigheid van niet-geï-
soleerde “gevaarlijke spanning” in
de behuizing van het product die
zo hoog kan zijn dat ze gevaar
voor een elektrische schok
betekent voor personen.
OPGELET: OM HET GEVAAR VOOR
EEN ELEKTRISCHE SCHOK TE
VERMINDEREN, BEHUIZING (OF
ACHTERKANT) NIET VERWIJDEREN.
GEEN DOOR DE GEBRUIKER TE
ONDERHOUDEN ONDERDELEN AAN
DE BINNENKANT. LAAT ONDERHOUD
OVER AAN GEKWALIFICEERD
ONDERHOUDS- PERSONEEL.
Het uitroepteken in een
gelijkzijdige driehoek is be-
doeld om de gebruiker attent
te maken op de aanwezigheid
van een belangrijke instructie
voor bediening en onderhoud
(service) in de documentatie
bij het apparaat.
RRIISSKK OOFF EELLEECCTTRRIICC SSHHOOCCKK
DDOO NNOOTT OOPPEENN
CAUTION
Table des matières
Langues :
Autres manuels Ricatech Platine

Ricatech
Ricatech RMC250 Deluxe Manuel utilisateur

Ricatech
Ricatech Ibiza RMC90 Manuel utilisateur

Ricatech
Ricatech RTT88 Manuel utilisateur

Ricatech
Ricatech RMC430 Manuel utilisateur

Ricatech
Ricatech RTT95 Manuel utilisateur

Ricatech
Ricatech RTT25 Manuel utilisateur

Ricatech
Ricatech RMC160 Manuel utilisateur

Ricatech
Ricatech RTT21 Manuel utilisateur

Ricatech
Ricatech RTT22 Manuel utilisateur

Ricatech
Ricatech REVOLUTION BLACK RTT20 Manuel utilisateur


