Ortur Ortur-4 Manuel utilisateur

Dongguan Ortur Intelligent Technologies Co., Ltd.
www.ortur3d.com www.ortur3dprinter.com
No.27, Second Industrial Park, Heshi Road, Qiaotou Town, Dongguan 523527, Guandong Province, China
1
Operation Manual of Ortur-4
Phase 1: The Operation Menu Before Printing:
1. “Print from SD” Menu:-----------------------------------------------------------------------------------------------------------------3
2. “Motion” Menu:-------------------------------------------------------------------------------------------------------------------------4
2.1 “Move axis” Menu: -------------------------------------------------------------------------------------------------------------------4
2.1.1 “Soft Endstops” Option:-----------------------------------------------------------------------------------------------------------4
2.1.2 “Move X” Menu:---------------------------------------------------------------------------------------------------------------------5
2.1.3 “Move Y” Menu + 2.1.4 “Move Z” Menu+ 2.1.5 “Extruder” Menu:--------------------------------------------------------5
2.2 “Auto home” Command:-----------------------------------------------------------------------------------------------------------5
2.3 “Home X” Command:----------------------------------------------------------------------------------------------------------------6
2.4 “Home Y” Command:----------------------------------------------------------------------------------------------------------------6
2.5 “Home Z” Command:----------------------------------------------------------------------------------------------------------------6
2.6 “Bed Leveling” Menu:---------------------------------------------------------------------------------------------------------------6
2.6.1 “Auto Home” Command:----------------------------------------------------------------------------------------------------------7
2.6.2 “Level bed” Command:-----------------------------------------------------------------------------------------------------------7
2.6.3 “Edit Mesh” Menu:-----------------------------------------------------------------------------------------------------------------7
2.6.4 “Bed Leveling” Option:-----------------------------------------------------------------------------------------------------------8
2.6.5 “Fade Height” Menu:--------------------------------------------------------------------------------------------------------------8
2.6.6 “Probe Z Offset” Menu:-----------------------------------------------------------------------------------------------------------8
2.6.7 “Load setting” Command:-------------------------------------------------------------------------------------------------------9
2.6.8 “Store setting” Command:------------------------------------------------------------------------------------------------------9
2.7 “Disable Steppers” Command:---------------------------------------------------------------------------------------------------9
3. “Temperature” Menu:---------------------------------------------------------------------------------------------------------------10
3.1 “Nozzle” Menu:-----------------------------------------------------------------------------------------------------------------------10
3.2 “Bed” Menu:--------------------------------------------------------------------------------------------------------------------------10
3.3 “Fan speed” Menu:------------------------------------------------------------------------------------------------------------------11
3.4 “Preheat PLA” Menu:---------------------------------------------------------------------------------------------------------------11
3.4.1 “Preheat PLA” Command:-------------------------------------------------------------------------------------------------------12
3.4.2 “Preheat PLA End” Command:-------------------------------------------------------------------------------------------------12
3.4.3 “Preheat PLA Bed” Command:------------------------------------------------------------------------------------------------12
3.5 “Preheat ABS” Menu:--------------------------------------------------------------------------------------------------------------13
3.5.1 “Preheat ABS” Command + 3.5.2 “Preheat ABS End” Command + 3.5.3 “Preheat ABS Bed” Command:---13
4. “Configuration” Menu:--------------------------------------------------------------------------------------------------------------13
4.1 “Advanced Settings” Menu:------------------------------------------------------------------------------------------------------13
4.1.1 “Probe Z Offset” Menu:-----------------------------------------------------------------------------------------------------------14
4.1.2 “Set home offsets” Command:------------------------------------------------------------------------------------------------14

Dongguan Ortur Intelligent Technologies Co., Ltd.
www.ortur3d.com www.ortur3dprinter.com
No.27, Second Industrial Park, Heshi Road, Qiaotou Town, Dongguan 523527, Guandong Province, China
2
4.1.3 “Velocity” Menu:------------------------------------------------------------------------------------------------------------------14
4.1.4 “Acceleration” Menu:------------------------------------------------------------------------------------------------------------14
4.1.5 “Jerk” Menu:------------------------------------------------------------------------------------------------------------------------15
4.1.6 “Steps/mm” Menu:---------------------------------------------------------------------------------------------------------------15
4.1.7 “Temperature” Menu:------------------------------------------------------------------------------------------------------------15
4.1.8 “Filament” Menu:-----------------------------------------------------------------------------------------------------------------15
4.1.9 “Initialize EEPROM” Menu:------------------------------------------------------------------------------------------------------16
4.2 “Runout Sensor” Option:----------------------------------------------------------------------------------------------------------16
4.3 “Outage Recovery” Option:------------------------------------------------------------------------------------------------------16
4.4 “Preheat PLA configuration” Menu:--------------------------------------------------------------------------------------------17
4.5 “Preheat ABS Configuration” Menu:-------------------------------------------------------------------------------------------17
4.6 “Store setting” Command:-------------------------------------------------------------------------------------------------------18
4.7 “Load setting” Command:--------------------------------------------------------------------------------------------------------18
4.8 “Restore failsafe” Command:---------------------------------------------------------------------------------------------------18
5. “Change filament” Menu:----------------------------------------------------------------------------------------------------------18
5.1 “Preheat PLA” Command:---------------------------------------------------------------------------------------------------------19
5.2 “Preheat ABS” Command:--------------------------------------------------------------------------------------------------------21
5.3 “Preheat Custom” Command:---------------------------------------------------------------------------------------------------21
Phase 2: The Operation Menu During Printing:
6. “Pause print” Command:----------------------------------------------------------------------------------------------------------22
7. “Stop print” Menu:-------------------------------------------------------------------------------------------------------------------22
8. “Tune” Menu:--------------------------------------------------------------------------------------------------------------------------23
8.1 “Speed” Menu:----------------------------------------------------------------------------------------------------------------------23
8.2 “Nozzle” Menu:----------------------------------------------------------------------------------------------------------------------23
8.3 “Bed” Menu:-------------------------------------------------------------------------------------------------------------------------24
8.4 “Fan speed” Menu:-----------------------------------------------------------------------------------------------------------------24
8.5 “Flow” Menu:------------------------------------------------------------------------------------------------------------------------25
8.6 “Babystep X” Menu:---------------------------------------------------------------------------------------------------------------25
8.7 “Babystep Y” Menu:----------------------------------------------------------------------------------------------------------------26
8.8 “Probe Z Offset” Menu:------------------------------------------------------------------------------------------------------------26
9. “Configuration” Menu:--------------------------------------------------------------------------------------------------------------27
10. “Change filament” Command:---------------------------------------------------------------------------------------------------27

Dongguan Ortur Intelligent Technologies Co., Ltd.
www.ortur3d.com www.ortur3dprinter.com
No.27, Second Industrial Park, Heshi Road, Qiaotou Town, Dongguan 523527, Guandong Province, China
3
Info Screen:
When Ortur-4 3D Printer is working, You would see this Info Screen.
And when you press the Control Button, you could go to the Main Menu to operate this printer.
Phase 1: The Operation Menu Before Printing:
1. “Print from SD” Menu:
In the Main Menu, the First Submenu is “Print from SD”, You could press the Control Button to go to this
menu.

Dongguan Ortur Intelligent Technologies Co., Ltd.
www.ortur3d.com www.ortur3dprinter.com
No.27, Second Industrial Park, Heshi Road, Qiaotou Town, Dongguan 523527, Guandong Province, China
4
In the “Print from SD” Menu, you would find the Gcode files, you had saved in the SD card. Please turn
clockwise or anticlockwise the Control Button to choose the Gcode file, you’d like to print. And then, press
the Control Button to start the print.
PS, Before the printing, please make sure you have leveled the X Axis and Hotbed. Otherwise, the printer
may be damaged !
2. “Motion” Menu:
In the Main Menu, the Second Submenu is “Motion”, You could press the Control Button to go to this menu.
2.1 “Move axis” Menu:
In the “Motion” Menu, the First Option is the “Move axis” Menu, You could press the Control Button to go to
this menu.
2.1.1 “Soft Endstops” Option:
In the “Move axis” Menu, the First Option is “Soft Endstops” Option, You could press the Control Button to
turn on tor turn off the “Soft Endstops” Function.
PS. When “Soft Endstops” turn on, the motors wouldn’t move the axes to the negative coordinate value.
So, if XYZ End stops are bad, this Command would protect the printer, wouldn’t let the XYZ motors keep
driving the XYZ axes and damaging the printer.

Dongguan Ortur Intelligent Technologies Co., Ltd.
www.ortur3d.com www.ortur3dprinter.com
No.27, Second Industrial Park, Heshi Road, Qiaotou Town, Dongguan 523527, Guandong Province, China
5
2.1.2 “Move X” Menu:
In the “Move axis” Menu, the Second option is “Move X” Menu, You could press the Control Button to go to
this menu.
And then, you could choose the “Move 10mm”, “Move 1mm” and “Move 0.1mm” Commands.
It sands for different displacement distances, would let the X motor move 10mm, 1mm and o.1mm.
2.1.3 “Move Y” Menu + 2.1.4 “Move Z” Menu+ 2.1.5 “Extruder” Menu:
It’s same operation as the “Move X” Menu.
PS. If you want to move the Extruder Motor, you need to preheat the Hotend first, so that the filament could
be removed from extruder head.
2.2 “Auto home” Command:
In the “Motion” Menu, the Second Option is the “Auto home” Command, You could press the Control Button
to let the XYZ Axes go back Home (X:0, Y:0, Z:0) automatically.

Dongguan Ortur Intelligent Technologies Co., Ltd.
www.ortur3d.com www.ortur3dprinter.com
No.27, Second Industrial Park, Heshi Road, Qiaotou Town, Dongguan 523527, Guandong Province, China
6
2.3 “Home X” Command:
In the “Motion” Menu, the Third Option is the “Home X” Command, You could press the Control Button to only
let the X Axis go back Home (X:0).
2.4 “Home Y” Command:
In the “Motion” Menu, the Fourth option is the “Home Y” command, Press the control button to only let the Y
axis go back Home (Y:0).
2.5 “Home Z” Command:
In the “Motion” Menu, the Fifth Option is the “Home Z” Command, You could press the Control Button to only
let the Z Axis go back Home (Z:0).
2.6 “Bed Leveling” Menu:
In the “Motion” Menu, the Sixth Option is the “Bed Leveling” Menu, You could press the Control Button to go
to this menu.
Dongguan Ortur Intelligent Technologies Co., Ltd.
www.ortur3d.com www.ortur3dprinter.com
No.27, Second Industrial Park, Heshi Road, Qiaotou Town, Dongguan 523527, Guandong Province, China
7
2.6.1 “Auto Home” Command:
Before you activate the Auto Bed Leveling Function, You need to press the Control Button to do the “Auto
home” firstly.
2.6.2 “Level bed” Command:
In the “Bed Leveling” Menu, the Second Option is “Level Bed” Command. You could press the Control Button
to let the sensor probe the Levelness of the Hotbed.
If the hotbed is moved, you should let the Sensor to probe the Hotbed again, After 25 points probed, Please
remember to press the “Store Setting” again.
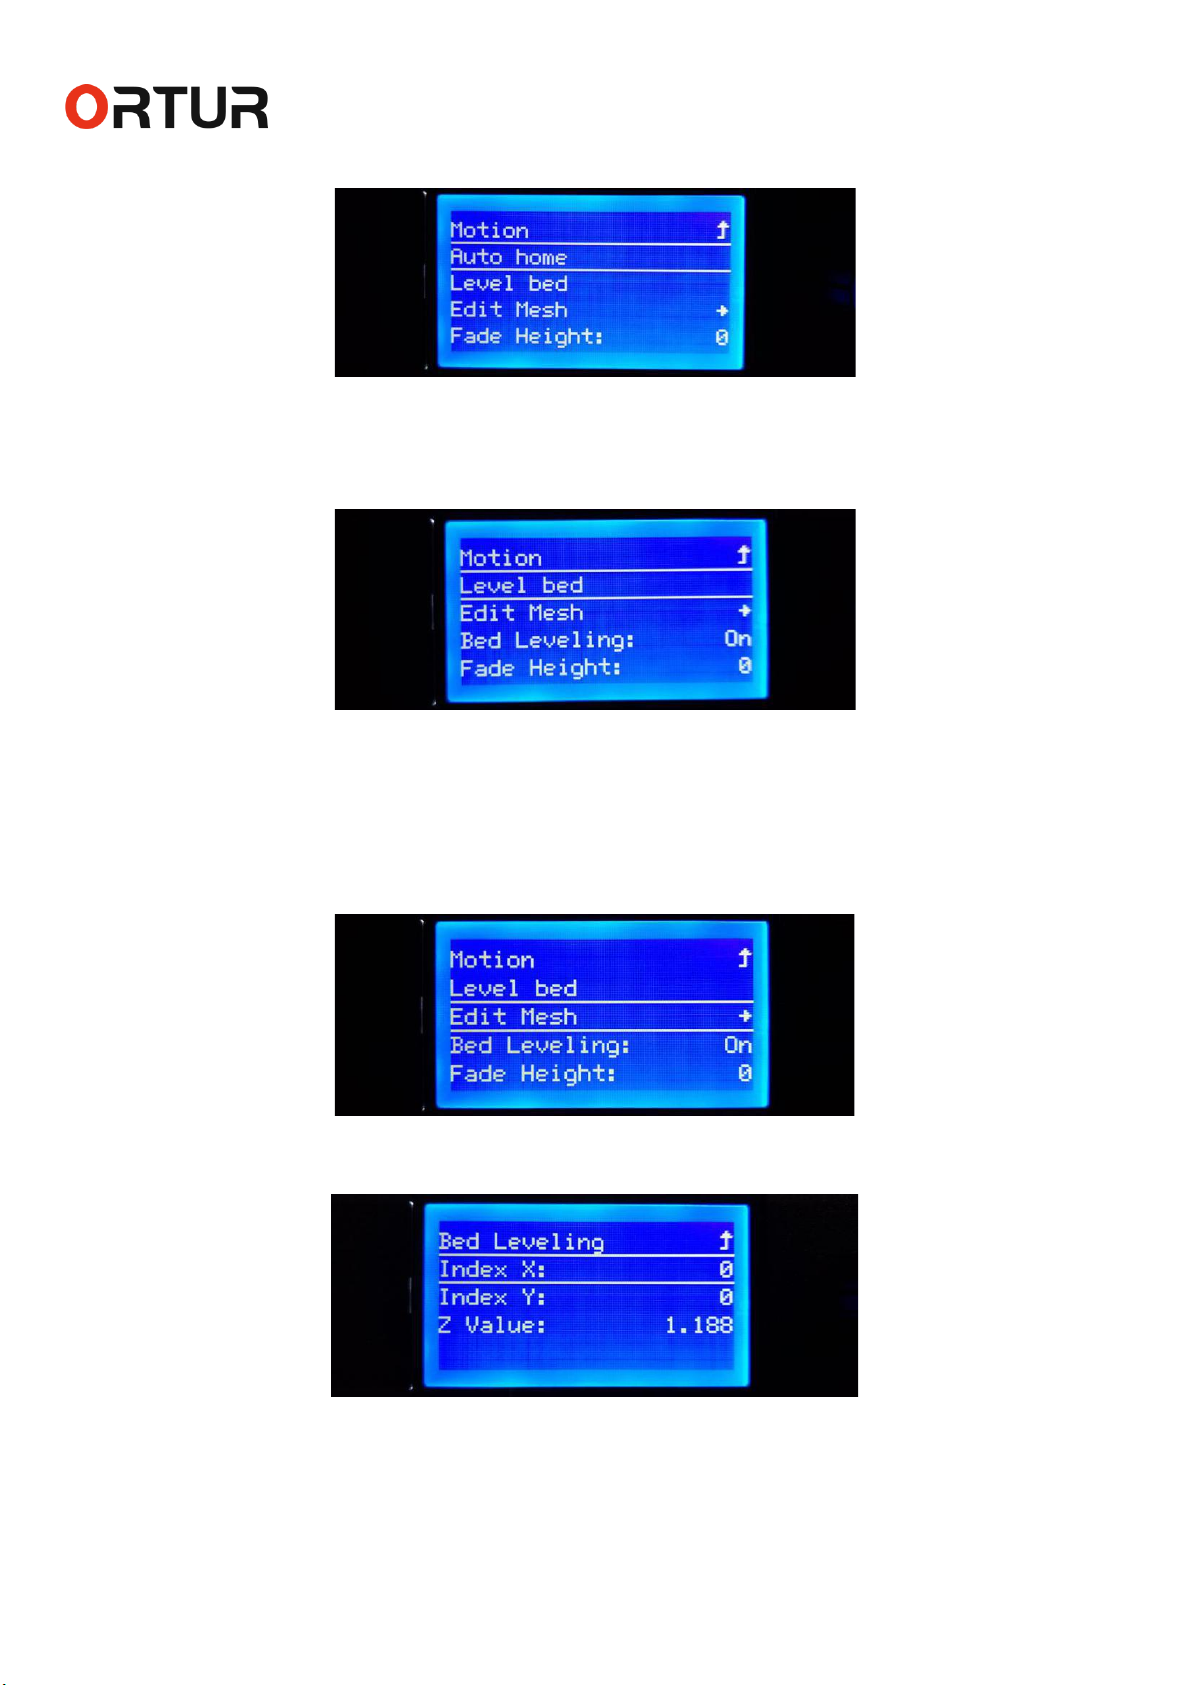
2.6.3 “Edit Mesh” Menu:
In the “Bed Leveling” Menu, the Third Option is “Edit Mesh” Menu, You could press the Control Button to go
to “Edit Mesh” Menu. Then, you could adjust the Z value of any point by hand.
PS. Usually, it would be too complex and useless for the normal users, so, you could just do the Second
option “Level Bed” Command, and ignore this menu.

Dongguan Ortur Intelligent Technologies Co., Ltd.
www.ortur3d.com www.ortur3dprinter.com
No.27, Second Industrial Park, Heshi Road, Qiaotou Town, Dongguan 523527, Guandong Province, China
8
2.6.4 “Bed Leveling” Option:
In the “Bed Leveling” Menu, the Fourth Option is “Bed Leveling” Option, You could press the Control Button
to turn on or turn off the “Bed Leveling” Function .
2.6.5 “Fade Height” Menu:
In the “Bed Leveling” Menu, the Fifth Option is “Fade Height” Menu, You could press the Control Button to go
to this menu.
And then, you could turn clockwise or anticlockwise to adjust the Height, that the “Bed Leveling” Function
would be available during this Height.
PS. If let the Fade Height to be “0”, the “Bed Leveling” would be available during the whole printing. And it
recommend to let the height to be “0” .
2.6.6 “Probe Z Offset” Menu:
In the “Bed Leveling” Menu, the Sixth Option is “Probe Z Offset” Menu, You could press the Control Button to
go to “Probe Z Offset” Menu. And then, you could turn clockwise or anticlockwise to adjust the Z Offset
Value.

Dongguan Ortur Intelligent Technologies Co., Ltd.
www.ortur3d.com www.ortur3dprinter.com
No.27, Second Industrial Park, Heshi Road, Qiaotou Town, Dongguan 523527, Guandong Province, China
9
PS. Please MUST take a look at the Manual of “How to set up the Auto-Leveling & Probe Z Offset Function”, So
that you could get know how to set up this Z Offset Value, it’s very important, otherwise, you may damage
the printer by wrong operation!
2.6.7 “Load setting” Command:
In the “Bed Leveling” Menu, the Seventh Option is “Load setting” Command. If you don’t want to activate
what you have just set up, please press “Load setting” to load the Setting, that you had stored at last time.
2.6.8 “Store setting” Command:
In the “Bed Leveling” Menu, the Seventh Option is “Store setting” Command. If you’re satisfied with the New
Setting, please press the Control Button to store setting.
2.7 “Disable Steppers” Command:
In the “Motion” Menu, the Seventh Option is the “Disable Steppers” Command, You could press the control
button to disable the steppers.
Then, the motors would stop working, and you could move the XZY axes by hand.

Dongguan Ortur Intelligent Technologies Co., Ltd.
www.ortur3d.com www.ortur3dprinter.com
No.27, Second Industrial Park, Heshi Road, Qiaotou Town, Dongguan 523527, Guandong Province, China
10
3. “Temperature” Menu:
In the Main Menu, the Third Submenu is “Temperature” Menu. You could press the Control Button to go to
this menu.
3.1 “Nozzle” Menu:
In the “Temperature” Menu, the First Option is “Nozzle” Menu. You could press the Control Button to go to
“Nozzle” Menu.
And then, you could turn clockwise or anticlockwise to adjust the Target Temperature of Nozzle. And press
the Control Button to preheat the Nozzle to this Temperature.
3.2 “Bed” Menu:
In the “Temperature” Menu, the Second Option is “Bed” Menu. You could press the Control Button to go to
this menu.
Autres manuels pour Ortur-4
1
Table des matières
Autres manuels Ortur Imprimante 3D


