DSE RK Series Manuel utilisateur

INSTALLATION MANUAL
RK SERIES - DVR and NVR
Page: 1
RK SERIES
DVR and NVR
Installation manual - Menu 5.0
How to install the system
How to network and connect cameras. How to use live and playback
How to connect with common clients
DSE SRL - ITALY - WWW.DSE.EU

INSTALLATION MANUAL
RK SERIES - DVR and NVR
Page: 2
Contents of the manual
The RK series DVRs and NVRs are video recording systems for CCTV surveillance. The NVR models are for connecting
IP cameras
The DVR models have BNC inputs to connect analog AHD, CVI, TVI, CVBS cameras but can also manage IP cameras.
This manual explains how to install the VCR, how to use essential functions and how to connect from a computer.
This manual refers to the NVR / DVR with Graphical Interface Version 5.0 that you see below
If your NVR / DVR has our classic interface, instead of 5.0, you can download the specific manual for your version, or you can continue
reading this manual considering that you will find the same options on your screen, only with different graphics.
DSE SRL - ITALY - WWW.DSE.EU

INSTALLATION MANUAL
RK SERIES - DVR and NVR
Page: 3
Get the cameras ready
Before installing a DVR or NVR you must have the cameras to be connected. If you connect analog cameras you have to supply them
with power and then connect the video signal with a coaxial cable or a twisted pair with balun. If you connect IP cameras to the network
you must first configure their IP address.
For these operations you must follow the camera manual.
DSE SRL - ITALY - WWW.DSE.EU

INSTALLATION MANUAL
RK SERIES - DVR and NVR
Page: 4
Install the Hard Disk
If you want your system to record, you need to install a Hard Disk inside the VCR. Any 3.5 ”computer SATA hard drive is fine, but for a
longer life it would be wise to purchase a dedicated video recording model.
The maximum hard disk capacity that you can mount is 8 TB.
Depending on the model, you can house from 1 to 8 Hard Disks inside the video recorder. You can easily understand the direction in which the
disk should be mounted by looking at the holes on the bottom of the DVR / NVR.
Remove the cover by unscrewing the side screws e
rear
Connect the hard disk with the two cables of
power and data you find inside. If there are multiple ports, choose
any pair.
Secure the hard drive with the 4 screws provided that you
screw from underneath the VCR
On the next boot, the NVR / DVR will reveal the newly installed Hard Disk and ask you to start formatting in order to use it.
DSE SRL - ITALY - WWW.DSE.EU

INSTALLATION MANUAL
RK SERIES - DVR and NVR
Page: 5
ATTENTION - The power consumption of a hard disk varies greatly according to its capacity. Our video recorders are supplied with a
power supply suitable for a normal 1 or 2TB hard disk, usually the most used size. If you install a higher hard disk or more than one hard
disk it is better to replace the standard power supply with one of greater power.
DSE SRL - ITALY - WWW.DSE.EU

INSTALLATION MANUAL
RK SERIES - DVR and NVR
Page: 6
Connect a DVR
If you have purchased a DVR, your device can manage both analog cameras, with its BNC inputs, and IP cameras, via the network
port.
These are the rear connections. The equipment varies according to the model you have purchased.
VIDEO IN - You can connect any type of analog camera in AHD, CVI or TVI technology, up to 8MP resolution, to these BNC video
inputs. You can also connect old analog CVBS cameras. The only cameras with BNC connection that you cannot connect are SDI
digital cameras.
A OUT - You can connect a speaker to this RCA connector to broadcast the audio of the DVR. Remember that the HDMI monitor
output also conducts audio so if you connect a TV via HDMI you can hear audio without connecting a speaker to this output.
HD OUT - This is the HDMI output for the monitor. Almost all TVs and PC monitors have this connection port. If you connect a TV,
you must remember to select the external HDMI input on your TV that you used for the NVR to view the images. This is usually done
by pressing the SOURCE button on the remote control. These DVRs come from the factory with a low output resolution that you can
increase to 4K to match the monitor's maximum resolution.
Remember that the HDMI cable cannot be longer than a few meters. To connect a remote HDMI monitor from the NVR you need to
use an HDMI transmission device.
VGA - You can connect a computer monitor to this output. This output supports the maximum resolution of 1920x1080 FullHD.
V-OUT - To this BNC output you can connect an analog monitor, the AV input of a TV and any device capable of receiving analog
CVBS video. This output has low resolution and it is not recommended to use it for the main monitor.
A1..A4 - You can connect audio signals from cameras or microphones to these RCA inputs. Remember that these audio inputs are
only usable on BNC channels because IP cameras require the microphone to be connected to the camera.
NET - This is the RJ45 network port. To be able to view your cameras via the Internet, or to connect IP cameras, you need to
connect the DVR to your network. You must use a normal straight type network cable and insert it on one side into the NET port of
the DVR and on the other side into a free port on your router
DSE SRL - ITALY - WWW.DSE.EU

INSTALLATION MANUAL
RK SERIES - DVR and NVR
Page: 7
or switch. The DVR is factory set to auto configure itself to the network automatically (DHCP).
USB - You can connect the mouse included with the DVR to the USB ports and USB sticks for backing up video files. All DVRs also
have a front USB port.
AB RS485 - This is the RS485 serial port to which you can connect the control pair to control the motorized cameras. In fact,
motorized analog cameras require this additional connection for control. The RS485 BUS is a twisted pair that connects in cascade
all the motorized units of your system. Find more information on how to connect it in the camera manual. You will then need to
configure the transmission protocol in the PTZ configuration of the DVR. Motorized IP cameras do not require this connection
because they are controlled via the network cable.
DC 12V - Connect the included 12VDC power supply here. Be careful not to confuse the power supply of the DVR / NVR, which has
at least 2A of power, with other smaller ones that you have purchased, perhaps for the cameras, because this would lead to
malfunctions. If you power the DVR with our centralized cassette power supply, you must consider that the individual outputs are
limited to 1A and it is therefore necessary to connect at least 3 in parallel to provide adequate power to the DVR.
DSE SRL - ITALY - WWW.DSE.EU
INSTALLATION MANUAL
RK SERIES - DVR and NVR
Page: 8
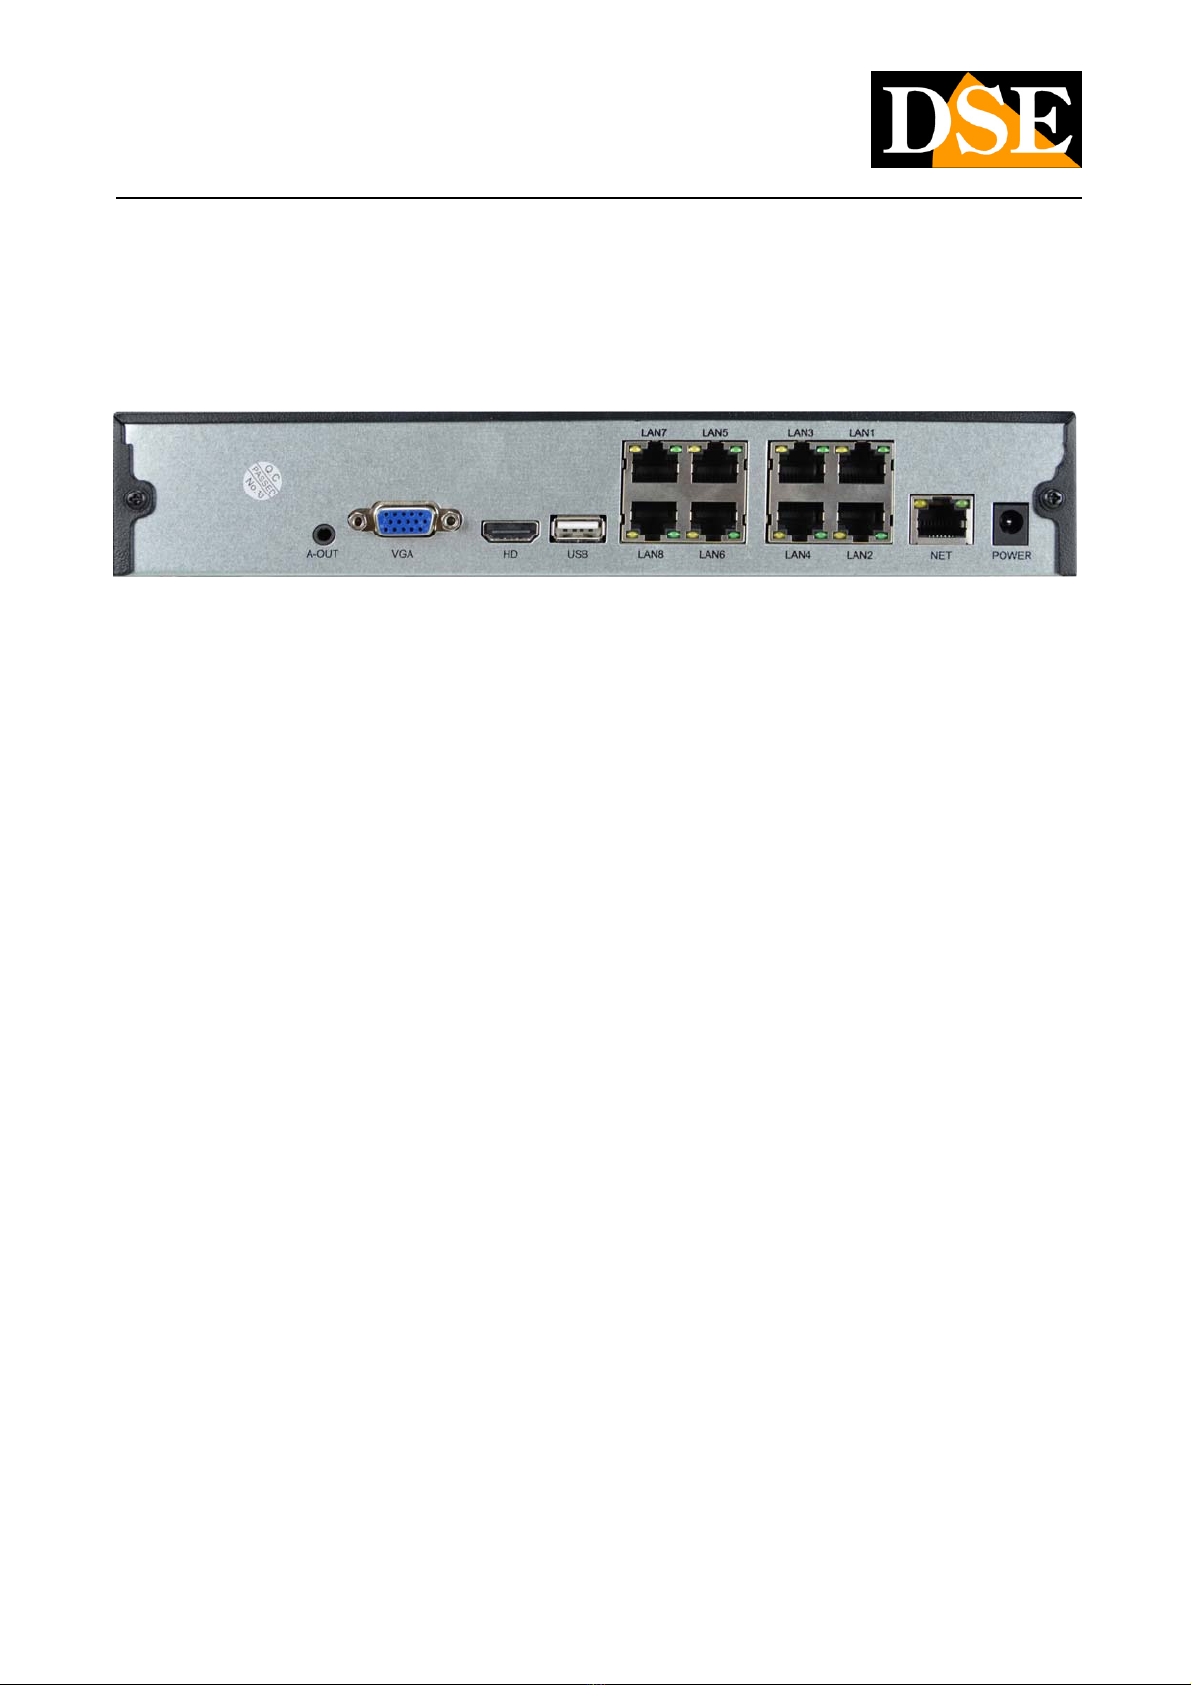
Connect an NVR
If you have purchased an NVR, your video recorder can only manage IP network cameras. These are the rear connections. The
equipment varies according to the model you have purchased.
A-OUT - You can connect an external speaker to this minijack connector to spread the audio. Remember that the HDMI monitor
output also conducts audio so if you connect a TV via HDMI you can hear audio without connecting this output.
VGA - You can connect a computer monitor to this output. This output supports the maximum resolution of 1920x1080 FullHD.
HD - This is the HDMI output for the monitor. Almost all TVs and PC monitors have this connection port. If you connect a TV, you
must remember to select the external HDMI input on your TV that you used for the NVR to view the images. This is usually done by
pressing the SOURCE button on the remote control. These DVRs come from the factory with a low output resolution that you can
increase to 4K to match the monitor's maximum resolution.
Remember that the HDMI cable cannot be longer than a few meters. To connect a remote monitor from the NVR you need to use an
HDMI transmission device.
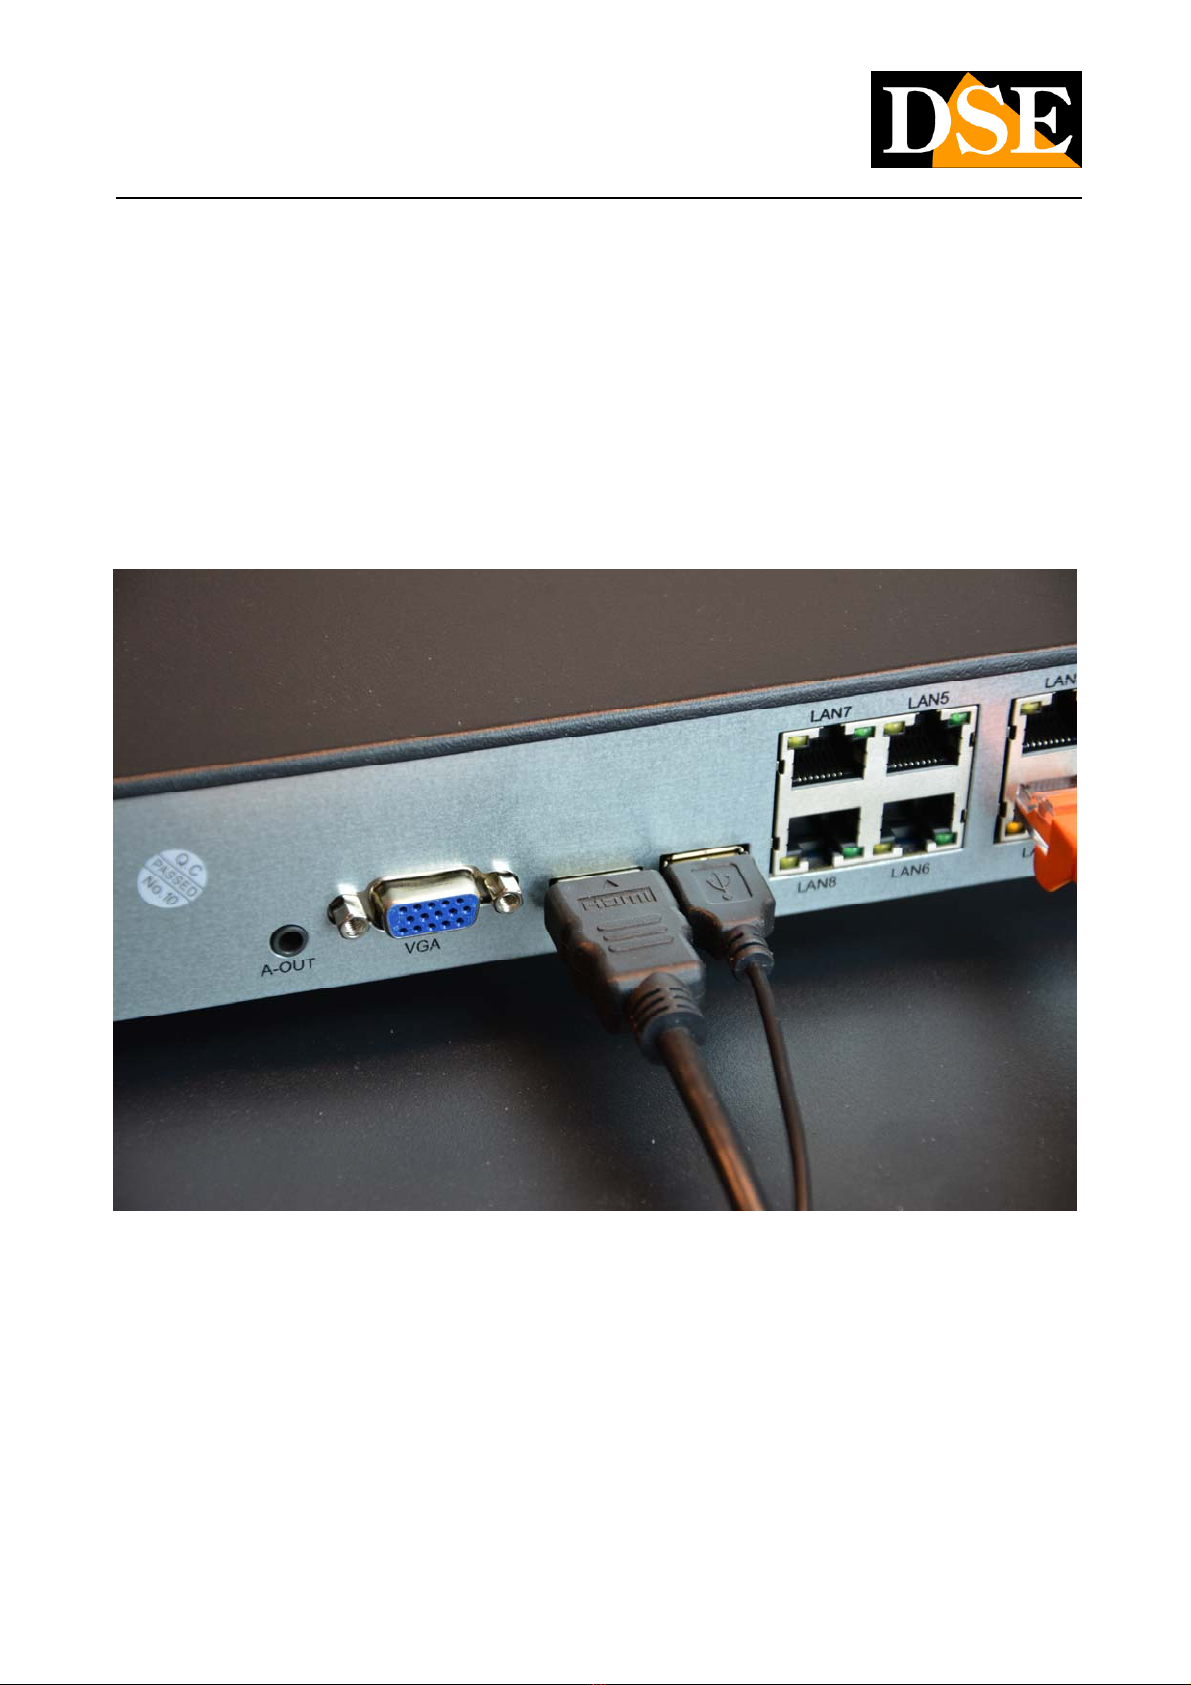
USB - You can connect the mouse included with the DVR to the USB ports and USB sticks for backing up video files. Many DVRs /
NVRs also have a front USB port. You can also connect USB disks to record to external HDDs
NET or LAN or WAN - This is the RJ45 network port. In order to view your cameras via the Internet, or to connect external IP
cameras, you need to connect the NVR to your network via this port. You must use a normal straight type network cable and insert it
on one side into the network port of the NVR and on the other side into a free port on your router or switch. The NVR is factory set to
auto configure to network automatically (DHCP).
LAN1..8 or POE1..8 - Some NVR models have POE ports for cameras. You can connect here the IP cameras you want to be
managed by the NVR. The NVR provides POE power to the cameras. If you connect our RK Series cameras to these ports, they are
automatically configured (plug and play). If you connect other cameras you will first need to assign them an IP address suitable for
the internal network of the NVR.
DC 12V - Connect the included 12VDC power supply here
DSE SRL - ITALY - WWW.DSE.EU
INSTALLATION MANUAL
RK SERIES - DVR and NVR
Page: 9
Plug in your monitor
Although the DVR / NVR can work without a monitor, you must necessarily connect one, at least for configuration operations.
You can use a computer monitor or a TV. The main, higher resolution monitor port is the HDMI port found in all modern TVs and
computer monitors.
There is also a VGA port if you need to connect a PC monitor from a few years ago.
DVRs / NVRs are factory programmed to provide low resolution (1280x1024) to be compatible with all monitors. Once you have
connected the monitor and started the DVR / NVR, you should increase the resolution of the video output up to the maximum supported
by your monitor (usually FullHD 1920x1080 or 4K 3840x2160).
If starting the DVR / NVR you only see the DSE logo and then nothing more, it is because the monitor does not support the video
resolution of the device. You have to connect another monitor and then eventually change the video resolution in the configuration
DSE SRL - ITALY - WWW.DSE.EU

INSTALLATION MANUAL
RK SERIES - DVR and NVR
Page: 10
Remember that the HDMI cable cannot be longer than a few meters. To connect a remote monitor from the NVR you need to use an
HDMI transmission device.
DSE SRL - ITALY - WWW.DSE.EU
Autres manuels pour RK Series
8
Table des matières
Autres manuels DSE DVR

DSE
DSE DK-CS4-HDS Manuel utilisateur

DSE
DSE DK-PV500W Manuel utilisateur

DSE
DSE DK-CS4-DVR Manuel utilisateur

DSE
DSE DH Series Manuel utilisateur

DSE
DSE G1680 Manuel utilisateur

DSE
DSE DR-N16 Manuel utilisateur

DSE
DSE DX Series Feuille d'instructions

DSE
DSE RK Series Feuille d'instructions

DSE
DSE DR-N8 Manuel utilisateur

DSE
DSE MV Series Manuel utilisateur


