Afinia 3D H800+ Manuel utilisateur

H800+ 3D Printer
Version 1.1

Afinia H800+ 3D Printer User’s Manual
2

Afinia H800+ 3D Printer User’s Manual
3
TABLE OF CONTENTS
Safety Precautions .................................................................................................................. 5
Protecting the Printer .............................................................................................................. 5
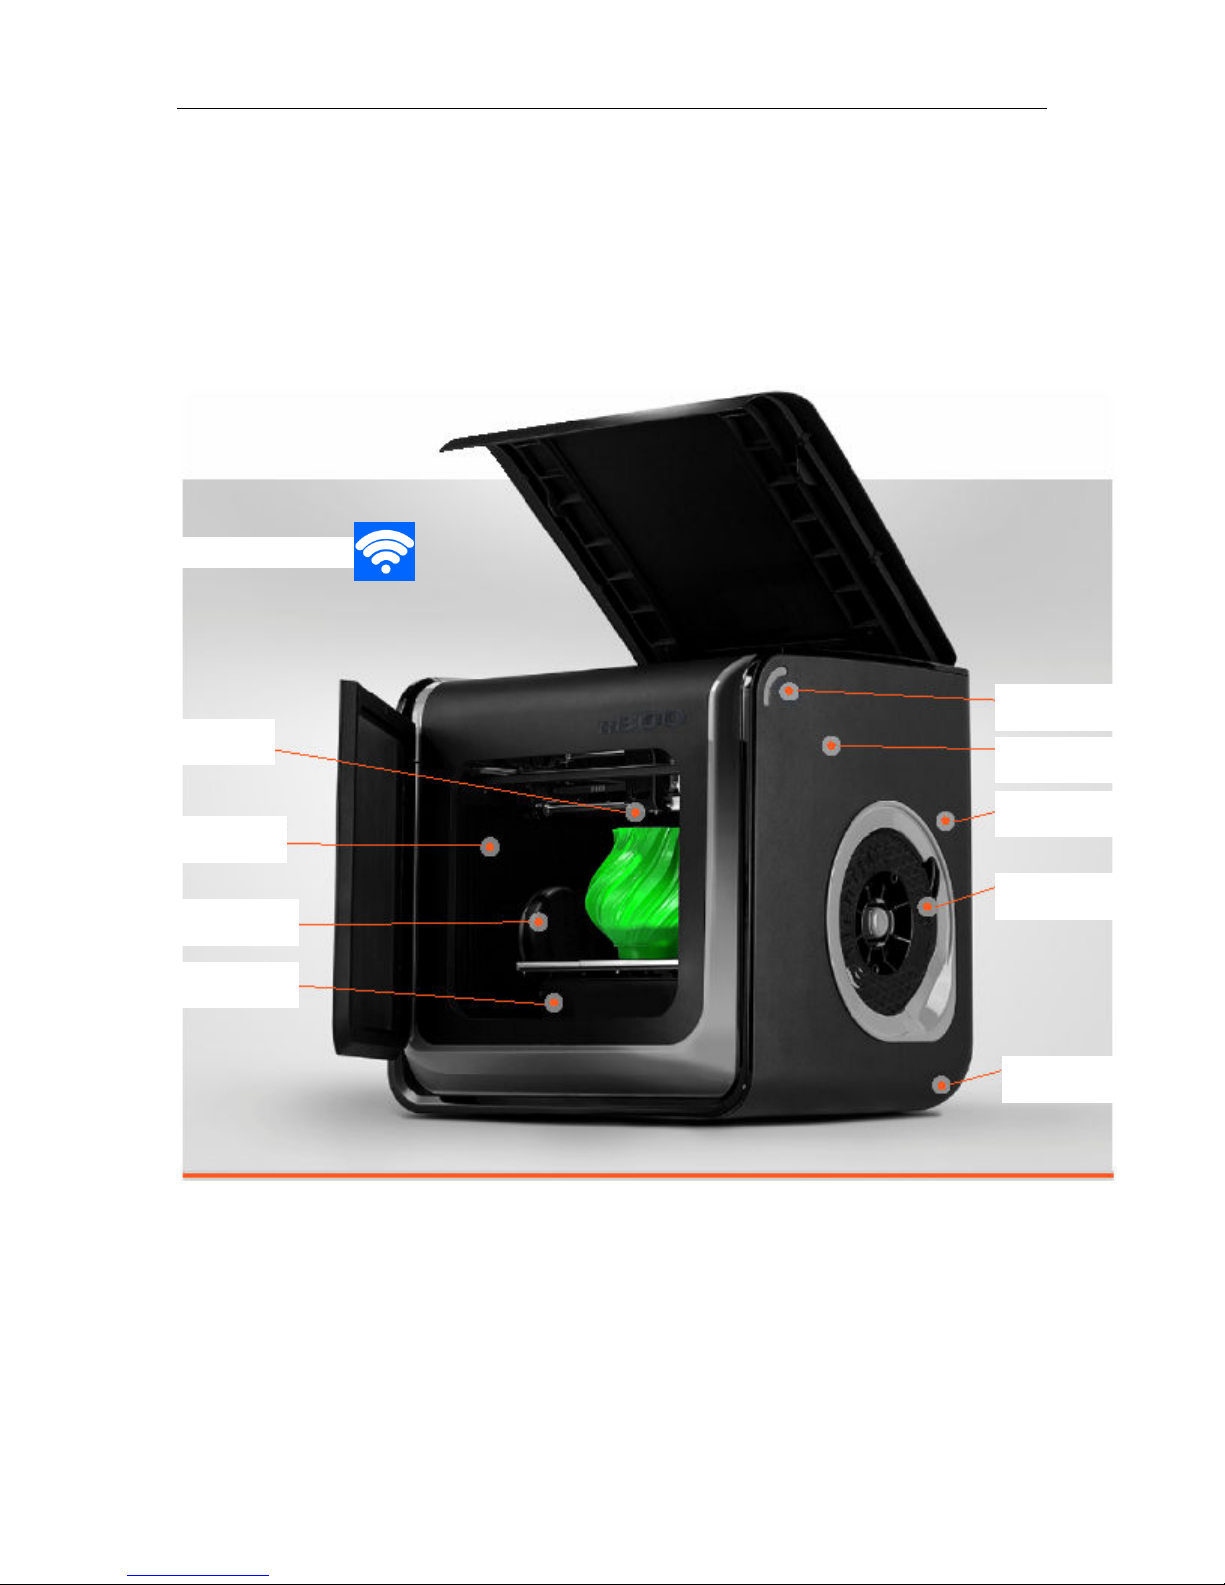
Overview ................................................................................................................................... 6
Unpacking the Afinia H800+ 3D Printer ............................................................................................. 8
The Print Head ................................................................................................................................... 9
The Control Button .......................................................................................................................... 9
nstalling the Afinia H800+ 3D Printer .................................................................................. 10
Driver and Software In tallation ...................................................................................................... 10
In talling the Printer ........................................................................................................................ 10
Loading the Filament Spool ............................................................................................................. 11
Preparing the Platform .................................................................................................................... 12
Software and Printer Settings .............................................................................................. 13
Starting the Studio Program ............................................................................................................ 13
Changing the Language ................................................................................................................... 14
Selecting the Printer ........................................................................................................................ 14
Wi-Fi Setup ............................................................................................................................... 14
Ver ion Management ...................................................................................................................... 15
Getting Ready to Print ........................................................................................................... 16
The Calibration Window .................................................................................................................. 16
Leveling the Print Platform ....................................................................................................... 16
Platform Calibration ................................................................................................................. 17
Nozzle Height Calibration ......................................................................................................... 18
The Maintenance Window .............................................................................................................. 19
Adding Cu tomized Material .................................................................................................... 19
Loading a 3D Model ......................................................................................................................... 20
Basic Printing ......................................................................................................................... 21
Printing a 3D Model ......................................................................................................................... 21
Infill Type ................................................................................................................................. 21
Print Progre .................................................................................................................................. 22
Pau ing or Stopping a Print ............................................................................................................. 22
Advanced Printing ................................................................................................................. 23
Loading Multiple Model ................................................................................................................. 23
Right-click Menu .............................................................................................................................. 23
Model Wheel, Menu Level 1 ........................................................................................................... 24
Rotation .................................................................................................................................... 24
Movement ................................................................................................................................ 25
Scaling ...................................................................................................................................... 26
Auto Placement ........................................................................................................................ 26
Undo ......................................................................................................................................... 26
View ........................................................................................................................................ 27
Model Wheel, Menu Level 2 ........................................................................................................... 27
Fix ............................................................................................................................................. 27
Merge ....................................................................................................................................... 28
Mirror ....................................................................................................................................... 28
Delete ....................................................................................................................................... 28
Save .......................................................................................................................................... 28
Re et to Default ........................................................................................................................ 28
Undo ......................................................................................................................................... 28
Return to Main Menu ............................................................................................................... 28

Afinia H800+ 3D Printer User’s Manual
4
Advanced Print Setting ................................................................................................................... 29
Part Setting ............................................................................................................................. 29
Support Setting ....................................................................................................................... 29
Other Setting .......................................................................................................................... 30
Status ndicator ...................................................................................................................... 31
Filament Check ...................................................................................................................... 31
Power Failure Recovery ........................................................................................................ 31
Converting a 2D Picture into a 3D Model ............................................................................ 32
Model Removal ...................................................................................................................... 33
Maintenance ........................................................................................................................... 34
Changing the Filament..................................................................................................................... 34
Cleaning the Nozzle ......................................................................................................................... 35
Removing / Changing the Nozzle ..................................................................................................... 35
Cleaning the Extruder Gear ............................................................................................................. 36
Cleaning the Platform ...................................................................................................................... 37
Lubrication of Extruder Rail ........................................................................................................... 37
Changing the HEPA Filter ................................................................................................................. 37
Spare part ...................................................................................................................................... 37
Tips & Tricks .......................................................................................................................... 38
Troubleshooting ..................................................................................................................... 40
Specifications ........................................................................................................................ 41
Technical Support .................................................................................................................. 42
Afinia 1-Year Li ited Warranty
Below is the one-year li ited warranty included with this Afinia product. Afinia prides itself on its outstanding
product line and its technical support. If for so e reason, your product fails, Afinia, a division of Microboards
Technology, LLC, stands behind its warranties and assures you the best service possible in a quick and ti ely
anner.
Afinia warrants to the original purchaser that this product is free fro defects in aterial and work anship.
Afinia will for one year, at its option, repair or replace at no charge for parts and labor fro the date you
purchased the product fro an authorized Afinia reseller. Nozzles and Cell/Perf Boards are warranted for
ninety (90) days.
• Warranty registration ust be co pleted within 30 days of receipt of the product in order to validate the
warranty.
• Afinia, a division of Microboards Technology, LLC, reserves the right to deter ine the validity of all warranty
clai s.
• Warranty is void if the product serial nu ber has been altered or re oved.
• Warranty is void if the product has been isused or da aged or if evidence is present that the product was
altered, odified, or serviced by unauthorized service people.
The above stated warranty is exclusive and replaces all other warranties, express of i plied, including those of
erchantability and fitness for a particular purpose. Afinia, a division of Microboards Technology, LLC, will not
be liable for any other da ages or loss, including incidental or consequential da ages and loss of profits or
revenues fro whatever cause, including breach of warranty or negligence.
This product has been thoroughly tested and inspected at the factory prior to ship ent. Nevertheless, inspect
your product co pletely for any da age or loss of parts that ay have occurred during ship ent. Notify the
delivering carrier pro ptly if da age clai s are to be filed.
Afinia reserves the right to odify or update its product without obligation to replace any equip ent delivered
prior to any such change.
To register your warranty, please visit www.afinia.com/register

Afinia H800+ 3D Printer User’s Manual
5
Safety Precautions
Please read this section carefully before using the printer.
• The printer can only be used with the power adapters supplied by this co pany, or the
product ay be da aged, with a risk of fire.
• To avoid burning or odel defor ation, do not touch the odel, nozzle, or the platfor by
hand or any other part of the body while the printer is working or i ediately after it has
finished printing.
• Protective glasses should always be worn when re oving support aterial, especially
PLA.
• There is a slight s ell fro ABS when it is being extruded. A well-ventilated roo is
reco ended; however when printing, keep the printer away fro any drafts as this can
affect the warping of ABS prints.
• When ABS is burnt it releases toxic fu es. Never set the nozzle te perature high enough
to burn the aterial.
The following classifications are used in this manual:
CAUTION: Indicates a potentially hazardous situation which, if not avoided, ay
result in inor or oderate injury.
WARNING: Indicates a potentially hazardous situation which, if not avoided, ay
result in serious injury.
GLOVES: When perfor ing certain aintenance procedures, the achine ay
be hot and gloves are required to avoid burns.
SAFETY GLASSES: Wear safety glasses to avoid injury to your eyes.
Protecting the Printer
• The printer ust not be exposed to water or rain, or da age ay occur.
• Do not shut down the Afinia H800+ 3D Syste or pull out the USB cable when loading a
digital odel or the odel data ay be lost.
• When using the “Extrude” function, keep at least 50 between the nozzle and the
platfor . If too close, the nozzle ay get blocked.
• The printer is designed to work properly at an a bient te perature of between 60°F and
85°F and hu idity of between 20% and 50%. Operating outside these li its ay result in
low quality odels.

Afinia H800+ 3D Printer User’s Manual
6
Overview
The Afinia H800+ was designed specifically for educators and professionals looking for fast,
hassle-free 3D printing with exceptional quality. The Afinia H800+ boasts a host of features, fro
Wireless Connectivity, user-friendly software and auto atic leveling, to paper-thin layer HD
resolution with a heated build platfor and an out-of-fila ent sensor. Everything about this
printer is geared towards creating high standard professional 3D odels.
Print a working bearing in one design, ake a part for a dishwasher or just unleash your creativity
and bring your designs to life with your new Afinia H800+.
The Studio software sends the print data fro a Mac or PC to the Printer either over a single USB
cable or by wireless connection. The Extruder delivers the Fila ent fro the Spool into the Nozzle,
which heats the fila ent to printing te perature and deposits it on the Platfor .
100 Micron
High
-
Definition Detail
Large 10” x 8” x 8”
Build
Platfor
HEPA Air
Filtration Syste
Fully Auto ated
Calibration
Easy Fila ent
Replace ent
S art Support
Technology
One
-
Button Fila ent
Change
-
out
51dB
-
Quiet
and Fast!
Out
-
of
-
Fila ent
Sensor
Wireless Connectivity

Afinia H800+ 3D Printer User’s Manual
7
The Afinia H800+ with HEPA filter is packed with advanced technologies in a stylish and robust
design.

Afinia H800+ 3D Printer User’s Manual
8
Unpacking the Afinia H800+ 3D Printer
The Afinia H800+ 3D Printer weighs over 40 pounds and should be
tea -lifted!
Re ove the power cord and 4 perf boards fro the top foa piece.
Re ove top foa fro the box. Lift the foa ring fro around the printer.
With two people, carefully lift the Printer fro the box.
Lift the foa sheet below the printer and re ove the Accessory Pack,
Power Supply, Putty Knife, and Snipping Pliers.
Lift the top cover and carefully lift out the foa above the platfor .
Open the front door and carefully re ove the two pieces of foa fro
under the platfor . Tip each foa piece back until it is lying flat, then
turn the foa counter-clockwise until the left end of the foa is through
the door.
Use the snipping pliers to carefully cut the 6 labeled
retaining strap loops fro around the Print Head rails
near the top of the printer.
Cut only the straps!
Next, check the Accessories:
• Reel of Fila ent (1, Natural/White)
• Power Supply
• USB Cable
• Extra Nozzle
• Nozzle Wrench
• Hex Wrenches
• Putty Knife
• Snipping Pliers
On top foa :
• Power Cable
• 1 Flex Board
• 2 Perf Boards

Afinia H800+ 3D Printer User’s Manual
9
The Print Head
The Print Head is already installed in the Printer. You do not need to do any asse bly.
The Control Buttons
You can do a lot with your Afinia H800+ by using the Control Buttons, so it follows your every
co and.
You also use the Afinia software to control the Afinia H800+.
Fila ent Button
Power Button Pause Button
Auto atic Leveling Probe
Printhead Locking Screw
Nozzle Fan Duct
Fans Fila ent feed
Fan Baffle

Afinia H800+ 3D Printer User’s Manual
10
nstalling the Afinia H800+ 3D Printer
You will need the USB Cable, Power Supply and Cable, and Fila ent Spool to co plete the Afinia
H800+ 3D Printer installation.
Driver and Software nstallation
For PC installation, go to the Support Section of www.afinia3d.co to download the latest version
of the Studio installer.
Double-click the setup.exe file to install the software. (The default installation path is C:\Progra
Files\Studio\). A pop-up window will appear. Select "Install" and follow the instructions to finish.
The printer drivers will be installed along with the software.
The Mac version of the Studio installer can only be obtained through Apple App Store.
nstalling the Printer
Connect the power adapter as shown with the flat side out and turn
on the power switch.
Long Press the Power button on the control panel to initialize the
printer.
Connect the printer to your co puter using the supplied USB cable.
The Printer will be recognized and auto atically installed when it is connected to
your PC or Mac.
You can also initialize the printer fro the Studio software.
U B connection
Autres manuels pour H800+
1
Table des matières
Autres manuels Afinia 3D Imprimante 3D


