Zoning NETBOX Manuel utilisateur

Cloud NETBOX Communication Gateway
Configuration and User Guide

Contents
1. Descripción..........................................................................................................................................3
2. Antes de empezar..............................................................................................................................3
3. Inicio.....................................................................................................................................................4
3.1. Instalación del dispositivo.........................................................................................................4
3.2. Configuración Wi-Fi. ..................................................................................................................4
3.3. Configuración de la aplicación local........................................................................................8
3.4. Registro de usuario..................................................................................................................10
3.5. Menú configuración avanzada...............................................................................................12
3.5.1. Reinicios ............................................................................................................................12
3.5.2. Usuario local......................................................................................................................12
4. Uso de la aplicación.........................................................................................................................12
4.1. Comandos de control del equipo de climatización..............................................................12
4.2. Comandos de control de zona...............................................................................................14
5. Configuración de la aplicación Cloud............................................................................................15
5.1. Comandos de configuración de la central............................................................................15
5.2. Comandos de configuración de zona....................................................................................15
6. Programación calendario anual.....................................................................................................16
7. Gestión de usuarios.........................................................................................................................19

1. Description.
The Netbox device is an external module that connects the Zity central zoning unit to your Wi-Fi
network for remote control via a friendly interface.
The contents include:
Power supply with 2.5 A 5.1 V European and British plug, Micro USB B and 1.5 m
cable.
Netbox device.
The Netbox device consists of a Modbus Rs485 connector, two LEDs for monitoring signal
transmission and reception and a power connector.
Figure 1: Netbox device.
2. Before you start.
Before you start the installation and configuration process, please make sure you have the
following:
1. Internet Access.
Netbox requires an Internet connection during the registration process and also during
normal operating mode.
2. Device with Internet access and Wi-Fi connection.
It requires a device with Internet access (1) and Wi-Fi connection (desktop PC, laptop,
Smartphone or tablet). This device must be connected to the same Wi-Fi network where the
Netbox device will be installed.
Make sure your device supports at least one of the following browsers(2).
Internet Explorer
9.0 or above
Mozilla Firefox
10.0 or above
Google Chrome
V8 or above
Safari
4.0 or above
Power connector
Modbus Rs485 connector

___________________________
1The costs related to Internet access are not included in the price of the Netbox.
2Users who have previous versions may experience incorrect operation or misaligned images, buttons and icons on the
interface. Please update your browser to reach our minimum requirements.
3. Start.
In order to start enjoying your device, you need to install and register the device to acquire a
user account. Below you will find a step-by-step guide to perform all these actions.
3.1. Installation of the Device.
Place the Netbox device in its final location, connect the power supply and the Modbus Rs485
connector, as shown in the following diagram.
Figure 2: Diagram to connect the Netbox device to the Zity central unit.
3.2. Wi-Fi Configuration.
To link the Netbox interface in the local network to which the device will be connected, follow
these 3 steps:
The Netbox generates a temporary Wi-Fi network "zoningwifi"
The PC, tablet or smartphone used for its configuration, and which is connected to the local Wi-
Fi network, is temporarily disconnected and connected to the temporary network "zoningwifi".
An application is opened in any of the compatible browsers to assign a Netbox IP in the range
of the local network router's IP.
Once the previous steps are complete, the PC, tablet or smartphone automatically reconnects
to the network where it was connected and the Netbox interface is now registered in your local
network. Proceed following the steps described below:
Once installed and powered, please proceed with the Wi-Fi configuration, following the steps
described below:
1. Select the wireless network generated by the Netbox device. The name of this network
starts with “zoningwifi”followed by 12 characters separated by “:”, which correspond to the
device's MAC.
The password for this temporary network is Zoe123Zoe”

Figure 3: Selection and connection of the wireless network generated by the Netbox device.
2. Link the Netbox device in the local Wi-Fi network: Open one of the browsers compatible
with the Netbox device and access its configuration webpage (http://192.168.44.1:88). Next,
select from the list the Wi-Fi network to which the Netbox will be linked.
Figure 4: Local network to which the Netbox will be connected.
The following Wi-Fi configuration modes are allowed. To change from one type of connection
to another, click on the connection type button.
Auto (recommended method): Where the Netbox device's IP address is assigned
automatically by the router.
Static: Where the assignment of the IP address, subnet mask and the router access
address must be specified. In this type of connection, you must take special care when
selecting the Netbox device's IP address. You must choose an address that is not being
used by any other device.
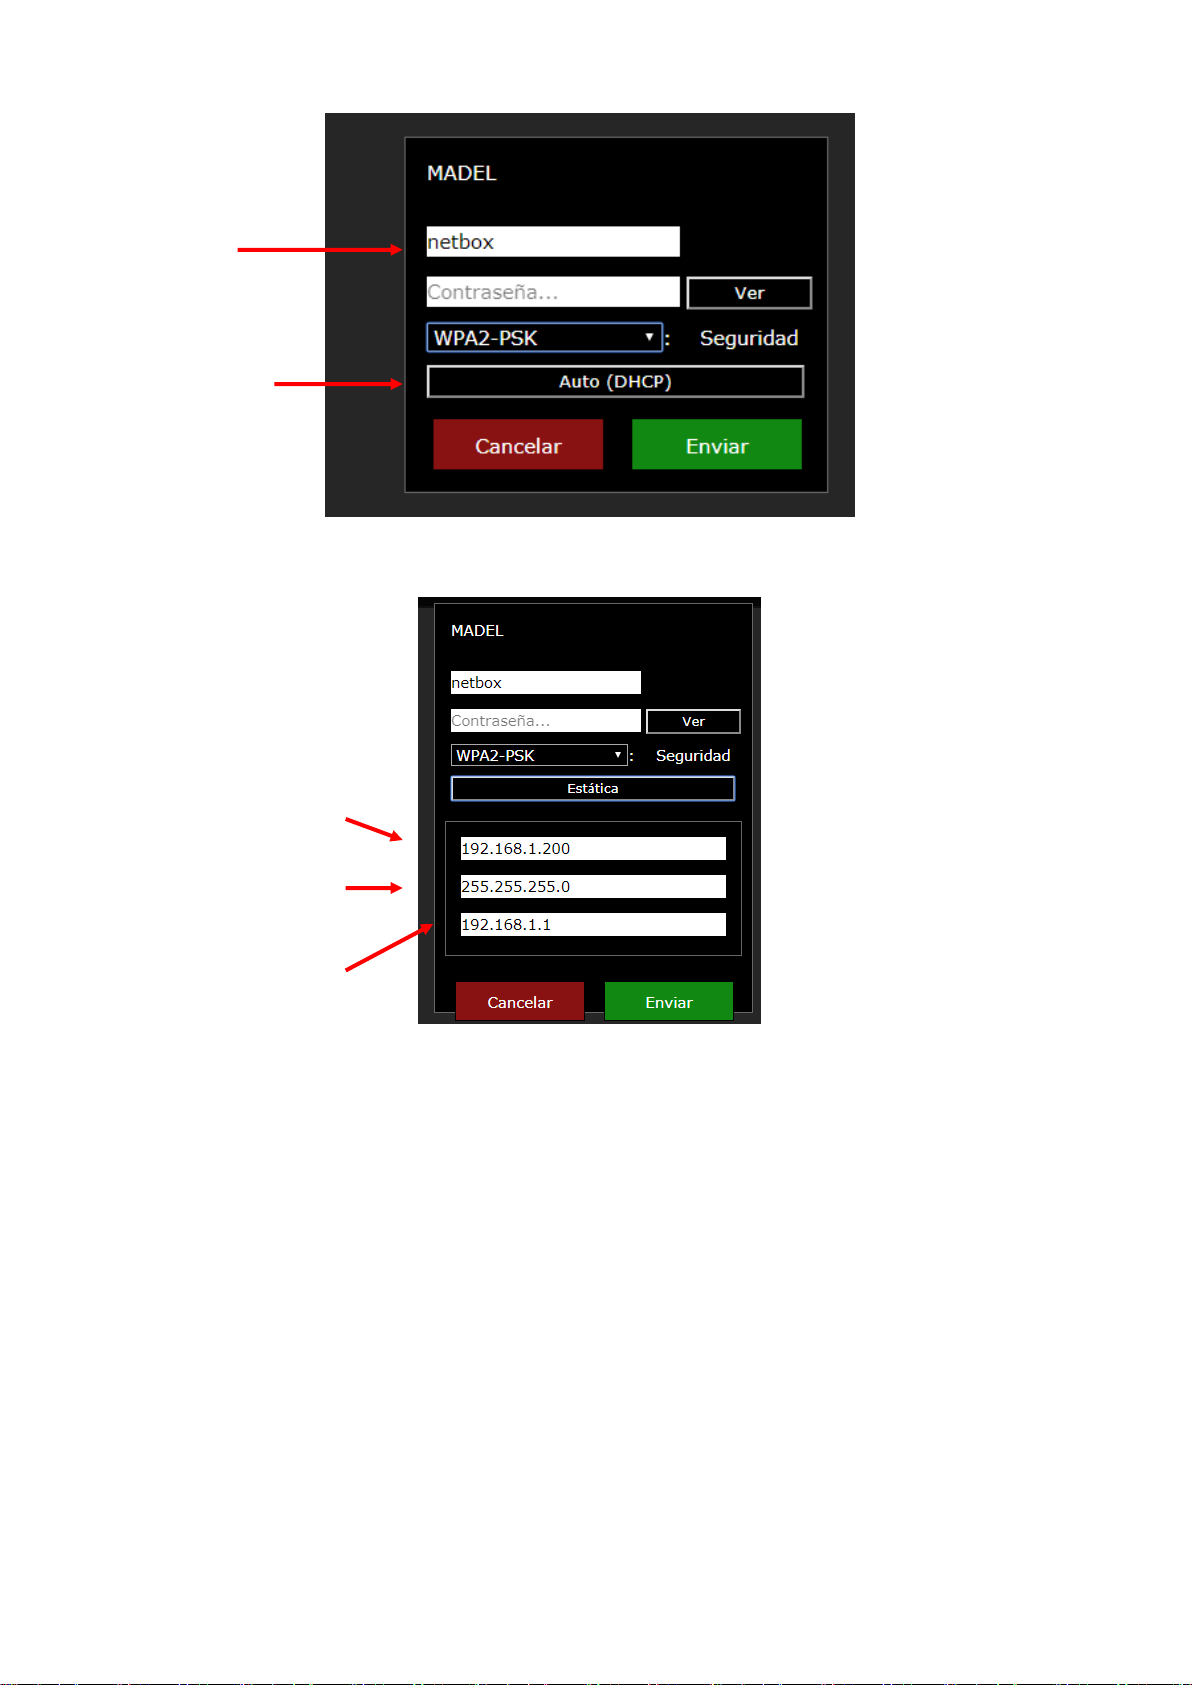
Figure 5: Automatic configuration of the Wi-Fi network.
Figure 6: Static configuration of the Wi-Fi network.
The name of the device will be the identifier that you will use later to access the web
application. It is important to remember the identifier used. In any case, it is recommended to
maintain the default name given (netbox). However, you must take into account that two
devices connected to the same Wi-Fi network cannot have the same identifier. In these cases,
it is recommended to number them (netbox1, netbox2, etc.).
3. Connect to the local Wi-Fi network: Enter the password of the Wi-Fi network to which it is
connected and press the send button. A status bar will appear at the top of the window
indicating the evolution of the Wi-Fi configuration process. Once complete, a popup window
will appear indicating it, see Figure 8.
Device
ID name
Connection type
IP Netbox
Subnet mask
Router access
address

Figure 7: Netbox device Wi-Fi configuration process.
Figure 8: Completion of the Netbox device configuration process.
At this point, the device used (desktop PC, laptop, smartphone or tablet) must automatically
reconnect to the Wi-Fi network of the home or premises. Check that this is the case, and if not,
connect it manually. This way, both devices (PC and Netbox), will be connected to the same
Wi-Fi network.
Figure 9: Connection of the device with internet access used, to the same Wi-Fi
network where the Netbox device has just been connected.
Status bar

4. Complete the process and move on to configure the application:: Wait between 3 and 5
minutes, open a WEB browser at the following address http://netbox/#/. (or the name that has
been assigned during the configuration process) The PC should connect to the application's
configuration webpage.
3.3. Configuration of the local application.
Once the Wi-Fi connection has been made, the installation must be configured in local mode
before making the connection to the cloud.
1. As shown in Figure 10, the Web application home page will appear. Initially, the username and
password are the following:
Username: admin
Password: admin
Figure 10: Web application home page.
2. A predefined building will appear in the main window. “Building 1”. You can change its name
by clicking on the edit button next to the name of the building . Once the new name of the
building has been defined, click on the name confirmation button .
Figure 11: Definition of the building name.

3. Press the button to add a new central unit, and two fields will appear:
Desc: To write the name of the new central unit.
Modbus: You must write the Modbus IP address that appears on the front label of
the Zity control panel.
Figure 12: Front label of the Zity central unit.
Once the two previous parameters have been defined, press the button that appears next
to the Modbus number.
Figure 13: Process to add a new central unit.
4. Wait between 3-5 min and press the arrow that appears next to the Modbus number on the
central unit . This way, the system control commands and zones associated with the Zity
central unit will appear automatically. The control commands are described in the 4section of
this document.

Figure 14: Control commands menu .
5. In the top left-hand corner of the system's command control window, the following icon should
appear . If this icon does not appear at any time, go to the configuration menu on the left of
the application , and press the base button. By pressing this button, the application takes
us back to the building menu. At this point, press F5 and enter the application again.
3.4. User register.
After configuring the Netbox device's Wi-Fi connection, all you need to do now is register the
user of the application. To do this, follow the instructions listed below.
1. Press the configuration button that appears to the left of the application
2. In the “Cloud User”submenu , press the “Create a new user”button. Next, fill in the required
fields and press the confirmation button .
Figure 15: Registering a new user.
3. You will receive an email with a verification code. Enter it in the “Validation code”field and
press the confirmation button .
Table des matières
Manuels Porte populaires d'autres marques

LST
LST M500RFE-AS Manuel utilisateur

Kinnex
Kinnex Media Gateway Manuel utilisateur

2N Telekomunikace
2N Telekomunikace 2N StarGate Manuel utilisateur

Mitsubishi Heavy Industries
Mitsubishi Heavy Industries Superlink SC-WBGW256 Manuel utilisateur

ZyXEL Communications
ZyXEL Communications ZYWALL2 ET 2WE Manuel utilisateur

Telsey
Telsey CPVA 500 - SIP Manuel utilisateur


