Z-EDGE Z3Pro Manuel utilisateur

BEDIENUNGSANLEITUNG
USER GUIDE
Z3Pro

English 1
Deutsch 18
CONTENTS / INHALTSVERZEICHNIS

Table of Contents
1 Introduction .................................................................................................................................... 2
1.1 Features ................................................................................................................................. 2
1.2 What's in the Box .............................................................................................................. 2
1.3 Product Overview ............................................................................................................. 3
2 Getting Started .............................................................................................................................. 4
2.1 Inserting the Memory Card ......................................................................................... 4
2.2 Installation ............................................................................................................................ 5
2.3 Adjust Device Position ................................................................................................... 6
2.4 Connecting to Power ...................................................................................................... 6
2.5 Powering the Dash Cam ............................................................................................... 7
2.6 Set Date & Time ................................................................................................................ 7
3 Using the Car Dash Cam .......................................................................................................... 8
3.1 Recording Videos ............................................................................................................. 8
3.2 Recording Screen ............................................................................................................. 8
3.3 Adjusting the Settings .................................................................................................... 9
3.4 Loop Recording ................................................................................................................. 9
3.5 Emergency Video Protection ...................................................................................... 9
3.6 Motion Detection ........................................................................................................... 10
3.7 Vibration Detection ....................................................................................................... 10
3.8 Taking a Snapshot ......................................................................................................... 10
3.9 Playback Videos & Photos ........................................................................................ 10
3.10 Managing Video & Photo Files ............................................................................ 11
3.11 GPS ...................................................................................................................................... 11
3.12 Night Vision .................................................................................................................... 12
4 Menu Overview .......................................................................................................................... 12
5 FAQs ................................................................................................................................................. 14
6 Customer Support .................................................................................................................... 14
7 Warranty ......................................................................................................................................... 15
8 Product Specifications ............................................................................................................ 16
-1-
-2-
1 Introduction
Welcome to the Z3Pro car dash cam. Protect you and your vehicle with real-time
video and audio recording whilst you're driving. Featuring a stealth size design
and dual-lens for recording front and back. Please read this manual carefully
before using this product. We hope you enjoy using this product.
1.1 Features
• Full HD 1920 x 1080P
• 2.0" LCD Color screen
• Up to 150-degree wide angle lens
• Built-in G-Sensor
• Motion Detection
• Audio Recording
• Night Vision
• GPS
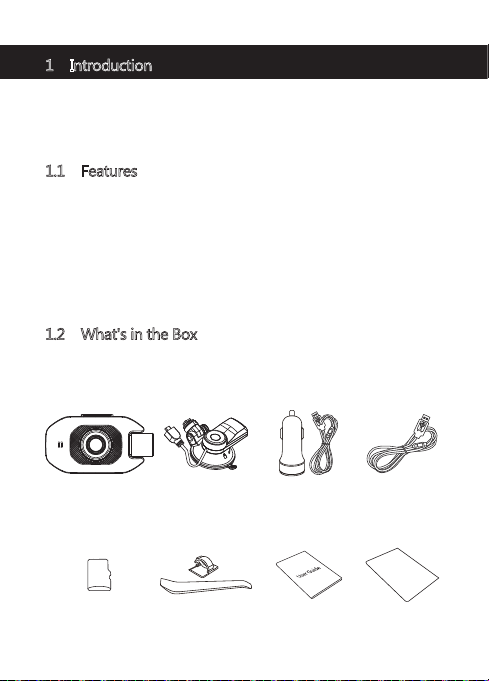
1.2 What's in the Box
Car Dash Cam Car Charger with
USB Cable
Car Mount with
Built-in GPS
User Guide
TF / Micro SD
Card
Micro USB
Cable
Thank You CardHand Tool &
Cable Clip x6
-3-
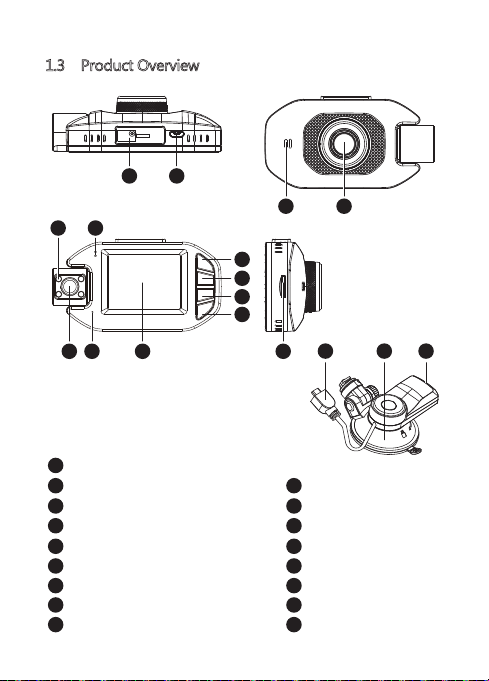
1.3 Product Overview
1
2
3
4
5
6
7
8
9
Suction Mount Slot
Micro USB Port
Power/Menu Button
Up Button
Down Button
OK Button
Display Screen
Mic
Rear Camera
10
11
12
13
14
15
16
17
IR LCDs
LCD Indicator
Speaker
Lens
TF/Micro SD Card Slot
USB Cable
Suction Cup Mount
GPS USB Port
3
4
5
6
15 16 17
1
714
12 13
9
10 11
8
2

-4-
2 Getting Started
2.1 Inserting the Memory Card
Insert the memory card, with the pins facing
towards the display, until it clicks into place.
Remove Memory Card
Push the edge of the memory card inward until you feel it click, then allow it to
push out until you can remove it from the slot.
WARNING:
It is recommended to format the memory card before initial use. Please note
that all data saved on the memory card will be erased after formatting.
Note:
• Supports Micro SDXC cards up to 128GB (Class 10 or above).
• Do not remove or insert memory card whilst the device is powered on -
this may damage the memory card.
Storage Capacity Video Recording Time
For reference only
8GB
16GB
32GB
64GB
128GB
45min
90min
180min
360min
720min

-5-
2.2 Installation
Please follow the below instructions for mounting your dash cam to your
vehicles windshield:
1. Slide the car mount into the slot on top of the device until a click sound is
heard.
2. Peel off the protective plastic backing from the suction-cup.
3. Press the suction-cup firmly against your windshield, and rotate the lever
clockwise (12 o'clock) to secure.
WARNING:
Do not install the device on a tinted window - doing so may damage the tint
film.
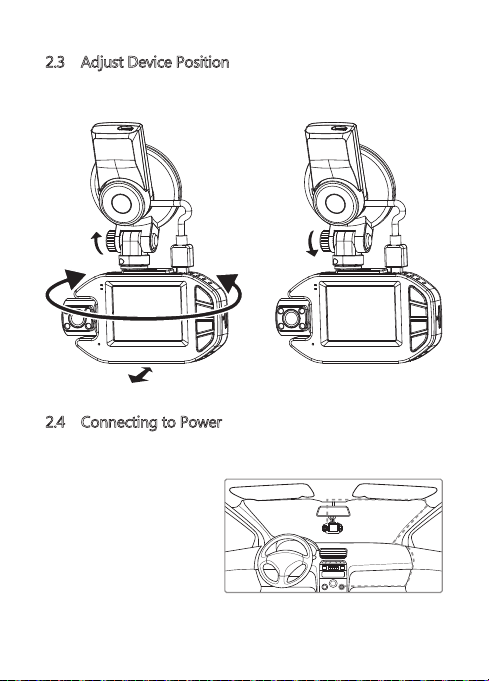
2.3 Adjust Device Position
Loosen the nut to swivel the device vertically. Click into place and secure by
tightening the nut. Rotate the device horizontally for a clear view.
2.4 Connecting to Power
Use only the supplied car charger to power the dash cam and charge the
built-in battery.
1. Plug the USB cable (15) on the
car mount into the car
dash cam's USB connector (2).
2. Plug one end of the USB
charging cable into the USB
Connector on the car mount (17).
3. Plug the other end into the car
charger, and insert that into
your vehicles lighter socket.
-6-
-7-
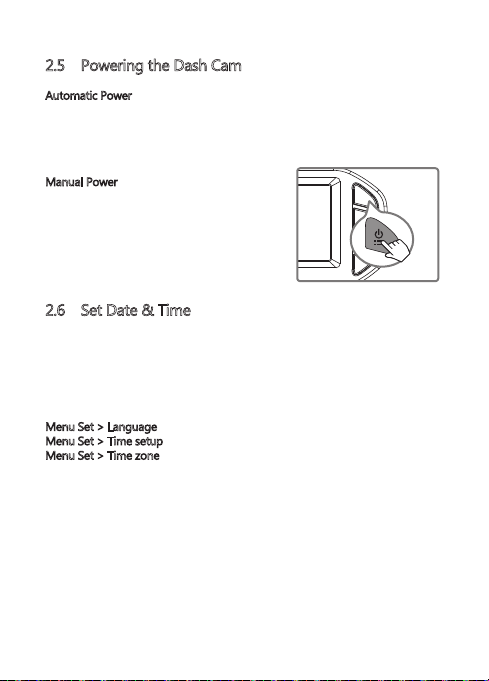
2.5 Powering the Dash Cam
Automatic Power
• Once the vehicle's engine is switched on, the dash cam will automatically
power on.
• When the vehicle's engine is switched off, the dash cam will automatically
save the recording and power off.
Manual Power
• To manually turn the power on, press and
hold the 'Power/Menu' button (3) for 3
seconds.
• To manually turn the power off, press and
hold the 'Power/Menu' button (3) for 3
seconds.
2.6 Set Date & Time
The first time you turn the camera on, the boot guide will appear. Please set the
language, time zone, date and time.
(Note: Set the correct time zone, the device will automatic calibration time
when the outdoor GPS signal is good)
You can also set it in the settings menu:
Menu Set > Language
Menu Set > Time setup
Menu Set > Time zone
Before using the device, we recommend you set the correct date and time:
• If the device is recording, short press the 'OK' button (6) to stop and enter
video Mode.
• Press the 'Power' button (3) to enter the Settings menu.
• Press the 'Up' and 'Down' buttons (4 & 5) to select Time setup and press 'OK'
button (6) to confirm. Adjust the date and time settings using the 'Up' ,
'Down' and 'OK' buttons (4,5,6)
• With all fields correct, press the 'OK' button (6) to save and exit the menu.

-8-
3 Using the Car Dash Cam
3.1 Recording Videos
With an SD card inserted and the device connected to power, when the car
engine is switched on the dash cam will automatically power on and start
recording. When the vehicle engine is switched off, the dash cam will
automatically save the recording and power off.
Alternatively, short press the 'OK' button (6) to stop/start video recording
manually.
3.2 Recording Screen
No. Item Description
Recording Flashing red light indicates device is recording with
time showing current duration of recording.
GPS Indicates if the GPS is connected.
Video Protection Indicates if video protection is active. Press
'Power/Menu' button (3) to activate when recording.
Resolution Indicates current resolution settings.
Loop Recording Indicates loop recordings length 1, 3 or 5 minutes.
1
4
5
Audio recording Indicates if audio recording active, press 'Down'
button (5) to turn on/off when recording.
7
2
3
1 2 3 4
12
66
5
7
8
9
10
11
6Press 'Up' button (4) to enter camera mode.
Camera button
Table des matières
Langues :
Autres manuels Z-EDGE Caméra embarquée

Z-EDGE
Z-EDGE Z3 Manuel utilisateur

Z-EDGE
Z-EDGE Z3D Manuel utilisateur

Z-EDGE
Z-EDGE T3 Manuel utilisateur

Z-EDGE
Z-EDGE Z3D Manuel utilisateur

Z-EDGE
Z-EDGE R1 Manuel utilisateur

Z-EDGE
Z-EDGE Z3 Manuel utilisateur

Z-EDGE
Z-EDGE Z3G Manuel utilisateur

Z-EDGE
Z-EDGE Z3 Instructions de montage

Z-EDGE
Z-EDGE S3 Manuel utilisateur

Z-EDGE
Z-EDGE T4 Manuel utilisateur


