XCVario XCStick Manuel utilisateur


Table of Content
1. Description..............................................................................................................................................................3
2. Features....................................................................................................................................................................4
3. Overvie .................................................................................................................................................................5
4. XCSoar Keys...........................................................................................................................................................6
5. LK8000 Keys...........................................................................................................................................................7
6. Installation...............................................................................................................................................................9
6.1. Electrical connections....................................................................................................................................10
7. SW Update.............................................................................................................................................................11
8. DC Po er..............................................................................................................................................................12
9. Technical specifications.........................................................................................................................................12
10. Maintenance........................................................................................................................................................13
11. Warranty Policy...................................................................................................................................................13
12. Permit..................................................................................................................................................................14
13. Limitation of Liability.........................................................................................................................................15
14. CE Declaration of Conformity............................................................................................................................16
Page 2-

1. Description
The XCStick is an ergonomic Arduino SW based ith USB connection and emulates an USB keyboard.
It features a ired USB connection for a stable and latency free connection, has a lo po er consumption, and
mostly orks by plug and play ith optimized default key bindings. T o soft are loads, one for XCSoar and one
for LK8000 are available.
The system hich is manufactured in large numbers is not expensive, comes readily built up and tested, is an
excellent add-on for XCSoar, LK8000 or ith custom key bindings also for other navis that support USB
keyboards, and keeps being extensible by open source soft are and can easily adapted to other systems.
Page 3-

2. Features
•Beech ood or Black Walnut ood remote stick
•1 meter dual t isted pairs PTFE 28 a g ire
•Silicone keypad ith silkscreen printed buttons
•Works ith XCSoar, LK8000 (4 custom programmable key bindings)
•Open Source Arduino programmable (https://github.com/iltis42/XCStick/)
•OTA upgradable
•USB 2.0 Type male Usb Jack ith scre Terminal Plug
•Almost no latency
•Fit's for almost any stick sizes
•19.3mm (DG, LAK, Schempp-Hirth)
•20mm (LS, Stemme, Apis, EB29)
•24mm (Schleicher, Pipistrel Taurus, Alisport Silent, EB28, JS3)
•25.4mm (JS1)
•Other diameters ask
Page 4-

3. Overview
The follo ing overvie sho s the embedding of the XCStick in the cockpit environment.
The standard case is the connection ith XCTouchNav or similar gadget featuring an USB interface. Any of the
USB ports types 2.0 or 3.0 are possible. Recommended is to use one of a USB 2.0 e.g. as provided on rear side of
the XCTouchNav connector field.
Page 5-

4. XCSoar Keys
The follo ing table sho s the keys that are sent. The JOY_.. keys are originated from the 5 joy-stick ay s itch
in the middle left.
The uppermost button opens the Quick Menu to access almost any function that is needed in flight. The red
triangle toggles bet een Alternates and Flarm-Radar screens, as long a GPS signal and Flarm signal is available.
The return key ill exit from the any menu that is entered. The Joystick zooms the map, s itches bet een the
configured screens and provides the enter key. The S2F s itch might be connected to the sticks S2F connector on
the PCB and ill then sent 'S' or 'V' to the navi.
Page 6-
F1: Quick Menu
F6 ↦ F4: Alternates Flarm-Radar↦
ESC: Return, Cancel or Back
UP/DOWN: Zoom in/out
LEFT/RIGHT: S itch Screen
PRESS: ENTER
PTT

. LK8000 Keys
The follo ing table sho s the keys that are sent. The JOY_.. keys are originated from the 5 joy-stick ay s itch
in the middle left.
The uppermost button shifts the bottom info fields of LK8000. The red triangle toggles bet een Cruise, APT
(airport), COMN (task) and TRF (traffic) screens. The return key ill exit from the any menu that is entered. The
Joystick zooms the map (Up/Do n), circles through the different vie s (Left/Right) and provides the enter key.
Page 7-
F1: Bottom Info Next
A: Cruise, APT, COMN, TRF screens
ESC: Return, Cancel or Back
UP/DOWN: Zoom in/out
LEFT/RIGHT: S itch Vie s
PRESS: ENTER
PTT
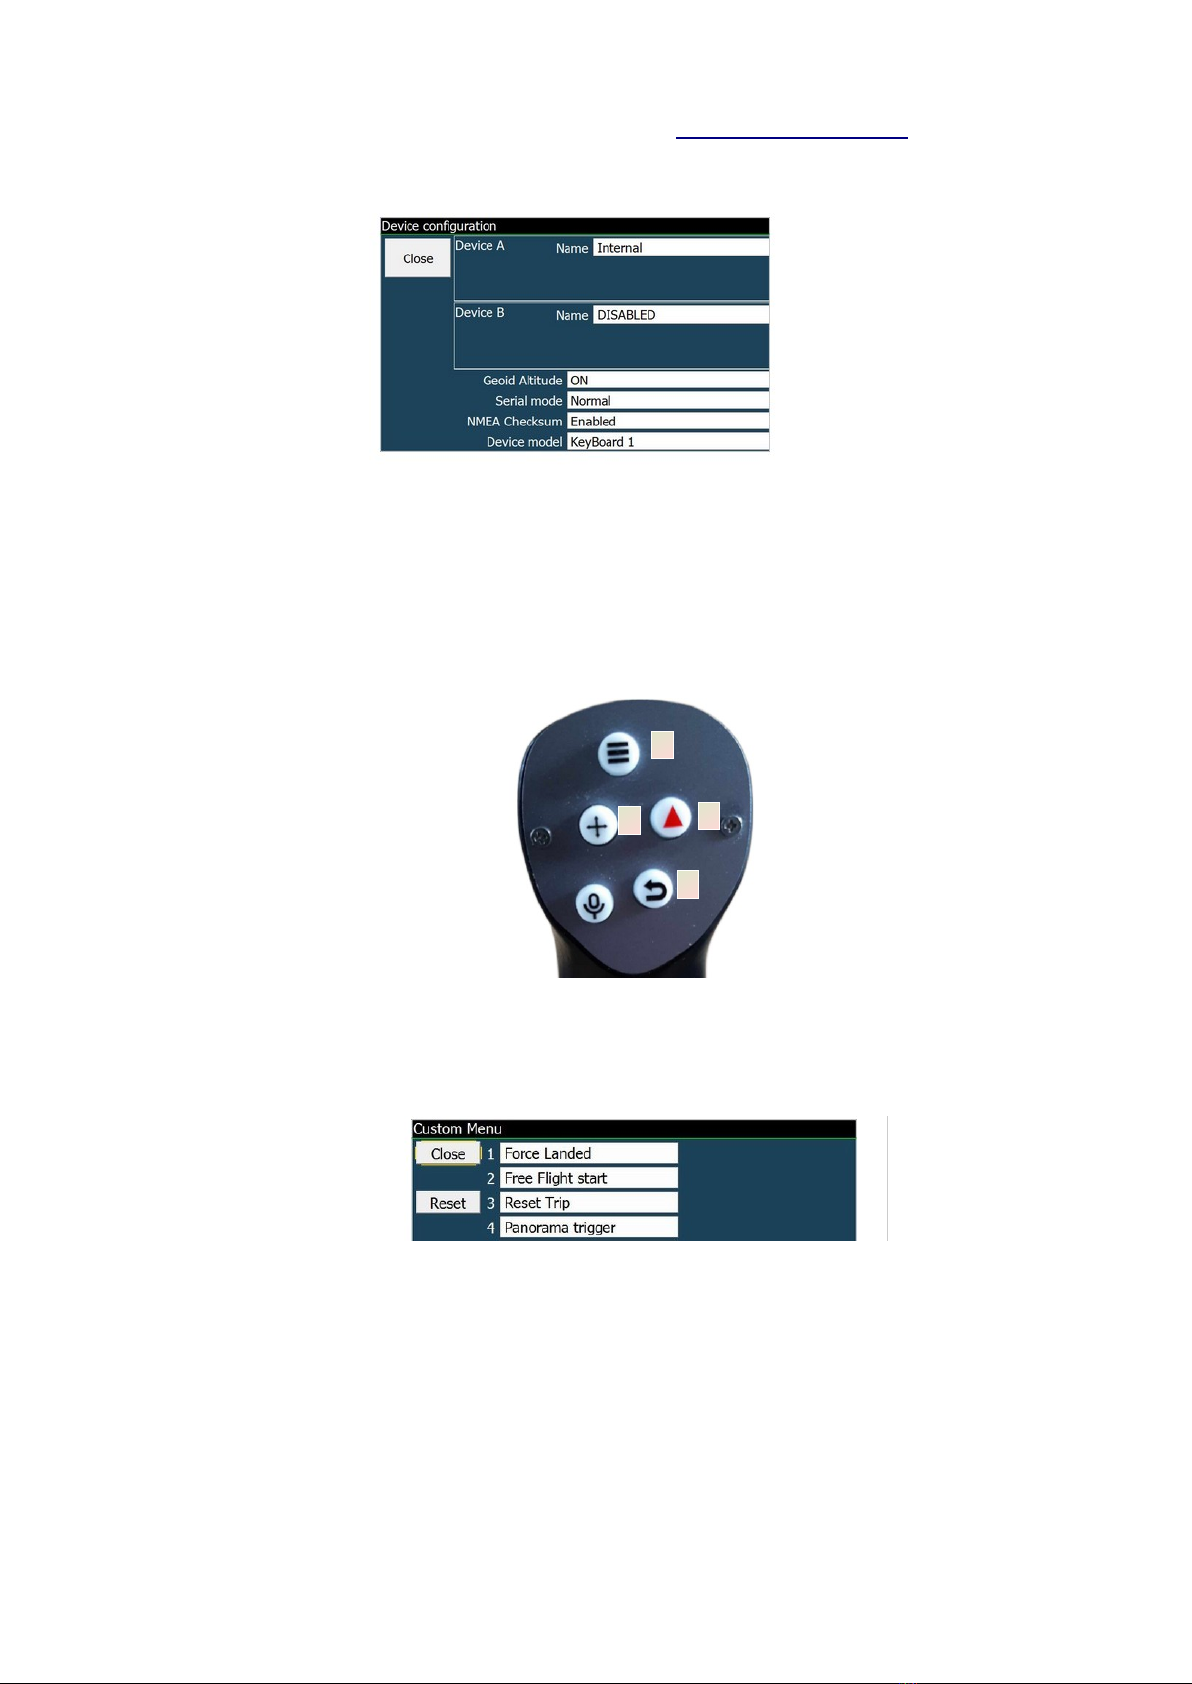
The settings for keyboard 'Device model', see also manual here: LK8000 keyboard setup, is to be set to
"XCREMOTE" instead of "KeyBoard 1" as sho n belo for the correct bindings to a remote stick.
As sho n in the button table on last page, all four key's (except PTT) support longpress, a press longer than 600
milliseconds, that can be mapped to a custom menu. The first entries in the table belo may be customized.
Button numbers are as indicated belo . The "Enter" function, means the press on the 5 ay joy-stick button is
assigned to button number 4.
As an example this setting sho s the LK8000 custom menu ith individual functions that can be reached per
longpress to the corresponding button above.
Page 8-
11
2
3
4

6. Installation
The XCStick can be installed instead of the previous grip onto the naked tube of the stick
in the cockpit. On the bottom there is an inbus scre to fasten to lock the XCStick to the
metal tube. The allen key to turn this scre is part of the delivery.
On Android devices, beside application specific setup, configure the physical keyboard to use the on-screen
keyboard as ell, other ise hen the stick is plugged, the stick is the only input device and you can't enter any
test in your application.
To do so on XCTouchNav go into Settings -> Languages & Input -> Physical Keyboard and check there "Use on-
screen keyboard", as sho n belo .
Page 9-

6.1. Electrical connections
The electrical connections is to be done by the USB-A connector to any USB 2.0 or 3.0 interface. For
XCTouchNav models e recommend to use the serial ttyS3, ttyS7 or ttyS9 USB 2.0 sockets.
In order to be able to get the cable through small holes, in some models to lay the cable there is a 6 mm hole in the
tube to be passed, the cable comes ith an open end. This end can be fit after mounting ith the scre terminal
USB Type A as contained by default.
The shield S is not used. The other cables are to be connected to the pins as sho n belo .
Red goes to +, White to D-, Green to D+ and to Black -
It is also possible to solder an USB-A male connector from a cut USB cable ith the four colors matching to the
XCStick cable after laying the cable.
For other devices, Type B might be applicable, see the corresponding pinout in the Table belo .
Page 10-
Table des matières
Manuels Unité de contrôle populaires d'autres marques

Festo
Festo Compact Performance CP-FB6-E Manuel de la liste des pièces

Elo TouchSystems
Elo TouchSystems DMS-SA19P-EXTME Manuel utilisateur

JS Automation
JS Automation MPC3034A Manuel utilisateur

JAUDT
JAUDT SW GII 6406 Series Guide rapide

Spektrum
Spektrum Air Module System Manuel utilisateur

BOC Edwards
BOC Edwards Q Series Manuel utilisateur


