Velopex Intra-X Manuel utilisateur

Automatic X-Ray Film Processor
WARNING:
Do not plug into the electrical mains power supply before
reading this manual – or before filling the machine with
liquids
Register your machine by returning the Warranty Card
to enable full customer support.
Operation and
Maintenance manual
USER GUIDE
Machine serial number to be
quoted on all correspondence:
Intra - X
Intra - XE

Thank you for purchasing your automatic film processor from
Velopex, we certainly appreciate your business.
In order to maintain the quality of our product and your
processing it is important that you pay close attention to the
following instructions contained in this user’s manual. This will
ensure a long life for your processor.
This manual is to be used with the following Velopex processors:
Intra-X, Intra-XE.
Warranty may be voided if the processor is incorrectly installed
or maintained outside the guidelines set forth in this manual.
Caution: Use assistance when unpacking and
positioning the machine.
Introduction
Contacts
EUROPE
MEDIVANCE INSTRUMENTS LTD.
Barretts Green Road .Harlesden
London .NW10 7AP . UK
Tel.: +44 (0)20 8965 2913
Fax: +44 (0)20 8963 1270
www.velopex.com
USA
VELOPEX INTERNATIONAL INC.
105 East 17th Street . St. Cloud
Florida .34769 . USA
Tel.: 888 - 835 - 6739
Fax: (407) 957 - 3927
www.velopexusa.com
ii
VELOPEX INTRA-X
User Guide

iii
16
Machine Accessories and Extras Supplied
12
13 18
17
15
14
12 Silicone Grease
13 Film Collecting Tray
14 Cleaning Brush
15 Turning Tool
1 Velopex X-Ray Film Processor - Left Side
2Film Collector
3Endo Slide
4On/Off Power Switch
5‘Run’ Button
6Viewer Cover
7Daylight Loader viewing Window
8Hand entry port/Glove
9Daylight Loader - Left Side
10 Film Entry Guide
11 Transport Module
Velopex Processor - Exterior
16 UK - Electricity Supply Cord
17 USA - Electricity Supply Cord
18 Continental - Electricity Supply Cord
7
8
9
10
1
5
2
4
3
6
11
8
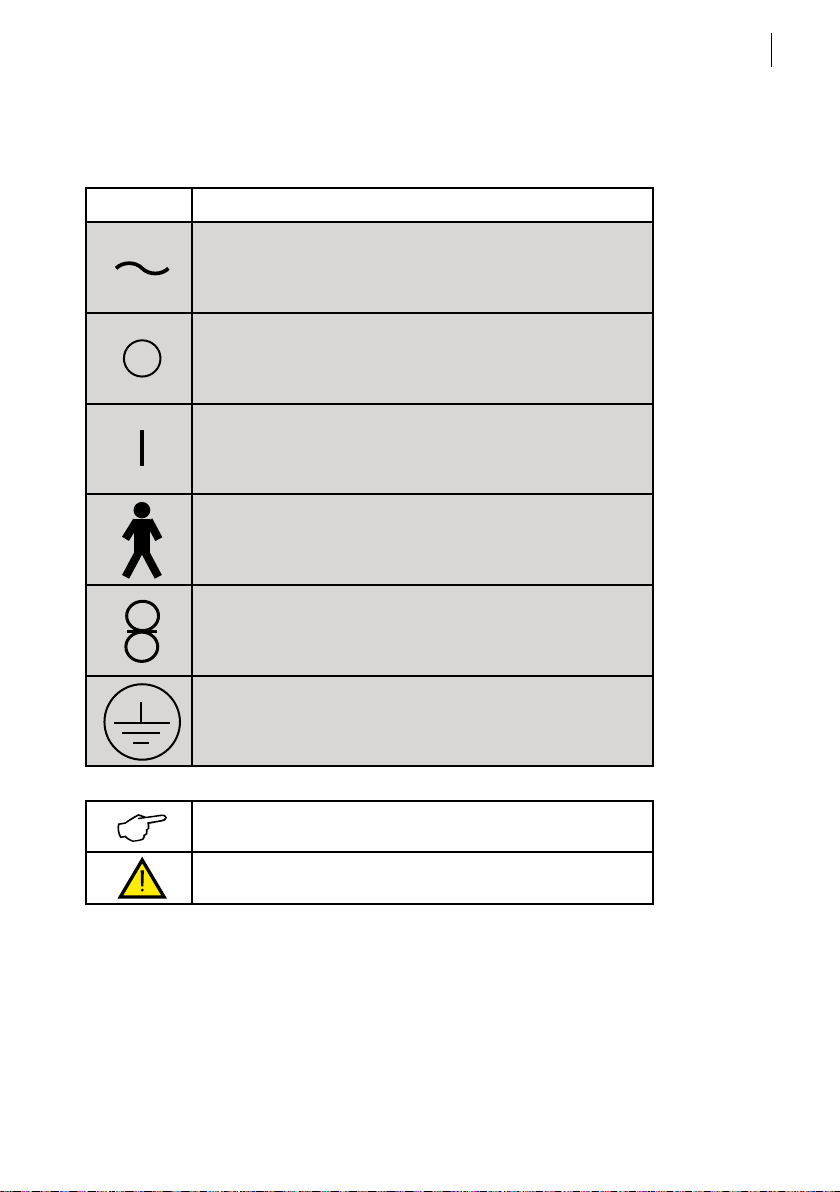
Table of Symbols
Symbol Description
Alternating Current
Off (Power: Disconnect from the mains)
On (Power: Connect to the mains)
Type ‘b’ equipment
‘RUN’ Button / Process switch
Protective Earth (Ground)
Symbols used within Manual
Tip
Attention / Warning
iv
VELOPEX INTRA-X
User Guide

Contents
Specification ................................................................. 2
Installation* .................................................................. 3
Pre Installation Instructions .............................................. 3
Daylight Loader Installation (when required) ............... 5
Filling with Chemicals ........................................................ 8
Operation ...................................................................... 11
Maintenance .................................................................. 15
Trouble Shooting .......................................................... 19
Service Log .................................................................... 24
INSTALLATIONOPERATIONTROUBLE SHOOTING MAINTENANCE
©June 2005 Medivance Instruments Limited
All rights reserved.
Issue 6 OM13 I/LIT3601M
1

Specification
Width (W) 290mm / 11½”
Depth (D)
Inc. Loader
435mm / 17”
635mm / 25”
Height (H) 315mm / 12½”
Weight:
Empty
Full Tanks
12.1Kg / 26½lb
13.9Kg / 30½lb
Tank Capacity 1.4litres / 2½Imp Pints each
Standard Supply
Voltage
220-240v 50Hz
110-120v 60Hz
Warm-up time 10 min. approx.
Film Feed Speed 470mm / 18½”per min.
Max film width 65mm / 2½”
Processing time:
Dry
Wet-Endodontic
4 min. approx.
2 min. approx.
(W)
(H)
(D)
2
VELOPEX INTRA-X
User Guide

VELOPEX INTRA-X
User Guide
INSTALLATION
3
• Unpacking the VELOPEX
NOTE: For unpacking and lifting the machine into position it is important to have
assistance.
The machine comes in a single carton containing:
Machine, Operator’s Manual, Silicone Grease, Electrical Cord, Transport Module
Turning Tool, Cleaning Brush, Chemical Change Chart and a box of Cleaning Tablets
(UK only), and Daylight Loader (as required).
1. Familiarise yourself with the layout of the machine by referring to the images
as you progress through the manual.
2. Lift the machine from the carton and position on counter top.Remove outer
and inner packaging. The transport modules are protected by internal
packing pieces: these must be discarded.
Pre Installation Instructions

INSTALLATION
• Siting of the VELOPEX
When using the machine in daylight or a darkroom, avoid sources of intense light.
Do not mount the unit under a window, fluorescent light or flood lamp.
IMPORTANT NOTE: A well ventilated position is mandatory.
The ambient temperature must be below 80oF (27oC).
Prevent siting the machine above or near other electrical or mechanical equipment.
Surfaces susceptible to water or chemical damage should be avoided, such as
carpeted areas.
1. COUNTER
a. Use a stable and level counter that will support a weight of at least
100 lbs. (50 Kg.).
b. When the machine is filled with chemicals, make sure the stand does not
rock or shake. NEVER move the machine with chemicals in the tanks.
2. ELECTRICAL SUPPLY
a. 115Vac 60Hz, 10A, 1150W (USA)/230Vac 50Hz, 10A, 1150W (World Wide).
b. The power source must be within three (3) feet (1m) of the machine. It
should be easily accessible for operation and maintenance.
WARNING: X-ray radiation can be harmful to patient, technician and dentist.
Inadequate lead shielding of the darkroom or film storage area will also cause
fogging from exposure of films to stray x-ray radiation. Consult your local
codes, Health Department or Dental Equipment Dealer for proper construction
of darkroom or placement of film processing equipment in the vicinity of x-ray
radiation sources.
Pre Installation Instructions (cont.)
4
VELOPEX INTRA-X
User Guide

VELOPEX INTRA-X
User Guide
INSTALLATION
5
Daylight Loader Installation (as required)
Bring the Lid to the upright
position.
Remove Side Panel by Sliding it
Upwards in its Runners.
Remove All Packing / Wrapping
Material and Modules.
3a.
2.
1.
TIP: Start with the Dryer Module, then
the Water Module followed by the Fixer
and Developer Modules.Those should be
removed by sliding the Tanks out.
TIP: The Lid can be kept in the upright
position while the machine is open, or
lifted away.

INSTALLATION
Daylight Loader Installation (cont.)
3b.
WARNING: When Removing
the Fixer and Developer modules, slide
tanks sideways until completely clear of
the immersion heaters mounted on the
machine internal wall.
Unscrew the Two Retaining
Screws and Remove White
protective strip from sealing
material on the back of the
loader.
Remove Protective Film from
Viewing Window Cover.
4.
5.
(Retaining
Screw X 2)
(Back of
Loader)
(Front of
Loader)
6
VELOPEX INTRA-X
User Guide
Autres manuels pour Intra-X
2
Ce manuel convient aux modèles suivants
1
Table des matières
Autres manuels Velopex Matériel informatique


Manuels Matériel informatique populaires d'autres marques

EMC2
EMC2 VNX Series Manuel du propriétaire

Panasonic
Panasonic DV0PM20105 Manuel utilisateur

Mitsubishi Electric
Mitsubishi Electric Q81BD-J61BT11 Manuel utilisateur

Gigabyte
Gigabyte B660M DS3H AX DDR4 Manuel utilisateur

Raidon
Raidon iT2300 Manuel utilisateur

National Instruments
National Instruments PXI-8186 Manuel utilisateur


