tri-art audio P Series Manuel utilisateur

ta 1
turntable
P-Series
User Manual
Product #7228
*Read the user manual
before operating.

safety
information
Before you start...
Warning of a hazard for the user, the unit or possible misuse. Important notice.
Thank you for buying a Tri-Art Audio product. Please read through this manual to
understand and operate this product correctly. Please keep this manual in a safe place so
that you may refer to it whenever necessary. Please ensure the product you are using is
rated for your country’s electrical system, or it will not be covered under our warranty.
Warning:
To prevent re or shock hazard, do not expose this product to rain or moisture.
Important Notice:
The serial number for this equipment is located on the bottom of this component. Please
write this serial number on the enclosed warranty card and follow the instructions to register
your product for our three (3) year limited warranty.
This equipment is designed for consumer use, such as home audio systems. It is not
designed to operate in a business environment or a mobile application. Mobile, pro or
commercial businesses such as restaurants will not be covered under warranty.
Caution:
To reduce the risk of electric shock, do not remove cover (or back). No user serviceable
parts inside. Refer servicing to qualied service personnel.

safety
information
Safety Instructions
Read Instructions:
All the safety and operating instructions should be read before operating this equipment.
Retain Instructions:
The safety and operating instructions should be retained for future reference.
Heed All Warnings:
All warnings, set up procedures, and operating instructions should be strictly adhered to.
Follow all instructions carefully.
Water and Moisture:
Under no circumstances should this audio component be used near water.
It is not to be used in a bathroom, water closet, shower, kitchen, wet basement,
pool/spa/sauna area, or outside.

safety
information
Safety Instructions
Ventilation:
Please ensure that the location of this equipment is such that in no way does it prevent adequate
ventilation. Do not enclose this in fabric or enclose in a cabinet where there is no adequate
ventilation. In no instance should the product be located where the ow of air is impeded or cannot
allow proper ventilation.
Heat:
This product should be located well away from all the heat sources such as but not limited to
heaters, forced air heat, radiators, stoves, and replaces.
Power Sources:
The Tri-Art component should be connected to a power supply as listed on the actual component
and manual.
Cleaning:
Your Tri-Art product was soaked in hemp oil and sealed in beeswax. Only use the Tri-Art Beeswax
and Hemp Oil in moderate amounts as per the instructions to freshen up the appearance from time
to time as needed. Do not use lacquers or aerosol wax products with this product. Do not pour
water on the surface at any time.
Heavy Objects:
Do not place heavy objects on this component.
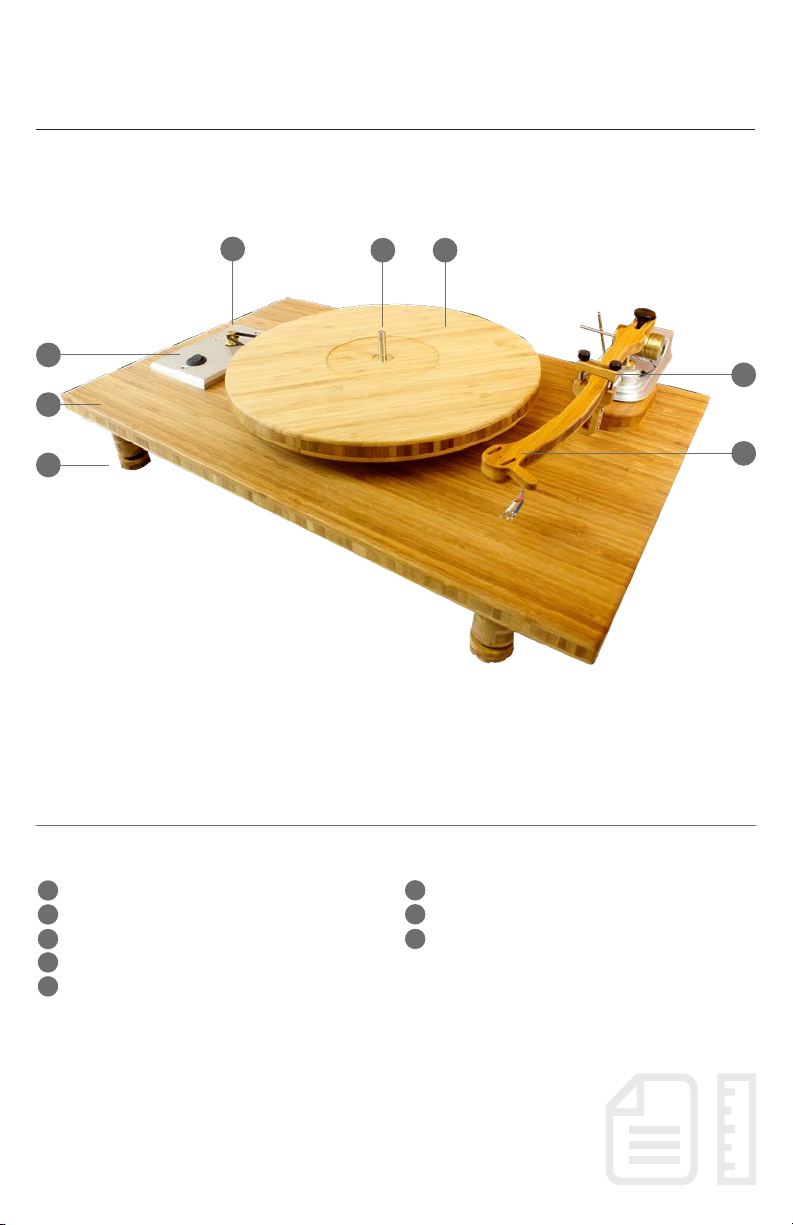
turntable front
1
45 6
7
8
2
3
16
27
38
4
5
Power Switch
Plinth
Iso Feet
Dual Pulley (33/45)
Removable Spindle Cap
Bamboo Platter
Arm Clamp
TA-1 Tonearm
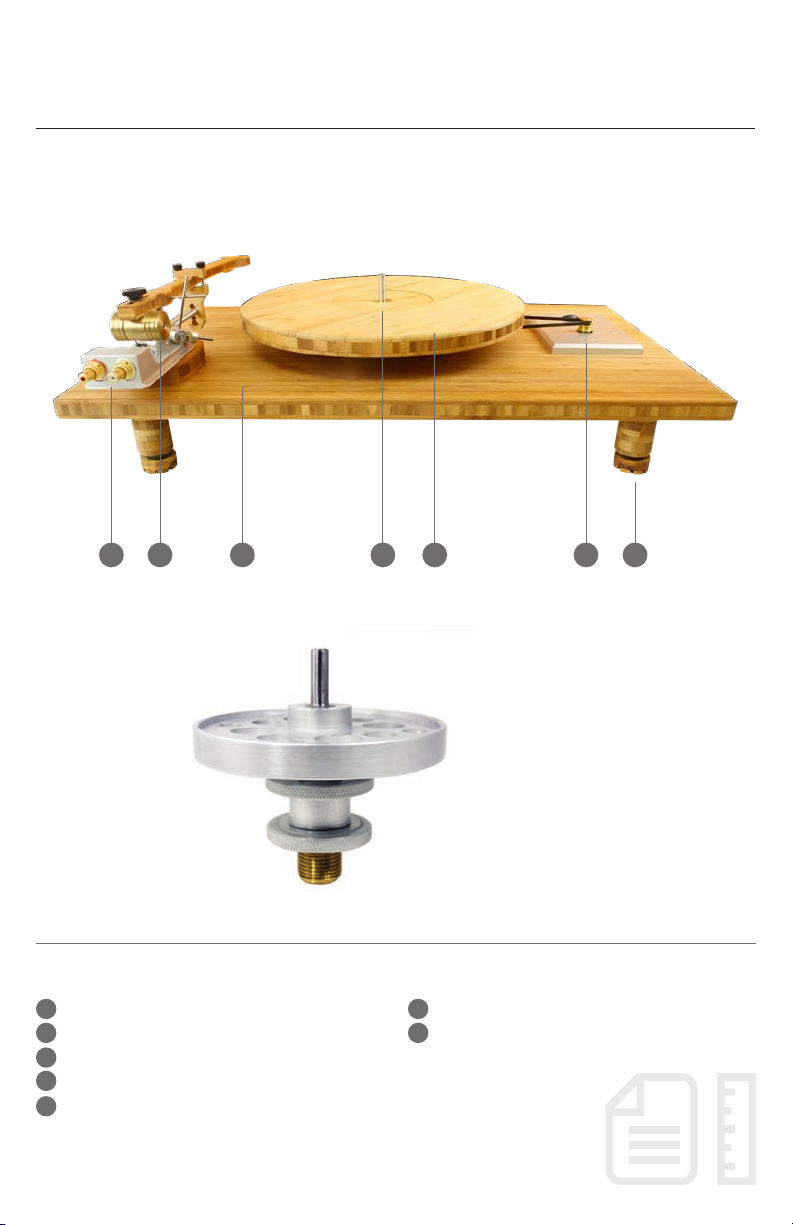
turntable back
1 2 3 4 5 6 7
1 6
2 7
3
4
5
RCA Outputs
Azsimuth Adjustment
Bamboo Plinth
Removable Spindle Cap
Bamboo Platter
Dual Pulley (33/45)
Iso Feet
Sub Platter
*Located under the Platter

turntable specs
Table Details:
Plinth: 3 Ply Bamboo laminate 19.05mm (3/4″)
Motor: Single 24 Pole Synchronous AC Motor
Speed: 33.3 & 45 RPM
Drive: Belt Drive
Platter: Bamboo Platter
Sub Platter: Aluminum Sub Platter with Bronze Shaft
Legs: Leveling Legs and Sorbothane Iso Feet
Bearing: Bronze Collar Spike Bearing with ABEC7 Carbonized Ceramic Ball Bearing
Dimensions: 54.61cm x 35.56cm / 21.5" x 14"
Weight: 4kg or 9lbs
Arm Details: 9" TA-1 Tonearm
Material: Three Ply Bamboo Laminate 12mm Thick
Settings: VTA & Azimuth Adjustments
Bearing: Bronze with Brass Collar Spike and Synthetic, High Viscosity Grease Bearing
Arm Wire: Cardas Wire 33 AWG Uninterrupted from Headshell Clips to Brass Female RCA
Arm Length: 9″ / 222 mm
Tone Arm Mass: 10g
Anti-Skate: Anti-Skating Mechanism
Weights: Brass counter and Brass Azimuth Weights
Crafted with bamboo and natural sheep’s wool.
Learn more at triartaudio.com
Arm Details: 9" TA-2 Tonearm
Material: 3-Ply Bamboo Laminate 19mm Thick
Settings: Simple To Use VTA and Azimuth Adjustments
Bearings: Bronze VTA Adjustable Spike and Grease Universal Pivot Bearing
Anti-Skating: Yes
Headshell: Brass Headshell
Cueing Device: Fully Adjustable Manual Cueing Device
Arm Plinth: Hand-Brushed Aluminium Arm Plinth with Left and Right Brass RCA Out
Wiring: Cardas Wire 33 AWG Uninterrupted from Headshell Clips (Silver Plated)
to Brass RCA
Shielding: Shielding Provided with Inconel Tubing, Mu-METAL and Brass
Arm Lock: Tone Arm Lock Down
Set Up: Bamboo Pivot to Spindle Setup Jig Included
Level: Micro Bubble
Tone Arm Length: 222mm (9")
Tone Arm Mass: 15g
Counter Weight: Brass Counter and Brass Azimuth Weights
Resonance Frequencies: 8 – 12hz
use &
guidelines
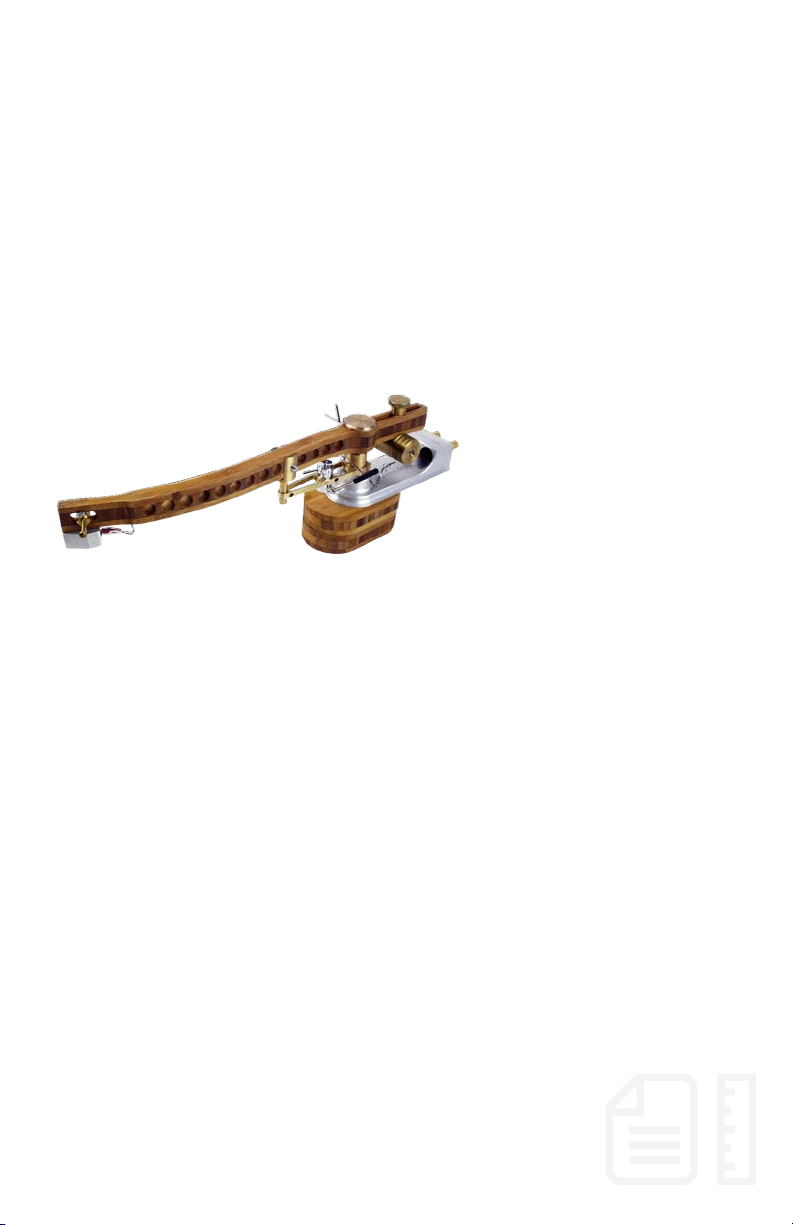
The P-series TA-1 Tone Arm features the same, handmade bamboo design as our
table. It is available together or separately and can also replace the arm of most
other tables. The 9" version mounts on both P-series and B-series Turntables. The
12" version only mounts on the B-series Turntable.
9" TA-2 Tonearm
#10726

use &
guidelines
Option #1
The video has a link within the product listings for the Pebbles Series
visit www.triartaudio.com
Option #2
YouTube Link: https://bit.ly/30XSNUS
Video Time Sheet
00:00 – 01:04 Opening Introduction
01:04 – 03:05 Plinth, Feet, RCA, Assemble
03:06 – 07:43 Platter Bearing Cleaning and Greasing
07:44 – 08:40 Platter Bearing Grease Description and Mounting
8:41 – 11:49 Tonearm Mounting to Arm Board
11:50 – 12:46 Mounting Arm Board with Tonearm to Turntable Plinth
12:47 – 14:08 Tonearm Distance to Platter Spindle Jig Set Up
14:09 – 15:17 Platter Height Adjustment with Jig
15:18 – 16:52 Sub Platter, Belt and Motor Pulley Set Up, 33.3 to 45 Change
16:53 – 18:05 Finishing Arm Board Set Up and Tightening
18:06 – 19:27 Mounting RCA’s to Table
19:28 – 20:55 Other Ways to Set Up Arms on Table
20:56 – 25:09 Finishing to Assemble Tonearm
25:10 – 28:10 Setting Up Tonearm Height and Azimuth
with Bubble Level on Platter
28:11 – 29:18 Stylus to Pivot Point Set Up
29:19 – 30:15 Last Look Before Adding Tonearm Grease, and Adjusting Speed
30:16 – 34:36 Platter Speed Adjustment
34:37 – 39:19 Applying Grease to Tonearm Pivot Point
39:20 – 39-51 Final Looks, Fine Tuning
39:52 – End Closing Words
Ce manuel convient aux modèles suivants
1
Table des matières
Autres manuels tri-art audio Platine


