TE-Group Guardo Action Cam + Manuel utilisateur

1
USER’S MANUAL
GB NL D
More languages available
on www.guardo.be
FR

2
DECLARATION OF CONFORMITY
Complies with the essential requirements, which are VSHFLˉHG in the GLrective 2004/108/EC
on the approximation of the laws on the Member States relating to
electromagnetic compatibility.
This prRGXFWKDVEHHQtestHGDJDLQst following stDQGDrGVDQGVSHFLˉcations,
applying versions vDOLGRQ-XO\
(1
(1
(1
0DQXDO*XDUGR$FWLRQ&DP /V3 --------------------------------
Copyright©GU$RDO
We, the unGersigneG
CompanyTE-GROUP nv
$GGressKapelsestraat 61, 2950 Kapellen - BELGIUM
Geclare, that the following equipment
ProGuct Name*XDUGR$FWLRQ&DP
ProGuct Type$FWLRQ&DPHUD:L)L
-------
-
DQG(&
ETSI EN 300 328 V1.7.1 (2006-10)
ETSI EN 301 489-1 V1.9.2 (2011-09)
ETSI EN 301 489-17 V2.2.1 (2012-09)

3
GB
ILLUSTRATIONS
PARTS & FUNCTIONS
INSTALLING THE BATTERY
CHARGING THE BATTERY
USE THE WATERPROOF HOUSING
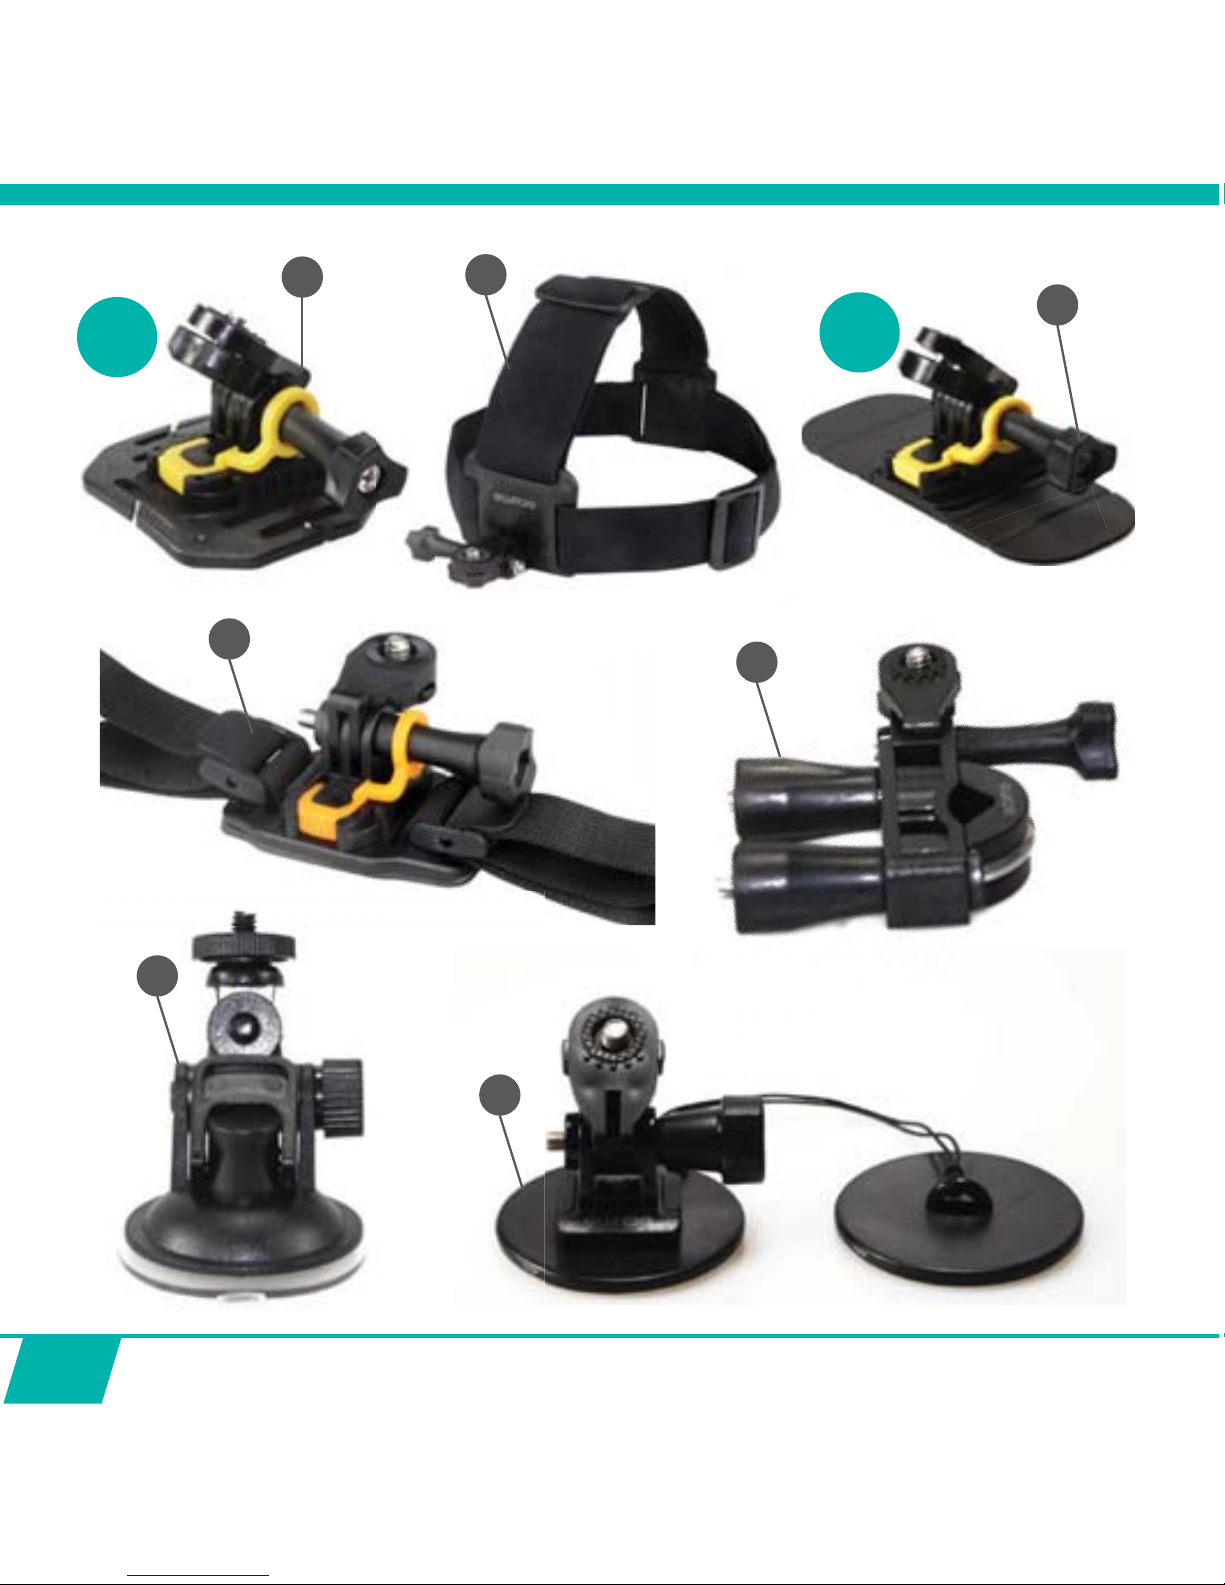
MOUNTING THE CAMERA USING THE DELIVERED MOUNTS
1. MOUNTS WITH ADHESIVE TAPE
A. Curved surface mount
B. Yellow Floater
C. Surfboard Mount
D. Flat Surface Mount
2. OTHER MOUNTS
A. Universal helmet mount with strap
B. Universal Head strap mount
C. Seatpost/Handlebar Medium
D. Suction Cup mount
E. Shorter screw
Safety plug
GETTING STARTED
1. PLACE MICRO SD CARD
2. TURNING ON/OFF
3. SETTINGS
OPERATION FROM CAMERA DIRECTLY
• Start video recording
• Stop video recording
• Take a photo
• Enable/disable Mute Mode
OPERATION FROM REMOTE CONTROL
• Use remote control with camera
• Use remote control with full HD TV
TABLE OF CONTENTS
5
8
9
10
11
14
16
16
17
18
20

4
21
22
25
27
28
28
29
29
31
32
34
34
34
35
FULL OPERATION FROM APP
- Install the app
- Enable Wi-Fi on the Action Cam
- Make a Wi-Fi Direct connection
Operation
ADJUST GENERAL SETTINGS FOR VIDEO/PHOTO
• Adjust resolution
• Zoom
• Set Timelapse interval
• Set Timelapse duration
• Set White Balance
• Set Frequency
• Format SD Card on Camera
ADJUST SETTINGS ONLY APPLICABLE IN VIDEO MODE
• Set Slow-Motion Function
• Set Upside Down Recording
ADJUST SETTINGS ONLY APPLICABLE IN PHOTO MODE
• Set Burst Mode
MAKE VIDEO RECORDINGS:
MAKE PHOTOS
VIEW/SELECT/DELETE VIDEOS AND PHOTOS
CONNECTING TO A COMPUTER
CONNECTING TO A FULL HD TV VIA HDMI CABLE (OPTIONAL)
DASHCAM CAR MODE
CUSTOMER SUPPORT
SOFTWARE UPDATES
GUARANTEE

5
2
3
4
5
6
7
8
9
10
11
1
2
1
2
3
5
13
14
15
1
6
25
0
0
0
20
1
ILLUSTRATIONS
Illustration I
6
17
19
21
18 22
23
24
2X 2X

7
Illustration II Illustration III
Illustration IV
14
3
5
6
7
9
24
3
5
6
8
9
0
0
Peel off screen protector

8
PARTS & FUNCTIONS
CAMERA See illustration I
1. Record Button
2. Microphone
3. LCD screen
4. Lens
5. Wi-Fi Button with LED indicator
6. Power / Mode Button
7. Infrared signal reception eye
8. Micro USB port
9. Mini HDMI port (HDMI cable optionally
available on www.guardo.be)
10. Micro SD card slot (Micro SD card
optionally available on www.guardo.be)
11. Battery Cover Switch
12. Recording/Status (LED) Indicator
LCD SCREEN See illustration II
1. Photo Camera mode
2. Video Camera mode (default)
:L)LLFRQRQO\YLVLEOHZKHQZLˉLVWXUQHG21
4. Micro SD card icon (only visible when micro SD card is inserted)
5. Resolution setting
0XWHPRGHRQO\YLVLEOHLQ0XWHPRGH21
7.
Photo counter: displays number of photos l
eft to capture (cannot display more than 999)
8. Video timer: displays hours and minutes
left that still can be used for recording
9. Battery icon: current battery status
Note: The above icons may vary according to the status of the camera.
13. Micro USB charging cable
14. Remote Control
15. Extra spare battery
16. Waterproof case
17. 2 x Curved surface mount + acc.
18. Universal helmet mount with strap
19. Universal Head strap mount + acc.
20. Yellow Floater
21. 2 x Flat Surface Mount + acc.
22. Seatpost/Handlebar Medium
23. Suction Cup mount
24. Surfboard Mount + acc.
25. Shorter screw
Peel off screen protector

9
INSTALLING THE BATTERY
See illustration IV
Please install the provided lithium battery correctly as shown in illustration IV:
1. Switch and hold the Battery Cover Switch (11) upwards to release the
battery cover.
2. Simultaneously slide the battery cover to the right to release and remove it.
3. Place the battery inside the battery compartment. Make sure the
electrodes of the battery correspond to the symbols on the cover.
4.
Slide the battery cover back in place and switch the Battery Cover Switch
(11)
downwards to lock the battery.
5.
CHARGING THE BATTERY
1. Make sure the battery is installed.
2. Make sure the Guardo Action Cam is turned off.
3. Connect the micro USB cable (13) to the Micro USB Port (8)of the Guardo Action Cam.
4. Connect the other end of the micro USB cable(13 to the USB port of your computer or
the optional Guardo USB home charging device, optionally available on www.guardo.be.
5. The camera will be turned 21 automatically (PCU or CAR will be displayed), and starts
UHFRUGLQJZKHQȟ&$5ȠLVˊDVKLQJ6WRSUHFRUGLQJE\SUHVVLQJWKH5HFRUG%XWWRQ
6. During charging, the blue LED Indicator (12) will light continuously.
When charging is completed the blue LED Indicator (12) will turn off.
Note:
x The camera can be used while charging.
x When the battery runs out of power, the Guardo will turn off but will save the part that was
recorded until the camera turned off.
x When the camera is ON but not in use it will automatically turn off after 5 min.
x :KHQWKHEOXH/('LQGLFDWRUZLOOˊDVKLQVWHDGRIOLJKWFRQWLQXRXVO\WKLVPHDQVWKDW
there is no battery inside the camera.
x Extra batteries and charging devices/accessories can be ordered from our website:
www.guardo.be
USE
(11)

10
THE WATERPROOF HOUSING
Placing the camera in the waterproof housing:
Place camera Close backdoor Grasp arm onto backdoor Click into place
To remove the camera from the waterproof housing: reverse the above procedure!
IMPORTANT! USAGE FOR PREVENTING WATER LEAKAGE
1) BEFORE EVERY USE: check carefully that the waterproof housing is securely locked
onto the camera and that no ‘objects’ (such as sand or a lock of hair) are in between
the rubber strap and the housing, as this could cause leaking.
2) The rubber strap is the most important part of the waterproof housing as it is the
element that keeps you camera waterproof. The rubber strap can be removed to
clean it in fresh water. Do not use a damp cloth to dry, but dry it by shaking it.
3) Whenever used in salt water, ALWAYS clean the plastic waterproof housing
afterwards in non-salt water and dry it. This is to avoid corrosion or to prevent dust/
sand/… building up in the rubber seal.
!ATTENTION!
If you do not consistently perform/execute the above mentioned tips, water damage
may occur and can result into the camera being damaged/destroyed. The warranty
GRHV127FRYHUZDWHUGDPDJHFDXVHGE\LPSURSHUXVHE\WKHXVHU
WATERDROPS & CONDENSATION
Regulary check the lens to see if waterdrops or condensation/fog have appeared as these
may be shown on your footage.
Table des matières
Autres manuels TE-Group Caméra d'action


