Taoglas EDGE Connect Manuel utilisateur


IG-20-08-003-A 2
EDGE Connect™
Next-generation IoT device
and soware platform
User Guide
Contents
1. Introduction 3
1.1 What’s in the Box? 3
1.2 Support 3
2. Set Up 4
2.1 Device Startup: 4
2.2 Account Setup 4
2.3 Activating your Device 5
3. Using the EDGE Connect 7
3.1 Device Overview 7
4. Using EDGE Insights 8
4.1 Insights Navigation 8
4.2 Device Management 9
4.3 Dashboard 10
4.4 Sensor Notification Rules 11
4.5 Add New Users 15
4.6 Support 16
5. Appendix 17
5.1 FAQ 17
5.2 Security 17
5.3 Safety and Regulatory Requirements 17

IG-20-08-003-A 3
The Taoglas EDGE Connect™ enables real time insights and intelligence to help your
enterprise save costs, increase revenue and enhance compliance. It is a next-generation
IoT device with cellular, Bluetooth, and on-board sensor capabilities with a cloud based
connectivity and device management platform.
1.1 What’s in the Box?
1. Taoglas EDGE Connect
2. Micro-USB Cable
3. USB Power Supply - US Version (Regional adapters supplied with other SKU’s)
4. Taoglas EDGE Insights Activation Card
4
1 2 3
1.2 Support
For technical support please contact iotsupport@taoglas.com
1. Go to https://www.taoglas.com/product/edge-connect to access
a. Datasheet
b. User Guides
1. Introduction

IG-20-08-003-A 4
2. Set Up
2.1 Device Startup:
1. To power on the EDGE Connect press the Power Button once.
2. The EDGE Connect should be fully charged before use, using the provided
power supply. When you plug the EDGEConnect into the provided USB power
supply, the USB Power LED will illuminate. If the EDGE Connect requires
charging, the Charge Status LED will illuminate, otherwise the Charge Status
LED will remain o. The EDGE Connect is not intended to be charged
using a computer USB.
3. Once powered on and initialised, the User LED will flash white 3 times.
4. At this stage you can check the battery level by pressing the Power Button once.
The User LED will blink a number of times according to the battery level.
Find more information on this in the Device Overview section below.
5. The device will start uploading to EDGE Insights straight away. To view any uploaded
samples, you will need to register an account and activate your device on
connect.taoglas.com.
2.2 Account Setup
1. To create an EDGE Insights account for your EDGE Connect devices, navigate to
connect.taoglas.com and click on ‘Sign Up’.
2. Create a username and enter your details.
Power
Button
Charge Status LED
User LED

IG-20-08-003-A 5
3. Once your information has been submitted, you will need to confirm your registration by clicking the link sent
to the email address provided.
4. Upon clicking the link, a browser will open and you will be requested to create a password.
5. Aer entering and confirming your password, registration is now complete, proceed to device activation.
2.3 Activating your Device
1. Using the details registered in the sign up process, you will be required to login to the EDGE Insights platform in order
to register your EDGE Connect.
2. The first time you log in, you will receive a popup message notifying you that you have not activated any devices.
Click on the ‘Devices Page’ button on the pop up, this will direct you to the device list page.

IG-20-08-003-A 6
3. To activate your EDGE Connect, click ‘Activate New Device’ at the bottom of the page, a popup window will request
your EDGE Connect S/N and Activation Code. Aer entering these, click ‘Submit’ to finish the activation process.
The EDGE Connect S/N and Activation Code can be found on the card included in the box.
4. Aer entering the EDGE Connect S/N and Activation Code, click ‘Submit’ to activate your EDGE Connect.
5. The EDGE Connect will now be listed on the devices page, see an example of this below.
6. If device activation fails please contact Taoglas IoT support at iotsupport@taoglas.com

IG-20-08-003-A 7
3. Using the EDGE Connect
3.1 Device Overview
The EDGE Connect has 2 buttons and 3 LED’s. See the diagram below for an overview of the LED’s and buttons.
• To power on the EDGE Connect, push the Power Button once. When the EDGE Connect is powered on and has
successfully initialised, the User LED will flash white 3 times in quick succession.
• To power o the EDGE Connect, hold the Power Button, while the EDGE Connect is powering down the User LED will
blink red continuously. The User LED will stop blinking when the EDGE Connect has completely powered o.
• When you plug the EDGE Connect into the provided USB Power supply, the USB Power LED will illuminate. If the EDGE
Connect requires charging, the Charge Status LED will illuminate, otherwise the Charge Status LED will remain o.
• Once powered, the EDGE Connect will automatically connect to EDGE insights to gather configuration information.
The EDGE Connect will continue to operate at the sampling and upload intervals set on EDGE Insights, for more
information on these intervals see Device Management Section.
• The EDGE Connect can be forced into making a connection with EDGE Insights outside of the upload interval using
either of the following methods:
• A single press of the Power Button, followed by a single press of the User Button will trigger the EDGE Connect
to connect to EDGE Insights and gather new configuration information.
• A single press of the Power Button, followed by a longer push of the User Button (more than 4 seconds) will
trigger the EDGE Connect to sample all configured sensors and upload them to EDGE Insights.
• The EDGE Connect uploads its battery level to EDGE Insights, however, the battery status can also be checked by
pushing the Power Button once. This will cause the User LED to flash red a number of times according to the battery
level, as per the table below:
20% 1 Flash
40% 2 Flashes
60% 3 Flashes
80% 4 Flashes
100% 5 Flashes
User Button
Power
Button
USB Power LED
Light Sensor
USB Port
Charge Status LED
User LED

IG-20-08-003-A 8
4. Using EDGE Insights
4.1 Insights Navigation
1. When you login to your account, you will land on the Dashboard page. For instructions on activating an
EDGE Connect on your account, please refer to the Activating your Device section.
2. You can use the links on the top of EDGE Insights interface to navigate between your dashboard,
device list page and account management pages.
a. Dashboard will bring you to your dashboard where you can see all the sensor data uploaded by your
EDGE Connect.
b. Devices will bring you to your device list page, from here you can manage each of the devices you have
activated on your account.
c. Clicking on ‘Settings’ will display a dropdown with various account management options, including:
i. Add/edit Users
ii. Edit Device Notification Rules
iii.Edit Device Notification Groups
iv. Edit Device Notification Contacts
e. Clicking on ‘Username’ will display a dropdown with various account management options, including:
i. Changing your password
ii. Editing your account details
iii.Deleting your account
iv. Logging out of your account
d. Clicking on ‘Support ’ will display a dropdown with support links.

IG-20-08-003-A 9
4.2 Device Management
1. You can edit the details for an individual device by clicking the edit icon( ) on the devices page.
2. This will direct you to the Edit Device page, from here you can amend the following:
a. Device Name, here you can enter a customized name for your EDGE Connect.
b. Address, here you can enter your address.
c. Upload Interval, this is the rate at which the EDGE Connect will upload recorded sensor samples to
EDGE Insights.
d. Upload Retries, in the event where the EDGE Connect fails to upload samples, this is the number of times it
will attempt to upload before backing o.
Edit Device rollover overview
Edit Device
IG-20-08-003-A 10
3. Depending on your device type and the sensors associated with it you will be able to set the individual sensor
sampling intervals in the Device Parameters section.
a. Simply enter the sampling interval in the format HH:MM:SS into the text box next to the sensor name.
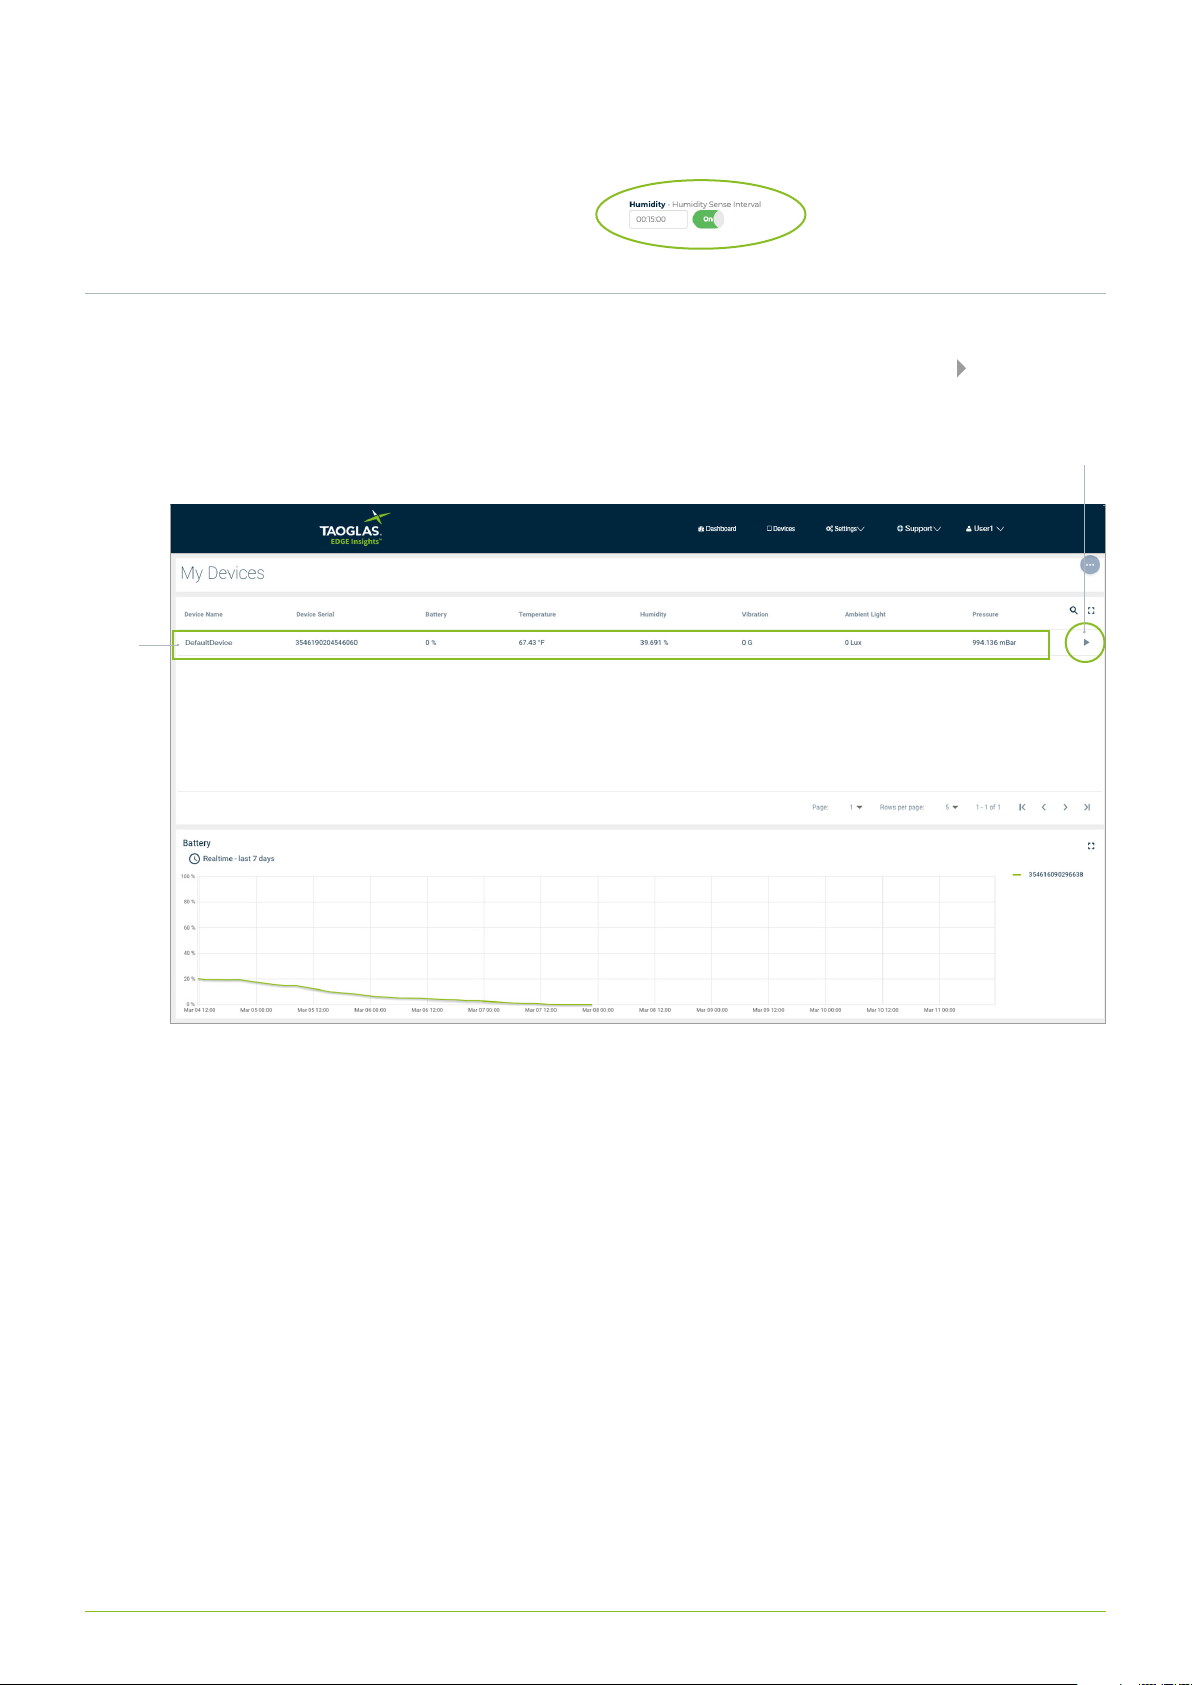
b. For an example, see Humidity sensor which has
a sampling interval of 15 minutes(00:15:00).
4.3 Dashboard
1. To view the samples uploaded for an individual device, select and click on the device row or use the icon for that
device. This will bring you to the Sensor Data view of the dashboard.
Sensor Data
View Icon
Device
Row
Autres manuels pour EDGE Connect
1
Table des matières
Autres manuels Taoglas Porte

Manuels Porte populaires d'autres marques

LST
LST M500RFE-AS Manuel utilisateur

Kinnex
Kinnex Media Gateway Manuel utilisateur

2N Telekomunikace
2N Telekomunikace 2N StarGate Manuel utilisateur

Mitsubishi Heavy Industries
Mitsubishi Heavy Industries Superlink SC-WBGW256 Manuel utilisateur

ZyXEL Communications
ZyXEL Communications ZYWALL2 ET 2WE Manuel utilisateur

Telsey
Telsey CPVA 500 - SIP Manuel utilisateur


