Simmons 119233C Manuel utilisateur
Instruction Manual
Manuel d’Instructions
Lit# 95-0120/03-11
English / Français
Digital Trail Camera
Appareil Photo Numérique de Sentiers
Model # 119233C Model # 119225C


3
Introduction 5
Parts and Control Guide 6
Battery and SD Card Installation 8
Using the Setup Menu 9
Setting the Date & Time 9
Setting Image Capture Mode and Resolution 10
Setting the Trigger Interval (Delay) 11
Formatting the SD Card 12
Exiting the Setup Menu 12
Camera Operation 13
Mounting the Camera 13
Activating the Camera 13
Testing the Coverage Area 14
Securing the Camera 14
Viewing the Photos and Videos 15
Glossary 16
Specications 17
Troubleshooting/FAQ 18
Page Index English

4
IMPORTANT NOTE
Congratulations on your purchase of one of the best trail cameras on the
market! We appreciate your business and want to earn your trust. Please
refer to the notes below and the instructions in this manual to ensure that
you are completely satised with this product.
If your Simmons Trail Cam does not seem to be functioning properly
or if you are having photo/video quality issues, please check the
Troubleshooting/FAQ section on pages 18-21.
Problems are often due to something simple that was overlooked, or
require only changing one setting to solve.
If your problem continues after trying the solutions in the
Troubleshooting/FAQ section, please call Customer Service at (800)
423-3537. In Canada, call (800) 361-5702.
Simmons recommends using Energizer® batteries
in your Trail Cam.
Simmons recommends using SanDisk® SD and SDHC Cards
in your Trail Cam.

5
INTRODUCTION
Congratulations on your purchase of the Simmons 119233C or 119225C
digital trail camera. Your trail camera is designed to record the activity
of wildlife in the outdoors with its still image and movie modes and
weatherproof, rugged construction. These trail cam models feature a
compact, portable size.
Main Features:
1.3MP• (119233C) or 2.0MP (119225C) digital CMOS sensor
Compact Size•
Trigger Time=1.5 seconds•
Automatic IR Filter•
15• (119233C) or 21 (119225C) Night Vision LEDs
Adjustable Trigger Delay• (119225C only): 5~ 59 second ,1~ 10mins.
(Trigger Delay on the 119233C is xed at 30 seconds)
Multiple Shot Mode (3 images per trigger)• (119225C only)
640*480 (VGA resolution) AVI Videos•
Supports up to 16GB• (119233C) or 32GB (119225C) SD Card
Date, Time & Moon Phase Imprint•
Auto Exposure•
Auto White Balance•
Power Supply: 4 “C”• (119233C/119225C) or 4 “AA” (119225C only)
batteries
Mounting Socket for Standard Tripods•
Weatherproof•
6
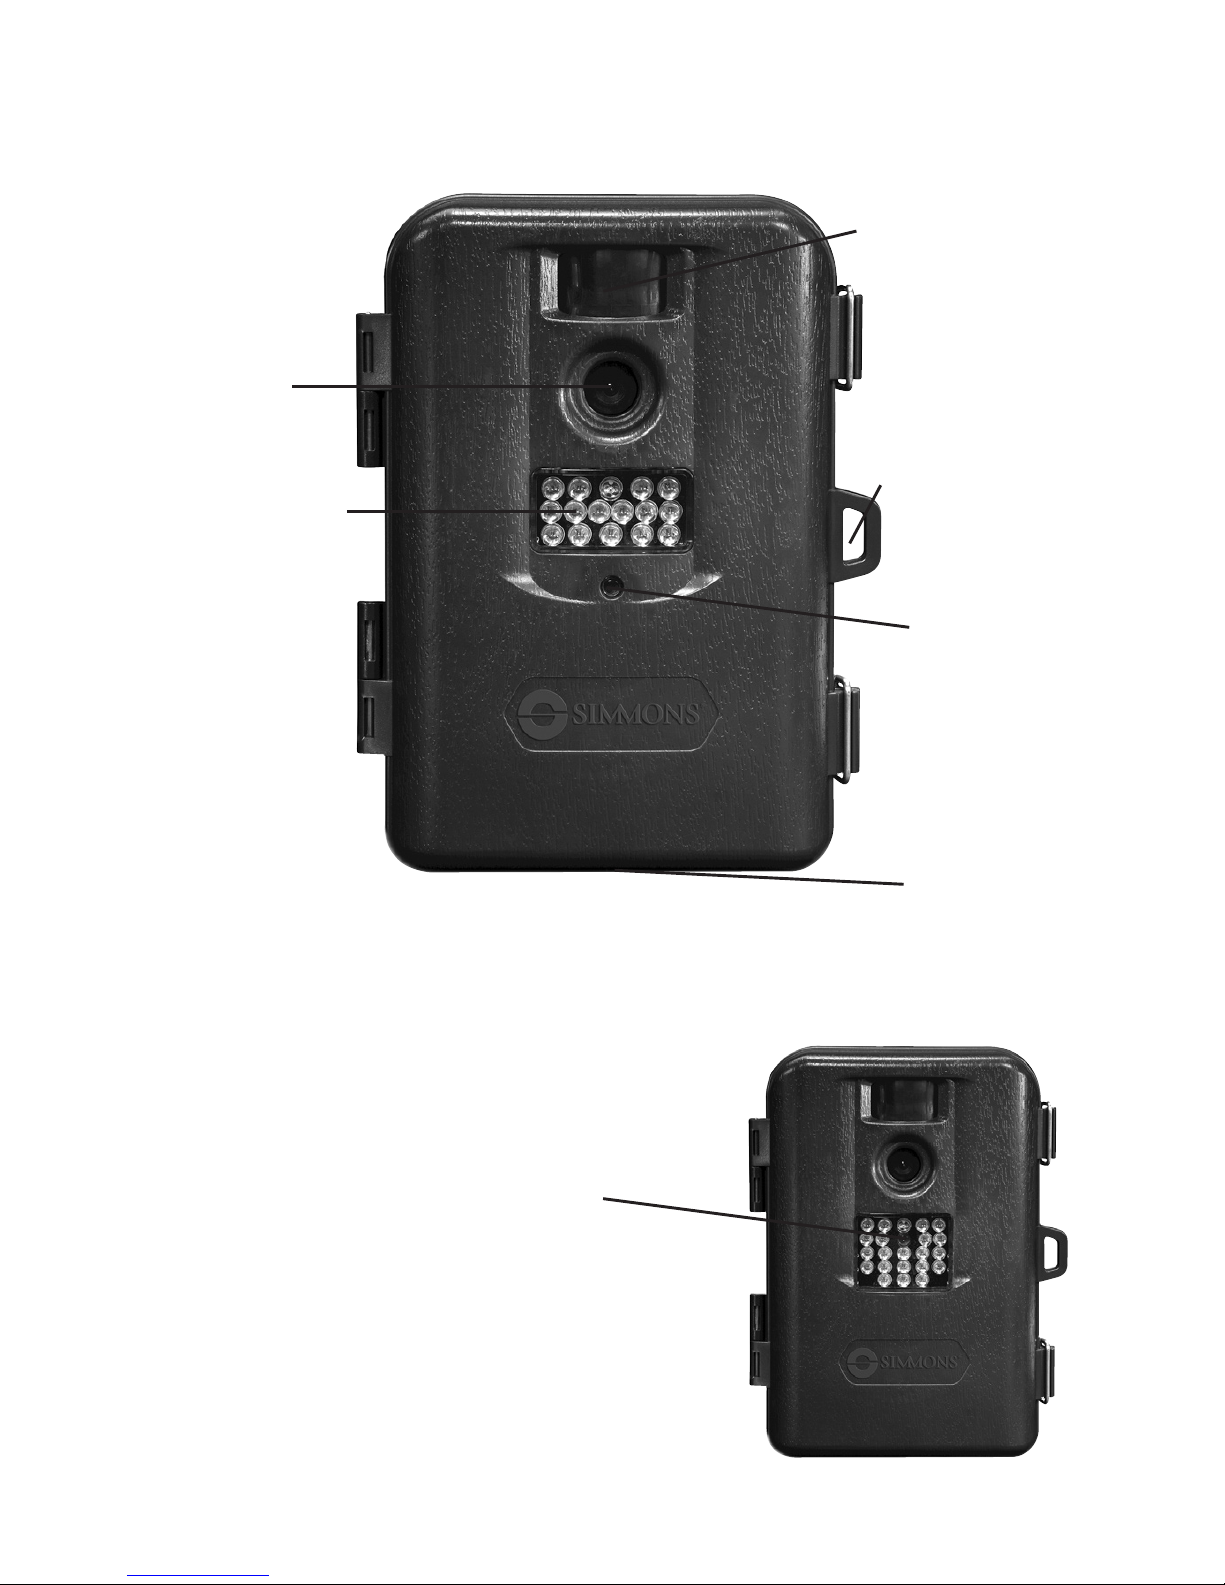
PARTS AND CONTROLS GUIDE
Front of Camera
Camera
Lens
Infrared
LED Array
PIR Motion
Sensor
Tripod
Socket
Padlock
Hole
PIR
Indicator
(Setup
Mode
Only
Model # 119233C
Model # 119225C
PIR
Indicator
(Setup
Mode
Only
7
PARTS AND CONTROLS GUIDE
Control Panel
(Front Opened)
POWER
Button
LCD
Display
USB Port
SD Card
Slot
UP, DOWN, OK
Buttons
Battery
Compartment
MENU
Button
Model #
119233C
USB Port
SD Card
Slot
LCD
Display
POWER
Switch
SETUP
Button
UP, DOWN, OK
Buttons
Battery
Compartment
Model #
119225C

8
BATTERY INSTALLATION
Unlock the latches on the right side of the camera and open it up so you
see the control panel, display and battery compartment. Insert 4 alkaline
“C” batteries (119233C or 119225C) or 4 alkaline or lithium “AA” batteries
(119225C only, installed in the vertical slots at the back of the battery
compartment)) as shown on the previous page. Simmons recommends
Energizer® brand batteries. Make sure the batteries are inserted correctly,
as indicated inside the battery compartment. Incorrect voltage or polarity
(+/-) will damage the camera.
NOTE: Always turn the power OFF before installing or removing
batteries.
SD CARD INSTALLATION
Your Simmons digital trail cam has a memory card slot, to accept SD or
SDHC cards (sold separately). The slot is located on the right side of the
control panel of model 119233C, and on the left side of the 119225C (see
previous page). The maximum capacity SD card that can be used is 16GB
(119233C) or 32GB (119225C). Simmons recommends SanDisk brand SD
cards.
Make sure the camera’s power is OFF position whenever adding or
removing memory. Insert an SD card into the card slot completely and
oriented correctly as shown by the icon above the slot (label side up, notch
on the right). To remove the SD card, rst push it back in slightly, then pull
out the card.
Using a new, blank SD card is recommended. If the SD card has been used
in another device, it’s recommended that you format it before using it in
your trail cam, using the“Format” option in the Setup menu as described
later in this manual. Make sure you have saved any les you wanted to
keep before formatting an old card! New cards are ready to use straight
from the package.

9
USING THE SETUP MENU
Press the POWER button (on model# 119225C, slide the switch to ON).You’ll
see four dashes, a number and 2 icons (119223C only) then a blank screen.
Before you start using the camera, you’ll need to make a few settings so
the correct date/time is printed on your photos, and so it takes the type
of images you prefer. This is done by using the Setup Menu. Here are the
items you’ll nd in the Setup Menu (in order), and how to use them:
Setting the Date and Time
First, you’ll make a few settings so the date and time that’s imprinted on
your images when the camera is triggered will be accurate. The order
these appear on the Menu screens is dierent for the two models, and
the way you use the control buttons are slightly dierent. Make sure the
camera’s power is on, and then:
If you have model #119233C:
Press the1. MENU button to enter the Setup Menu.
Set the Year2. (last 2 digits only) with the UP/DOWN buttons, then
press OK to conrm.
Set the Month with the3. UP/DOWN buttons, then press OK to
conrm. Set the Day with the UP/DOWN buttons, then press OK to
conrm.
Set the Hour with the4. UP/DOWN buttons, then press OK to conrm.
Set the Minute with the UP/DOWN buttons, then press OK to
conrm.
If you have model #119225C:
Press the1. SETUP button to enter the Setup Menu.
“DATE” will blink. Press2. OK. Set the Month with the UP/DOWN
buttons, then press OK to conrm. Set the Day with the UP/DOWN
buttons, then press OK to conrm.
Set the Year3. (last 2 digits only) with the UP/DOWN buttons, then
press OK to conrm.
“TIME” will blink. Press4. OK. Set the Hour (24 hr. format) with the UP/
DOWN buttons, then press OK to conrm. Set the Minute with the
UP/DOWN buttons, then press OK to conrm.

10
USING THE SETUP MENU
Setting the Image Capture Mode, Resolution, and Shot Mode
Both trail cam models are normally (by default) set to take still photos, at
the highest resolution the camera is capable of: 3MP (119233C) or 5MP
(119225C). However, you may prefer to setup your camera to capture
video clips instead of still photos, or change the still photo resolution to
“Lo”, so you can get more photos on the SD card and not have to download
or change cards as often (lower resolution=smaller les=more will t on
card of same capacity).
These settings are found in the Setup Menu for both models, immediately
after the Date and Time settings. So rst, you’ll need to enter the Setup
Menu (press MENU or SETUP), and go past all the Date/Time settings as
previously described-just keep pressing the OK button. Next:
If you have model #119233C:
“HI”and the still photo icon (regular camera) will be blinking. If you1.
want the camera to take high resolution (3MP) still photos (this is the
default setting unless you change it), just press OK and you’re done.
If you want the camera to take low resolution (1.3MP) still photos,2.
press UP once (“Lo”will blink), then press OK.
If you want the camera to take video clips (15 seconds each time3.
camera is triggered), press UP twice (a video camera icon will blink),
then press OK.
If you have model #119225C:
Both the still photo and video icons will be blinking. Press1. OK, then
press UP or DOWN so only one of the icons is blinking-if you want
still photos, select that icon (regular camera), then press OK (you’ll
then have more options). If you want videos, select that icon (video
camera) then press OK (if you select video mode, that’s the only
step-you’re done).
If you selected the still photo icon in the previous step, you now2.
have a choice of having the camera take one photo (“1P”) or a
rapid multi-image sequence of three photos (“3P”) each time it’s
Ce manuel convient aux modèles suivants
1
Table des matières
Langues :
Autres manuels Simmons Appareil photo numérique


