
Secure Computing SnapGear Instructions d'installation et d'utilisation
PUT LOGO HERE
APPLICATION NOTE
www.securecomputing.com
Setting up
SnapGear for VoIP
This note describes how to set up
SnapGear as an IPSec VPN gateway
for Voice over Internet Protocol.

286-0948364-A
Table of Contents
Setting up SnapGear for VoIP
About this note ................................................. 3
Powering on ..................................................... 4
Connecting ....................................................... 4
Logging in and configuring ................................... 5
Using QoS traffic shaping .................................. 11
Enabling and configuring ToS prioritization ............ 13
Setting the Ethernet MTU for QoS ........................ 15
Using the SnapGear VPN solution ........................ 16
Updating firmware ............................................ 20
Downloading a TSR .......................................... 21

Setting up SnapGear for VoIP
About this note
86-0948364-A 3
About this note This application note describes how to set up SnapGear as an IPSec VPN
gateway for Voice over Internet Protocol traffic. It also describes how to take
advantage of SnapGear’s Quality of Service (QoS) bandwidth management
features to maintain voice quality. The following is included:
•Powering on
•Connecting
•Logging in and configuring
•Using QoS traffic shaping
•Enabling and configuring ToS prioritization
•Setting the Ethernet MTU for QoS
•Using the SnapGear VPN solution
•Updating firmware
•Downloading a TSR
Note: This document provides one method for configuring SnapGear for VoIP.
Additional configurations are detailed in the SnapGear Administration Guide, which
is available at www.securecomputing.com > Support > Product
documentation > Product Manuals.
Setting up SnapGear for VoIP
Powering on
486-0948364-A
Powering on 1Do not connect any Ethernet cables. Plug the 5V DC mini-plug into the
back of the SnapGear appliance.
2Plug the AC plug (the three-prong plug) of the power adapter into an
electrical outlet.
3After 25 to 30 seconds, confirm the unit is in factory default mode by
resetting it. To reset, gently press the Erase button on the rear panel twice
within three seconds, one second apart. The unit will reboot into the factory
default mode.
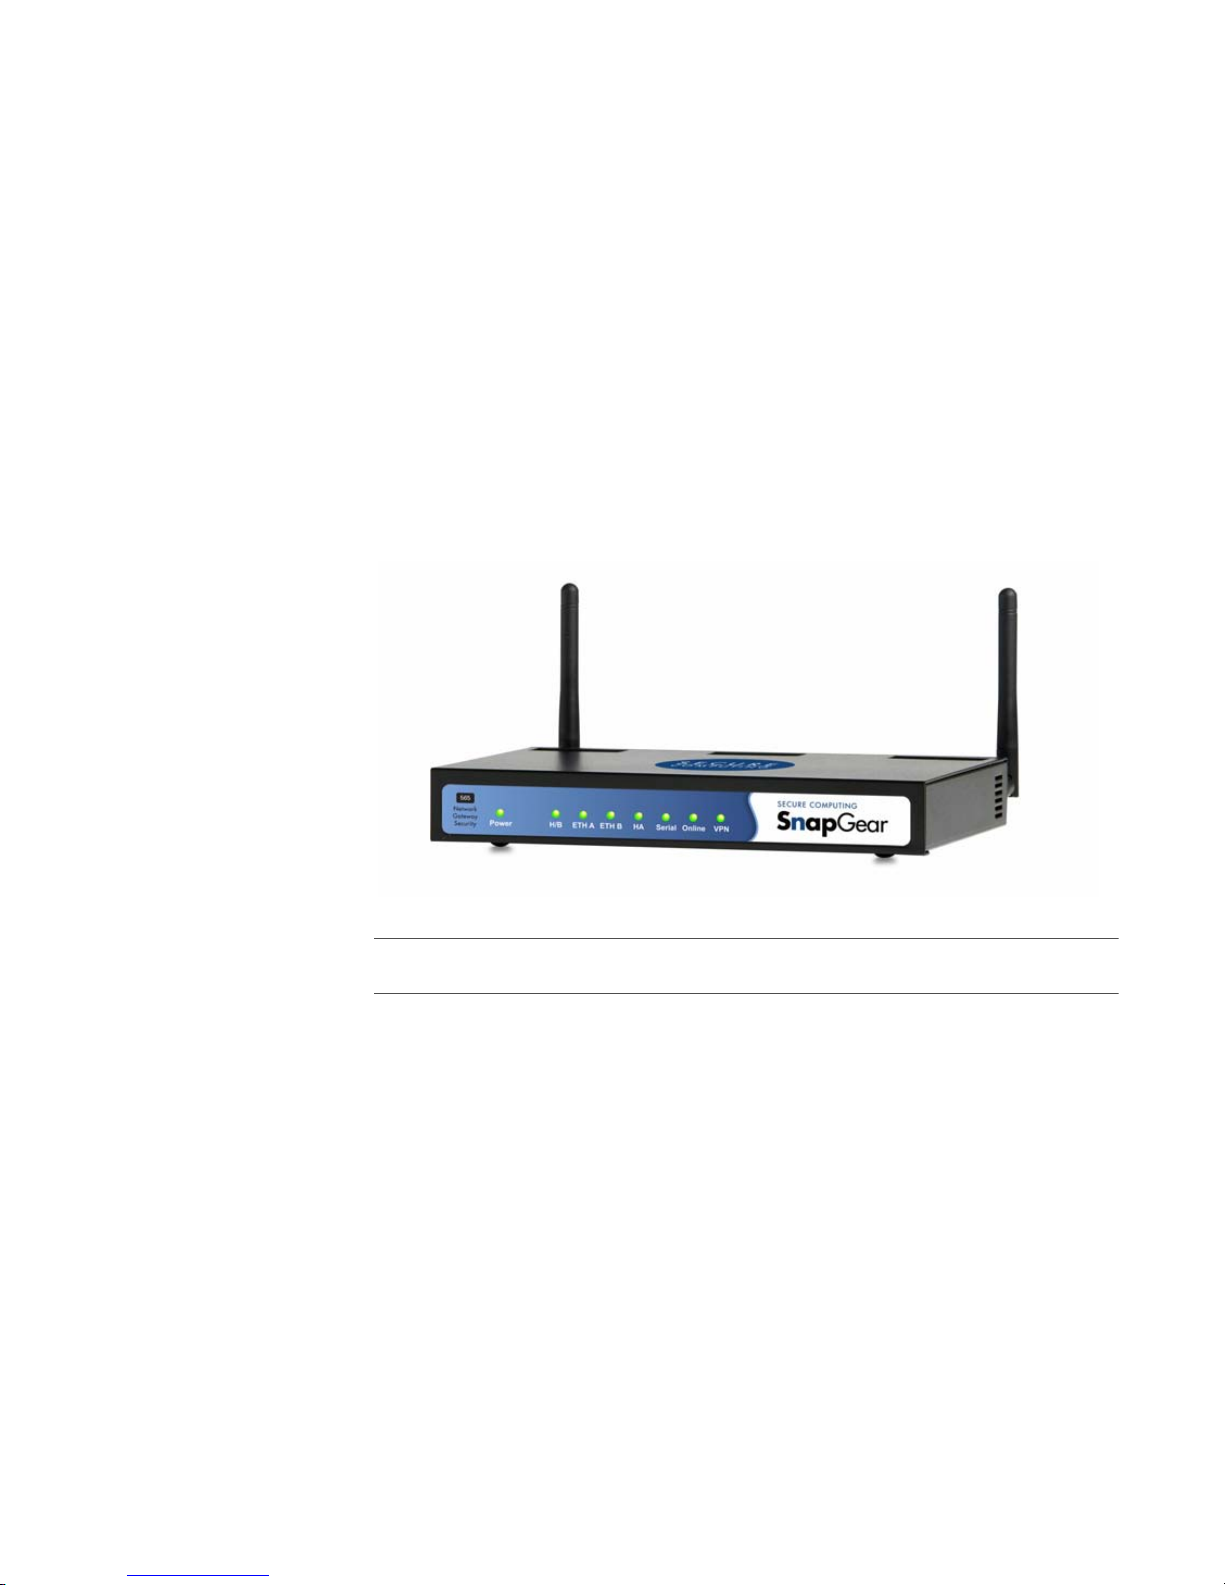
Figure 1 shows the SG565 after a reset, but before being connected to the
network. All models except the SG300 power on with the front LEDs blinking
green when in the factory default mode.
Figure 1: SG565 after a
reset
Note: When powering down the appliance, it is a good practice to unplug the AC
plug first in order to drain the power adapter, before unplugging the DC mini-plug.
Connecting To connect the appliance to the network:
1Connect the supplied cable into Ethernet port A1 on the appliance.
2Connect the other end of the cable to a PC or workstation Ethernet jack.
The PC or workstation should have a Java-enabled Internet browser such
as Microsoft Internet Explorer or Mozilla Firefox installed.
Setting up SnapGear for VoIP
Logging in and configuring
86-0948364-A 5
Logging in and
configuring To log in and configure the appliance, follow the process described in Table 1,
“Configuration sequence” below.
Table 1: Configuration sequence
Configuration window Actions
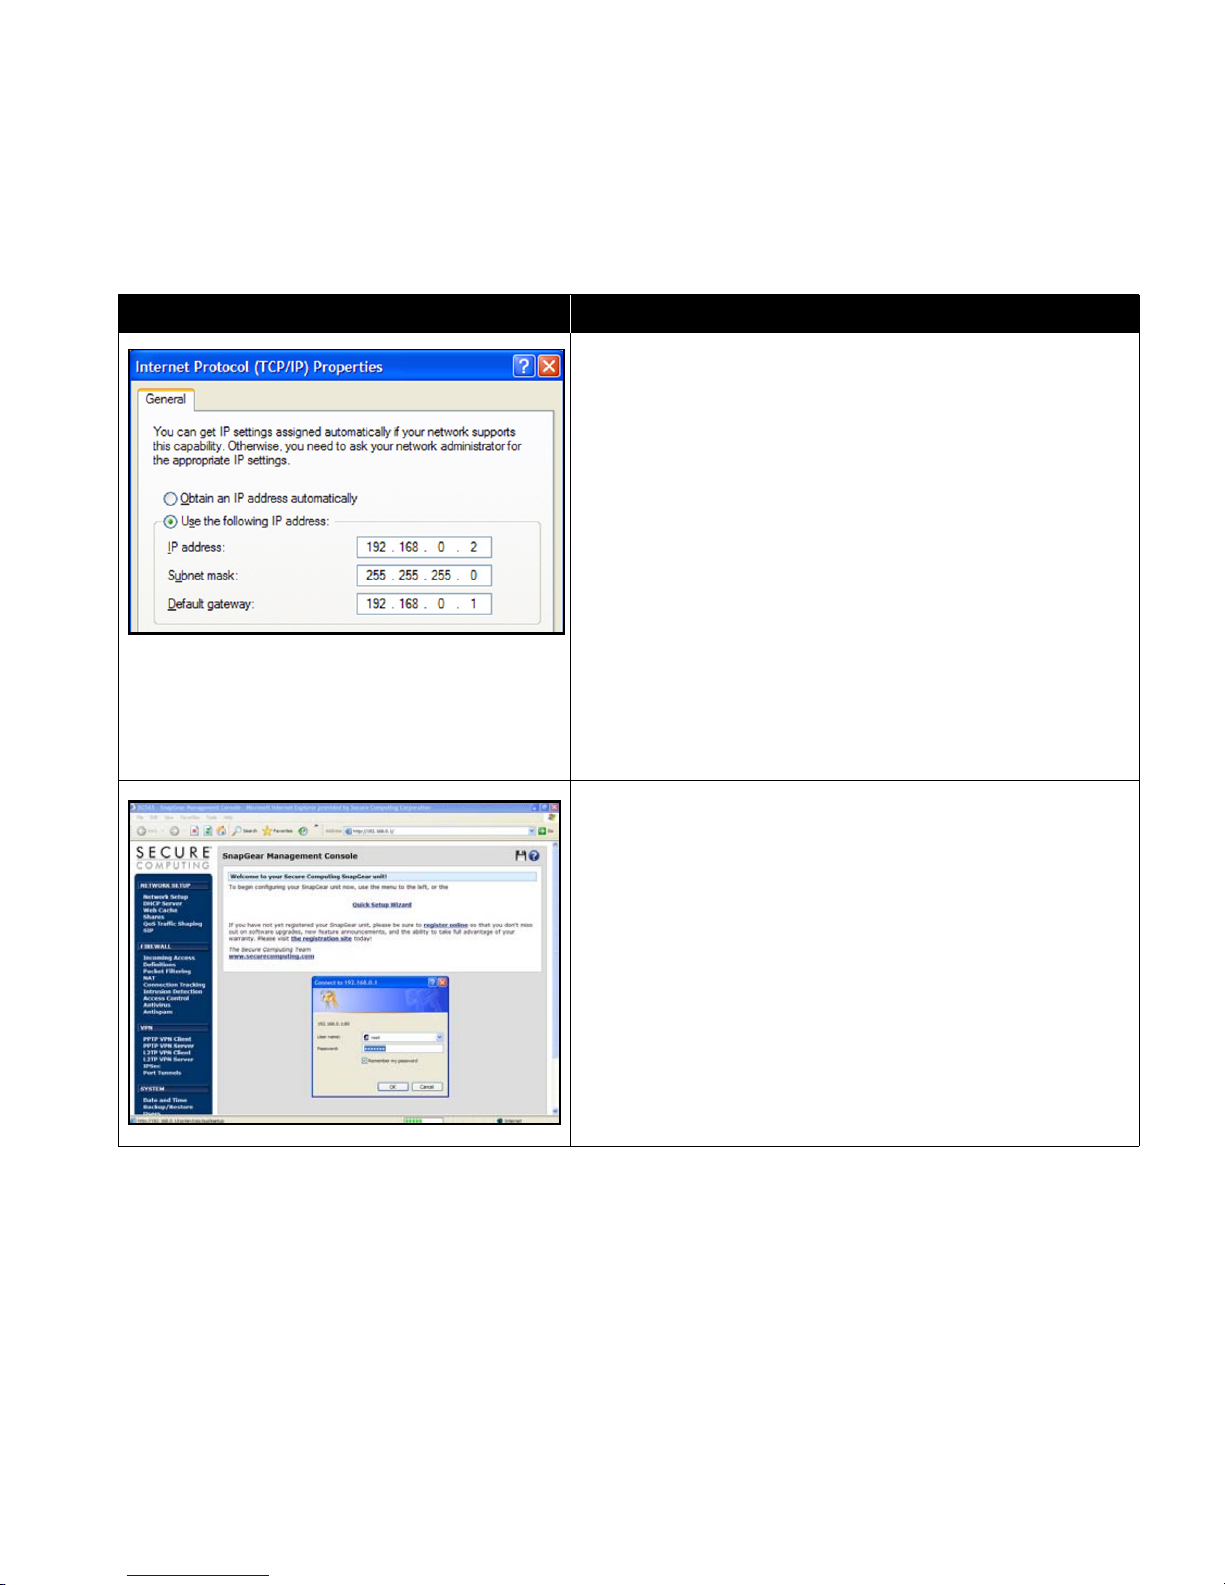
Configure the PC for IP address 192.168.0.2 by doing the
following:
1Select Start > Settings > Control Panel.
2Double-click Network Connections.
3Right-click Local Area Network, and then click
Properties.
4Select the Use the following IP address option, and
then enter 192.168.0.2 in the IP address field.
The default gateway IP address is the factory default address
of the SnapGear unit (192.168.0.1). DNS settings are not
required at this time.
Note: Because the PC and the SnapGear are isolated
during the initial configuration process, you can use any PC
IP address in the range of 192.168.0.2 through
192.168.0.254.
Log into the unit by doing the following:
1Enter http://192.168.0.1 into a Web browser.
2Enter the default user name root in the User name field.
3Enter the default password default in the Password field.
4Click OK.
More...
Setting up SnapGear for VoIP
Logging in and configuring
686-0948364-A
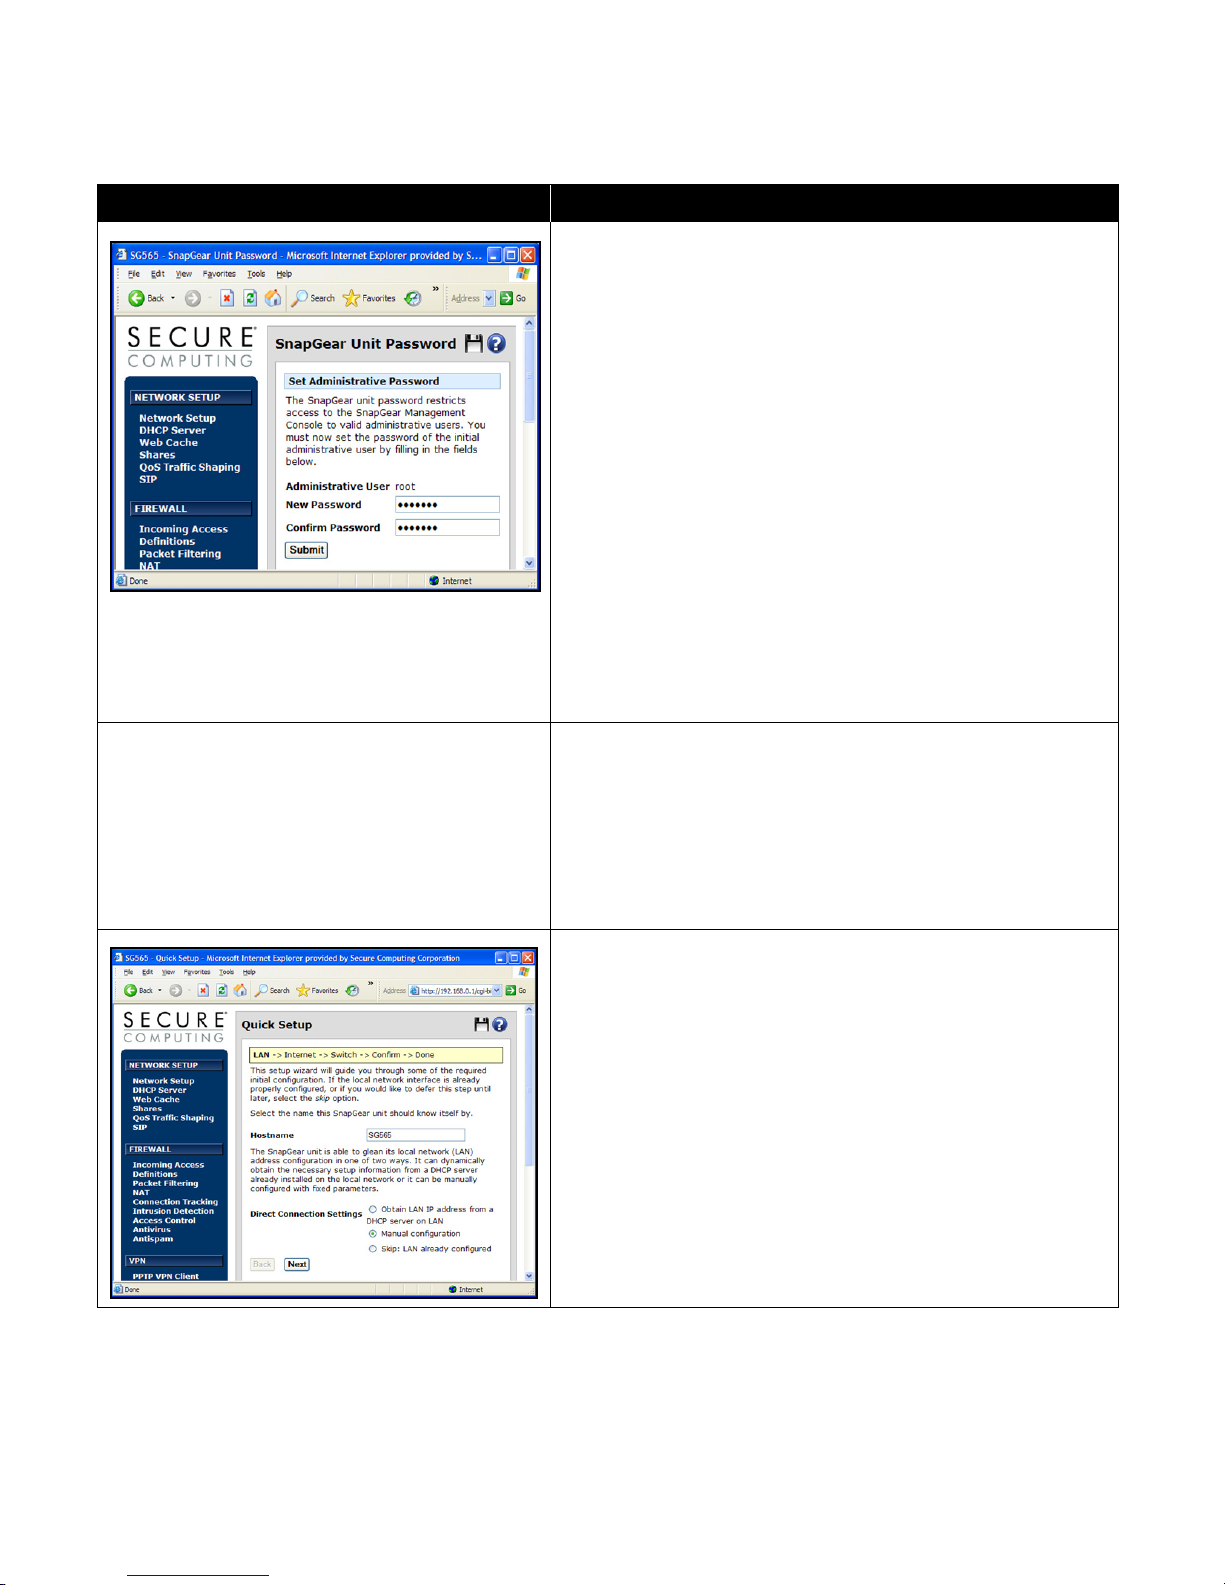
It is good practice to change the default root password.
The SnapGear firmware automates this step after a reset:
1Enter a new password in the New Password field.
2The characters you type are masked, so you are required
to enter the new password the same way twice to ensure
it is changed as intended. Re-enter the password in the
Confirm Password field.
Note: This password will be required for all administrative
access until additional administrative accounts are created. If
forgotten before these accounts are added, the appliance
must be reset to the factory default mode to regain access.
3Click Submit.
To subsequently change the root password:
1Click Users under the System menu.
2Edit the root user. You can also create new administrative
accounts in this area.
It is good practice to cable the Ethernet port B for Internet
access prior to running the Quick Setup Wizard. The Wizard
can automatically configure some circuit types if the port is
cabled prior to completing the Internet steps.
1Connect the other end of the Ethernet cable to the cable
modem, DSL router, or other device supplied by the ISP.
2Cable and power that device as instructed by the ISP.
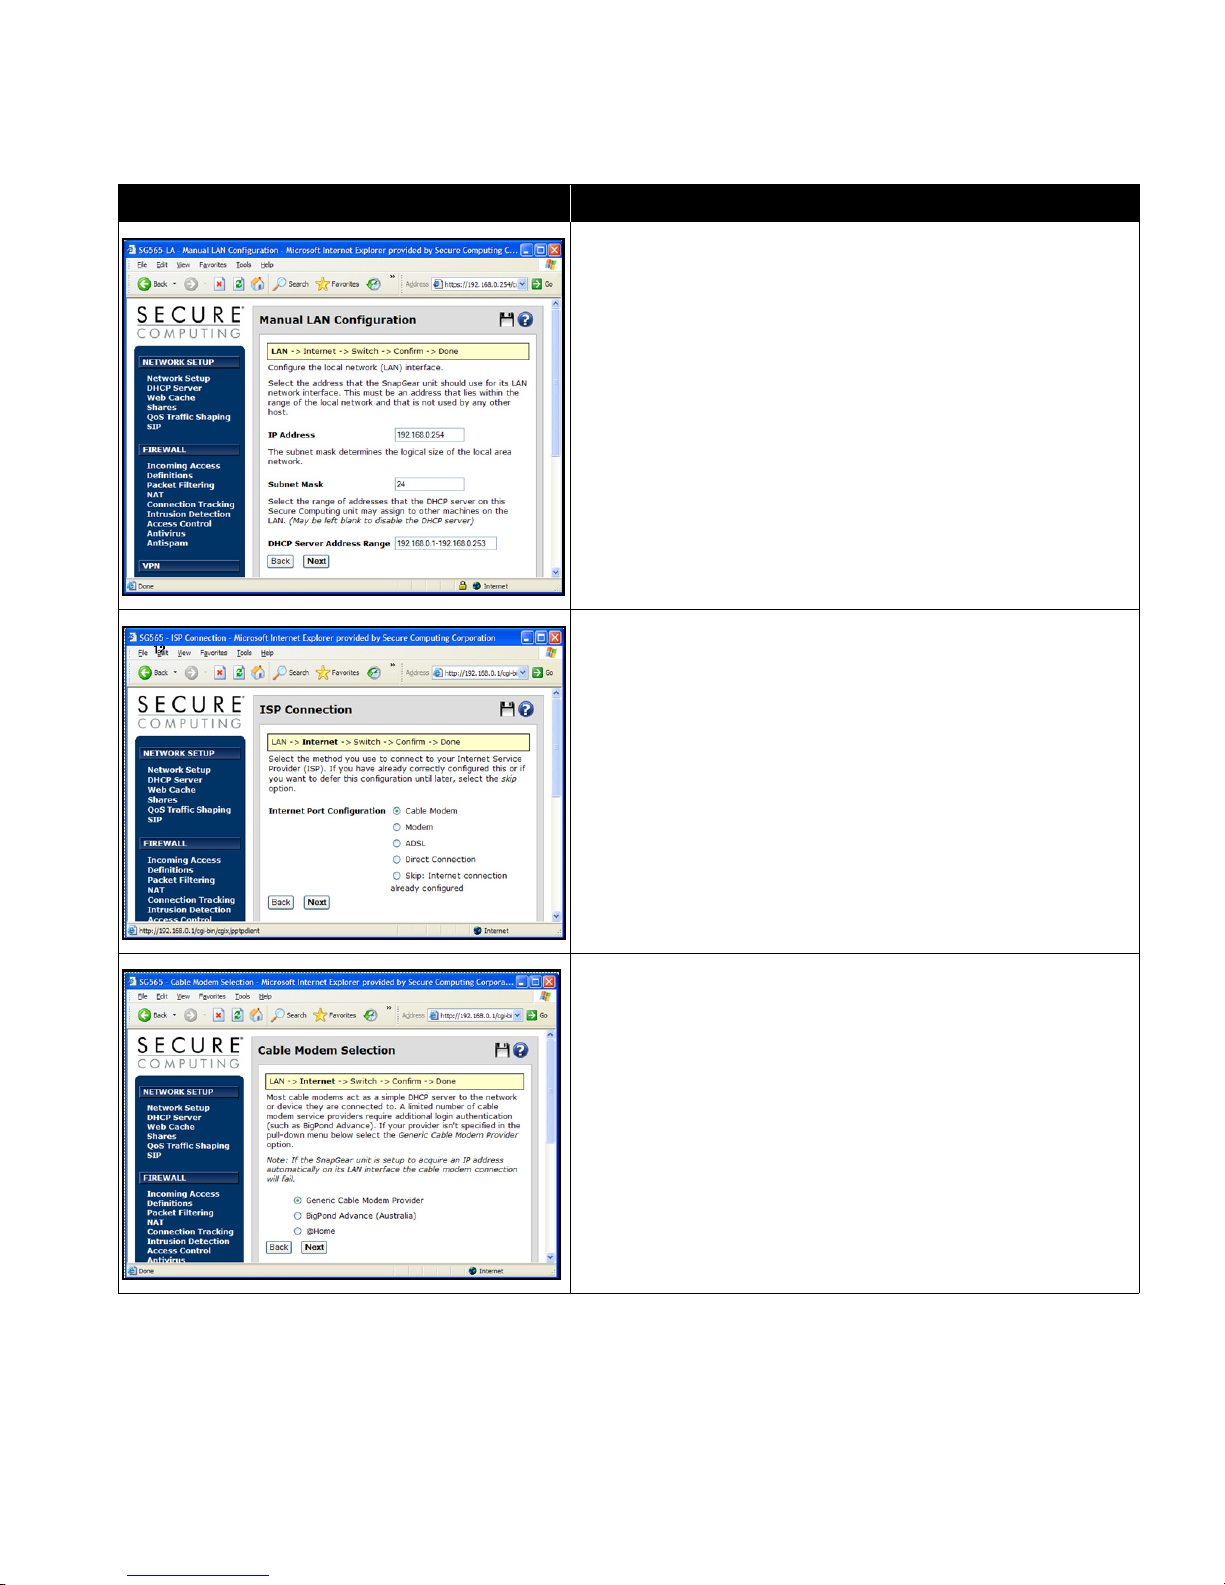
After setting the new root password, the Quick Setup
Wizard starts on the LAN page. All of the settings
established by the Wizard can be changed later using
the regular menu system.
1Type a unique hostname in the Hostname field. This
name will identify the unit.
2Leave the LAN Direct Connection Settings set to the
default selection of Manual configuration.
3Click Next.
More...
Configuration window Actions
Setting up SnapGear for VoIP
Logging in and configuring
86-0948364-A 7
1Enter the SnapGear LAN address into the IP Address
field. This is the address that all other hosts on the LAN
will use as their default gateway, e.g. 192.168.0.254.
2Enter the network mask into the Subnet Mask field. The
example to the left showing the 24-bit mask length can
also be entered as 255.255.255.0. SnapGear supports
both Class-full and custom subnet masks.
3If the other hosts on the LAN will receive their address
assignments from this unit using the Dynamic Host
Control Protocol, enter the DHCP Server Address
Range starting with the lowest address followed by a
dash and the highest address.
4Click Next.
1Select an Internet Port Configuration for Ethernet
Port B. Typically this port will be wired to a cable modem,
a DSL or ADSL router, or some other router type that
uses a direct connection. The window at left illustrates
cable modem connection.
2Click Next.
Note: Click the round ?icon in any configuration window
and select Open in a new window to read more detail about
the task being performed. Selecting a new window or tab will
avoid losing any work in the configuration window.
1Select the Generic Cable Modem Provider option for
most cable services.
2Click Next.
Note: It is not advisable for a SnapGear to automatically
acquire both its LAN and Internet IP addresses. At least one
IP address should be static for proper administrative access.
Attempting to use dynamic addresses on both the LAN and
Internet interfaces will fail when using a cable modem.
More...
Configuration window Actions
Setting up SnapGear for VoIP
Logging in and configuring
886-0948364-A
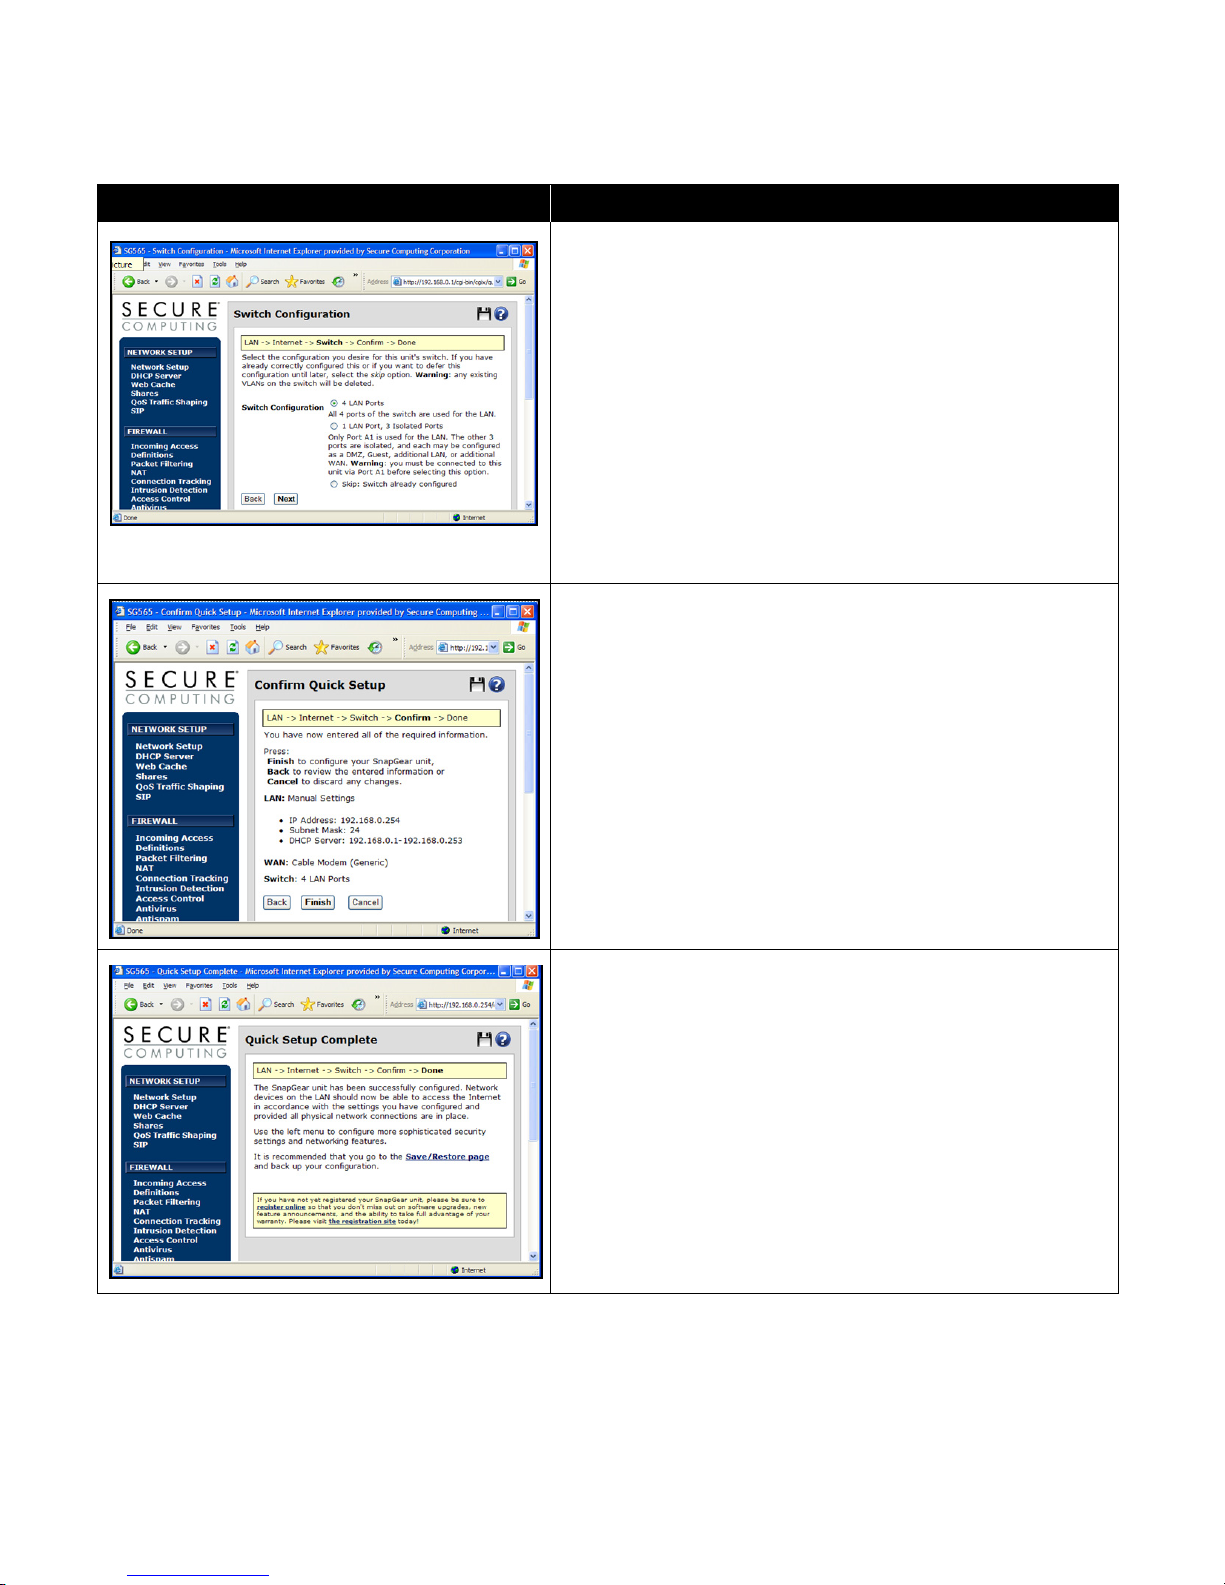
1Switch A should be left at the default setting of 4 LAN
Ports if there is no requirement for multiple Internet links.
It can always be changed later. For the greatest flexibility
in setting up the SnapGear’s Quality of Service (QoS)
features, do not configure more than one LAN/DMZ
segment. Using 4 LAN Ports lets you plug up to four
devices directly into the SnapGear. A SnapGear LAN port
can also be expanded by cascading to an additional
switch or hub.
2Click Next.
Note: QoS is important for the quality of VoIP calls. The
SnapGear’s QoS Autoshaper and ToS Packet Priority rules
can prioritize real-time streaming protocols like VoIP.
The last step in the Quick Setup Wizard is the review page. It
is especially important to confirm the new LAN settings. If the
LAN IP address has been moved from the 192.168.0.0/24
network, communication with the PC will cease after the
Finish button is clicked. In this example, all you have to do is
adjust the web address in a Web browser to http://
192.168.0.254.
Remember to plan for any required changes to your PC’s
Ethernet configuration prior to clicking the Finish button.
When all changes are complete, click Finish.
The Quick Setup Wizard completes with a page containing
links to the Save/Restore page and the Secure Computing
SnapGear registration site. Assuming the cable modem is
properly configured and attached, you can right-click the
registration link and choose Open in New Window to
register the SnapGear unit (not illustrated here).
Note: It is good practice to use the register online link
http://my.securecomputing.com to register the unit serial
number, activate Technical Support, and access the SnapGear
Knowledge Base.
More...
Configuration window Actions
Setting up SnapGear for VoIP
Logging in and configuring
86-0948364-A 9
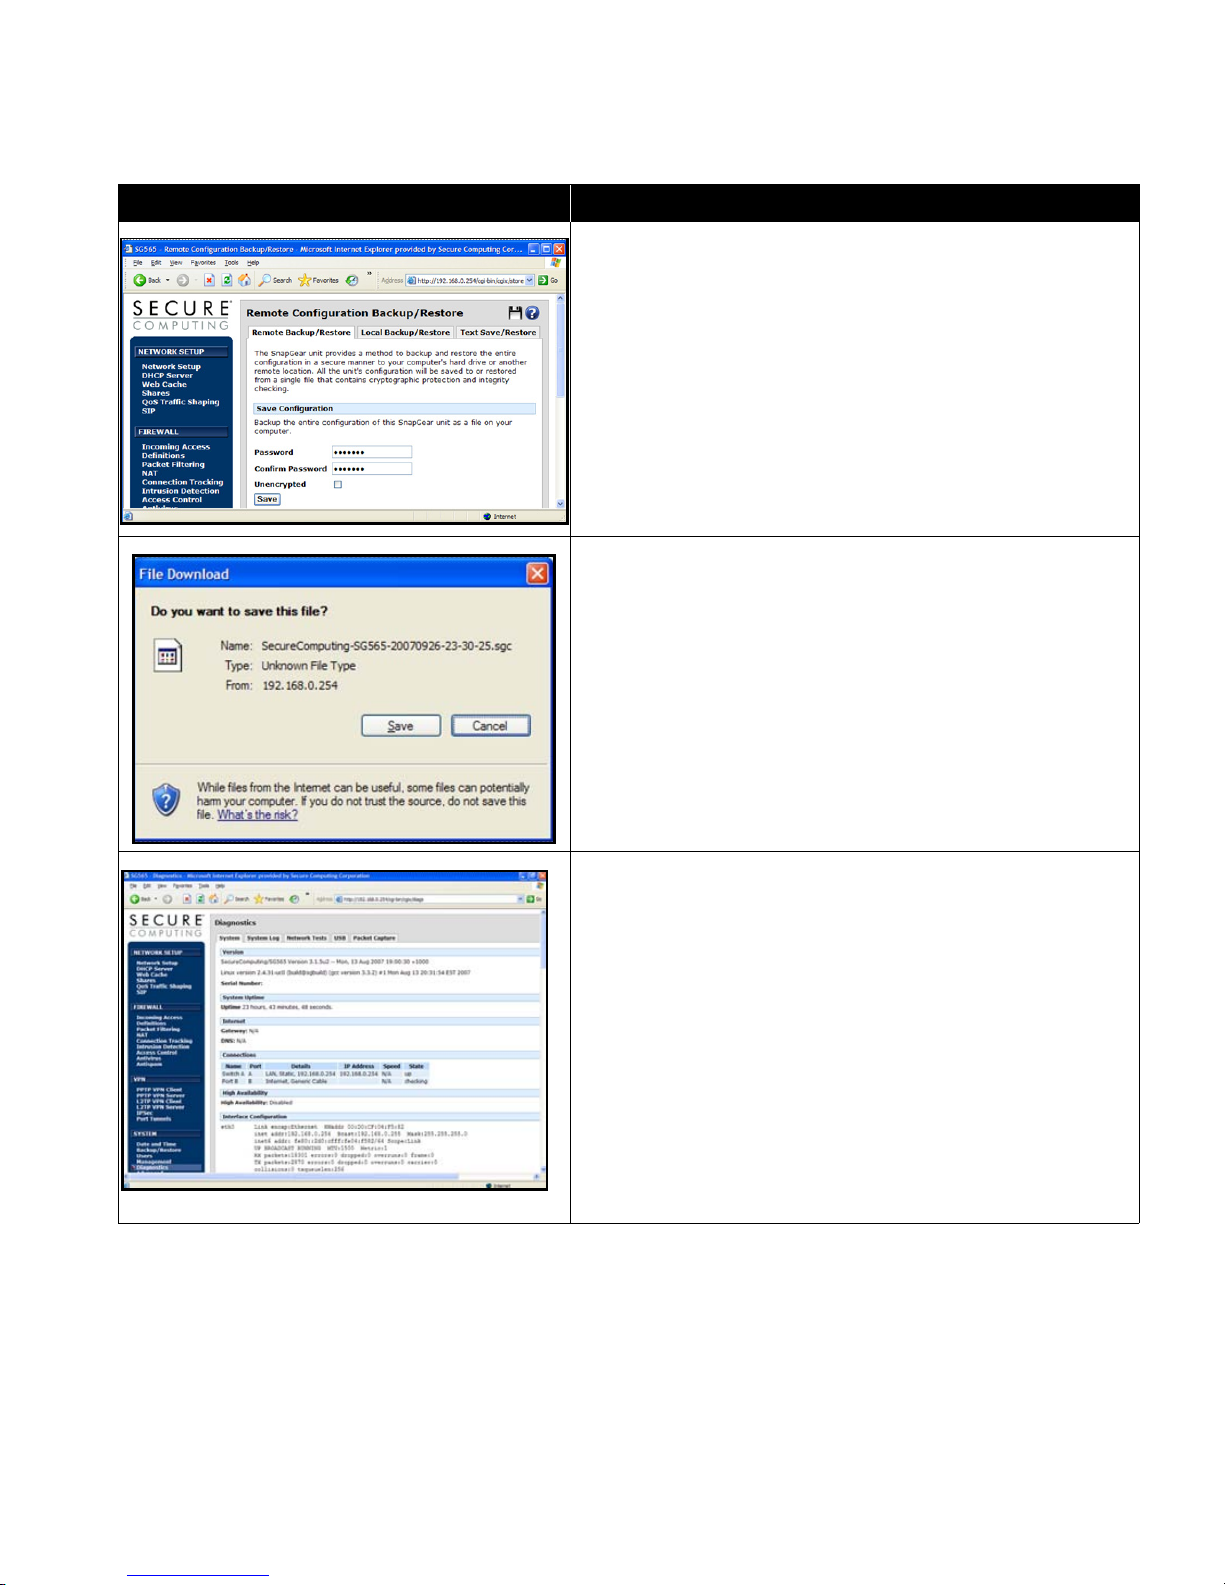
Clicking the Backup/Restore menu option opens the Remote
Configuration Backup/Restore page. Enter and confirm a
backup Password, then click Save.
Click the Save button in the File Download window and
browse to the workstation file system to save the backup.
Internet access and DNS services are confirmed if you were
able to browse to the registration site described earlier. If you
were not able to browse to the site, under the System menu,
select Diagnostics. Under the System tab, check the
Connections table for Port B. If the State entry is Checking,
the connection has not been completely negotiated.
Confirm all Internet cabling, power, and Internet Service
Provider (ISP) instructions. Check the cabling for the ISP
circuit; it can be a coaxial cable, a DSL phone line and filter
adapter, or another cable type. Power cycle the ISP device
and monitor the indicator lights on the device. Some cable
modem providers recommend leaving their devices off for
five minutes or more to insure new circuit negotiation.
More...
Configuration window Actions
Setting up SnapGear for VoIP
Logging in and configuring
10 86-0948364-A
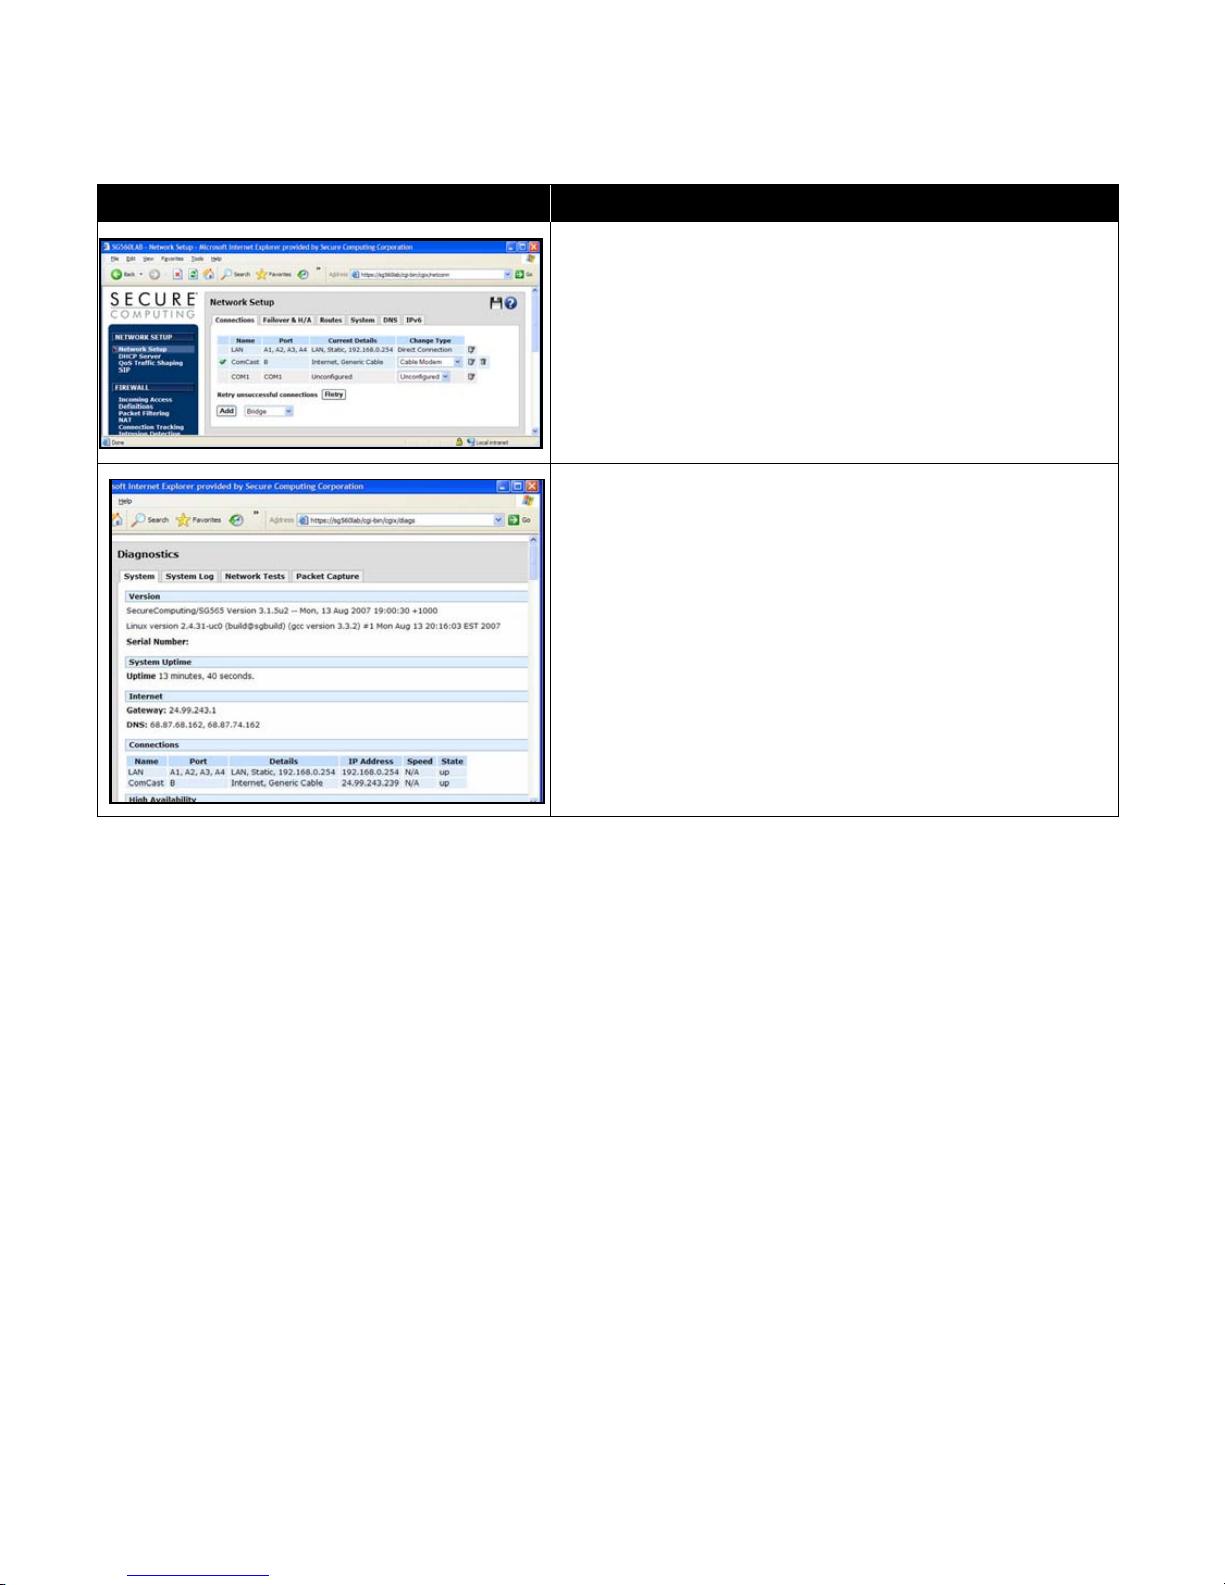
You may also check the connection by selecting Network
Setup from the Network Setup Menu. On the Network Setup
page, click the Retry button labeled Retry unsuccessful
connections, then recheck the data on the Diagnostics,
Connections table.
In the example to the left, the Connections table now shows
that the Internet is up, and that an IP address has been
assigned by the cable modem. The Internet listing above the
Connections table also shows the data for the Internet
Gateway and DNS servers on the ISP networks. If Internet
browsing still fails, connectivity and DNS services can be
further checked using this data. Additionally, you may
• Ping the ISP Gateway and DNS server IP’s to confirm
server availability on the Networks Tests tab.
• Trace Web browsing attempts on the Packet Capture tab.
• Click the Help icon for additional instructions for using
these tabs.
Configuration window Actions
Table des matières
Autres manuels Secure Computing Porte


Manuels Porte populaires d'autres marques

LST
LST M500RFE-AS Manuel utilisateur

Kinnex
Kinnex Media Gateway Manuel utilisateur

2N Telekomunikace
2N Telekomunikace 2N StarGate Manuel utilisateur

Mitsubishi Heavy Industries
Mitsubishi Heavy Industries Superlink SC-WBGW256 Manuel utilisateur

ZyXEL Communications
ZyXEL Communications ZYWALL2 ET 2WE Manuel utilisateur

Telsey
Telsey CPVA 500 - SIP Manuel utilisateur


