RSC Nano Manuel utilisateur

nano
dashcam
Copyright © 2018 RSC Labs Inc. All rights reserved
User Manual
Rev 1.01

Table of Contents
Page
Box Contents .............................................................1
Camera Operation .................................................... 2-3
Interface
LED status lights
Installation ................................................................4-5
Insert memory card
Mounting the camera
Connecting the power adapter
Using the Camera ..................................................... 6-7
Powering on
Switching camera On/Off
Loop recording
Emergency le locking
Motion detection
Retrieving your videos
Firmware upgrade
Connecting to Wi-Fi ..................................................8
iOS / Android Mobile App download
Connecting the camera via Wi-Fi
Using the Mobile App ...............................................9-13
FAQ (Frequently Asked Questions) .........................14-15
Notice......................................................................... 16-18
FCC Statement
Warranty
Contact
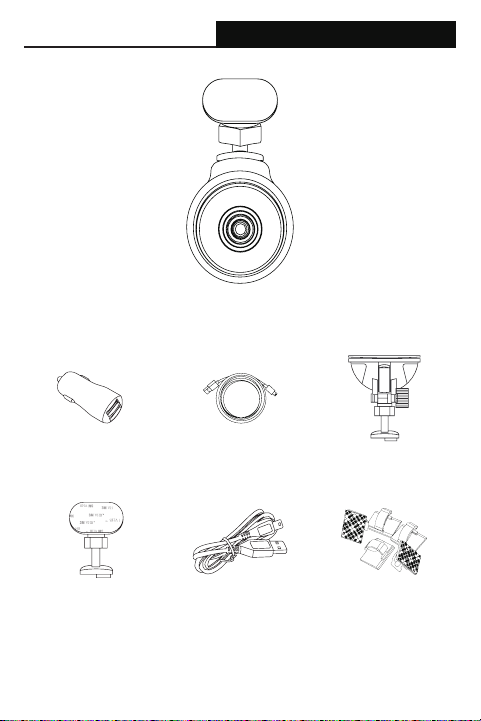
Box Contents
nano Camera
Suction Cup MountCar Power CableCar Power Adapter
Cable ClipsUSB CableAdhesive Tape Mount
1

Camera Operation
2
Cooling Vent
Camera Lens
Power Port
Memory
card slot
Mounting
Slot
Microphone
Figure 1
Figure 2

Camera Operation
LED Status
LED Activity Status
Power
LED
(Red)
Solid Red Power ON.Recording
Flashing Red 1. Power ON.Not recording
2. Firmware update in progress
Wi-Fi
LED
(Green)
Solid Green Wi-Fi connected
Flashing Green Awaiting for Wi-Fi connection
3
Wi-Fi LED
(Green)
Power LED
(Red)
Power Button
Figure 3

Installation
4
1. Insert memory card
Please insert a microSD memory card into the memory card slot located at
the top of the camera. Be aware of the orientation shown in the picture below
(Electrical contacts of the memory card should be facing the camera lens side
of the camera.) When the memory card is successfully inserted, a‘click’sound
should be heard.
It is recommended to use a Class 10,8GB or above microSD memory card. The
camera supports up to 64GB of memory capacity.
2. Installing camera mount
Align the notch of the mount with the mounting slot on the camera, then slide
the mount to the left. Ensure the mount is secured before proceeding with
install. To remove the mount, simply slide the mount to the right.
Position the camera to the desired install location on your windshield with
optimal viewing angle,and proceed with mounting.
Please note: Suction cup mounts should not be placed over the defrost grid
(Mostly in dotted form) of the windshield, as the suction cup will not have
sufcient mounting capability due to uneven surface.

Installation
5
3. Connect the power cable
Plug the car power adapter into your vehicles’ cigarette lighter/power port.
Connect the power cable into the power adapter, and insert the mini-USB plug
into the power port on the camera.
4. Congure camera via Wi-Fi
Before connecting to the camera’s Wi-Fi, please proceed to the App store on
your mobile device, search for “RSC Viewer”, and download our mobile camera
app (App Icon shown below). Further instructions on how to operate the App is
available on Page 8 of the user manual.
RSC Viewer

Using the camera
6
Powering On
The camera is designed to automatically power on when it receives power from
the car power adapter. A start-up sound will be played when the camera has
started successfully.
Switching camera On/Off
Automatic: When the camera is ON,simply turn OFF the engine or unplug the
power cable and the camera will switch OFF automatically.
Manual: Switching the camera OFF manually is required for vehicles where the
vehicle’s power socket provides continuous power after the engine is turned
OFF. To turn the power off manually, press and hold the power button for at
least 5 seconds. When the camera has been turned off, all status LEDs will not
be lit.
To turn the camera on manually, press and hold the power button for at least 3
seconds.
Loop Recording
Default: 1 Minutes
The loop recording function allows the camera to continuously record video
footage on your memory card. When there is insufcient space on the memory
card, loop recording will automatically overwrite the oldest non-protected le on
the memory card, and replace with a new recording.
The available settings of 1/3/5/10 minutes allows you to choose how long to
record for each video le.
Emergency le protection
Default: Low
When the G-sensor is activated due to a collision,the footage currently recorded
will be automatically locked to avoid being overwritten by loop recording. Adjust
the G-sensor level of the camera to the appropriate setting based on your
driving area.
Motion Detection
If turned ON, the camera will start recording when camera detects any
movement within its FOV (Field of view). Once the camera does not detect any
movement for 60 seconds,it will stop recording and returns to Detection mode.
Recording will resume if any new movement is detected.

Using the camera
7
Retrieving your videos
Retrieving using a PC/Mac:
Connect the camera to a computer using the supplied Mini USB cable. The
camera will automatically turn on.
The computer will detect a“removable disk”, similar to connecting a USB Flash
Drive on your computer.
Navigate to the corresponding folder to access video recordings;
Recording Type Folder Location
Normal Recording \MOVIE
Emergency Protected \MOVIE-RO
Video Snapshot \PHOTO
Retrieving using Mobile App:
Connect your smartphone to the camera’s Wi-Fi SSID. After a successful
connection, tap the icon located at the bottom left of the screen. A list of
available video les will be shown on the App.
Firmware Upgrade
Step 1: Download latest rmware from our website (www.rsc-labs.com), and
unzip/extract the ZIP le.
Step 2: Copy & Paste or drag & drop the extracted .bin le to the root of the
Micro SD card.
Step 3: Insert the Micro SD card into the camera’s card slot once the transfer is
completed.
Step 4: Connect the camera into a power source and then turn the camera ON.
Step 5: The LED indicator will start ashing to conrm the update progress.
Step 6: Once the upgrade is completed, the camera will automatically reboot.
Step 7: To verify the installed rmware version,access the ‘Version’ tab on the
mobile app.
Step 8: Before using the camera, please reformat the memory card using the
mobile app.
Please Note:
• To ensure a stable rmware upgrade, we recommend formatting the memory
card prior to the upgrade process.
• DO NOT unplug or power-off the camera during a rmware upgrade process,
as it may cause repairable damage to the camera.

Connect to Wi-Fi
8
Connecting to the camera Wi-Fi:
Before connecting to the camera’s Wi-Fi, please make sure your camera is
powered on. Navigate to the Wi-Fi connection page on your smartphone/tablet,
and look for a Wi-Fi SSID name starting with:
nano-######### (# is a random number)
When prompted for a password, please enter the default password:
12345678
After a successful connection,your device’s Wi-Fi page should display the
message “Connected”, or a check-mark located beside the camera’s Wi-Fi name.
In order to protect your device from unwanted accesses, it is strongly
recommended to change your camera’s Wi-Fi password under the Mobile
App’s Settings menu.
iOS Android
Table des matières
Langues :
Autres manuels RSC Caméra embarquée


