Renaissance Venetian Blinds Manuel utilisateur

www.rca-uk.com
Instruction Manual
Venetian Blinds
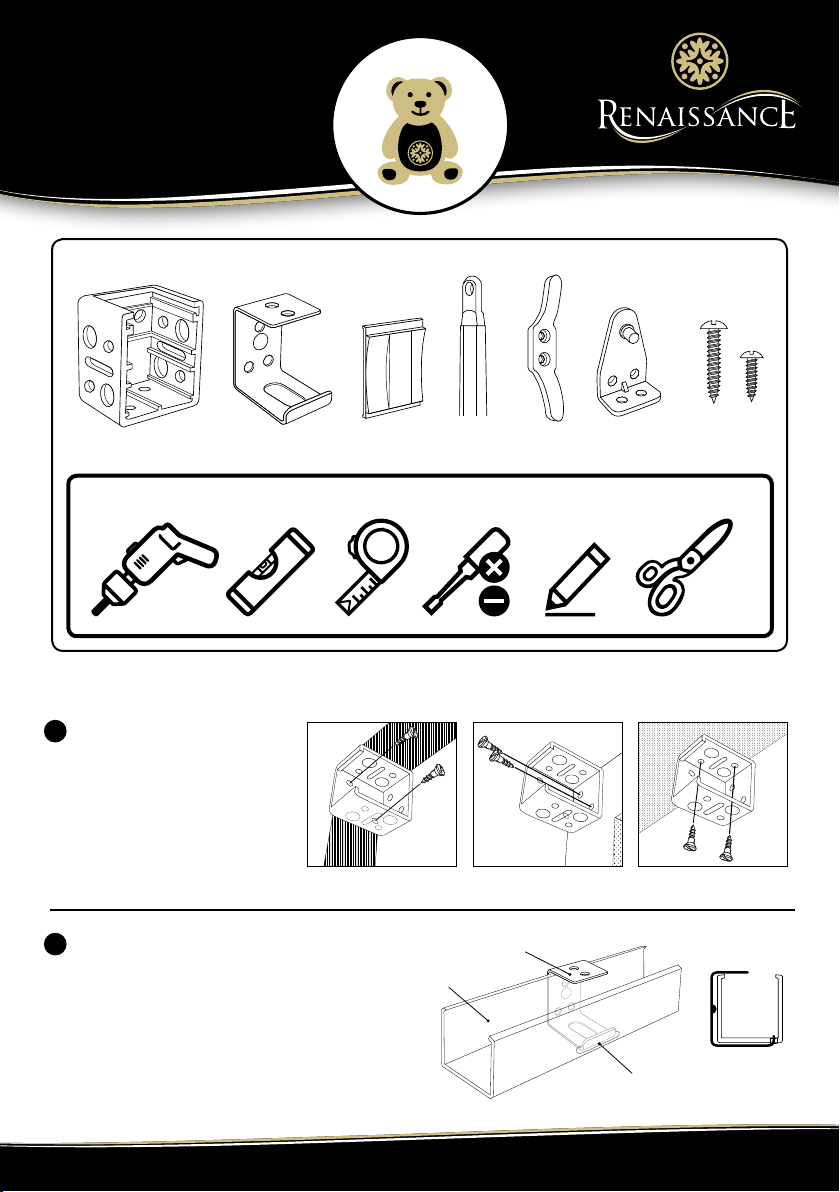
Tools required for installation:
2x
End Brackets
NB: Blind headrails shall not be installed less than 1.5m from the oor.
2x
Face Plates
2x
Retention Plate
6–14x
Screws
1x
Wand
1x
Cleat
0–3x
Support Brackets
Assembly Accessories:
Fix brackets
Measure and mark bracket
position. Dill holes in the wall
substrate and plug if required,
then x the 2 x brackets into
place with the screws provided.
1
Fix intermediary support brackets
For blind width sizes over 75cm you then need
to x support brackets. Ensure these brackets are
positioned to line-up exactly with the slots on the
underside of the head rail.
NOTE:The support bracket closest to the pull
cord end must be installed. This is essential.
2
Head Rail
Centre Support
Slot on underside
of the Head Rail
Side view
In a recess Wall mounted To the ceiling
C
H
I
L
D
S
A
F
E
I
F
I
N
S
T
A
L
L
E
D
A
C
C
O
R
D
I
N
G
T
O
I
N
S
T
R
U
C
T
I
O
N
S
REN073-04-v11- R E V 3 - 0 71 5

www.rca-uk.com
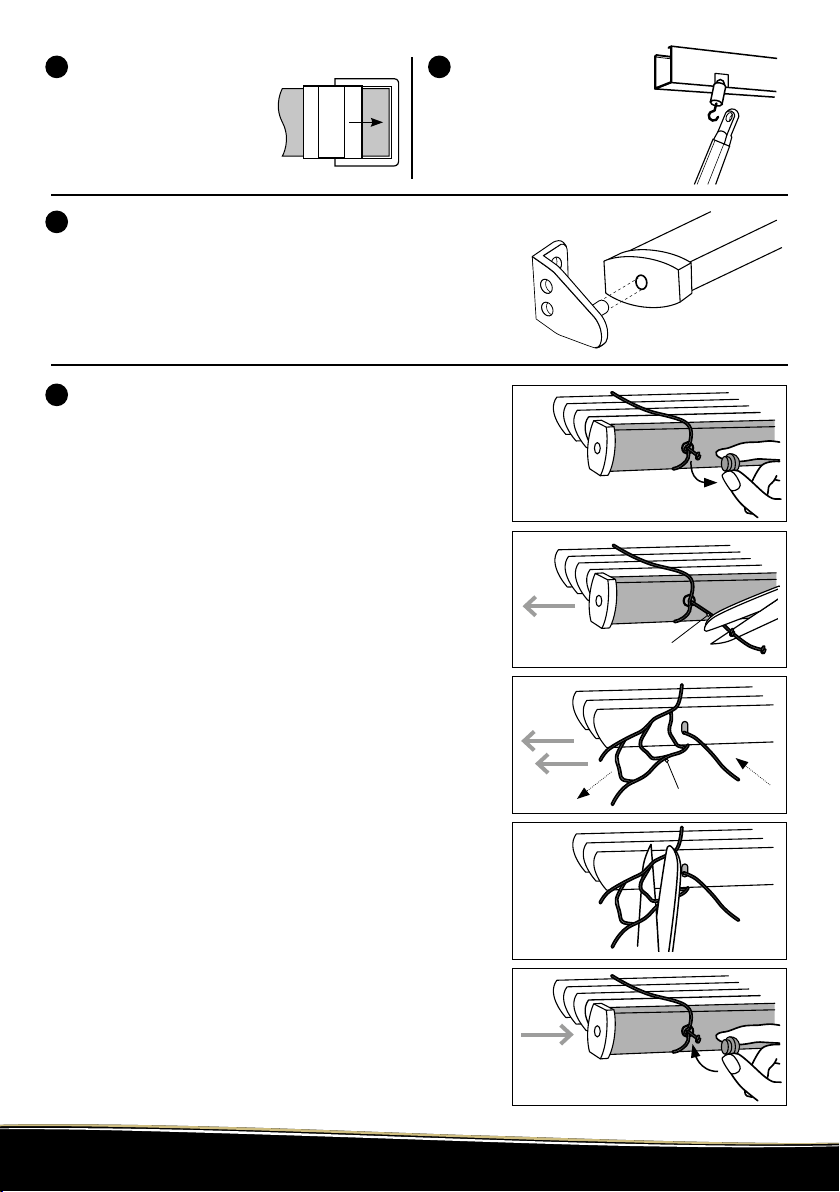
Insert face plates
Insert blind head rail into the
end brackets, then slide into
position the bracket face plates
into the front of each bracket.
3
Securing blind to bottom of window
If you want to secure the blind to the bottom of the window
(optional), the hole on the end of the bottom weight bar ts
into the retention plate (provided) at the base of the window.
Screw the plate securely to the window frame and then clip
into the bottom weight bar.
5
To shorten the blind drop height
NOTE: Before tting you can custom t the blind to the
correct height by follow the instructions below.
6.1 The height – when the blind is fully lowered there should
be no slats over lapping at the bottom of the blind. If over
lapping occurs you can remove slats to allow a custom t.
6.2 Hold the blind at the desired location and allow it to fully
lower. In the open position the slats should be approximately
2cm apart.
NOTE: A good rule of thumb is to remove 8 slats for
every 150mm (6") you wish to shorten the blind by.
6.3 Lay blind on a at surface and remove the caps on the
bottom weight bar. The caps cover the lift cords [g. 1].
6.4 Cut lift cord 2cm above cap and remove. Pull the lift cord
from the bottom weight bar to allow it to slide out of the
ladder rung [g. 2].
6.5 Count the number of slats you wish to remove. Pull the
lift cord from these slats to allow them to slide out of the
ladder rung and remove the required number of slats [g. 3].
6.6 Remember to allow for the bottom weight bar to be
reinserted, then thread the lift cord back through the cap holes.
6.7 Knot lift cord directly beneath the bottom weight bar
and cut off excess cord [g. 4]. Allow one extra rung and cut
off excess ladder, now tuck remaining ladder into the bottom
weight bar cap holes. Then replace the caps [g. 5].
6.8 After blind is shortened you may wish to adjust the pull
cord length. Remove the plastic cover over the knot and cut
off excess cord and then re-knot.
6
Fix wand
Connect the wand to the
tilt control hook, which is
positioned towards the left
hand side of the blind.
4
g. 1
g. 2
g. 3
g. 4
g. 5
Lift cord
Ladder rung

www.rca-uk.com
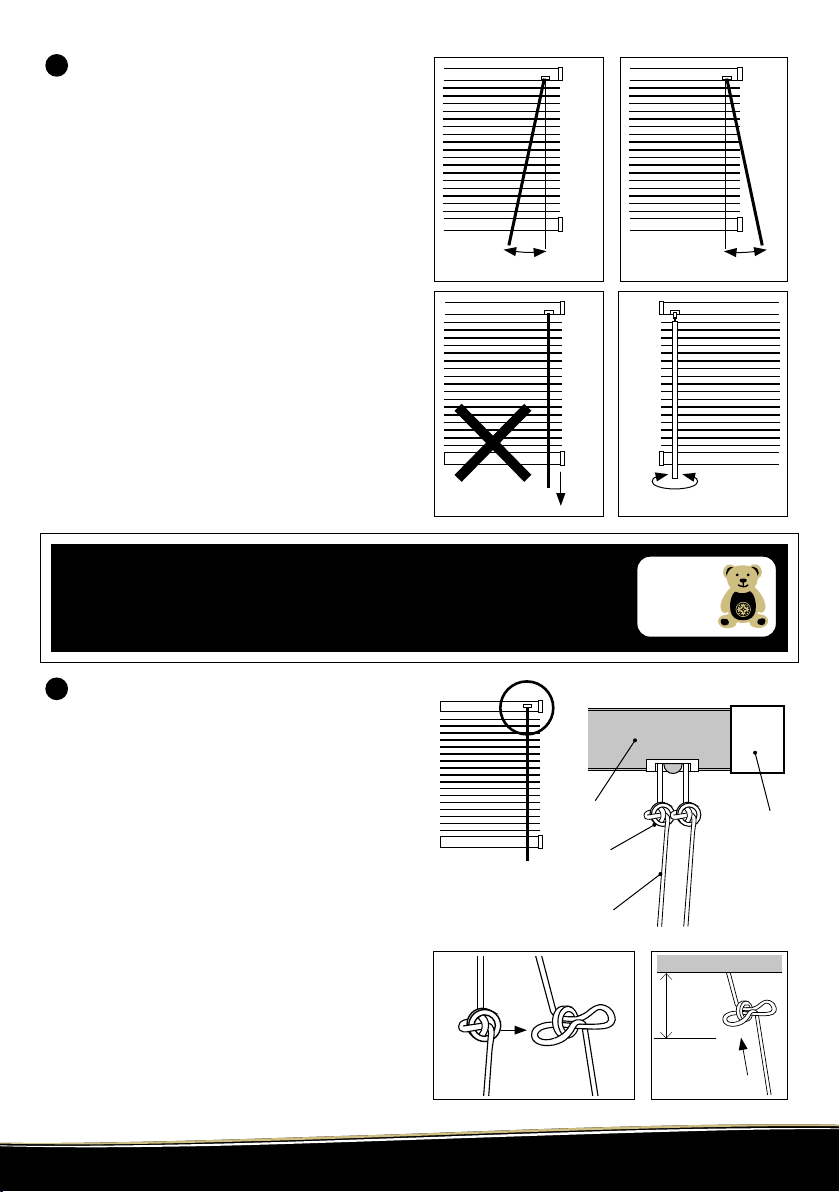
To operate the blind
To raise blind: Move cord to the left then pulling
it down gently until cord lock releases. Pull cord
down towards the left until blind reaches desired
position [g. 6], then move cord to the right and
release [g. 7]. The blind will lock automatically.
To lower blind: Move cord to the left then pull it
down gently until cord lock releases. Allow blind
to descend until it reaches the desired position.
Move cord to the right and release, the blind will
lock in position automatically.
WARNING: Do not pull the cord downward
directly – this may break the blind! [g. 8]
To tilt blind slats: Rotate ‘wand’ on left side of
blind either clockwise or anti-clockwise to attain
desired slat positions [g. 9].
IMPORTANT: Always adjust the tilt of the blind
slats to horizontal before raising or lowering the
blind – this increases the life of the blind.
7
Position safety cord-stops
8.1 Install the blind as detailed overleaf, making
sure the head rail is securely fastened. Lower blind
to maximum desired length and lock in to place.
8.2 Measure the distance from head rail to
cord-stops. If cord-stops are 25–50mm below the
head rail, no further adjustment is needed and
your blinds are ready to use.
8.3 If cord-stops ARE NOT 25–50mm below
the head rail, loosen (but do not untie) the knot
surrounding the cord-stop [g. 10].
8.4 Push both the cord-stop and the loosened
knot toward the head rail until the cord-stop is
25–50mm below the head rail [g. 11].
8.5 Hold cord-stop in place and pull rmly on
pull cord to re-tighten knot.
8.6 Repeat 8.3 through 8.5 for each cord-stop.
8
g. 6 g. 7
30° 30°
g. 8 g. 9
Head Rail Bracket
Cord-Stop
Pull Cord
25–50mm
g. 10 g. 11
CHILD
SAFETY
FIRST!
CHILD SAFETY IS MANDATORY!
ALL CHAINS AND LOOPS MUST BE SECURED
For more information please visit www.rca-uk.com/childsafety

www.rca-uk.com
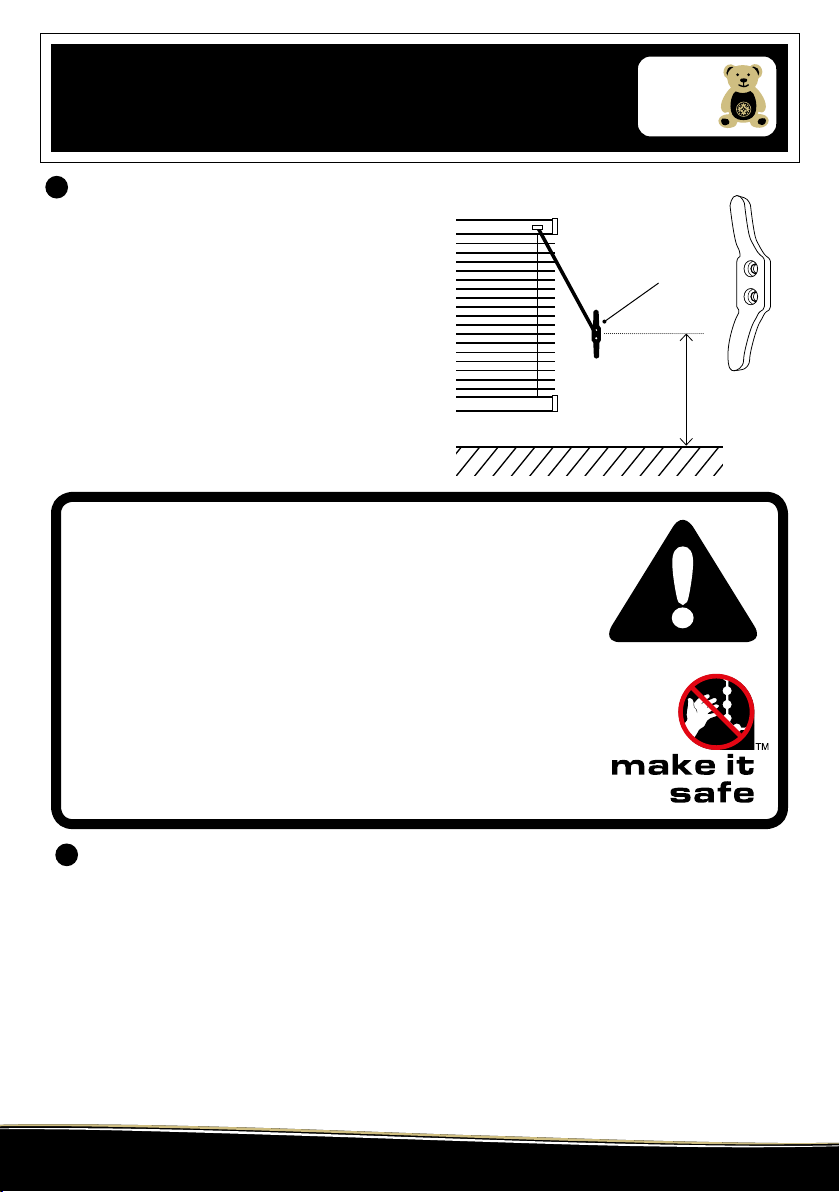
Minimum of
150cm from
oor level
Cleat hook
accumulation system
WARNING
Young Children can be strangled by loops in pull cords,
chains, tapes and inner cords that operate the product.
To avoid strangulation and entanglement, keep cords out of the reach
of young children. Cords may become wrapped around a child’s neck.
Move beds, cots and furniture away from window covering cords.
Do not tie cords together. Make sure cords do not twist and create a loop.
NOTE: Fitting guidelines state that the safety device should keep the cords
taut and should not be tted less than 1.5m from oor level.
Go to www.makeitsafe.org.uk for further details.
CHILD
SAFETY
FIRST!
CHILD SAFETY IS MANDATORY!
ALL CHAINS AND LOOPS MUST BE SECURED
For more information please visit www.rca-uk.com/childsafety
To trim blind width
10
Your blind can be trimmed by up to 80mm each
side (160mm max total). To trim the blind to size:
10.1 Measure the overall width of the outer
distance of the mounted end support brackets and
deduct 5mm to get the desired nished blind width.
10.2 Calculate the amount that needs to be
cut off the blind headrail.
10.3 Divide this measurement by two, then mark
and cut this amount equally off each side of
headrail using a hacksaw.
10.4 Remove the end-caps on the bottom weight
bar and shorten this in the same manner, then
replace the endcaps.
10.5 Then using a Renaissance Venetian Blind
Slat Cutter, trim the same measurement off end
of each slat.
Blind Maintenance: Your blind can be dusted
using a Renaissance Venetian Blind Duster. Your
local Renaissance retailer can help you with this.
Install the cleat hook accumulation system as close
to the headrail as possible and, in all cases, not less than
1.5m from the oor.
Hold the cord cleat up parallel with the window frame.
Mark dots through the holes. Drill pilot holes and x
the cleat with screws provided.
Wind cord in a gure-of-eight motion around the
cleat to keep cords out of reach. Cords should be fully
wound around the cleat hook accumulation system so
that no part of the cord is left within reach of children.
COMPLIANT WITH BS EN 13120: 2009+A1:2014 /16433 /16434.
Install cord cleat hook accumulation system
9
Table des matières
Autres manuels Renaissance Store vénitien
Manuels Store vénitien populaires d'autres marques

Domondo
Domondo PureNight Manuel d'instructions d'installation

rollease acmeda
rollease acmeda Easy Spring Air Guide de configuration

IKEA
IKEA KADRILJ Manuel utilisateur

Hallis Hudson
Hallis Hudson Rolls Super glide Manuel utilisateur

Benthin
Benthin P1614 Manuel utilisateur

MV LINE
MV LINE CLARA 015 Mode d’emploi