
Rehau NEA SMART R Manuel utilisateur

NEA SMART R ROOM CONTROL DISPLAY UNIT
Installation and operating manual

CONTENT
1 Safety 3
1.1 Used symbols 3
1.2 Intended use 3
1.3 General safety warnings 3
2 Versions 4
2.1 Technical data 4
2.2 Compliance 4
3 Installation 5
3.1 Box contents 5
3.2 Installation 5
4 Operation 7
4.1 Overview and display 7
4.2 Operation 8
4.3 Commissioning (incl. pairing) 8
4.4 Connection test 8
4.5 Comfort programs - Smart Start/Stop mode 8
4.6 Lifestyle functions overview 8
4.7 Lifestyle functions 9
4.8 Overview parameters 9
4.9 Parameters 10
5 Troubleshooting, Cleaning and Decommissioning 11
5.1 Troubleshooting 11
5.2 Changing the batteries 11
5.3 Cleaning 11
5.4 Disposal 11
More information on the NEA Smart control system and all
documentation available for download can be found at
www.rehau.uk/neafamily
2

1 SAFETY
1.1 Used symbols
There is danger to life and limb.
1.2 Intended use
The NEA Smart R room control display unit (in the following abbrevi-
ated as room control unit D) is a room control unit for the base station
NEA Smart R 230 V.
The device is intended to
- control the NEA Smart R base station 230 V.
- register the room temperature and setting of the desired target
temperature in the allocated heating zone.
Every other use outside its intended use, the manufacturer cannot be
held liable for.
1.3 General safety warnings
Danger to life in case of swallowing
Small children might swallow the control knob.
Install room control unit out of the reach of small children.
These instructions belong to the device NEA Smart R room control
display unit. Retain this manual and provide it to future owners.
3

2 VERSIONS
2.1 Technical data
NEA Smart R room control unit D
Floor temperature monitoring
NEA Smart remote sensor (optional)
Power supply 2 x LR03/AAA (micro battery) alkaline
Battery lifetime > 2 years
Wireless technology Wireless, 868 MHz SRD band
Range 25 m (in buildings)
Protection type/protection class
IP20 / III
Ambient temperature 0 to 50 °C
Relative humidity 5%-80%, not condensing
Dimensions (HxWxD) 86 x 86 x 26.5 mm
Target temp. setting range 5 up to 30°C
Target temp. resolution 0.2 K
Actual temp. measuring
range 0 up to 40°C (int. sensor)
Measuring accuracy of internal NTC
±0.3 K
Tab. 2-1 Technical data NEA Smart R room control unit D
2.2 Compliance
This product is labelled with the CE Marking and therefore complies
with the requirements from the following guidelines:
- 2004/108/EG with amendments “Council Directive on the approxi-
mation of the laws of the Member States relating to Electromagnetic
Compatibility”
- 2006/95/EG with amendments “Council for Coordination of the
Regulations of EU Member Countries regarding the electrical
equipment for use within certain voltage limits”
- “Radio and Telecommunications Terminal Equipment Act (FTEG) and
Guideline 1999/5/EG (R&TTE)”
Increased protection requirements may exist for the overall installation,
the compliance of which is the responsibility of the installer.
4
3 INSTALLATION
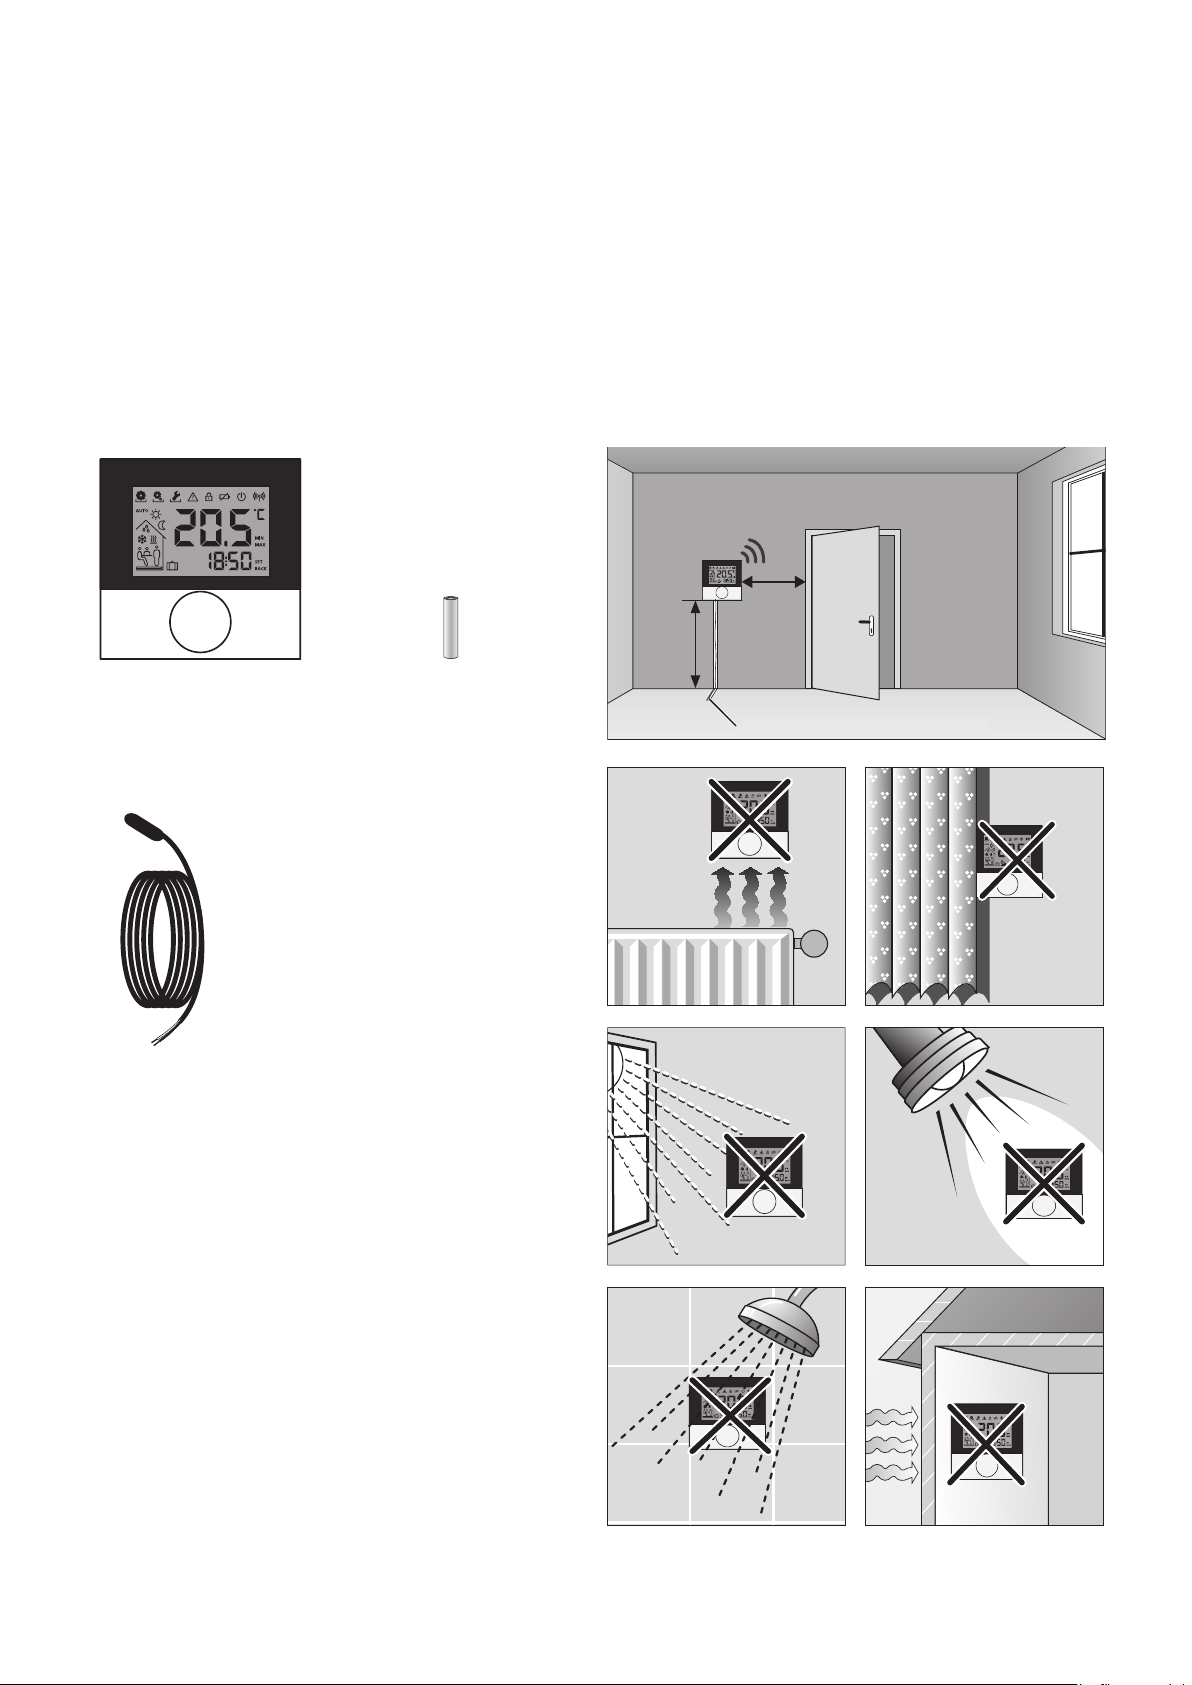
3.1 Box contents
+
-
AAA
1 x 2 x
Accessories:
NEA Smart remote sensor
Fig. 3-1 Box contents
3.2 Installation
~150 cm
~ 30 cm
NEA Smart remote sensor
Fig. 3-2 Information on the mounting location of the room control unit D
5

1 2 3
Ø 3,5 mm
45b5 5b6
7
Fig. 3-3 Installation and connection of the room control unit D
6

4 OPERATION
4.1 Overview and display
Display with function icons
Room temperature
Time
Control knob
Fig. 4-1 Technical data NEA Smart R room control unit D
Symbol Meaning Symbol Meaning
Menu "Lifestyle" active Night mode active
Menu "Parameters" active Condensation detected, cooling deactivated
Menu "Service" active Cooling mode active
Important note/malfunction Flashing: Smart Start/Stop mode active
Permanent on: Heating mode active
Child safety lock active Presence active (only in Automatic mode)
Low battery Party function active
Stand-by mode active
Holiday function
Flashing: planned
Permanent on: active
Transmitting power Floor temperature below minimum
Automatic mode active
Day mode active
Tab. 4-1 Meaning of display symbols
7

4.2 Operation
The room control display can be operated via the control knob:
Pressing the control knob activates menus and functions.
+-
Rotating allows setting the target temperature as well as
navigating between menus and functions.
A basic level and three menus are available.
Basic level:
+-
Rotating sets the desired target temperature.
Menu selection with:
Functions: includes all important lifestyle functions.
Parameters: includes several parameters e. g. heating and
setback temperatures, date and many more.
Service: includes settings for the specialist (secured by PIN,
see manual of the base station)
4.3 Commissioning (incl. pairing)
1. No other base stations within range must be in pairing mode.
2. Activate the pairing function at the base station for the desired
heating zone (see manual NEA Smart R base station 230 V).
3. Press the control knob for approx. 3 secs. in order to activate
pairing function (the display shows "Set").
- The base station and the room control unit D are now con-
nected to each other.
- If the base station has been programmed before, the date and
time of the room control unit are set automatically.
For first commissioning of the base station:
Set year, date and time by rotating, confirm entries by pressing the
control knob.
4.4 Connection test
Press the control knob for approx. 3 secs. in order to activate pairing
function (the display shows "Set").
At the base station, the heating zone connected to this room control
unit changes status for 1 minute, in other words switches on or o
depending on the previous operating status.
4.5 Comfort programs - Smart Start/Stop mode
Comfort programs include pre-defined heating times to be used for
week days (1-5) or for weekends (6-7). Outside the heating times the
installation switches to night mode. You can select the comfort
programs in the Parameter menu. The Smart Start/Stop Mode of the
system calculates the required times in order to achieve the desired
temperature at the start and finish time of the heating program.
Program Comfort time 1 Comfort time 2
P0 05:30 – 21:00 –
P1 04:30 – 08:30 17:30 – 21:30
P2 06:30 – 10:00 18:00 – 22:00
P3 07:30 – 17:30 –
Tab. 4-2 Predefined time programs
You can create individual comfort programs with the on-line software
available under www.ezr-home.de and transfer these to the base
station with a MicroSD card.
4.6 Lifestyle functions overview
In this menu you can activate or deactivate the lifestyle functions.
1. Press the control knob.
2. Activate the menu “Lifestyle functions” by pressing the control
knob again.
3. Select the desired lifestyle function.
The following lifestyle functions are available to you; you can find
further information in the Table 4-3 (page 9).
It may take up to 10 minutes before changes of global lifestyle
functions are displayed on all room control units.
+
–
Fig. 4-2 Selection menu of lifestyle-functions
8

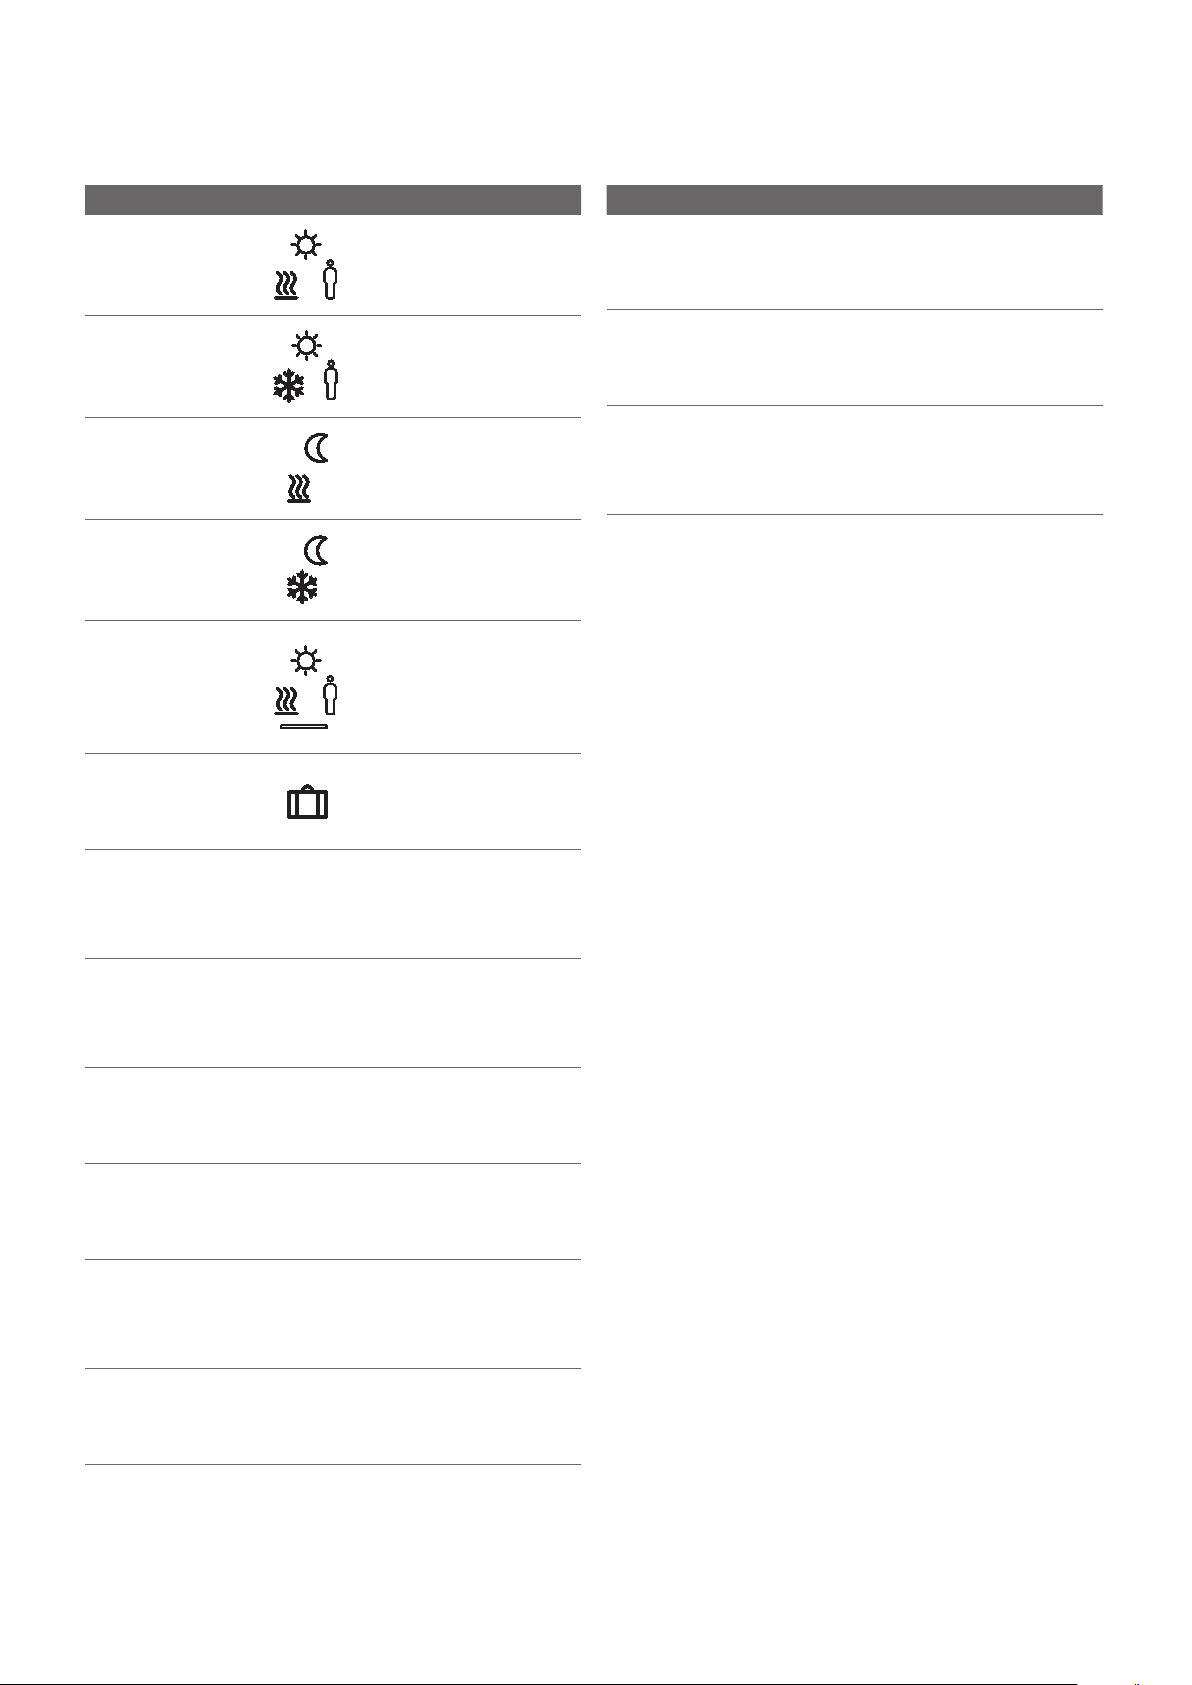
4.7 Lifestyle functions
Lifestyle functions Symbol Steps
Party
Deactivates the
temperature setback for
XX hours
- Activate by pressing.
- Set the duration in hours (hh)
- Confirm your entry by
pressing.
Presence
Weekend heating times
are also used for working
days
- The automatic mode is only
available on workdays.
- Activate by pressing.
- Finish by selecting another
Lifestyle function.
Day (default setting)
Permanent regulation
after setting the target
temperature
- Activate by pressing.
Night
Permanent setback to a
programmed night
temperature.
- Activate by pressing.
Automatic
Automatic temperature
regulation according to
the correspondingly
activated comfort
programs
- Activate by pressing.
Deactivates the room
control unit, the
temperature is still
displayed, frost
protection is activated
- Press to switch o the room
control unit D
- A short press switches the
room control unit back on.
Selection of heating or
cooling operation
The operating mode can
be set on the room
control unit D when the
CO pilot function is
activated on the base
station.
(The CO pilot of the base station
is activated.)
- Activate by pressing.
- Select the mode.
- Confirm your entry by
pressing.
Holiday mode
The temperature is set
back automatically to the
set holiday temperature
- Activate by pressing.
- Select 1. the start date and
2. the end date (dd:mm)
confirm by pressing.
- Deactivate the holiday mode by
selecting the holiday function
again.
Child safety lock
Locks the room
operating unit
- Activate by pressing.
- Deactivate by prolonged
pressing for more than 3 secs).
BACK
The room control unit
returns to the basic level. - Exit the menu by pressing
Tab. 4-3 Lifestyle functions
4.8 Overview parameters
This menu is needed only for basic setup.
- Press the control knob.
- Select the menu “Parameters” and activate it by pressing again.
The following parameters are available to you; you can find further
information in the Table 4-4 (page 10).
It may take up to 10 minutes before changes of global system
parameters are displayed on all room control units.
+–
min.
max.
E-CL
SET
P0
6-7 P0
1-5
SET
TIME
XX.X
XX.X
XX.X
RES
USER
Fig. 4-3 Selection of parameters
9
4.9 Parameters
Parameters Symbol Steps
Temperature for
presence in
heating mode
- Activate and set the desired
temperature.
- Confirm by pressing.
Temperature
for presence in
cooling mode
- Activate and set the desired
temperature.
- Confirm by pressing.
Setback temperature
for heating mode
- Activate and set the desired
temperature.
- Confirm by pressing.
Setback temperature
for cooling mode
- Activate and set the desired
temperature.
- Confirm by pressing.
Floor heating
minimum temperature
(only in connection
with NEA remote
sensor)
- Activate and select the
desired comfort tempera-
ture
(1.0...6.0 ≈ 18 °C...28 °C)
- Confirm by pressing.
Setback temperature
for holidays
- Activate and set the desired
temperature.
- Confirm by pressing.
Setting the tempera-
ture limitation
min
max
- Activate
- Select the min./max.
temperature, confirm each
by pressing
Time control via
external timer (instead
of Comfort programs
P0 to P3)
E-CL
SET
- Activate and select the
status On or O.
- Confirm by pressing.
Select Comfort
program for week
days
P0
1-5
- Activate and confirm entry.
- Select and activate Comfort
program (P0-P3).
Select Comfort
program for the
weekend
P0
6-7
- Activate and confirm entry.
- Select and activate Comfort
program (P0-P3).
Set time/date SET
TIME
- Activate, set year (yyyy),
month (mm) and day (dd)
as well as time (hh:mm),
confirm each by pressing.
Software version of
room control unit
So1
XX-XX
- Displays the software
version of the room control
unit
Parameters Symbol Steps
Base station software
version
So2
XX-XX
- Displays the software
version of the base station
Software version
Ethernet Controller
So3
XX-XX
- Displays the software
version of the Ethernet
Controller
User level reset
Reset of all user
settings to factory
settings!
RES
USER
- Activate and select Yes
- Press in order to reset all
functions.
Tab. 4-4 Parameters
10
Autres manuels pour NEA SMART R
1
Ce manuel convient aux modèles suivants
1
Table des matières
Autres manuels Rehau Unité de contrôle


Manuels Unité de contrôle populaires d'autres marques

Festo
Festo Compact Performance CP-FB6-E Manuel de la liste des pièces

Elo TouchSystems
Elo TouchSystems DMS-SA19P-EXTME Manuel utilisateur

JS Automation
JS Automation MPC3034A Manuel utilisateur

JAUDT
JAUDT SW GII 6406 Series Guide rapide

Spektrum
Spektrum Air Module System Manuel utilisateur

BOC Edwards
BOC Edwards Q Series Manuel utilisateur


