
Raft MinerVa MV7 Manuel utilisateur
Service Manual
V2.0 24012022


●
●●●
1. Quick Troubleshooting Checklist
Before contacting the support team it may be helpful to attempt to resolve some common
issues by first following this list of solutions. However, please do not hesitate to contact
the support team if these solutions do not resolve your error. Please follow all safety
precautions before attempting what is described here.
1. Electronics of all kinds can encounter unexplained errors from time to time,
it usually helps to completely disconnect the power, wait a few seconds, then
reconnect the power again. If the problem persists after a power cycle, please
follow these next steps.
2. If the miner has been restarting with no warning then it may be too hot, please turn
off the miner, disconnect any cables, then leave the miner to cool down for about
an hour or as long as needed, after which please reconnect the miner and turn it on
again.
3. Check that the power cable is firmly connected and is switched on at both
the wall socket and on the miner.
4. Check that the fans on the miner are spinning, if they are not this indicates that the
miner has encountered an error. Please contact the support team.
5. Check that the green light, found on the control panel, is illuminated; this light will
flash at regular intervals. If the red light is illuminated or none of the lights are
illuminated this indicates that the miner has encountered an error. Please contact
the support team.
6. Check that the Ethernet port of the miner is connected to your network and that
it can access the internet. The IP address of the miner can be found on the DHCP
server or your router's homepage.
7. If you can’t login to the miners web interface please make sure you’re entering the
username and password correctly. Note: the login is case sensitive and
the default login is: admin.
8. Check that the mining pool addresses are correct. The mining pool address should
be in the format of: stratum+tcp://eca.ss.greatpool.ca:1800 other

●
●●●
mining pools may have a similar address but the port number (ex. 1800) may differ.
stratum+tcp://[pool address]:[port number]
9. Check that the worker name is correct. The worker name should be in the format
of: MinervaLab.default1 where usually ‘MinervaLab’ is your account name,
there is a full stop after the account name, and then followed by ‘default1’. This
is usually the name of your miner/worker which is visible in the pool dashboard.
[account name].[worker name]
10.Check the miner is connected to the pool. This can be done by viewing the pools
dashboard, or by looking on the miners web interface and seeing shares being
accepted and the network status reported in milliseconds (ms).
If your encountered problem persists after a power cycle and none of the above solutions
describing your problem in full detail.
2. FAQs
The purpose of this section is to illustrate to the user the different components that they
should be aware about when attempting to setup or troubleshoot their miner.
2.1 Miner Overview
●Where do I connect the power cable?
oConnect the power cable to the C20 socket. See figure 2.
●Where is the on/off switch located?
oThis should be next to the power socket. See figure 1.
●Where are the fans located?
oThere should be two large fans. See figure 1.
●Where is the Control Panel located?
oSee figure 1. The function of this is described later in the manual.

●
●●●
Figure 1. Minerva MV7 Miner Overview
Figure 2. Where to Connect the Power Cable
On/Off switch
Power supply
–C20 Socket –
Fans
Control Panel
C20 socket at the miner
C19 plug
●
●●●
2.2 Control Panel Overview
2.2.1 What options does the Control Panel provide?
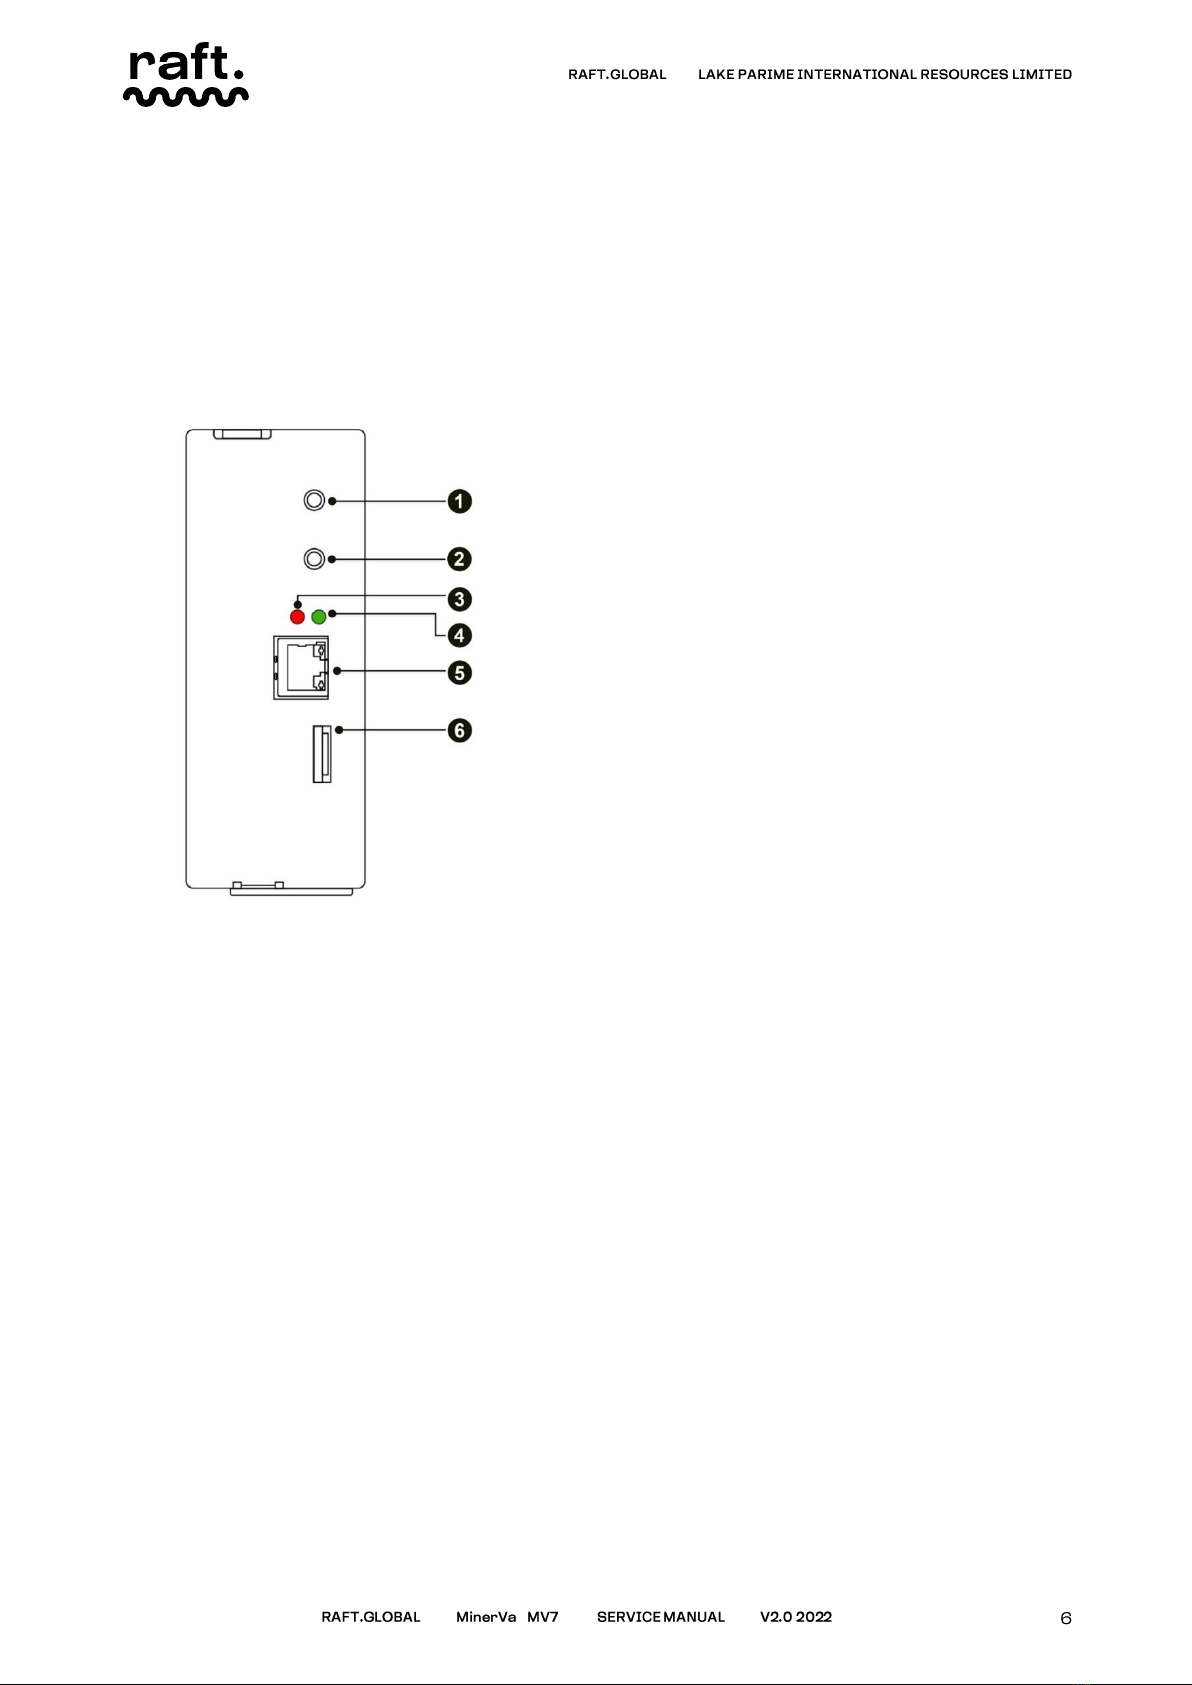
The following figure shows a more detailed view of the Control Panel first shown
in Figure 1. The Control Panel contains the following components:
Figure 3. Control Panel Function Description
1. IP report button: This is used to broadcast the miners IP address information
to the local network.
2. Reset button: This is used to restore the miner to factory settings.
3. Red indicator light: This indicates special events or errors. After pressing the IP
report button or reset button, the red indicator light will light up or flash.
4. Green indicator light: This indicates the normal state of the mining machine.
5. Ethernet port: This supports a 100 Mbit Ethernet connection. Please connect this
to your network and the internet in order to begin mining with a mining pool.
6. SD card slot: This is only used before the miner leaves the factory or when repairing
the miner by professionals. Please do not insert any SD card into this slot, or it may
cause the failure of the machine or damage the SD card.
IP Report button
Reset button
Red indicator light
Green indicator light
Ethernet port
SD card slot

●
●●●
2.2.2 What do the LED indicators mean?
The following table can be used to decode the indicator lights on the miner. Which will
inform the user of the current working status of the miner, and if there is an error.
Figure 4. Control Panel Function Description
LED STATUS
DESCRIPTION
Both lights off
The miner has encountered a Power supply
or Control Board failure.
Red lights off
The miner is working normally
Red light solid or
flashing
The IP report button or reset button was
pressed.
The miner has encountered a hashboard
fault or a fan failure.
Green light solid or
flashing
This is normal during startup or reset.
This light will flash at intervals when
the miner is operational.
IP Report button
Reset button
Red indicator light
Green indicator light
Ethernet port
SD card slot

●
●●●
2.3 Solutions to Common Errors
2.3.1 How do I Reboot the Miner?
To reboot the miner, please access the Reboot page from the web interface sidebar and
then press the Reboot button on the Reboot page.
Figure 5. Reboot Screen on the Minerva Web Interface
2.3.2 How do I Restore the Miner to Original Settings?
The reset button is used to restore the miner to factory settings. Whilst the miner
is running press and hold the reset button for 10 to 12 seconds, then release it, after which
the red LED indicator will light up and the miner will be automatically restored
to the factory default and will restart.
Figure 6. Restoring original settings via Reset button at Control panel
Reset Button

●
●●●
2.3.3 How do I Configure my Mining Pool?
Figure 7. Accessing the Pools Management Page on the Web Interface
1. Click on Configuration -> Pools on the left side menu of the interface, shown
in the image above:
2. Click the Add Pool button and input the mining URL, worker number and password
of the mining pool in turn. After the input is completed, click
the Confirm button, and the miner will load the new mining pool configuration
automatically and restart the mining program.
3. The mining pool address entered in the box titled URL should be in the format of:
stratum+tcp://eca.ss.greatpool.ca:1800 other mining pools may have a
similar address but the port number (ex. 1800) may differ. Generic format:
stratum+tcp://[pool address]:[port number]
4. The worker name entered in the box titled Worker should be in the format of:
MinervaLab.default1 where usually ‘MinervaLab’ is your account name, there
is a full stop after the account name, and then followed by ‘default1’. This
is usually the name of your miner/worker which is visible in the pool dashboard.
Generic format: [account name].[worker name]
5. To remove pools, click the delete button in the upper right corner of the label
to delete the corresponding mining pool. Once the deletion is successful, the mining

●
●●●
machine will automatically load the new mining pool configuration and restart the
mining program.
Caution: The mining device will choose one of the mining pools to mine. The last
running mining pool cannot be deleted.
2.3.4 How do I Verify I am Connected to the Mining Pool?
This can be done by viewing your chosen mining pools dashboard, or by looking on the
miners web interface.
The web interface will look like figure 8 (below), please check that the current pool details
are set to your chosen pool address and worker name. Then if the web interface is
reporting a hashrate greater than zero, shares being accepted, and the network status
reported in milliseconds (ms), then you are successfully mining to your chosen mining
pool.
It is quite common for the mining pools dashboard to take some time before it updates,
this could be up to an hour of mining before the mining pools dashboard shows that your
miner is connected and hashing. This of course is dependent on your chosen mining pool,
so your experience may vary.
Figure 8. Overview of the Miner’s Status on the Web Interface
Table des matières
Manuels Matériel informatique populaires d'autres marques

EMC2
EMC2 VNX Series Manuel du propriétaire

Panasonic
Panasonic DV0PM20105 Manuel utilisateur

Mitsubishi Electric
Mitsubishi Electric Q81BD-J61BT11 Manuel utilisateur

Gigabyte
Gigabyte B660M DS3H AX DDR4 Manuel utilisateur

Raidon
Raidon iT2300 Manuel utilisateur

National Instruments
National Instruments PXI-8186 Manuel utilisateur


