PowerLocus P19 Manuel utilisateur

PowerLocus P19
USER MANUAL
Support Email:
info@powerlocus.com
For Warranty or Problems with
the product, please contact us!
Bluetooth Over Ear Headphone
PowerLocus
2
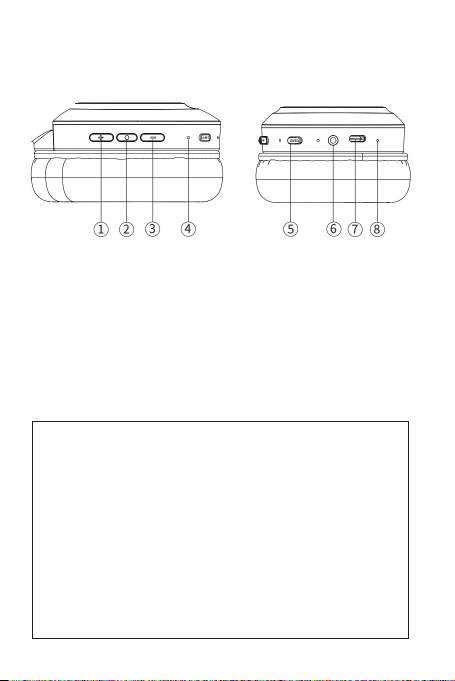
1. PRODUCT FUNCTION
INSTRUCTIONS
1. “+”: Volume up/Next song
2. “o”: MFB button
3. “-”: Volume down/Previous song
4. Bluetooth indicator
5. Power On/Off & EQ button
6. 3.5mm audio port
7. USB Type C charging port
8. Microphone
Bluetooth Version: V5.3
Working Distance Range: 10M
Frequency Range: 20Hz-20kHz
Audio Drivers: Φ40mm Charging Voltage: DC 5V
Charging Time: About 1.5 Hours
Talking/Music Time: About 20 Hours (50% Volume)
Impedance: 32 Ohms Weight: 175g/0.39LBs
Volume Sensitivity: 100+/-3dB
Bluetooth Specication Power Class 1
Frequency band: 2.402-2.480GHz
Operating frequency: 2402-2480MHz
Rated power consumption: 120 mW
Maximum output power: < 7dBm
Operating Temperature: 0 °C to 45 °C
3
2. PRODUCT OPERATION
INSTRUCTIONS
2.1 Power on/off
• How to turn it on?: In power-off status, press
and hold the power on button 2s-3s, the blue light
will be on around 2 seconds, then blue and red
light will blink alternately, the headphone enters into
pairing mode.
• How to turn it off?: In power-on status, press
and hold the power off button 3s, the indicator
light will goes off then.
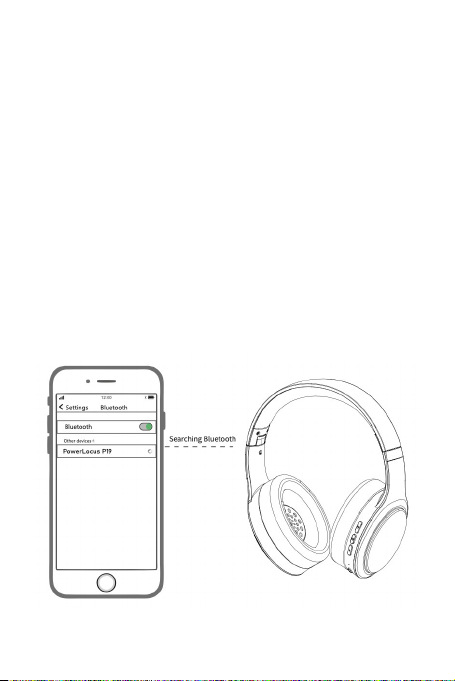
2.2 Pairing
When the headphone is turned on and the LED is
Blue/Red, open the Bluetooth menu of your device
(Phone, Tablet, PC etc.) and select the appearing
“PowerLocus P19”. Once paired successfully, the
blue indicator blinks every 6 seconds.

4
2.3 EQ mode
Totally three kinds of EQ for option:
1)Bass mode; 2) Pop mode; 3) Vocal mode
Click the EQ button to switch EQ
2.4 Music playing
Volume up: Click the “+” button to increase volume
Volume down: Click the “-” button to decrease
volume
Next song: Press and hold the “+” button around
2 seconds
Previous song: Press and hold the “-” button
around 2 seconds
Music play/pause: Click the MFB button
2.5 Calling (Mobile)
Answer call:Click the MFB button when the call
is incoming
End call:Click the MFB button when the call is over
Cancel call:Click the MFB button when calling
Reject call: Press and hold the MFB button
around 2 seconds when call is incoming
Redial:Double click the MFB button to redial last
call number
2.6 Bluetooth Reset:
Press and hold the “+” and ”-” button at the
same time around 3 seconds until the red and blue
indicator blink alternately. This way, you will reset the
headphone and enter it into initial pairing mode again.
2.7 Voice assistant activation:
In standby mode or music mode, long press MFB
button 2 seconds to activate Siri or Google assistant.

5
3. BLUETOOTH INDICATOR
INSTRUCTION
Connected
successfully
Pairing mode
Reset
Music Mode
Full Charging
Charging
Mode
Power off
The blue indicator blinks every 6
seconds
The red and blue indicator blink
alternately
The red and blue indicator blink
alternately
The blue indicator blinks every 6
seconds
The indicator will be solid red
The indicator will be solid blue
The red indicator will goes off
4. AUX MODE
Connect one end of the 3.5mm audio cable into
the audio jack of the headse and the other end into
your mobile or other devices.
Note: The headphone will be power off once
plug the 3.5mm audio cable into audio jack (When
headphone is power on). If you want to turn on the
headphone, the 3.5mm audio cable must be taken
out from the headphone.
5. CHARGING INSTRUCTION
Before using, please check and assure the
battery is enough.

6
While the headphone is in low battery, please use
Type-C charging cable to charge and the charging
indicator will be RED when charging. Once it’s fully
charged,the indicator will be solid BLUE.
6. FAQ
6.1 Headphone can’t be turned on
Please ensure the battery is enough.
6.2 Pairing failure
Please ensure the headphone is in power on
and pairing status, and the mobile or other device
locates within 1 m range;
And then redo again.
6.3 Connect automatically
The headphone will automatically connect the
mobile or other devices which used last time
6.4 Sound cut off/stuck
Check whether the mobile or other devices
locates valid range (10m) and whether there are
obstacles between the headphone and mobile .
6.5 Charging way
Please ensure the charging adaptor is DC
5V/1A,or Car charger or power bank to charge the
headphone.

7
CE
Hereby GL Grup-2015 LTD declares that
wireless headphone PowerLocus P19 is in
compliance with essential requirements and other
relevant conditions of Directive 2014/53/EU.
The full text of the EU declaration conformity
is available at the following internet address:
(powerlocus.com/doc)
Frequency: 2402-2480 MHz
Max radio frequency power: 100 mW (EIRP)
GL GRUP-2015 LTD.
36 VASIL LEVSKI STREET, 5370 DRYANOVO,
BULGARIA
WARNING:
This device complies with Part 15 of the FCC
Rules. Operation is subject to the following two
conditions: (1) this device may not cause harmful
interference, and (2) this device must accept any
interfer- ence received, including interference that
may cause undesired operation.
Changes or modications not expressly
approved by the party responsible for compliance
could void the user’s authority to operate the
equipment.
NOTE: This equipment has been tested and
found to comply with the limits for a Class B digital
device, pursuant to Part 15 of the FCC Rules.
These limits are designed to provide reasonable
protection against harmful interference in a
residential installation. This equipment generates,
uses and can radiate radio frequency energy
and, if not installed and used in accordance with
the instructions, may cause harmful interference
to radio communications. However, there is no

8
guarantee that interference will not occur in a
particular installation.
If this equipment does cause harmful
interference to radio or television reception which
can be determined by turning the equipment off
and on, the user is encouraged to try to correct
the interference by one or more of the following
measures:
--Reorient or relocate the receiving antenna.
-- Increase the separation between the
equipment and receiver --Connect the equipment
into an outlet on a circuit different from that to
which the receiver is connected.
--Consult the dealer or an experienced radio/
TV technician for help NOTE: This device and its
antenna(s) must not be co-located or operation in
conjunction with any other antenna or transmitter.
The device has been evaluated to meet general RF
exposure requirement.
ISED CANADA STATEMENT:
This device contains licence-exempt
transmitter(s)/receiver(s) that comply with
Innovation, Science and Economic Development
Canada ‘s licence exempt RSS(s). Operation is
subject to the following two conditions:
this device may not cause interference and
this device must accept any interference,
including interference that may cause undesired
operation of the device.
Radiation Exposure: This equipment complies
with Canada radiation
Exposure limits set forth for an uncontrolled
environment to maintain compliance with IC’s RF
Exposure guidelines. This equipment should be
installed and operated with minimum distance of

9
0mm the radiator your body. This device and its
antenna(s) must not be co-located or operation in
conjunction with any other antenna or transmitter.
DÉCLARATION DU CANADA:
Ce dispositif contient un (S) émetteur (S)/
récepteur (S) exempté (S) de licence qui
respecte l’innovation, Science et développement
économique Canada a exempté le ou les RSS
de licence. L’exploitation est soumise aux deux
conditions suivantes:
1) cet appareil ne doit pas causer d’interférences
et
2) ce dispositif doit accepter toute interférence,
y compris toute interférence pouvant entraîner un
fonctionnement indésirable du dispositif. Exposition
au rayonnement: cet équipement est conforme
au rayonnement Canada conformité avec les
lignes directrices d’exposition aux RF d’IC. Cet
équipement doit être installé et exploité à une
distance minimale de 0mm du radiateur de votre
corps. Ce dispositif et ses antennes ne doivent pas
être co-localisés ni fonctionner en conjonction avec
une autre antenne ou un autre émetteur.
This symbol on a product means that
the product is covered by European
Directive 2012/19/EU. Electrical products
should not be disposed of with household
waste. Please recycle them at the collect
points provided for this purpose. Contact
the local authorities or your dealer
for recycling advice. Proper disposal
of old appliances helps preserve the
environment and health

10
Safety Instructions
1. Please charge the headphones
ƣƲnjȉȯƲ٪˚ȯȷɅ٪ɅǛǼƲ٪ɍȷǛǾǍؘ٪
2. Please charge at least once every
ׁ٪ǼȉǾɅǕȷ٪Ʌȉ٪ǯƲƲȬ٪ƣƇɅɅƲȯɬ٪ǛǾ٪Ǎȉȉƫ٪
ƤȉǾƫǛɅǛȉǾؘ
3. ½ȉ٪ȬȯȉɅƲƤɅ٪ɬȉɍȯ٪ǕƲƇȯǛǾǍؙ٪ȬdzƲƇȷƲ٪ƫȉ٪
ǾȉɅ٪ɍȷƲ٪ɅǕƲ٪ǕƲƇƫȬǕȉǾƲȷ٪dzȉǾǍ٪ɅǛǼƲ٪
ɦǛɅǕ٪Ʌȉȉ٪ǕǛǍǕ٪ɥȉdzɍǼƲؘ
4. Do NOT expose the headphone to
ǕȉɅ٪ɅƲǼȬƲȯƇɅɍȯƲ
5. ¤ȯȉɅƲƤɅ٪njȯȉǼ٪ȷǕȉƤǯȷ٪ƇǾƫ٪ƫȯȉȬȷ
6. %ȉ٪v½٪Ʌȯɬ٪Ʌȉ٪ȉȬƲǾ٪ɅǕƲ٪ȬȯȉƫɍƤɅ
7. %ȉ٪v½٪ƲɫȬȉȷƲ٪Ʌȉ٪ǼȉǛȷɅɍȯƲؙ٪ȯƇǛǾ٪
ƇǾƫ٪dzǛȮɍǛƫȷ
!
To nd out more about the UK Declaration of
Conformity, please visit:
https://powerlocus.com/doc-uk-p19
Table des matières
Langues :
Autres manuels PowerLocus Casque audio


