Page 9
8.2. Assembly for top hung windows opening outwards
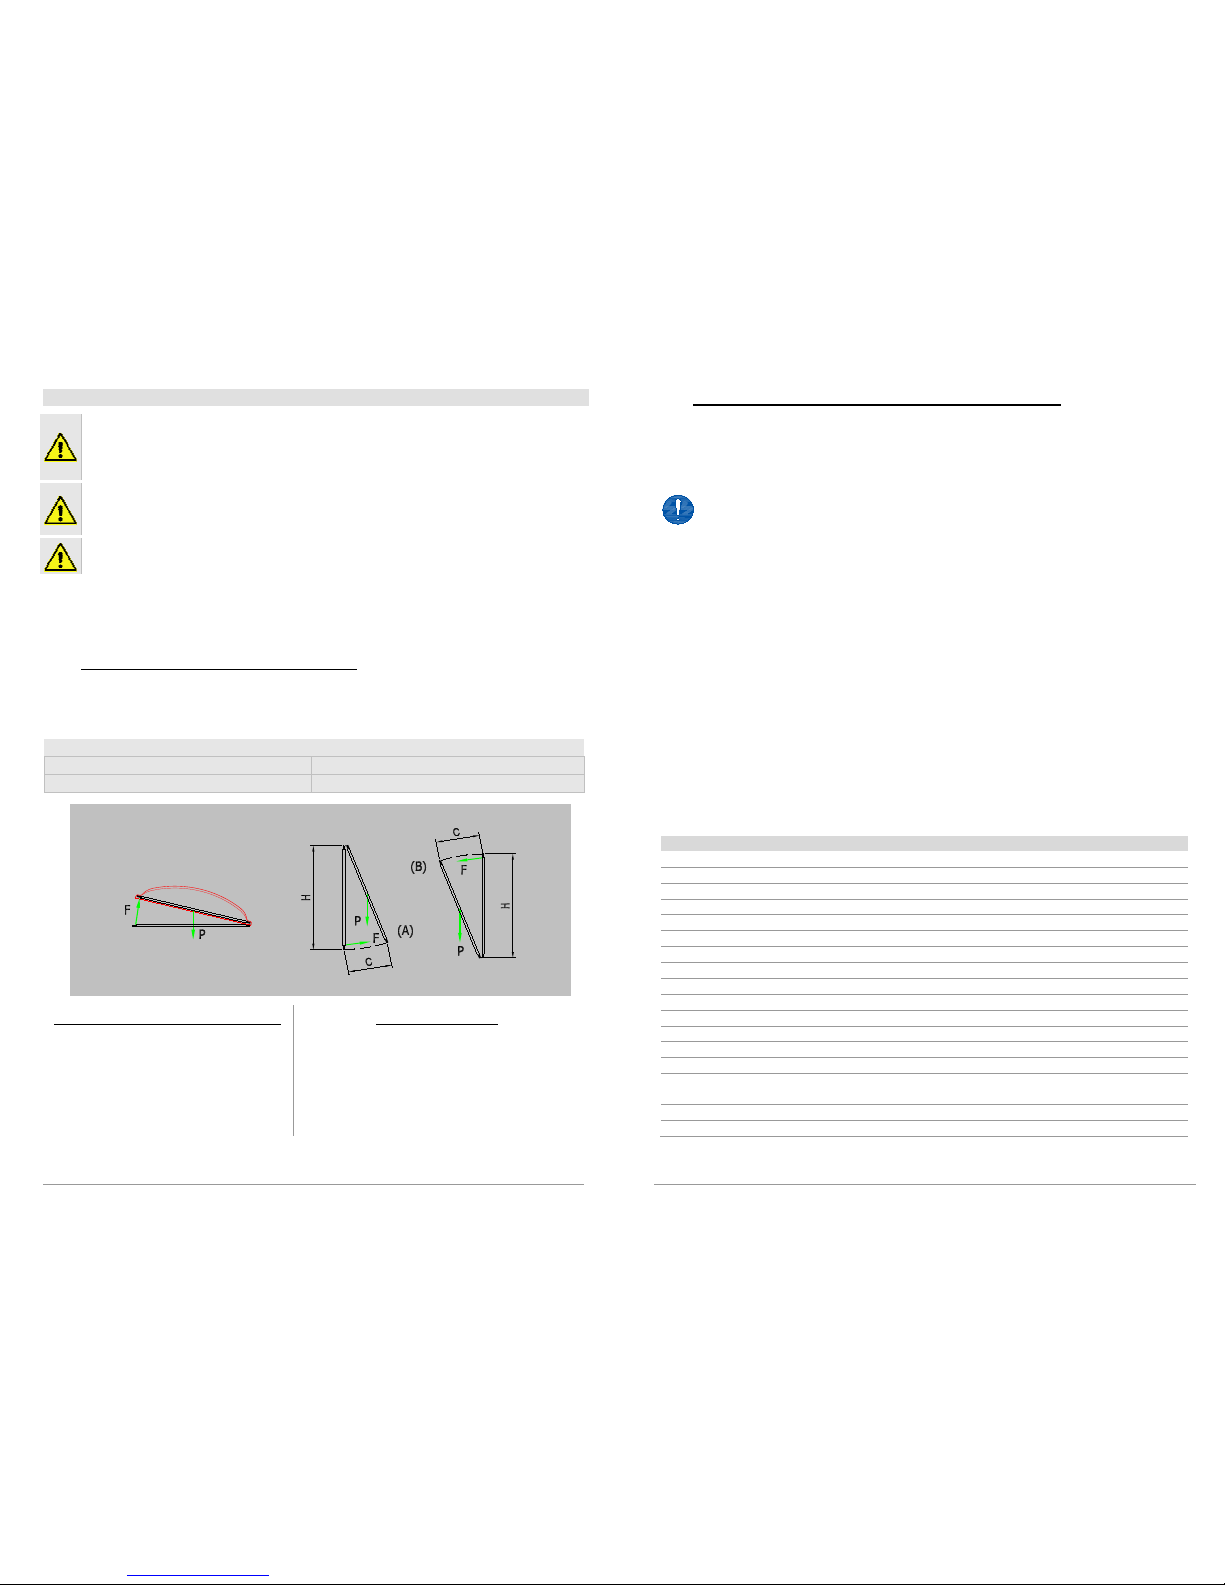
A. Pencil in the middle line for the window frame on both
mobile and fixed parts (Fig. 1).
B. Place the motor support bracket in position at the edge
of the fixed part in line with the centre line pencilled in
earlier and pencil in the four openings to be used for
fixing (Fig. 2).
C. Use the appropriate drill head to perforate the window
frame and assemble the motor support bracket, taking
care to tighten all screws well (Fig. 3 and Fig. 3bis).
D. Place the front rod in line with the centre line of the
mobile part of the window frame and trace out the three
fixing openings (Fig. 4).
E. Use the appropriate drill head for perforation and
assemble the front bracket, taking care to tighten all
screws well (Fig.5 and Fig. 5bis).
F. Take the clamp screws and assemble them onto the motor
support bracket. Leave at least two turns of leeway.
G. Slide the swallow tailed profile of the actuator onto the
clamp screws, and check they have been inserted
correctly into the socket of the profile to ensure the
actuator runs smoothly along its axis.
H. Position the actuator so the eyebolt head is inserted into
the front bracket. Insert the M6x25 screw into the
bracket and eyebolt and fix the self-locking nut into
position using two 10 keys.
I. Manually move the actuator along its axis to close the
window and press firmly against the seals. Tighten the
clamp screws previously only placed and set the
actuator in line with the window frame. Suggested
tightening torque is 5÷7 Nm.
Fig. 1
Fig. 2
Fig. 3
Fig. 3 bis
J. The actuator may now be powered up for a complete trial of opening and
closing of the window. After closure, make sure that the window is completely
closed and check the pressure on all seals.
K. The stroke-end for the actuator is automatic. The appliance exerts a traction
force of over 550 N, which guarantees perfect pressure on seals even for
windows with large dimensions.
8.3. Assembly on light domes or dormer windows
First, check the actuator has been applied correctly and check positioning of the brackets
on both frame and sash.
(Follow the instructions set out in “Assembly for outward opening windows”).
Page 10
8.4. Assembly with bottom hung windows
A. Pencil in the centre line for the window on both mobile
and fixed parts (Fig. 1).
B. Position the motor support bracket at the edge of the
frame of the mobile part in line with the centre line and
trace in the four openings to be used for fixing (Fig. 2).
C. Use an appropriately dimensioned drill head to perforate
the window frame and assemble the motor support
bracket, taking care to fix the screws securely into
position (Fig. 3 and Fig. 3bis).
D. Position the front bracket in line with the centre line on
the fixed part of the frame and trace in the three
openings for fixing (Fig. 4).
E. Use an appropriate size of drill head for perforation and
assemble the front bracket, taking care to fix the screws
securely into position (Fig. 5 and Fig. 5bis).
F. Take the clamp screws and assemble them onto the motor
support bracket. Leave at least two turns of leeway.
G. Insert the swallow tailed profile of the actuator onto the
clamp screws, taking care to insert correctly into the
socket of the profile to ensure the actuator runs
smoothly along its track.
H. Position the actuator so the eyebolt head is inserted into the front bracket.
Insert the M6x25 screw into the bracket and eyebolt and fix the self-locking nut
into position with two fixed 10 keys.
I. Manually move the actuator along its axis to close the window and press firmly
against the seals. Tighten the clamp screws previously only placed and set the
actuator in line with the window frame. Suggested tightening torque is 5÷7 Nm.
J. The actuator can now be powered up for a complete trial of opening and closing
the window. After closing, check the window is completely shut and check
pressure on the seals.
K. The stroke-end of the actuator is automatic. The appliance exerts a traction
force of over 550 N to guarantee perfect pressure against the seals even for
large dimension windows.
8.5. Assembly on louvre windows without mechanical lock or on
sunshades
To perform this assembly, the actuator must be powered electrically. Check the
technical data label on the motor for the appropriate form of electricity.
A. Connect the actuator to the power supply and activate so the rod protrudes until
the maximum opening stroke-end steps in.
B. Set the louvres to closed position by manually adjusting the casement levers.