
MasterChef 18mcpm20qlh Manuel utilisateur
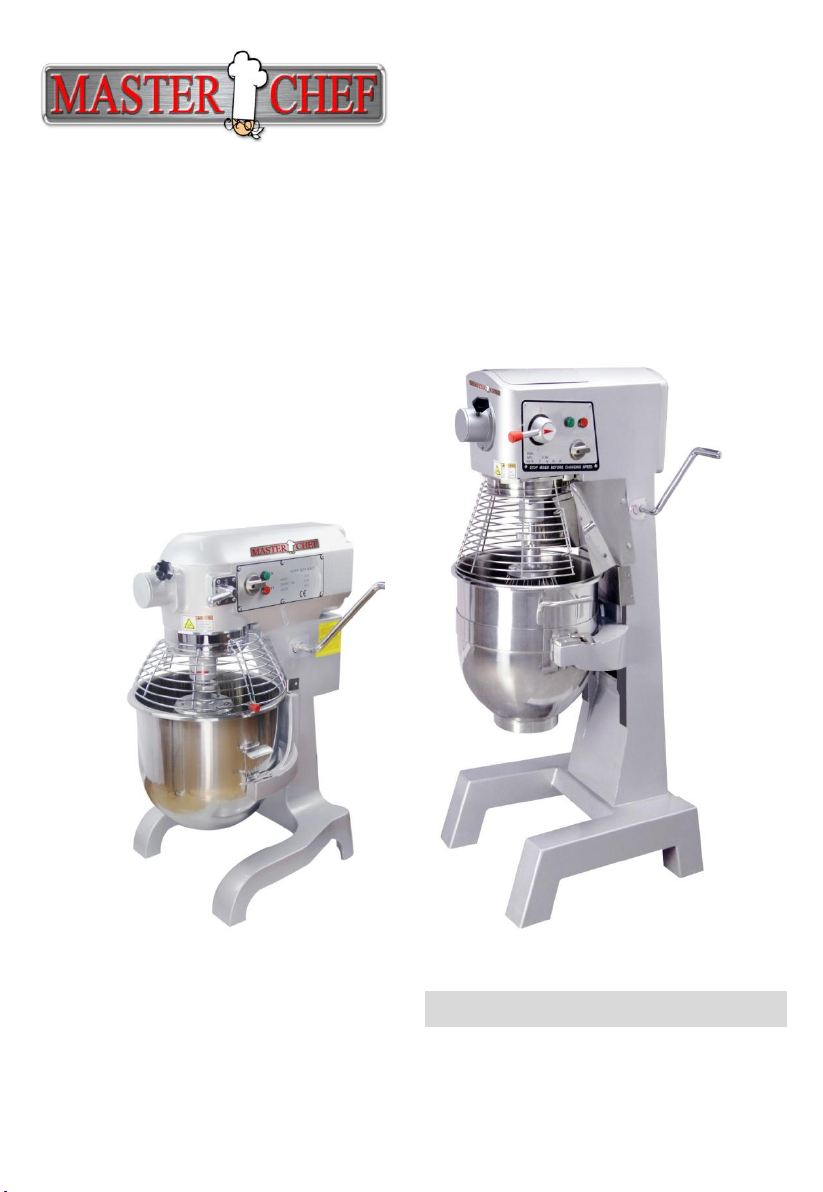
Planetary Mixer
Instruction manual
18mcpm20qlh, 18mcpm30qlh
Distributed by masterchefpr.com
787788-2264 787 788-2269 787 275-1643
Pack Contents
The following is included:
•Food Mixer •Spiral Dough Hook •Whisk
•Mixing Bowl •Beater •Instruction Manual
General Description
This is a kind of changing speed gear mixer. With its planetary
stirring design, it has a compact structure, high efficiency, power
saving and easy operation. It provides as an ideal assistant to you for
bread and cake making.
Technical Parameters
Name
Power
(KW)
Weight
(LBS)
Speed of Stirring Shaft
(r/min)
Overall Dimensions
(inch)
1st
Speed
2nd
Speed
3rd
Speed
18mcpm20qlh
1.1
180
108
195
355
25" x 23.50" x 35.50"
18mcpm30qlh
1.5
396
91
166
282
28" x 26.50" x 50"
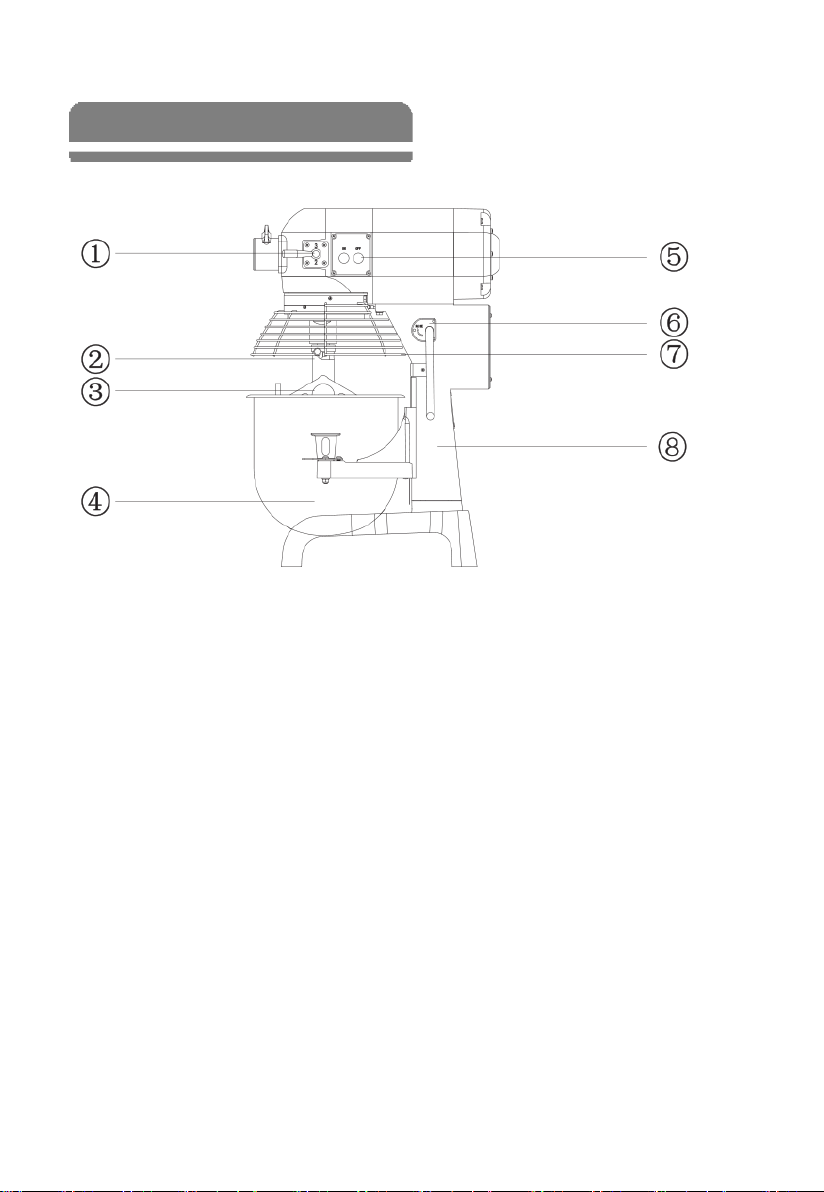
Main External Parts Mixer
①Gear change hand lever
②Stirring shaft
③Mixer
④Stainless barrel
⑤Power switch
⑥Bent lever
⑦Safety guard ( may choose the fitting)
⑧Suppor

Operation Instruction
①Standard power supply v/ HzAc. (Please use a plug
with 3 wide contacts and good grounding.)
②Installation of mixer: Put the stirring shaft 2 in Mixer 3 and rotate
it in clockwise direction.
③Starting procedures: Pull the gear change hand lever 1 to position
1 before starting, then turn on the power switch 5 and set the
speed required. After the mixer is in normal operation, pull the
hand lever 6 to the highest point and lift the support 7 to the
highest position.
④Speed transformation: If you want to change speed, please turn
off the power switch 5 firstly, and then pull the gear change hand
lever 1 to the position required.
⑤Shutting down: when the operation is complete, turn off the
power switch 5 firstly, then pull the gear change hand lever 1 to
position 1, and pull back the hand lever 6 to the lowest point and
finally disconnect power supply.
Accessories and Functions
①Whisk: Used for stirring of liquid material, such as cram and egg.
Recommended speed: mid or high speed.
②Beater: Used for stirring of paste, powder and fragmental
material, such as stuffing and cake dough. Recommended speed:
start with low speed, end with mid speed.
③Spiral dough hook: Used for stirring of sticky material, such as
dough. Recommended speed: low speed.

Notes
①The power socket must be provided with a good ground wire
to guarantee the mixer’s good grounding through it. There will
be an electric shock if no ground wire or an improper
grounding mounted. The ground wire can never be connected
with gas pipe, water pipe, lightning rod or telephone line.
Electric leakage should be checked after installation. Once the
power line damaged, the user must replace them in the special
maintain service company.
②Don’t put your hands into the stirring barrel during operation.
Power supply should be disconnected before the mixer is going
to be installed.
③Don’t operate the mixer beyond the time limit to prevent
reduction of its service life.
④The mixer should be mounted on a stable and clean place.
Keep it away from overheated or overwet places and away
from equipment which has strong electromagnet or can
produce strong electromagnet.
⑤Keep the machine clean constantly. Disconnect power supply
before maintenance. Clean it with a piece of soft and a bit wet
cloth. Don’t clean it with liquid or spraying detergent.
Maintenance
Clean the bowl and stirrer daily or after use to maintain hygiene
standard.
The transmission gear box is greased in factory. Check the
greasing each 6 months. To ass or refill grease, open the top cover,
then fill grease from aperture or replace the grease directly.

Trouble Shooting
Problems
Causes
Solutions
Tool shaft does not
rotate after starting
the machine
Loosen electric wiring
Check electric wiring,
tighten those loose
connects
Oil leakage
The seal rings are
worn out
Replace seal rings
Motor temperature
raised while
reduced output
speed
Too low voltage
Check the power
supply
Overloaded
Reduce load
The sped of mixing is
too high or using a
wrong stirrer
Select a suitable speed
and stirrer
The mixing knocks
with the bowl
The stirrer or bowl is
deformed
Repair or replace the
stirrer or bowl
Abnormal noise and
high temperature
from gearbox
Insufficient lubrication
Add or replace the
grease
Warning!
If the equipment is out of function, please make sure that it is
serviced by professional person or please turn to special service point.
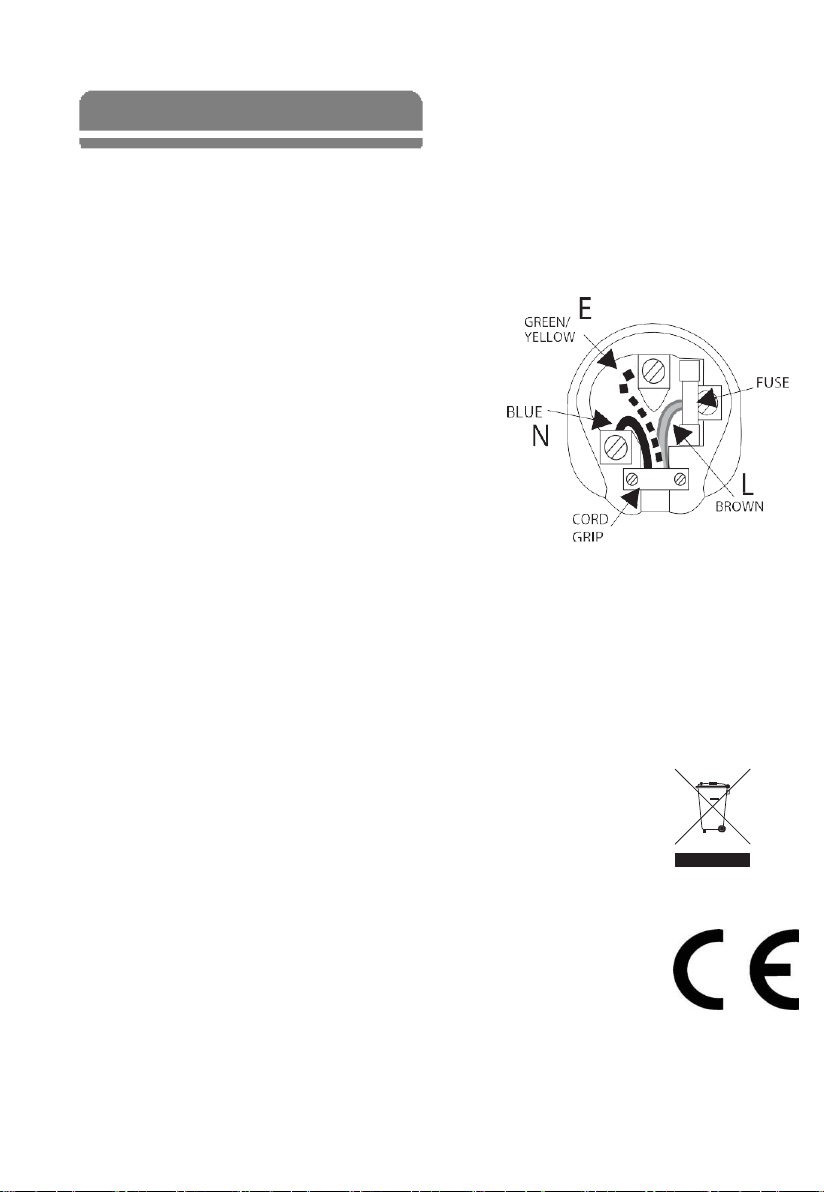
ElectricalWiring
This appliance is supplied with a 3 pin, moulded,
BS1363 plug
and lead, with a 13 amp fuse as
standard.
The plug is to be connected to a suitable
mains socket.
This appliance is wired as
follows:
•
Live wire (coloured brown) to terminal marked L
•
Neutral wire (coloured blue) to terminal marked N
•
Earth wire (coloured green/yellow) to terminal marked E
This appliance must be earthed, using a dedicated
earthing
circuit.
If in doubt consult a qualified electrician.
Electrical isolation points must be kept clear of any obstructions. In the event of any
emergency
disconnection being required they must be readily accessible.
Compliance
The WEEE logo on this product or its documentation indicates that the
product must
not be disposed of as household waste. To help prevent
possible harm to human
health and/or the environment, the product
must be disposed of in an approved and
environmentally safe recycling
process. For further information on how to dispose of
this product
correctly, contact the product supplier, or the local authority responsible
for waste disposal in your area.
parts have undergone strict product testing in order to comply with
regulatorystandardsandspecificationssetbyinternational,independent,and
federal
authorities.
products have been approved to carry the following symbol:
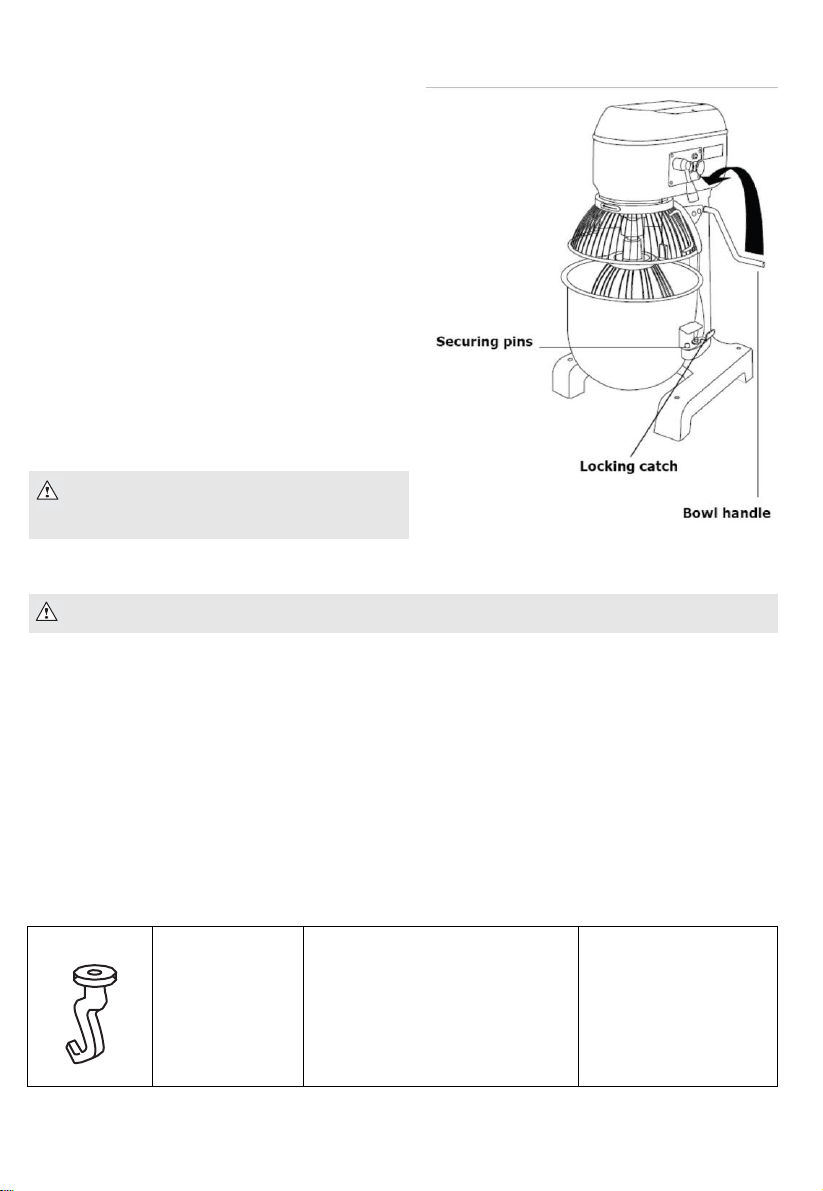
Securing pins
Remove the appliance from all packaging.
Fitting/Removing the Bowl
1.
Turn Off the appliance.
2.
Open the safety guard by turning it to the left
(HLM10 &HLM20) or lifting it above the
mixer
(HLM30).
3.
Lower the bowl with the bowl handle.
4.
Release the locking catches either side of the
bowl.
5.
Lift the bowl. The bowl is held in place by two
pins
securing the handles to the cradle and a
hole at
the back of the appliance which houses
the lug on
the bowl lip.
6.
Reverse the procedure to fit the bowl.
Changing the Mixer Attachment
1.
Turn Off the appliance.
2.
Open the safety guard by turning it to the left ( HLM10 & HLM20) or lifting it above the mixer
(HLM30).
3.
Lower the bowl with the bowl handle.
4.
Push the mixer attachment up and to the left to release it.
5.
Insert the desired attachment. Push up and to the right to lock it into place.
6.
Raise the bowl.
We recommend the following uses for each attachment:.
Spiral Dough hook
Heavy mixes
dough, pie pastry etc.
Suitable Gears:
1
Slow
Note: Regularly grease the bowl lift mechanism to ensure smooth operation .
Note: Ensure the handle is fully pushed
back and the bowl is completely raised or
the mixer will not work.
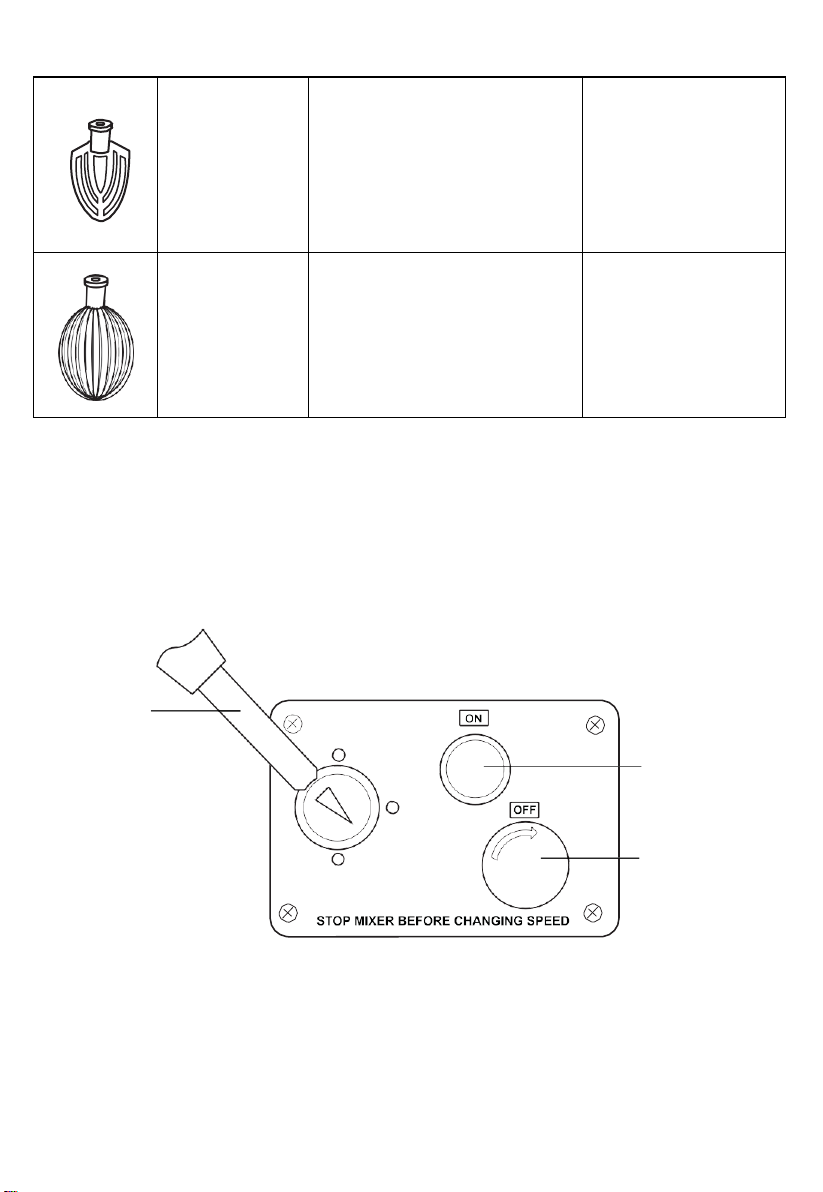
Layout of Controls
Gear lever
ON switch
OFF switch
ON button - Press to start the mixer.
OFF button - Press to stop the mixer. Twist clockwise to release and reset HLM30 only).
GEAR LEVER - Use to adjust the speed of the mixer.
Beater
Firm mixes
light pastry, cake/biscuit mix,
icings,
fillings and mashed
vegetables
Suitable Gears: 1, 2
Medium
Whisk
Light mixes
whipped cream, mayonnaise, egg
whites, pancakes and soufflés
Suitable Gears: 1, 2, 3
Fast
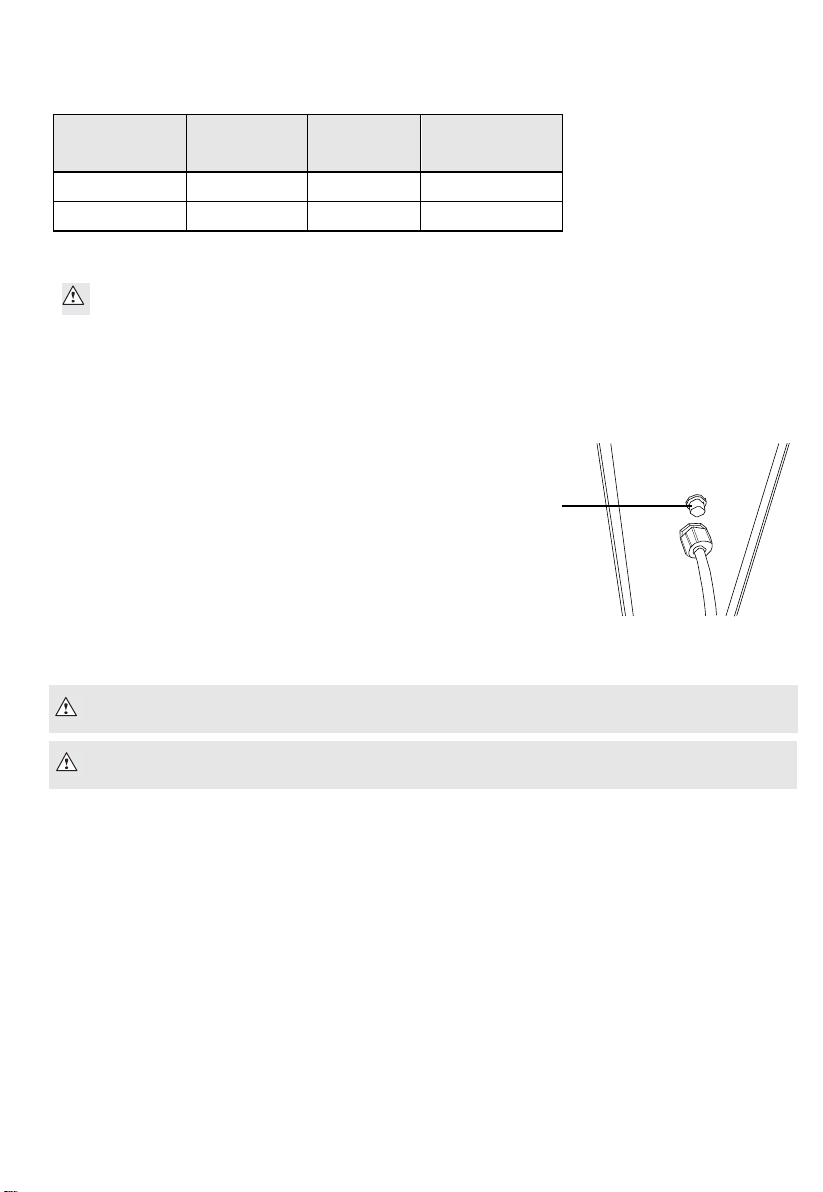
MixingCapacity
Model
Bowl
Volume
Max Flour
Max
Dough
18mcpm20qlh
20Quart
11.00LBS
18.00LBS
18mcpm30qlh
30Quart
16.50LBS
25.00LBS
Changing Mixing Speed
Note: ALWAYS stop the mixer before attempting to change the mixing speed.
With the appliance turned Off:
1.
Select the required gear using the gear change lever.
2.
Restart the appliance.
OverloadSwitch
The Overload switch is situated at the back of the machine
beside the cable entry. If the appliance becomes too hot the
Overload switch will stop the machine automatically. If
this
happens:
1.
Turn Off the mixer.
2.
Reduce the load in the mixing bowl.
3.
Push the Overload switch back in to reset it.
4.
Allow the appliance to cool for 20 minutes.
Cleaning, Care & Maintenance
Overload
Switch
•
Always turn off the mixer and disconnect from the power supply before cleaning.
•
Use warm soapy water to clean the bowl and mixing attachments. Do not use abrasive cleaning
chemicals as these can leave harmful residues.
•
Clean the exterior of the appliance with a damp cloth.
•
Dry all parts thoroughly after cleaning.
•
Do not use jet/pressure washers to clean the appliance.
•
Clean the appliance regularly.
Note: In the event of a power cut the Overload switch will cut in to prevent the
appliance from restarting automatically when power is restored.
Note: Always disconnect the Planetary Mixer from the mains powers supply when not
in use.
Ce manuel convient aux modèles suivants
1
Table des matières
Autres manuels MasterChef Mixer


