KREYER Chilly Manuel utilisateur

Picture guide
Start-up of chillers type
Chilly
230V / single phase
Important notes:
The following picture guide is additional information to the official instruction manual and does
not replace it The instructions in the manual are to be considered before this document
Electrical and water installation and the start-up should be done by qualified personnel

_________________________________________________________________________________________
Kreyer – Picture guide to installation and start-up Chilly (page 2of 18) v.11-2015
Dear Chilly user – Brewer, winemaker, hobby user!
Congratulations on your new CHILLY unit !!
The following guide includes pictures to show you the step-for-step installation
and start-up of your new Chilly to help you get started fast and easy.
Pic.1: Your new CHILLY would be delivered secured on a pallet with protective foil and safety bands, eventually
in carton packaging.
Please check at arriving on possible transport damages and claim these immediately to the transporter.
If you are not sure please unpack the unit together with the transporter.
Transport damages cannot enforcement later!!
Correct place of installation:
In a well aired room.
If set outside, the unit should be under an awning or in a shed providing protection from the elements
(sunshine, rain, snow) and well aired.
The unit operates between the ambient temperatures:
Min. +10°C / 50°F
Max. + 42°C / 107°F
Distance / placement:
Free space in front of the cool air intake min. 0,5 meter / 2 feet
Free space in front of the hot air outlet min. 1,0 meter / 3,5 feet
For exact installation conditions, please refer to the manual.

_________________________________________________________________________________________
Kreyer – Picture guide to installation and start-up Chilly (page 3of 18) v.11-2015
Pic.2: When unpacking the Chilly, you will find its official
Instruction Manual
. This Manual pertains to your
specific unit by means of its Serial Number. The electrical diagram in this manual pertains to your unit.
Unit Serial Number appears on the name plate attached to it (8 digit number).
Pic. 3: View inside of the open tank – the heat-exchanger (evaporator) in spiral type is visible

_________________________________________________________________________________________
Kreyer – Picture guide to installation and start-up Chilly (page 4of 18) v.11-2015
Pic. 4: Fill the tank with clear water
Pic. 5: Add ‘food-safe’ grade glycol (anti-frost protection) to the water. The concentration of the Glycol in the total
quantity of water in your system depends on the water temperatures you want to set your Chilly to produce, and
the instructions from the Glycol manufacturer. Typically, you need to have about 25% - 30% of Glycol part in the
total quantity of water in your system. (Necessary for low temp Chillys, if ambient temperature can reach negative
temperature or in case of cooling below +8°C is needed)
Pic. 6: Controlling the level of filled water/glycol-mix in the sight glass - it should always be between MIN
(minimum) and MAX (maximum), also when the unit is in full operation.

_________________________________________________________________________________________
Kreyer – Picture guide to installation and start-up Chilly (page 5of 18) v.11-2015
If the water level went down after you started using the unit and water is circulating in your tanks – top up the
water and make sure to add Glycol in the right quantity as well!
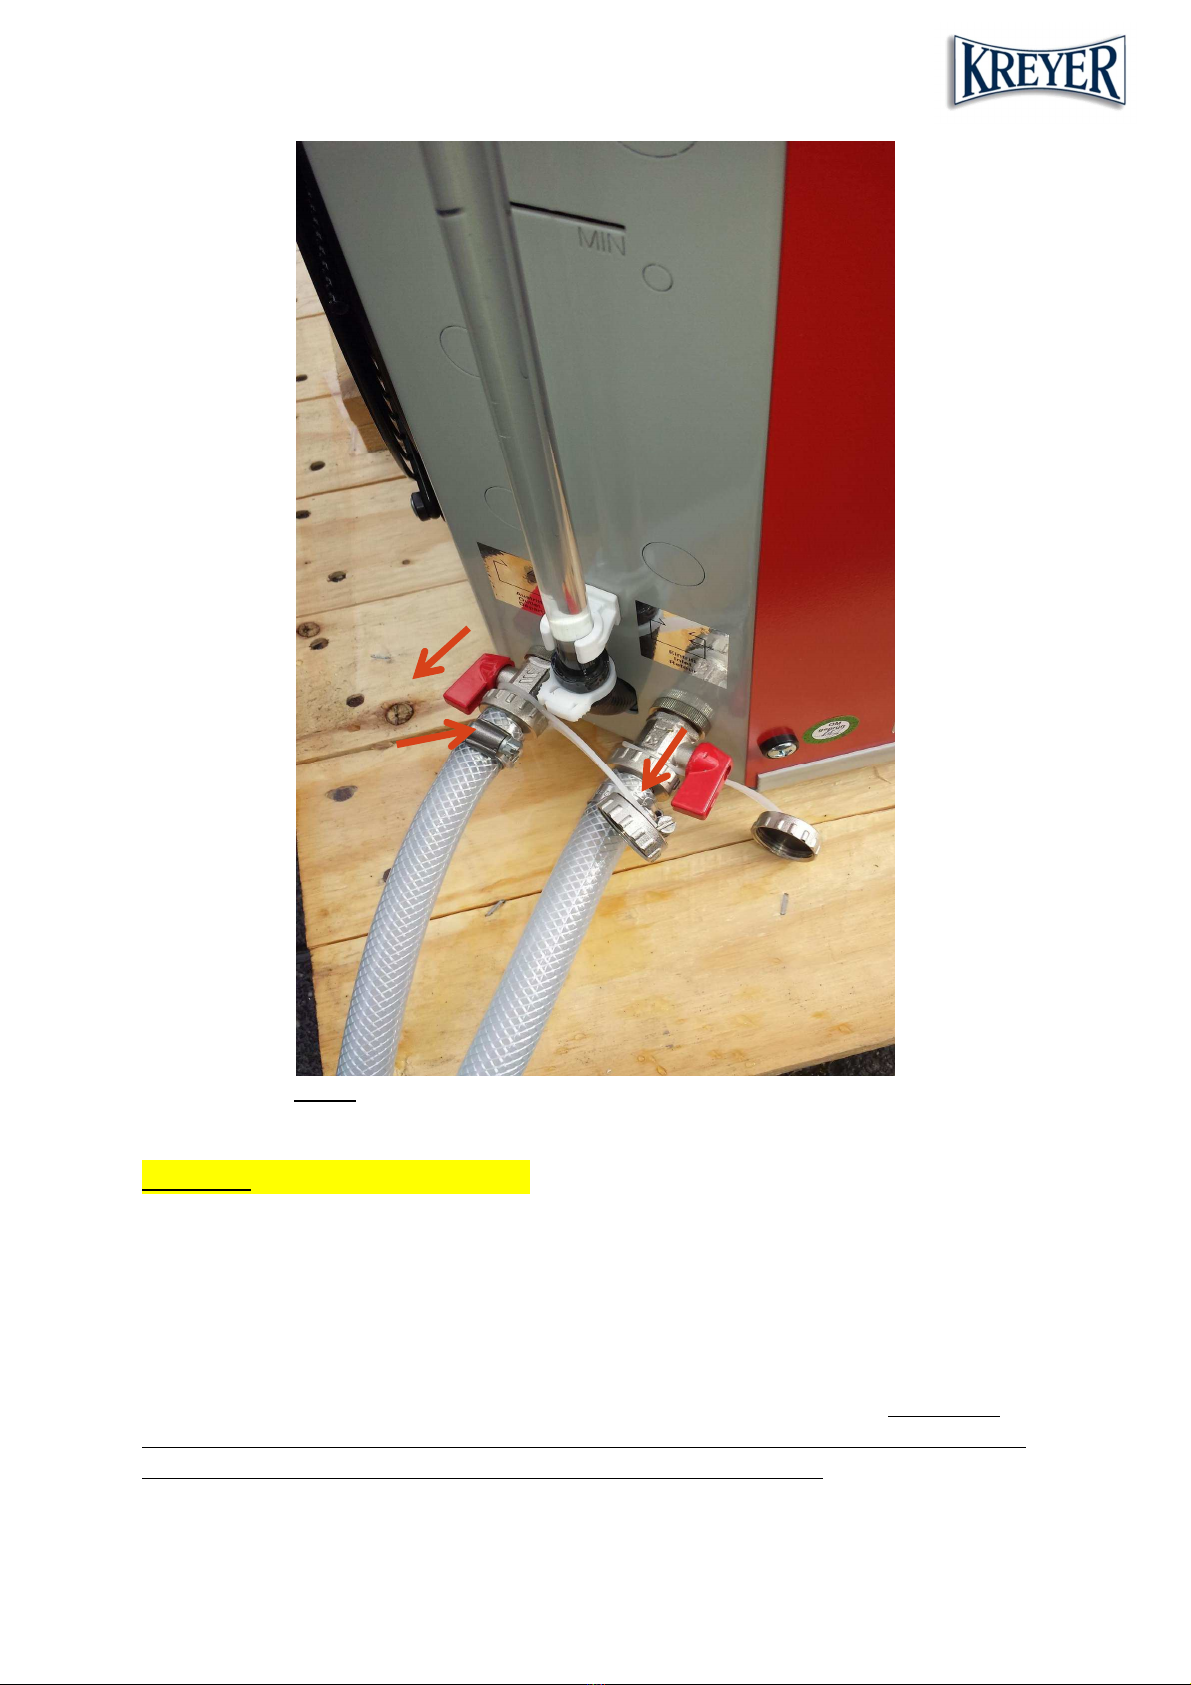
Pic. 7 + 8: Connection of the systems water pipes/hoses to the chiller. At this point the valves are closed and
pointing upwards (see arrow direction).

_________________________________________________________________________________________
Kreyer – Picture guide to installation and start-up Chilly (page 6of 18) v.11-2015
Pic. 9: Bleeding of the pump (letting out air from the pump) – disconnect the tube/hose of the chiller
water outlet and open the outlet valve . At first the water will flow out in spurts. Keep the valve open
until the water comes out in a constant flow. This tells you that all air has been pushed out of the pump
by the water. Close the valve again and top up the water in the tank if necessary. Remember your
Glycol!
Attention:
Please check the pressure capacity of the unit pump. Please ensure that all
components in your water system are compatible with the maximum pump pressure. If

_________________________________________________________________________________________
Kreyer – Picture guide to installation and start-up Chilly (page 7of 18) v.11-2015
necessary, use pressure-reducer elements (e.g. bypass-valve) in your water system. Pump
capacity and further information are inside the unit manual.
_________________________________________________________________________________________
Kreyer – Picture guide to installation and start-up Chilly (page 8of 18) v.11-2015
Pic. 10: Reconnect the tube/hose to the chillers outlet. Then open both valves
(The valves are open when they are parallel to the tube, see arrows).
Optional: Overflow protection kit
he unit CHILLY is working as an open water system. Water users (e.g. tanks) should be installed on
the same level as the chiller or below to avoid an overflow of the chillers buffer tank when the
unit/pump is off.
If this isn’t possible you should install an overflow protection kit (consisting of a solenoid valve, a
solenoid connection cable and a non-return valve – available from WTG / KREYER). For the right
voltage of the solenoid valve respect absolutely the available control voltage of the chiller –> check
inside the electrical diagram appearing at the end of the instruction manual.

_________________________________________________________________________________________
Kreyer – Picture guide to installation and start-up Chilly (page 9of 18) v.11-2015
Install the non-return valve in the outlet pipe/flow line (for the right fitting position respect the flow
direction indicated by an arrow on the non-return valve) and the solenoid valve in the inlet
pipe/return line of your chiller (see picture in the example below
Insert the solenoid connection cable in one of the free cable inlets at the side of the chiller (see green
arrows -> remove one of the pre-cut openings + install a screwed cable gland) and lead it through to
the control cabinet:

_________________________________________________________________________________________
Kreyer – Picture guide to installation and start-up Chilly (page 10 of 18) v.11-2015
Check the electrical diagram of the chiller appearing at the end of the instruction manual where to
connect the cable of the solenoid valve (in this example here the contact inside the control cabinet is
X2 -> clips 5, 6 and 7=earth). It doesn’t matter whether you connect the brown or the blue cable to
clip 5 or 6:
Please check and compare volage on name plate with your local voltage – if not correlating
please contact your supplier!
- End of the optional overflow protection kit -
Autres manuels pour Chilly
1
Autres manuels KREYER Refroidisseur


