Intelbras XSA 1000 Manuel utilisateur

User’s Manual
XSA 1000
XSA 1000 BLACK

XSA 1000 / XSA 1000 BLACK
Universal Support
Congratulations, you just have purchased a product with Intelbras
quality and safety.
The XSA 1000 / XSA 1000 BLACK universal support was structured to
t perfectly in most presence sensors available in the market and oth-
er equipments with compatible features, and also have a wide direc-
tion angle, support to wiring passage and UV protection for installing
in outdoor environments.

Caution and safety
» LGPD – Data processing by Intelbras: Intelbras does not access, transfer, capture or
perform any type of processing of personal data from this product.
» Follow all instructions in the manual for assembling and installing the product;
» Make sure that both the sensor and the bracket are securely xed in place to avoid
changes in the detection angle of the product.
» Make sure the installation location is stable and not subject to ickering.
» We recommend that the installation be carried out by a professional installer as
incorrect use of the articulator may impair the PET function and the coverage
angle of the presence sensor.

Summary
1. Technical specications 5
2. Product 5
3. Features 6
4. Installation 6
Term of Warranty 10
5
1. Technical specications
General features
Material Plastic with UV protection
Weight 44 g
Load capacity 1.5 kg
Installation environment Internal / external
Size (W × H × D) 99 × 58 × 64 mm
Horizontal movement angle 160°
Vertical movement angle 160°
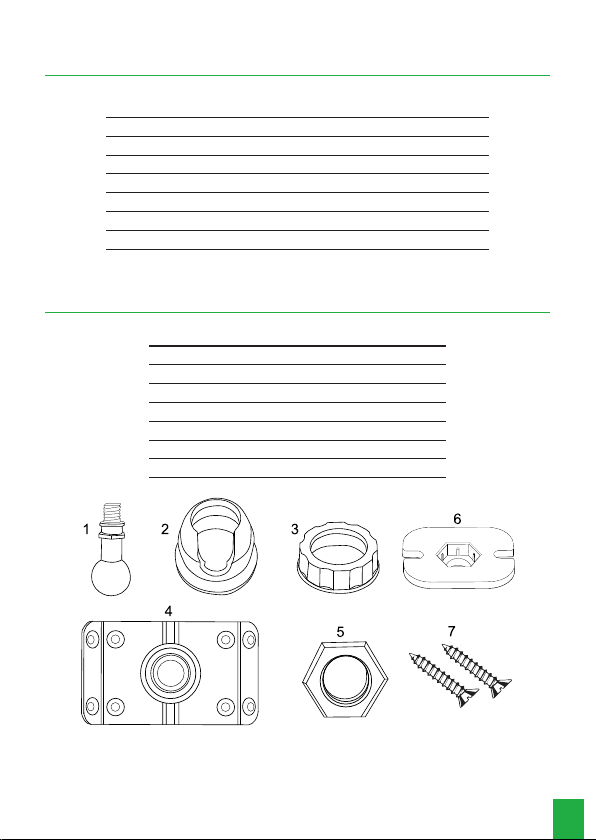
2. Product
Components
1 Axle
2 Cover
3 Ring
4 Base
5 Upper base
6 Connector
7 Screw 3.5 × 9.5 mm

6
Mounted support
Mounted support
3. Features
» Made of UV protected material;
» Easy to install;
» Wide application scenario;
» Compatible with most presence sensors available in the market and other equip-
ments for the same applications and purpose.
4. Installation
» Insert the shaft into the cover (part 1 and part 2);
» Pass the ring through the previous set (piece 3);
» Insert the nut into the connector (key 5 and 6);
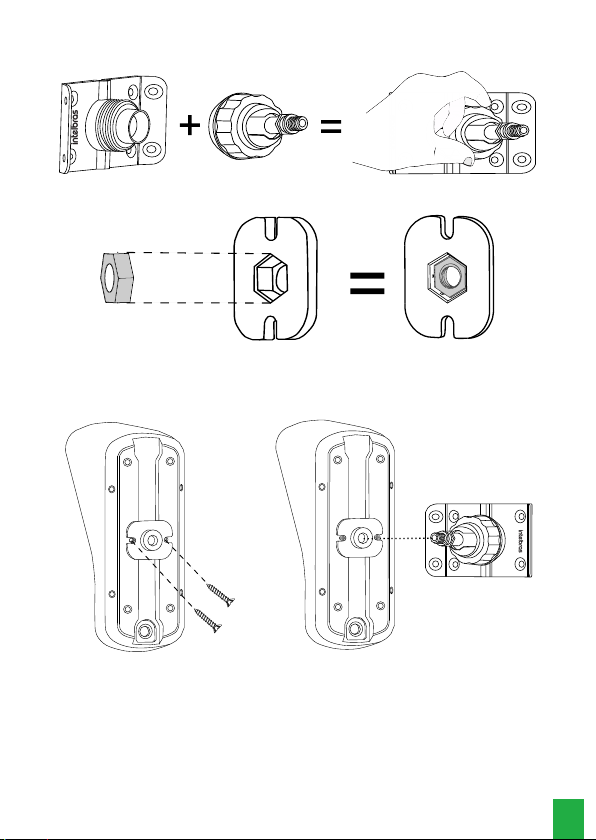
7
» Screw the ring on the base turning clockwise until you feel that it is tight;
» Insert the nut into the connector parts 5 and 6.
» Attach the support to the base of the sensor or product to be used as shown in the
image below, use the xing screws that come with the XSA 1000 support, then
insert the shaft through the hole, rotating clockwise until you feel that it is stuck.
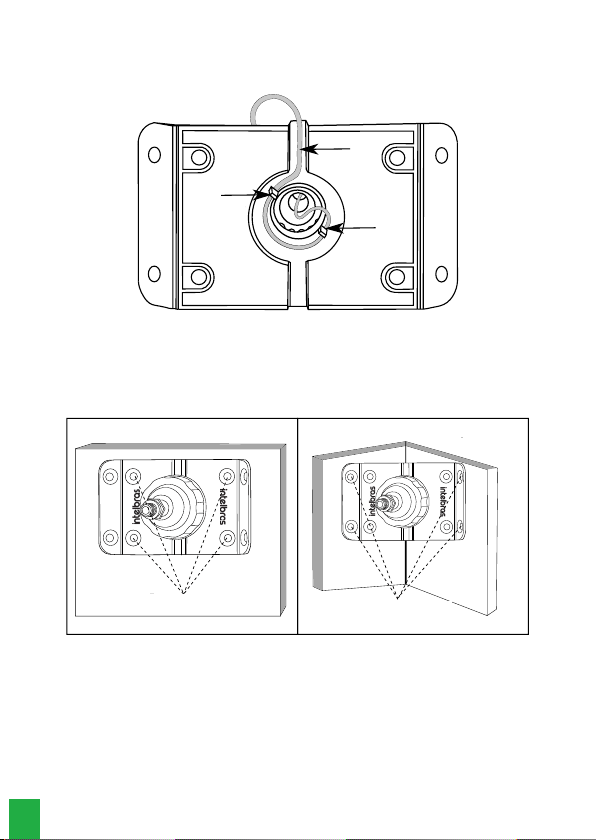
To x the XAS 1000 in the installation location, follow the steps below:
Note: the XAS 1000 support has an opening for passing the wire if necessary,
follow the steps below for its correct use.
» Lead the wiring through the wire feedthrough;
» Fix the wire through the two internal locks for xing the wiring;
» Route the wire through the hole in the center of the base towards the inside of
the product to be xed.
8
Note:
It is important to use the locks for xing the wiring, as they prevent water
from entering the inside of the sensor conducted by the wiring.
Cable
Wiring
lock
Wiring
lock
Wired base rear view
» If the sensor is installed on a at surface, use the four innermost holes in the base
for mounting. If the sensor is used on a 90° corner, use the four outermost screws
on the base.
Wall mounted Mounted in the corner of the wall
Passage for the screw
Passage for the screw
9
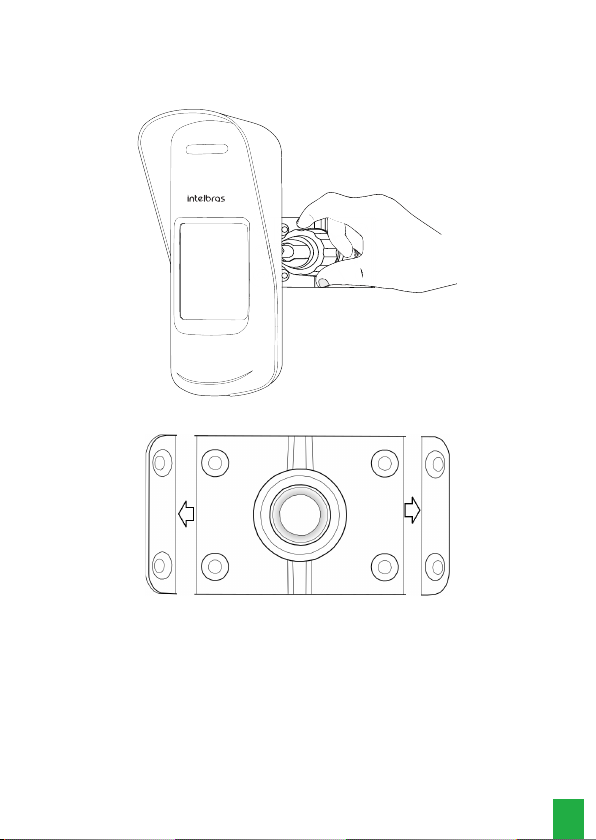
» After denitively xing the base, direct the sensor to the desired detection eld,
always respecting its specications. Lock the sensor position by turning the xing
ring clockwise until you feel that it is rm.
» The corner xing tabs can be easily detached if not in use.
Detaching the base

10
Term of Warranty
It is expressed that this contractual warranty is granted according to the following
conditions:
Customer name:
Customer’s signature:
Tax Invoice No.
Date of Purchase:
Model: Serial No.:
Retailer
1. All parts, pieces and components of this product are warranted against any man-
ufacturing defects, which may arise within a period of 1 (one) year - being 90
(ninety) days of legal warranty and 9 (nine) months subject to contractual warran-
ty - from the date when the Customer purchased the product, according to the
product purchase tax invoice, which is an integral part of this Term throughout
the Brazilian territory. This contractual warranty expressly includes the product ex-
changes in case of manufacturing defect. If no manufacturing defect is conrmed,
but there is a failure due to improper use, the Customer shall bear any of these
incurred expenses.
2. The product must be installed according to the Product Manual and/or Installation
Guide. If your product requires to be installed and congured by a skilled techni-
cian, your should seek for a reliable and skilled professional, but the costs of such
services are not included in the product price.
3. Once the defect is conrmed, the Customer shall contact immediately the nearest
Authorized Service listed in the report provided by the manufacturer, they are the
only professionals authorized to check and remedy the defect within the warranty
term provided herein. It it is not observed, the warranty is void, characterized as
product infringement.
4. Eventually, if the Customer requests service at home, he/she may contact the near-
est Authorized Service to ask for fee quotation of a technical visit. If it is necessary
to withdraw the product to be repaired, the incurred expenses such as transpor-
Ce manuel convient aux modèles suivants
1
Table des matières


