HELVIA HRMA PLAY Series Manuel utilisateur

HRMA PLAY Series
6 Zones Integrated Mixer Amplier with USB/SD/FM, and
Zone individual Control
Manuale d’uso
en-ita
Please read this manual carefully and keep it for future reference
Leggete questo manuale e conservatelo per future consultazioni
User Manual

Gentile Cliente,
Prima di tutto, grazie per aver acquistato un prodotto HELVIA®. La nostra missio-
ne e di orire soluzioni basate sulle tecnologie più aggiornate a tutte le esigenze
di integrazione di sistemi nei settori privati, commerciali e corporate.
Speriamo che siate soddisfatti da questo prodotto e, qualora vogliate partecipare,
saremmo molto lieti di poter ricevere il vostro feedback sul funzionamento del
prodotto e su possibili miglioramenti da apportare in futuro. Potete andare sulla
sezione CONTATTACI del sito www.frenexport.com e inviare una e-mail con la vo-
stra opinione; questo ci aiuterebbe a realizzare apparecchiature sempre più vicine
alle reali esigenze dei Clienti.
Vi preghiamo, inne, di leggere attentamente questo manuale di istruzioni prima
di utilizzare il prodotto; un uso incorretto potrebbe causare danni a voi e al pro-
dotto stesso: pensateci!
Il team HELVIA
Dear value Customer,
First, thank you for purchasing a HELVIA® product. Our mission is to oer
solutions based on the most up-to-date technologies for all systems integration
needs in the private, commercial and corporate sectors.
We hope you are satised with this product and, if you wish to participate, we
would be very pleased to receive your feedback on the operation of this product
and possible improvements for the future. You can go to “CONTACT” section of
www.frenexport.com and send an e-mail with your opinion; this would help us
make equipment that are closer to the real needs of our customers.
Finally, please read this user manual carefully before using the product; incorrect
use could cause damages to you and the product. Take care!
The HELVIA team

TABLE OF CONTENTS
1. PRECAUTIONS .................................................................................. 4
1.1. Important Safety Symbols................................................................................................ 4
1.2. Important Safety Instructions......................................................................................... 4
2. GETTING STARTED........................................................................... 6
2.1. Unpacking..............................................................................................................................6
2.2. First Start-Up .........................................................................................................................6
3. PRODUCT OVERVIEW ......................................................................7
3.1. Features: .................................................................................................................................7
4. INSTRUCTION....................................................................................7
4.1. Front Panel.............................................................................................................................7
4.2. Rear panel ..............................................................................................................................9
4.3. Remote Control.................................................................................................................. 11
4.4. Connections ........................................................................................................................12
5. SPECIFICATIONS..............................................................................13
6. WARRANTY AND SERVICE ...........................................................14
7. WARNING.........................................................................................14
HRMA PLAY Series 6 Zones Mixer Amp with USB/SD/FM, and Zone Control
4
1. PRECAUTIONS
1.1. Important Safety Symbols
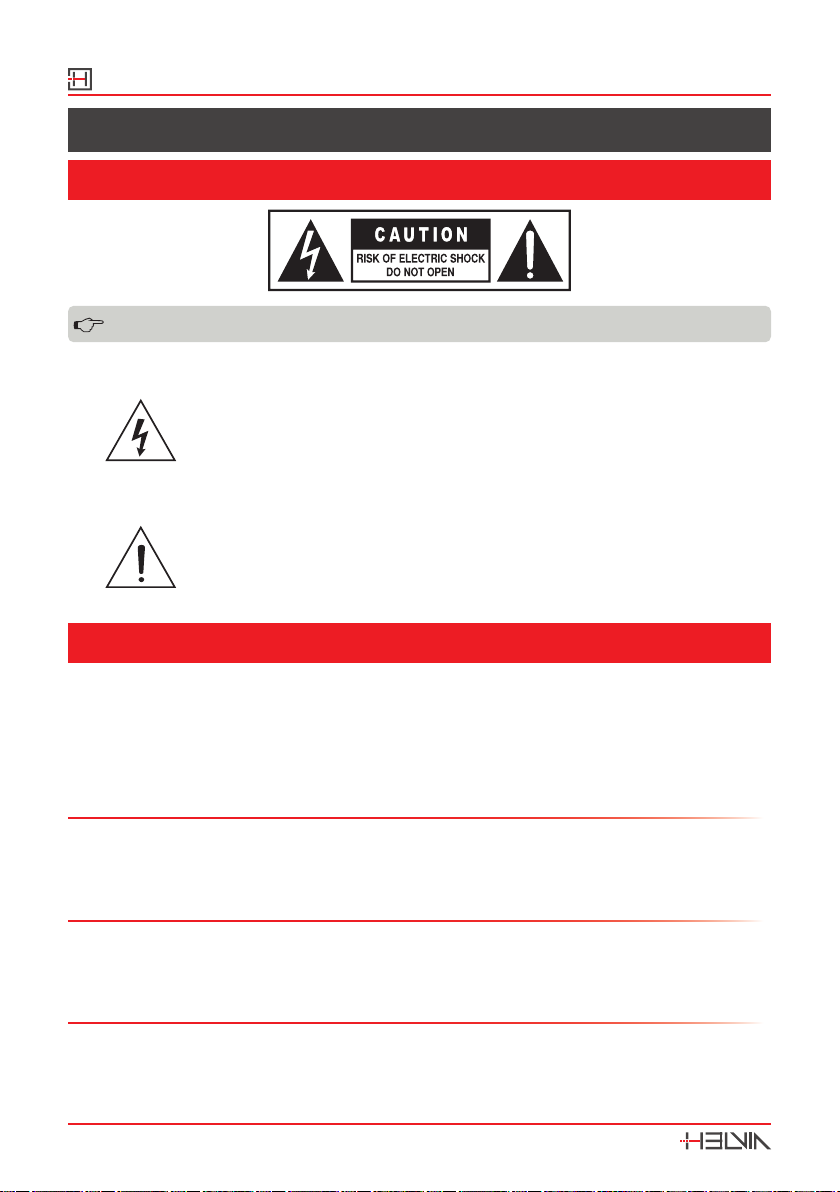
The above warning is located on the rear of the unit
The lightening ash with arrowhead symbol within an equi-
lateral triangle is intended to alert the user to the presence of
uninsulated “dangerous voltage” within the product’s enclosure
that may be of sucient magnitude to constitute a risk of elec-
tric shock to persons.
The exclamation point within an equilateral triangle is intended
to alert the user to the presence of important operating and
maintenance (servicing) instructions in the literature accompa-
nying the product.
1.2. Important Safety Instructions
yRead these instructions
yKeep these instructions
yHeed all warning
yFollow all instructions
Water and Moisture
The apparatus should be protected from moisture and rain and can not be used
near water; for example near a bathtub, a kitchen sink, a swimming pool, etc.
Heat
The apparatus should be located away from heat sources such as radiators, stoves
or other appliances that produce heat.
Ventilation
Do not block areas of ventilation opening. Failure to do could result in re. Always
install according to the manufacturer’s instructions.

HRMA PLAY Series
6 Zones Mixer Amp with USB/SD/FM, and Zone Control
5
Object and Liquid Entry
Objects do not fall into and liquids are not spilled into the inside of the apparatus
for safety.
Power Cord and Plug
In case of external power cord, protect it from being walked on or pinched partic-
ularly at plugs, convenience receptacles, and the point where they exit from the
apparatus. Do not defeat the safety purpose of the polarized or grounding-type
plug. A polarized plug has two poles; a grounding-type plug has two poles and a
third grounding terminal. The third prong is provided for your safety. If the pro-
vided plug does not t into your outlet, refer to an electrician for replacement.
Power Supply
In case of products with external power adapter, the unit should be connected to
power adapters only of the type as marked on the apparatus or described in the
manual. Failure to do could result in damage to the product and possibly the user.
Unplug this apparatus during lightning storms or when unused for long periods.
Fuse
In case of products with external fuse holder, in order to prevent the risk of re
and damaging the unit, please use only of the recommended fuse type as de-
scribed in the manual. Before replacing the fuse, make sure the unit turned o
and disconnected from the AC outlet.
Noise and Interferences
Do not use the device in the nearby of a TV, radio, stereo equipment, mobile
phone, or other electric devices. Otherwise, the device, TV, or radio may generate
noise.
Electrical Connection
Improper electrical wiring may invalidate the product warranty.
Cleaning
Clean only with a dry cloth. Do not use any solvents such as benzene or alcohol.
Servicing
Do not implement any servicing other than those means described in the manual.
Refer all servicing to qualied service personnel only. Only use accessories/attach-
ments or parts recommended by the manufacturer.

HRMA PLAY Series 6 Zones Mixer Amp with USB/SD/FM, and Zone Control
6
2. GETTING STARTED
2 .1 . Unpacking
Thank you for purchasing your HRMA PLAY Series 6-Zones Mixer Amplier. All
units have been rigorously tested before leaving the factory, This product is wide-
ly used in schools, shops, bars, pubs, parks, parking lots, villas, and other places:
it is the ideal choice for public broadcasting. In order to facilitate your installation,
commissioning and use of this product, please read this manual before installa-
tion.
Carefully unpack the carton and check the contents to ensure that all parts are
present and in good conditions:
y1x HRMA PLAY Series mixer amplier
y1x Set of screws for rack mount
y1x FM Tuner Antenna Cable
y1x Stereo RCA cable
y1x Power Cord
y1x Remote Control
yThis User manual
If anything damaged during transport, notify the shipper immediately and keep
packing material for inspection. Again, please save its carton and all packing
materials. If the unit must be returned to the manufacturer, it is important that
the unit is returned in the original manufacturer’s packing. Please do not take any
action without rst contacting us.
Our products are subject to a continuous process of further development. There-
fore modications to the technical features remain subject to change without
further notice.
2.2. First Start-Up
When starting up the stereo amplier for the rst time, please proceed as follows:
1. Turn down the volume of each source.
2. Turn all 6-zones attenuation knobs to OFF position.
3. Connect the amplier to a microphone and/or other AUX source.
4. Connect one or more zone outputs to speakers.
5. Turn on ON/OFF switch. The power indicator will light.
6. Turn at least one of the 6 zone attenuation knobs to 1 position.
7. Gradually increase the input level related to connected source (MIC1, MIC2,
LINE1, LINE2, LINE3, USB, etc.) until you reach the desired volume. If you need
HRMA PLAY Series
6 Zones Mixer Amp with USB/SD/FM, and Zone Control
7
to change the wiring or installation, make sure to decrease all volumes to mini-
mum and disconnect power cord rst.
3. PRODUCT OVERVIEW
HRMA PLAY series oers 4 MIC inputs (MIC1 on front with Priority and Mute func-
tion; MIC 3 and 4 with Phantom), 3 AUX stereo line inputs, a USB/SD/FM player
with remote control. They manage up to 6 Zones with individual attenuation
control (6-step + O). Speaker outputs are at 100V, plus a low-impedance main
output. The HRMA series has a sturdy frame in two 19” rack units, and represent
the ideal solution for shops, bars, pubs, restaurants, supermarkets and other
small-medium sized venues with more than two zones. Powers range from 120W
to 350W in total.
3.1. Features:
y6 zones output, each zone with individual volume attenuator
yBuilt-in USB/SD player and FM radio with remote control and built-in chime
y4 MIC inputs (Mic 1 with priority and muting function)
yMIC 2-4 with XLR (MIC3 and MIC4 with Phantom Power)
y3 AUX line input and 1 AUX line output for power extension
yEach AUX and MIC input has individual volume control
y100V speaker outputs and 4-16ohm main output
yPower supply: AC220V-240V/50-60Hz
4. INSTRUCTION
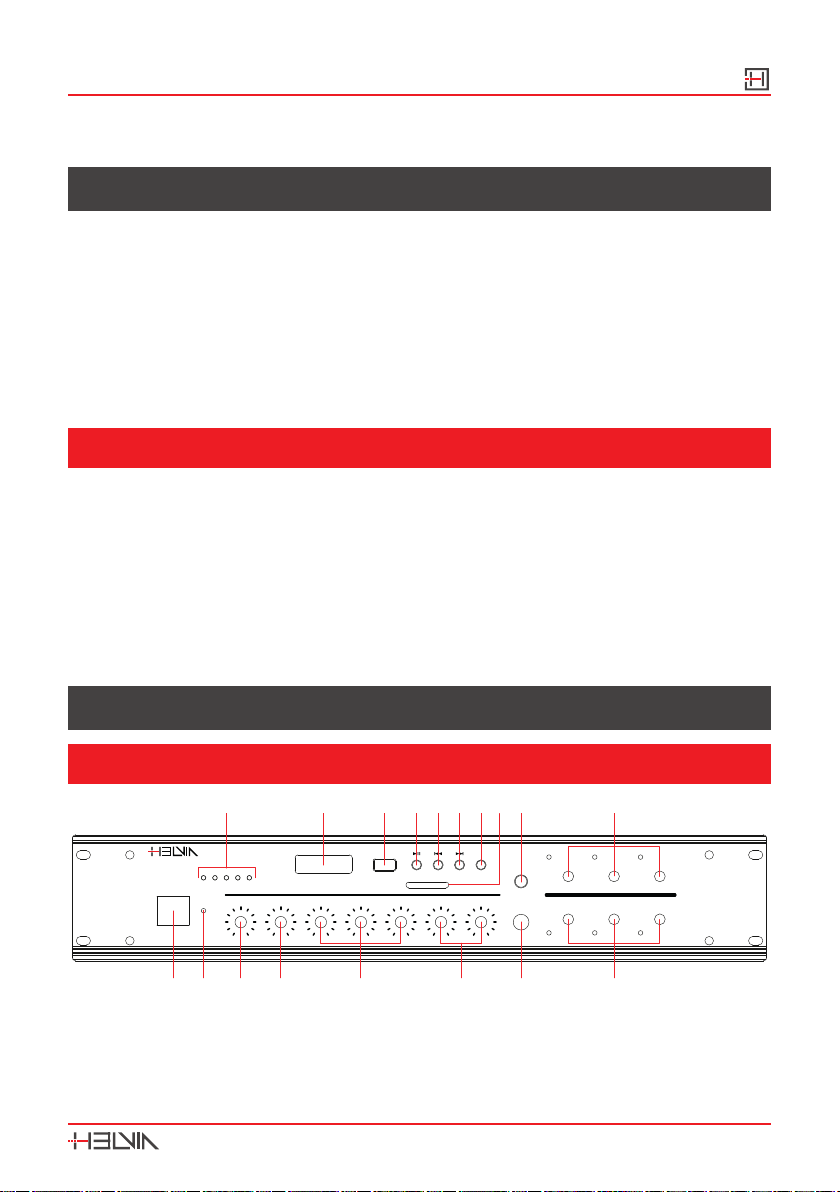
4.1 . Front Panel
LINE2 VOLLINE3 VOL LINE1 VOL MIC1 VOLMIC2 VOL
CHIME
MIC1 IN
CH6CH4 CH5
5
2
1
3
0
4
10
9
8
7
6
+10+10 -10-10
5
2
1
3
0
4
10
9
8
7
6
5
2
1
3
0
4
10
9
8
7
6
BASSBASS
0
TREBLETREBLE
0
246 8 10
5
2
1
3
0
4
10
9
8
7
65
2
1
3
0
4
10
9
8
7
6
1
OFF
5
3
24
OFF
1
4
5
23
OFF
1
4
5
23
OFF
1
4
5
23
OFF
1
4
5
23
OFF
1
4
5
23
USB/CARD/TUNER DISPLAY USB MODE
VOL-
CH3CH1 CH2
POWER
Output Level
ON
SD-CARD
VOL+
HRMA-3506 PLAY
350W 6-Zones Mixer Amplifier
1 2 3 4 5
10111213
6 7 8
91415161718
1. Power Switch - Push to switch the unit on/o.
2. Power Indicator - It lights when the unit is on.
HRMA PLAY Series 6 Zones Mixer Amp with USB/SD/FM, and Zone Control
8
3. Bass Tone - This knob adjusts the overall bass response.
4. Treble Tone - It adjusts the overall treble response.
5. Line Inputs Volume - These three knobs adjust Line 1, 2, and 3 level.
6. MIC Inputs Volume - These knobs adjust MIC1 and 2 levels.
NOTE: Priority is active while the signal is sent to this Mic1 input only.
7. MIC 1 Input Jack - Connect here microphones of unbalanced 30-600ohm
with 1/4″phone plug (6,3mm). Priority is active while the signal is sent to this
Mic input.
8. Zone 1-6 Attenuation Knobs - These knobs have 6 positions (OFF, 1 to 5).
You can attenuate output level of each zone from maximum (5) to minimum
(1), or switch them o.
9. Zone Level Indicator - These LEDs ash according to audio level of each
zone
10. Chime Button - Press this button to play Chime to all active zones and
low-impedance power output.
11. SD-Card Slot - This SD-Card outlet accepts SD-Cards in FAT32 format (max.
32GByte) and plays MP3 les only (44.1kHz/16-bit @ 256kpbs max).
Note: When insert an SD-Card, the unit will automatically switch to
USB mode, and playback will start.
12. Mode Button - Push repeatedly this button to choose between AUX mode
(LINE1/2/3 sources), and RADIO mode. If a USB drive or an SD-Card are in-
serted in the related slots, it switches in turn to this modes too.
13. Next Song - In USB and SD mode, press this button to switch to next song
in the directory. In FM mode, press this key to switch to next stored station in
the list.
14. Last Song - In USB and SD mode, press this button to switch to previous
song in the directory. In FM mode, press this key to switch to previous stored
station in the list.
15. Play/Pause Button - In USB and SD modes, it pauses & plays current song. In
FM mode, by pressing rapidly twice this button, it searches and stores radio
stations automatically.
HRMA PLAY Series
6 Zones Mixer Amp with USB/SD/FM, and Zone Control
9
16. USB Input Socket - This Type-B female USB connector accepts USB drives
in FAT32 format (max. 32GByte) and plays MP3 les only (44.1kHz/16-bit @
256kpbs max).
Note: When insert a USB drive, the unit will automatically switch to USB
mode, and playback will start.
17. MP3 Player/TUNER Display - When you connect a USB drive or as SD-Card,
It shows for about 1 second the total number of MP3 les in the directory,
then starts playback from rst le on. In FM mode, it shows for 1 second the
station number, then its frequency.
18. LED Level Meter - It indicates output level.
When all the five LEDs (+10dB) remain lit, it indicates that the sound
is distorted. In such case, adjust each volume controlling knob, until
LED element 4 (+8dB) and LED element 5 (+10dB) occasionally
flash.
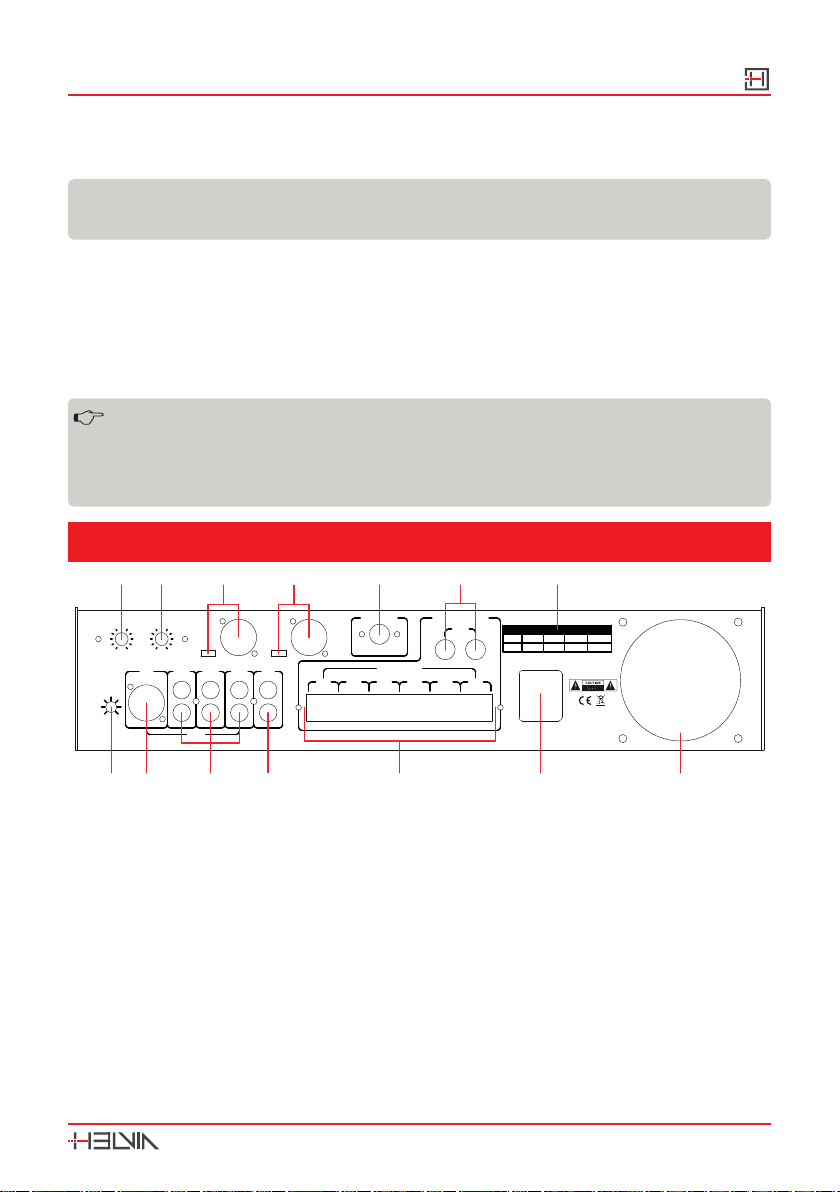
4.2. Rear panel
MIN MAX
MUTE
AUX1
MIC2 AUX2 OUT
AUX3
FA
CH4CH1 CH3CH2 CH5 CH6
COM 100V COM 100V COM 100V COM 100V COM 100V COM 100V
+
-F4AL250V
RMA3506RMA1206
F4AL250V
RMA606
F2AL250V F4AL250V
RMA2506MODEL
FA
MIC3 IN MIC4 IN
MIC4 VOLMIC3 VOL
5
2
1
3
0
4
10
9
8
7
65
2
1
3
0
4
10
9
8
7
6
INPUT
~220-240V/50-60Hz/6A
SPEAKER OUTPUT
ZONE OUTPUT
4-16Ω
FM ANTENNA
FM(75Ω)
PHANTOM
MIC
PHANTOM
MIC
MADE IN CHINA
FUSE TYPE
1 2 3 4 5
10111213
6 7
8914
1. Mute Control - This Trimmer adjusts muting function, that is the threshold
from which all audio sources (LINE1/2/3, MIC2, USB/SD/FM) are muted when
MIC1 audio level exceed it.
2. MIC2 input - Connect here microphones with balanced XLR plugs. This signal
is muted when MIC1 audio exceeds mute threshold.
3. Line 1/2/3 Input - You can connect here any Line-level stereo sources
(CD-players, DAB Radio Tuner, Mixers, Tablets, etc.). All these signals are mut-
ed when MIC1 audio exceeds mute threshold.
4. Line Output - Connect here any power amplier, recording device, mixer or
other audio system.
5. 6-Zone Output terminals - Connect here your 100V speakers.
HRMA PLAY Series 6 Zones Mixer Amp with USB/SD/FM, and Zone Control
10
WARNING: Pay attention to line polarity when connect speakers to the
unit. Each output has positive terminal (100V), and negative terminal
(COM).
6. AC Power Connector / Fuse Holder - Connect power cord to a mains outlet,
paying attention that voltage is 220-240Vac/50-60Hz. Fuse holder allows the
user to change fuse. In order to prevent the risk of re and damaging the
unit, please use only of the recommended fuse type as described in Speci-
cations. Before replacing the fuse, make sure the unit turned o and discon-
nected from the AC outlet.
7. Fan Slot - This window assures good heat dissipation to the amplier.
Please be careful to not cover this slot, otherwise the equipment
could be damaged.
8. Fuse Table - This table shows fuse values of all HRMA PLAY Series models.
Please follow these information when need to replace fuses.
Model Fuse
HRMA-606 PLAY F2AL 250V
HRMA-1206 PLAY F4AL 250V
HRMA-2506 PLAY F4AL 250V
HRMA-3506 PLAY F4AL 250V
9. Low-Impedance Output terminals - This output allows the user to connect
4-16ohm speakers. It is not controlled by 6-Zone attenuation knobs. Only
source level knobs act. It can be very helpful, for instance, if, in addition to the
6 zone 100V speaker lines, you also need a local monitor; in this case you can
use this low-impedance output for this purpose.
WARNING: Pay attention to polarity when connect speakers to the
unit. Each output has positive terminal (+), and negative terminal (-).
10. FM Antenna - The unit is supplied with antenna wire. Connect it here and
extend that wire as much as possible, in order to increase radio receiving
sensitivity.
11. MIC4 Input - Connect here microphones with balanced XLR plugs. This signal
is muted when MIC1 audio exceeds mute threshold. You can connect both
dynamic and condenser microphones. In the latter case, always remember to
choose PHANTOM on selector beside the XLR connector.
12. MIC3 Input - Like MIC3 input, you can connect here microphones with
balanced XLR plugs. Also this signal is muted when MIC1 audio exceeds mute
threshold. You can connect both dynamic and condenser microphones. In the
latter case, always remember to choose PHANTOM in the selector beside the
XLR connector.
Ce manuel convient aux modèles suivants
3
Table des matières
Langues :
Autres manuels HELVIA Amplificateur

HELVIA
HELVIA HMMA PLAY Series Manuel utilisateur

HELVIA
HELVIA HSMA PLAY Series Manuel utilisateur

HELVIA
HELVIA HCA-40 PLAY Manuel utilisateur

HELVIA
HELVIA ZEUS CA Series Manuel utilisateur

HELVIA
HELVIA HWA-40 PLAY Manuel utilisateur

HELVIA
HELVIA HRMA-1206C Manuel utilisateur

HELVIA
HELVIA HCA-60 PLAY Manuel utilisateur

HELVIA
HELVIA ZEUS X Series Manuel utilisateur

HELVIA
HELVIA HTMA TOUCH Series Manuel utilisateur

HELVIA
HELVIA HPMA Series Manuel utilisateur


