Gastrodomus ASQCH8 Manuel utilisateur

1
FORNO ESSICATORE PER FRUTTA
FRUIT DEHYDRATOR OVEN
DÖRRGERÄT FÜR OBST
HORNO DESHIDRATADOR DE FRUTAS
FOUR DÉSHYDRATEUR POUR FRUITS
Manuale d’uso
User manual
Betriebsanleitung
Manual del usuario
Manuel de l'utilisateur

2

3
ITALIANO / ENGLISH / DEUTSCH / ESPAÑOL/ FRANÇAIS
INDICE / INDEX / ÍNDICE
I.Parametri tecnici ............................................................................................................................................. 5
II.Funzionamento ............................................................................................................................................... 5
III.Avvertenze Generali ...................................................................................................................................... 6
IV.Avvertenze all'installazione ........................................................................................................................... 6
V.Mantenimento e pulizia ................................................................................................................................. 7
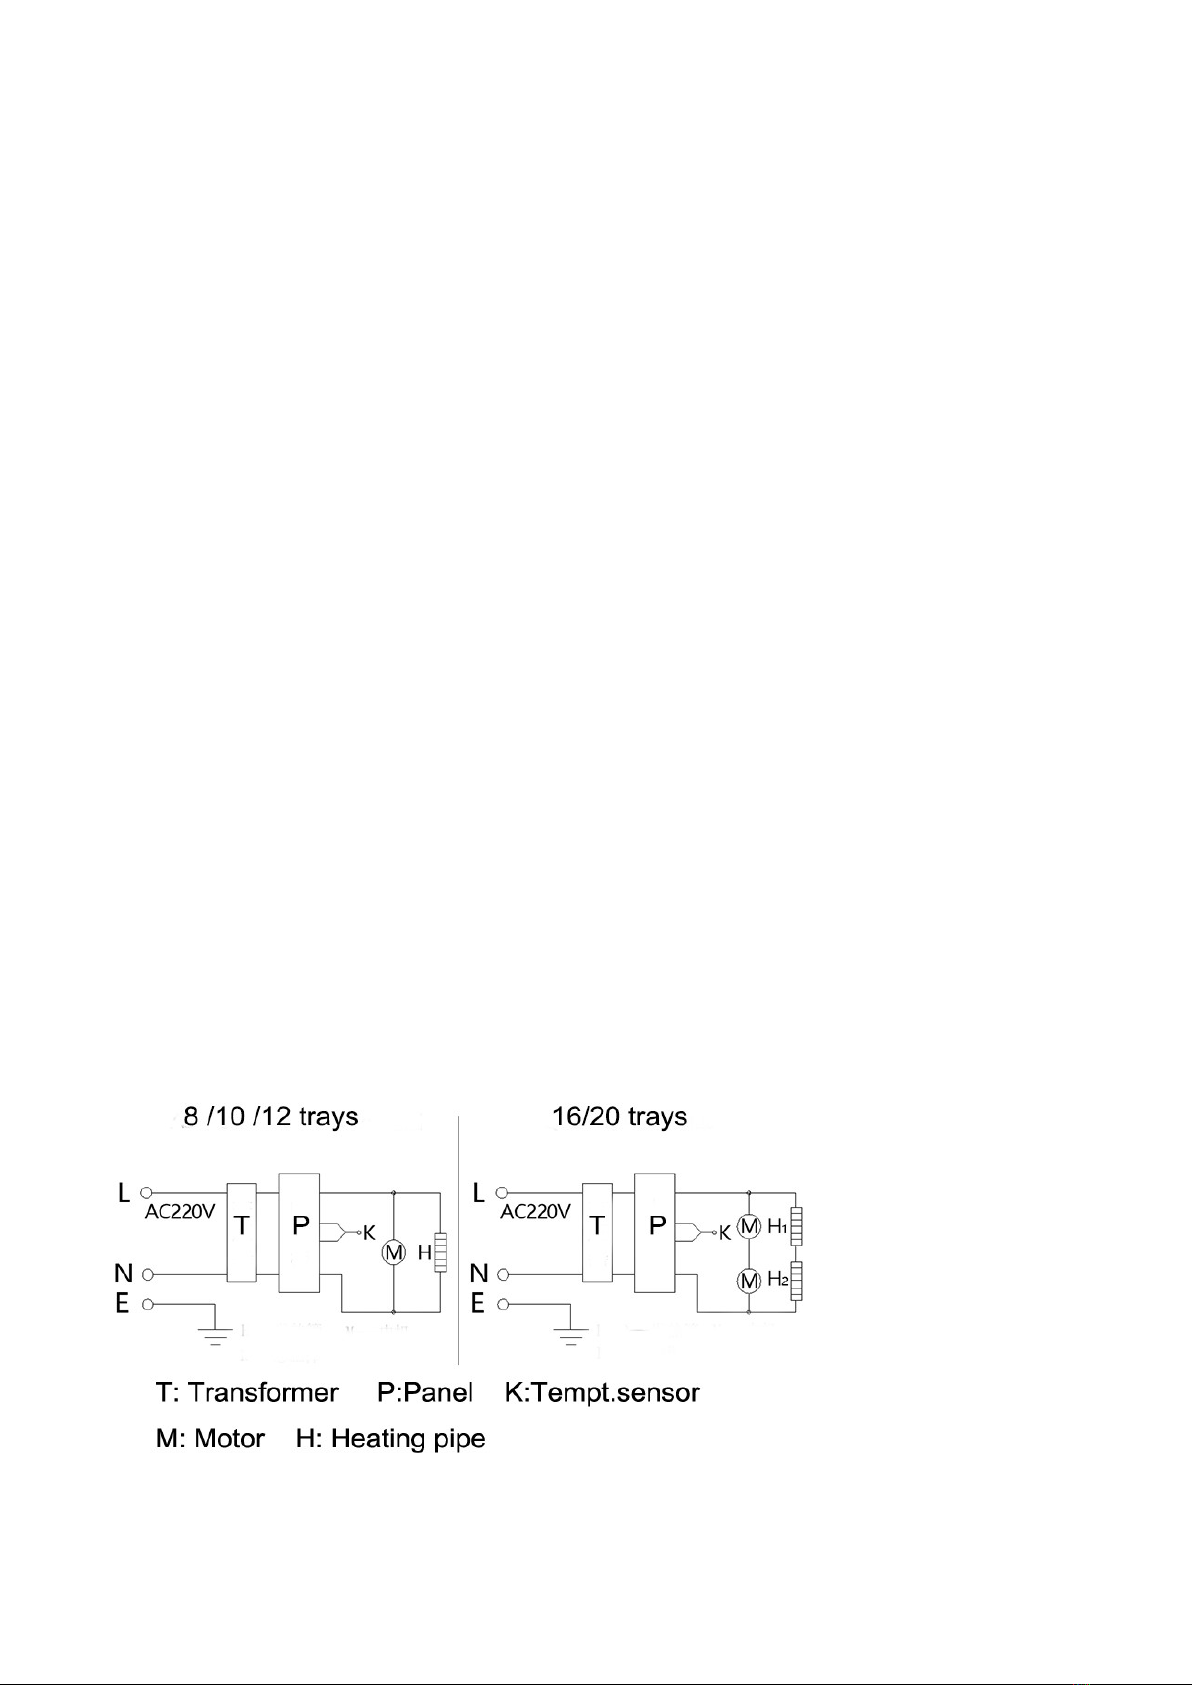
VI.Schema Circuito ............................................................................................................................................. 7
I.Technical Parameters ...................................................................................................................................... 9
II.Operation........................................................................................................................................................ 9
III.General Warnings ........................................................................................................................................ 10
IV.Installation Warnings .................................................................................................................................. 10
V.Maintenance and Cleaning........................................................................................................................... 11
V.Circuit Diagram ............................................................................................................................................. 11
I.Technische Daten .......................................................................................................................................... 13
II.Funktion ........................................................................................................................................................ 13
III.Warnhinweise .............................................................................................................................................. 14
IV.Installation ................................................................................................................................................... 14
V.Wartung und Reinigung ............................................................................................................................... 15
VI.Schaltplan .................................................................................................................................................... 15
I.Características técnicas ................................................................................................................................. 17
II.Funcionamiento ............................................................................................................................................ 17
III.Advertencias generales ............................................................................................................................... 18
IV.Instrucciones de instalación ........................................................................................................................ 18
V.Limpieza y mantenimiento ........................................................................................................................... 19
VI.Diagrama de cableado ................................................................................................................................. 19
I. Paramètres techniques………………………………………………………………………………………………………………21
II. Fonctionnement……….………………………………………………………………………………………………………………21
III. Avertissements généraux……….…………………………………………………………………………………………….…22
IV. Avertissements concernant l'installation………………………………………………………………………….…….22
V. Entretien et nettoyage
VI. Schéma du circuit

4
Manuale dell'utente
(Si prega di leggere attentamente queste istruzioni prima dell'uso)

5
I.Parametri tecnici
Modello
Nome del
prodotto
Dimensione (CM)
Volt (V)
Potenza (Kw)
ASQ
-
CH
8
Forno essicatore
per frutta 8 ripiani
40*46.5*42
220V
1.0
ASQ
-
CH
12
Forno essicatore
per frutta
12 ripiani
40*46.5*55
220V
1.0
ASQ
-
CH
16
Forno essicatore
per frutta
16 ripiani
40*46.5*68
220V
2.0
ASQ
-
CH
20
Forno essicatore
per frutta
20 ripiani
40*46.5*80
220V
2.0
II.Funzionamento
1.Impostazione della temperatura: premere "Su" o "Giù" nello stato di accensione, quando il quadro della
temperatura inizierà a lampeggiare sarà possibile regolarla. La temperatura è regolabile : 40°C~90°C. Dopo
5 secondi di impostazione, manterrà la temperatura impostata.
2. Impostazione Timer : Premerendo il pulsante "Setting" nello stato di accensione il quadro “timing”
inizierà a lampeggiare . Premere il pulsante "Su" o "Giù" per regolare . E’ possibile regolare il timer a partire
da 1 minuto a 99 ore. Dopo 5 secondi di impostazione, manterrà il tempo impostato.
Dopo aver impostato il tempo nello stato di accensione, premere il pulsante "Timer", avverà il conto alla
rovescia ,visibile nel riquadro “timing”. Terminato il tempo precedentemente impostato , verrà emesso un
segnale acustico "beep" e premere "Timer".

6
III.Avvertenze Generali
1. Dopo l'uso, spegnere l'apparecchio e staccare dalla corrente.
2. Se si trova qualsiasi perdita o malfunzionamento, spegnere immediatamente l'apparecchio e chiamare
un tecnico , in tal modo da poter prendere visione e/o ripararlo.
3. La temperatura di questo apparecchio è compresa tra 40-90 °C. Si raccomanda che la temperatura di
utilizzo abituale sia di 60-85 °C.
4. Questa apparecchiatura dovrebbe essere installata in un ambiente con buone condizioni di ventilazione
di ≤45 °C.
5. L'attrezzatura deve essere posizionata in modo tale da soddisfare i requisiti di sicurezza.
IV.Avvertenze all'installazione
1. Verificare se L'apparecchiatura è predisposta per funzionare alla tensione e frequenza con cui sarà
alimentata.
2. Se il cavo di alimentazione è danneggiato, deve essere sostituito con un cavo , resistente all'olio, YCW o
YZW con un filo di terra bicolore giallo-verde.
3. L'attrezzatura dovrebbe essere collocata in un luogo stabile, la distanza tra la superficie dell'attrezzatura
e i materiali infiammabili dovrebbe essere ≥ 50cm
4. Il cablaggio fisso collegato al cavo di alimentazione di questo apparecchio deve essere dotato di una
distanza aperta (distanza di apertura dei contatti di 3 mm o più) e di un interruttore di protezione contro le
perdite scollegato su tutti i poli secondo le regole di cablaggio. Si raccomanda di installare un interruttore di
protezione da dispersione a terra. Non impilare detriti davanti all'interruttore per facilitare il
funzionamento.
5. C'è un bullone di messa a terra dietro il corpo del forno, e il filo di rame del nucleo non inferiore a
1.5mm2 è usato per connettersi in modo affidabile con il filo di terra che soddisfa le norme di sicurezza.
7
6. Dopo l'installazione, controllare se il cablaggio è allentato, se la tensione è normale e se la terra di
sicurezza è collegata in modo affidabile.
7. Non conservare materiali infiammabili o esplosivi vicino al luogo di installazione. La temperatura
ambiente è inferiore a 45 °C.
8. L'installazione di questa attrezzatura dovrebbe essere gestita da un tecnico autorizzato .
V.Mantenimento e pulizia
1. Prima di pulire, spegnere l'alimentazione elettrica per evitare incidenti.
2. Dopo il funzionamento quotidiano, strofinare con un panno umido (non utilizzare detergenti corrosivi).
3. Quando si pulisce il corpo del forno, è vietato lavare direttamente con acqua (o colonna d'acqua),
altrimenti si lascerà che l'acqua penetri nelle prestazioni dell'apparecchiatura elettrica e comprometta il
normale funzionamento del prodotto.
4. Quando non viene utilizzato per un lungo periodo, l'attrezzatura dovrebbe essere pulita e posta in un
luogo ben ventilato .
VI.Schema Circuito

8
User's Manual
(Please read these instructions carefully before use)

9
I.Technical Parameters
II.Operation
1.Temperature setting: press "Up" or "Down" to turn on the appliance, when the temperature picture
starts flashing you can adjust it. The temperature is adjustable : 40°C~90°C. After 5 seconds of setting, you
can keep it.
2. Timer Setting : Press "Setting" button in the power-on status, the "timing" panel will start flashing. Press
"Up" or "Down" button to adjust . You can adjust the timer from 1 minute to 99 hours. After 5 seconds of
setting, it will keep the set time.
After setting the time in the power-on state, press the "Timer" button, it will start counting down, visible in
the "timing" box. When the previously set time has elapsed, it will beep and press "Timer".
Model Product Name Dimension(
CM) Volt(V) Power(kW
)
ASQ-
CH8
8deck Fruit
dehydrator oven 40*46.5*42 220V 1.0
ASQ-
CH12
12deck Fruit
dehydrator oven 40*46.5*55 220V 1.0
ASQ-
CH16
16deck Fruit
dehydrator oven 40*46.5*68 220V 2.0
ASQ-
CH20
20deck Fruit
dehydrator oven 40*46.5*80 220V 2.0

10
III.General Warnings
1. After use, turn off the unit and disconnect from power.
2. If any leaks or malfunctions are found, turn the unit off immediately and call a service technician to
inspect and/or repair it.
3. The temperature of this appliance is between 40-90°C. It is recommended that the usual operating
temperature is 60-85 °C.
4. This equipment should be installed in an environment with good ventilation conditions of ≤45 °C.
5. The equipment should be well grounded to meet safety requirements.
IV.Installation Warnings
1. Check to see if the equipment is set up to operate at the voltage and frequency with which it will be
powered.
2. If the power cord is damaged, it should be replaced with an oil-resistant, YCW or YZW cord with a two-
color yellow-green ground wire.
3. The equipment should be placed in a stable place, the distance between the surface of the equipment
and flammable materials should be ≥ 50cm
4. The fixed wiring connected to the power cord of this equipment should have an open gap (contact
opening distance of 3mm or more) and a leakage protection switch disconnected on all poles according to
the wiring rules. It is recommended that a ground fault circuit interrupter be installed. Do not stack debris
in front of the switch for ease of operation.
5. There is a grounding bolt behind the furnace body, and copper core wire not less than 1.5mm2 is used to
reliably connect with the ground wire that meets safety standards.
Ce manuel convient aux modèles suivants
4
Table des matières
Langues :
Autres manuels Gastrodomus Appareils de cuisine

Gastrodomus
Gastrodomus WINE800SB Manuel utilisateur

Gastrodomus
Gastrodomus EPC-8L Manuel utilisateur

Gastrodomus
Gastrodomus SLA350 Manuel utilisateur

Gastrodomus
Gastrodomus HP100 Fiche technique

Gastrodomus
Gastrodomus VM320 Manuel utilisateur

Gastrodomus
Gastrodomus HITOUCHPLUS5000 Manuel utilisateur

Gastrodomus
Gastrodomus CHOCOLADY 5 Manuel utilisateur

Gastrodomus
Gastrodomus TRH12 Manuel utilisateur

Gastrodomus
Gastrodomus DAG4 Manuel utilisateur

Gastrodomus
Gastrodomus HITOUCH2700 Manuel utilisateur


