Formax DS-40i Manuel utilisateur

Table of Contents
Read this First ...............................................................................................11
Safety...............................................................................................................1
Declaration of Conformity (EU only).................................................................1
About this manual............................................................................................1
Meet your Document System ......................................................................32
Introduction......................................................................................................3
Operating Controls...........................................................................................5
Control Panel...................................................................................................6
Power Up..........................................................................................................7
Home screen....................................................................................................8
What is a Job?.................................................................................................8
Job overview....................................................................................................9
Settings menu................................................................................................10
Remote assistance (optional)........................................................................10
Tri-Fold option................................................................................................11
Shut Down the System...................................................................................12
Working with Jobs ......................................................................................133
Introduction....................................................................................................13
Use an existing job.........................................................................................13
Create a New Job..........................................................................................14
Job Settings...................................................................................................15
Save a Job.....................................................................................................18
Run a Job.......................................................................................................19
A Daily Mail job..............................................................................................20
A Tri-Fold job..................................................................................................21
Loading the System ...................................................................................244
Installing the Envelope Catch Tray.................................................................24
| Page 1 | TOC | Jan-15-2019 03:21 |

Document Orientation....................................................................................25
Document Feed Trays....................................................................................26
Loading Envelopes.........................................................................................29
Filling the Sealing Liquid Reservoir................................................................31
Settings menu .............................................................................................325
Open the Settings Menu................................................................................32
Open the Supervisor menu............................................................................33
Supervisor Settings Menu..............................................................................35
Operator Maintenance ................................................................................416
Maintenance..................................................................................................41
Cleaning or Replacing Moistening Brushes...................................................42
Clean the system...........................................................................................42
Fault finding ................................................................................................437
Fault Finding..................................................................................................43
Clearing Stoppages.......................................................................................44
Operator Troubleshooting...............................................................................46
Specifications .............................................................................................538
Technical Specifications.................................................................................53
Dimensions and weight..................................................................................54
Hopper and Feeder Capacity.........................................................................54
Document Specifications...............................................................................55
Envelope and Insert Specifications................................................................56
Terminology ................................................................................................589
Terminology description.................................................................................58
| Page 2 | TOC | Jan-15-2019 03:21 |

Read this First1
Safety
Ensure you have read and fully understood the safety requirements
in the Safety Guide.
Declaration of Conformity (EU only)
The product presented in this guide meets the requirements of applicable directives. For
more details refer to the Declaration of Conformity. Contact your authorized distributor for
availability of this document.
About this manual
Disclaimer
This Guide is published without any warranty. Improvements and changes to the online
Guide necessitated by typographical errors, inaccuracies of current information, or
improvements toprogramsand/orequipment, maybe made atanytime and withoutnotice.
Such changes will, however, be incorporated into new editions of the PDF Guide (if
applicable).
1
| Page 1 | Jan-15-2019 03:21 | Read this First
1
English

Symbols
This manual uses the symbols listed below.
Indicates...This symbol...
WARNING: Indicates a human safety hazard.
ATTENTION: A risk to the equipment or mail could result from an action
you may perform.
NOTE: A remark that explains different cases or specificities.
TIP: Advice to help save you time when processing your mail.
SUPERVISOR: Indicates that you have to use the supervisor menu to
perform the procedure.
Languages
In the EU the user guide must be available in the national language(s) of the country where
the system is delivered. Therefore, if the User Guide is not available in your country’s
language(s), contact your authorized distributor.
2
| Page 2 | Jan-15-2019 03:21 | Read this First
1
English

Meet your Document System2
Introduction
The system feeds, folds and inserts documents into envelopes and then seals and stacks
the envelopes. Automatic monitoring ensures the correct number of inserts per envelope.
The system is a sophisticated folding and inserting system which can process large
quantities of mail rapidly and easily.
You can save the settings of the system (document type, envelope type and fold type) in
so-called jobs.
The figure shows an overview of the systems document and envelope flow.
3
| Page 3 | Jan-15-2019 03:21 | Meet your Document System
2
English

Feeder Area (1)
The system has a feeder block with two document feeders. The feeder block is equipped
with feeder swap. This means that you can link both feeders as pairs. When the first feeder
is empty, the system switches to the other feeder. Meanwhile you can refill the other empty
feeder without stopping the system. The front feeder (feeder 1) is equipped with a “daily
mail” function to process documents or sets of documents which cannot be processed
automatically (e.g. stapled).
Double Feed Control (DFC)
Each feeder has double feed control (DFC). In this way the system can detect faulty sets
of documents. When a job is started, the first document taken per feeder is used for a
reference measurement. When a document is exceeding that reference thickness an error
will be displayed.
When Daily mail is selected, the DFC is switched off automatically.
Envelope Hopper (2)
The envelopes are picked up and transported to the insert position inside the system.
Feeder for Business Reply Envelopes (BRE) and Other Enclosures (3)
Small enclosures or BREs are fed from feeder 3 and added to the folded document set.
Folding area (4)
In the folding area the documents are folded. The following fold types are possible (see
“Terminology” on page 29):
• No fold
• V-fold (single fold)
• C-fold (letter fold)
• Double V-fold (double parallel fold)
Inserter (5)
The folded document set is transported to the inserter unit and inserted into a waiting
envelope. The inserter can seal the envelope.
Exit (6)
The mail set leaves the system from the exit.
4
| Page 4 | Jan-15-2019 03:21 | Meet your Document System
2
English
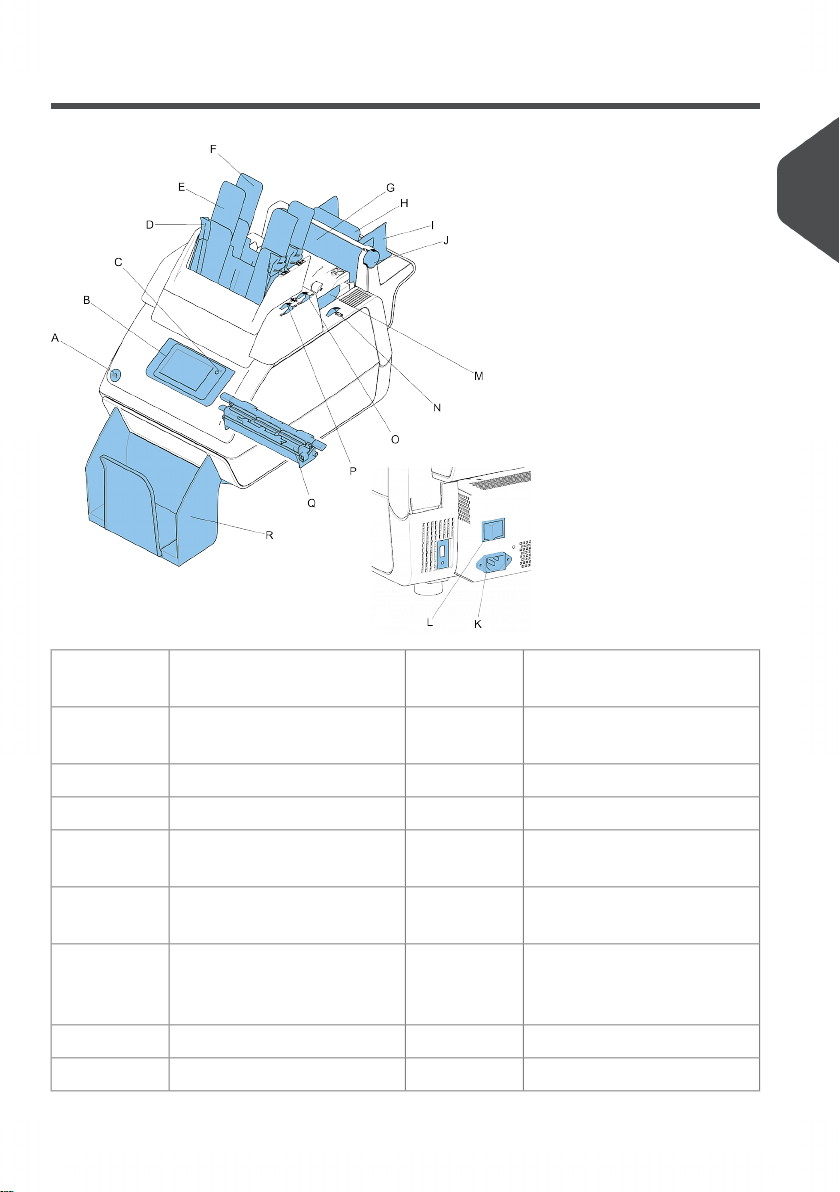
Operating Controls
thumb wheel to adjust side
guides feeder 3
Jbutton to open the systemA
power inletKcontrol panel with touch
screen
B
power switchLOn/Off buttonC
side guides envelope hopperMpaper guidesD
thumb wheel for adjusting
side guides envelope hopper
Ndocument feeder 1E
locking levers for side guides
(document feeder trays)
Odocument feeder 2F
thumb wheels for adjusting
sideguides (document feeder
trays)
Pflap, for access to document
path of feeder 3
G
sealing liquid reservoirQsupport feeder 3H
catch trayRside guides feeder 3I
2
English
5
| Page 5 | Jan-15-2019 03:21 | Meet your Document System

Control Panel
On/Off (B): The touch sensitive button in the upper right corner of the display switches the
system on or off. If after operation the system is not used for 15 minutes, the system
switches to sleep mode. If you touch the screen the system will switch to operation mode
again. If the system is not used for one hour, the system switches off to safe power.
Status LED (C): A status LED indicates the state of the machine: a green LED indicates
that the system is switched on. An orange LED (and a black screen) indicates that the
system is in sleep mode. No colored LED (togehter with a black screen) indicates that the
system is switched off.
The display is a capacitive touch screen. To avoid permanent
damage of the display, do not use sharp objects to operate the
display.
To clean the display use a dry lint-free or microfiber cloth. If water
is necessary to clean the screen, you should make your microfiber
cloth slightly damp instead of putting the water directly on your
screen. Never use large amounts of water, harsh chemicals,
abrasive cloths or paper towels to clean the display.
6
| Page 6 | Jan-15-2019 03:21 | Meet your Document System
2
English

Power Up
To start up the system:
Connect the system to the mains power supply.1.
You can severely damage the machine if it is connected to the
incorrect mains voltage. Before plugging in the machine, check if
the local voltage is the same as the voltage mentioned on the type
plate.
2. Use the power switch to switch on the system. The power switch is located at the back
of the system.
3. Press the on/off button next to the display.
The touch screen shows the "Home screen".
2
English
7
| Page 7 | Jan-15-2019 03:21 | Meet your Document System

Home screen
When you start up the system, the ‘Home screen’ appears. The LH side of the screen
shows the job list. The RH side of the screen shows the selected/current job. Other things
you can do here are:
1. Create a new job
2. Edit the selected/current job
3. Start the selected/current job
4. Open the settings menu bar *)
5. Select another job
*) From the settings menu bar you can get access to the following:
- the "main" settings menu
- the Remote Assistance screen
What is a Job?
If you have to process a lot of mail sets of the same type (for example bills), you can save
the settings to a 'job'. The next time you just select the job and immediately start without
defining any settings.
The following settings are saved in a job:
• Envelope type/size;
• Sealing on/off;
• Which document feeders should be used, how many documents should be fed from
each feeder and document height for each feeder;
• Feeder linking on/off;
• If BREs or insert cards should be included;
• Address position;
• Double feed control settings;
8
| Page 8 | Jan-15-2019 03:21 | Meet your Document System
2
English
Ce manuel convient aux modèles suivants
5
Table des matières
Autres manuels Formax Système d'insertion de documents


