Ezviz A1 Manuel utilisateur

A1


COPYRIGHT ©2018 Hangzhou Hikvision Digital Technology Co., Ltd. or its subsidiaries. ALL RIGHTS RESERVED.
About this Manual
The Manual includes instructions for using and managing the product. Pictures, charts, images and all other information
hereinafter are for description and explanation only. The information contained in the Manual is subject to change, without
notice, due to firmware updates or other reasons. Please find the latest version in the ™ website (http://www.
ezvizlife.com).
Any and all information, including, among others, wordings, pictures, graphs are the properties of Hangzhou Hikvision Digital
Technology Co., Ltd. or its subsidiaries (hereinafter referred to be “Hikvision”). This user manual (hereinafter referred to
be “the Manual”) cannot be reproduced, changed, translated, or distributed, partially or wholly, by any means, without the
prior written permission of Hikvision. Unless otherwise stipulated, Hikvision does not make any warranties, guarantees or
representations, express or implied, regarding to the Manual.
Trademarks Acknowledgement
™, ™, and other Hikvision’s trademarks and logos are the properties of Hikvision in various jurisdictions.
Other trademarks and logos mentioned below are the properties of their respective owners.
Legal Disclaimer
TO THE MAXIMUM EXTENT PERMITTED BY APPLICABLE LAW, THE PRODUCT DESCRIBED, WITH ITS HARDWARE, SOFTWARE
AND FIRMWARE, IS PROVIDED “AS IS”, WITH ALL FAULTS AND ERRORS, AND HIKVISION MAKES NO WARRANTIES, EXPRESS
OR IMPLIED, INCLUDING WITHOUT LIMITATION, MERCHANTABILITY, SATISFACTORY QUALITY, FITNESS FOR A PARTICULAR
PURPOSE, AND NON-INFRINGEMENT OF THIRD PARTY. IN NO EVENT WILL HIKVISION, ITS DIRECTORS, OFFICERS, EMPLOYEES,
OR AGENTS BE LIABLE TO YOU FOR ANY SPECIAL, CONSEQUENTIAL, INCIDENTAL, OR INDIRECT DAMAGES, INCLUDING, AMONG
OTHERS, DAMAGES FOR LOSS OF BUSINESS PROFITS, BUSINESS INTERRUPTION, OR LOSS OF DATA OR DOCUMENTATION,
IN CONNECTION WITH THE USE OF THIS PRODUCT, EVEN IF HIKVISION HAS BEEN ADVISED OF THE POSSIBILITY OF SUCH
DAMAGES. TO THE MAXIMUM EXTENT PERMITTED BY APPLICABLE LAW, IN NO EVENT SHALL HIKVISION’S TOTAL LIABILITY FOR
ALL DAMAGES EXCEED THE PURCHASE PRICE THE PRODUCT.
HIKVISION does not undertake any liability for personal injury or property damage, as the result of product interruption or
service termination cause by: a) improper installation or usage other than as requested; b) the protection of national or
public interests; c) Force Majeure; d) yourself or the third party, including not limitation, using any third party’s products,
software, applications, and among others.
REGARDING TO THE PRODUCT WITH INTERNET ACCESS, THE USE OF PRODUCT SHALL BE WHOLLY AT YOUR OWN RISKS.
HIKVISION SHALL NOT TAKE ANY RESPONSIBILITES FOR ABNORMAL OPERATION, PRIVACY LEAKAGE OR OTHER DAMAGES
RESULTING FROM CYBER ATTACK, HACKER ATTACK, VIRUS INSPECTION, OR OTHER INTERNET SECURITY RISKS; HOWEVER,
HIKVISION WILL PROVIDE TIMELY TECHNICAL SUPPORT IF REQUIRED.
SURVEILLANCE LAWS VARY BY JURISDICTION. PLEASE CHECK ALL RELEVANT LAWS IN YOUR JURISDICTION BEFORE USING
THIS PRODUCT IN ORDER TO ENSURE THAT YOUR USE CONFORMS TO THE APPLICABLE LAW. YOU FUTHER AGREE THAT THIS
PRODUCT IS ONLY FOR CIVIL USE, AND HIKVISION SHALL NOT BE LIABLE IN THE EVENT THAT THIS PRODUCT IS USED WITH
ILLEGITIMATE PURPOSES, SUCH AS THIRD PARTY RIGHTS INFRINGEMENT, MEDICAL TREATMENT, SAFETY EQUIPMENT OR
OTHER SITUATIONS WHERE THE PRODUCT FAILURE COULD LEAD TO DEATH OR PERSONAL INJURY, OR WEAPON OF MASS
DESTRUCTION, CHEMINCAL AND BIOLOGICAL WEAPON, NUCLEAR EXPLOSION, AND ANY UNSAFE NUCLEAR ENERGY USES OR
ANTI-HUMANITY USAGES. YOU SHOULD UNDERTAKE ALL RESPONSIBILITIES FOR LOSSES OR DAMAGES RESULTING FROM THE
ABOVE USAGES WHATSOEVER.
IN THE EVENT OF ANY CONFLICTS BETWEEN THE ABOVE AND THE APPLICABLE LAW, THE LATER PREVAILS.

Regulatory Information
EU Conformity Statement
This product and - if applicable - the supplied accessories too are marked with "CE" and comply therefore
with the applicable harmonized European standards listed under the the Radio Equipment Directive
2014/53/EU, the EMC Directive 2014/30/EU, the RoHS Directive 2011/65/EU.
2012/19/EU (WEEE directive): Products marked with this symbol cannot be disposed of as unsorted
municipal waste in the European Union. For proper recycling, return this product to your local supplier
upon the purchase of equivalent new equipment, or dispose of it at designated collection points. For more
information see: www.recyclethis.info.
2006/66/EC and its amendment 2013/56/EU (battery directive): This product contains a battery that
cannot be disposed of as unsorted municipal waste in the European Union. See the product documentation
for specific battery information. The battery is marked with this symbol, which may include lettering to
indicate cadmium (Cd), lead (Pb), or mercury (Hg). For proper recycling, return the battery to your supplier
or to a designated collection point. For more information see: www.recyclethis.info.
EC DECLARATION OF CONFORMITY
Hereby, Hangzhou Hikvision Digital Technology Co., Ltd. declares that the radio equipment type [CS-A1-32W] is in compliance
with Directive 2014/53/EU.
The full text of the EC DECLARATION OF CONFORMITY is available at the following web link:
http://www.ezvizlife.com/declaration-of-conformity
Due to the product shape and dimension, the name and address of the importer/manufacturer are printed on
the package.
Safety Instruction
CAUTION: THE PRODUCT IS BUILT IN A REPLACEABLE BATTERY. RISK OF EXPLOSION IF BATTERY IS REPLACED
BY AN INCORRECT TYPE. DISPOSE OF USED BATTERIES ACCORDING TO THE INSTRUCTIONS.
SAVE THIS MANUAL FOR FUTURE REFERENCE

1
Operations
Step 1
Preparation
Make sure the environment and the power supply meet the requirements below:
•Power voltage: DC 5V (Micro USB)
•Working temperature: -10°C to 55°C (14°F to 131°F)
•Working humidity: 10% to 90% (non-condensing)
1Starting A1
Connect the A1 and power adapter with the USB data cable, and then plug the power adapter
into the power socket. The white indicator turns on indicating the A1 is starting, and then the red
indicator turns on when the A1 starts completely.
2Installing the EZVIZ App
- Connect your mobile phone to Wi-Fi.
- Download and install the EZVIZ app by searching the “EZVIZ” in App Store (iOS version) and Google
PlayTM (Android version).
- Start the app and register for an EZVIZ user account following the start-up wizard.
Power Socket
Power Adapter
USB Data Cable

2
Step 2
Quick Settings
1Adding A1
- Connect the mobile phone to a Wi-Fi.
- Log in the EZVIZ app and scan the QR code on the A1 to add it to your EZVIZ account.
- Follow the prompts to configure the A1 Wi-Fi connection, such as SSID (Wi-Fi name) and
password.
•Make sure the mobile phone is connected to the Wi-Fi and the A1 has not connect to any
Wi-Fi yet, or the connection will be failed.
•The distance between the A1 and the mobile phone should be no further than 50 cm.
2Completing Configuration
The LINK indicator flickers in yellow when the A1 has been successfully connected to the Wi-Fi (of
the router).
Hold down the Setting Button if you want to enable the Wi-Fi modification function. For
example: the procedure for connecting A1 to the Wi-Fi (router) is not successful and you have
to repeat the operation; or you want to change the Wi-Fi connection (to connect A1 to another
Wi-Fi network).

3
Step 3
Adding Detectors
1Enabling the Adding Detectors Mode
Press the Setting Button for once and the voice prompt of the adding detectors mode is enable
starts. The yellow and red indicators flicker twice every second indicating the Adding Detectors
Mode is enabled.
2Adding Detectors
Take the detector close to the A1 (within 50cm) and trigger alarm manually. A voice prompt of the
type and the serial number of the detector starts indicating the corresponding detector is added (up
to 32 detectors are allowed).
T
U
R
N
T
O
R
E
M
O
V
E
D
O
N
O
T
P
A
I
N
T
……
3Disabling the Adding Detectors Mode
Press the Setting Button for once to disable the Adding Detectors Mode after all the detectors are
added.
•The Adding Detectors Mode will be disabled if no operation in 3 minutes.
•The Max. effective distance between detectors and the A1 is 100m (no barrier is allowed).

4
Appendix
Box Contents
A1 x1 Remote Control x1 USB Data Cable x1
Quick Start Guide x1 Power Adapter x1
Function Introduction
Irreplaceable Home Guard
Accessable to various wireless detectors and provide a comprehensive protection to your
home.
World’s leading Communication Technology
Convenient security deployment with wireless detectors.
Convenient Network Configuration
One-push Wi-Fi connection (not support the 5G Wi-Fi).
EZVIZ Cloud P2P Service
Receiving alarm and remote control on mobile phone and PC.

5
A1 Basics
Name Description
Power Input Power supply for the device (by USB port).
ALARM LED Indicator Steady Red: The A1 is in the normal status.
Red Flicker: An alarm occurs.
LINK LED Indicator Yellow Flicker:The Wi-Fi is connected.
Unlit: The Wi-Fi is disconnected.
READY LED Indicator Steady White: The A1 is powered on (by USB port).
Mounting Hole Hole for hanging the device.
RESET Button Connect the device to the power supply (by USB port). Press and hold the RESET
button with a needle and release until the 3 indicators flicker at the same time
for once. The device restarts and all settings are restored except the connected
detectors and remote control.
Setting Button
Power Input
Speaker
Mounting Hole
RESET Button
LED Indicators
(ALARM, LINK,and READY)
6
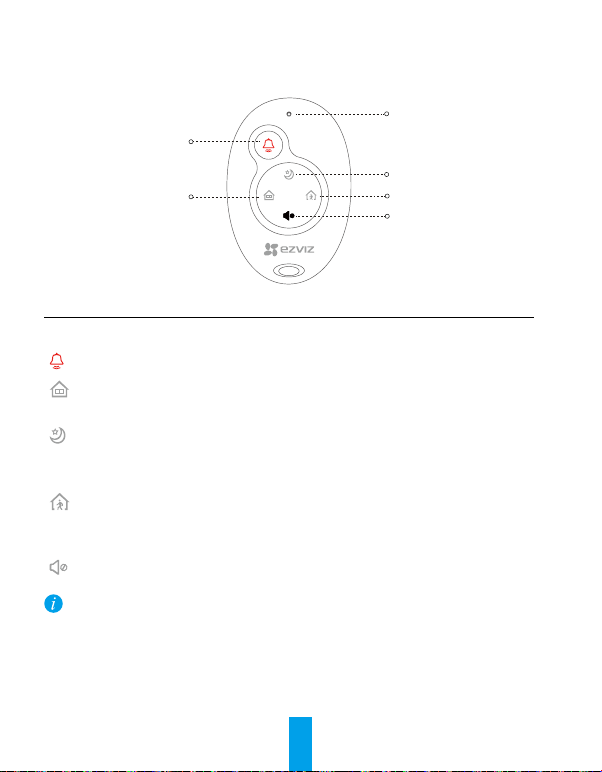
Remote Control Basics
Name Description
LED Indicator Flicker when any button is pressed.
Hold down the button for 2 s to send an emergency alarm to the EZVIZ platform.
If anyone stays at home or you are going to get into the house, you need to disarm the
alarm system. Press the button to activate the At-Home mode.
When you are at home and still want to feel protected: only the perimeter parts of the
house (doors and windows) are armed. The Sleeping mode is appropriate during the
day or sleeping time at night. Press the button to activate the Sleeping mode.
If no one stays at home, you need to activate the alarm system to protect it from
intruders. The Leaving-Home mode is appropriate. Press the button to activate the
Leaving-Home mode.
Press to turn off the voice prompts.
•The remote control in the package is connected to the A1 by default. Refer to the step 3 in the
Operation to connect another remote control to A1 if the remote control does not work normally
or you have a new one.
•The above descriptions for arming mode are the default settings. You can customize the
detectors arming status in each arming mode and switch the arming mode by EZVIZ app.
Emergency Button
At-Home Mode
LED Indicator
Mute
Leaving-Home Mode
Sleeping Mode
Autres manuels pour A1
4
Table des matières
Langues :
Autres manuels Ezviz Domotique


