Daewoo DASL0580 Manuel utilisateur

Manufactured under license of Daewoo International Corporation, Korea
www.daewoopowerproducts.com
USER'S MANUAL
DASL0580
Solar light

2
INDEX
1. INSTALLATION ......................................................................................................................................... 3
2
. GETTING TO KNOW YOUR SOLAR LIGHTS .......................................................................................... 3
3
. REPLACING THE BATTERY .................................................................................................................... 3
4
.EXPLODED VIEW AND SPARE PART LIST ............................................................................................. 4
5
.TECHNICAL DATA .................................................................................................................................... 4
WARRANTY ................................................................................................................................................. 5

3
EN
The lights are powered by solar energy through solar panel, and rechargeable battery. The solar
panel converts sunlight into electric energy and charges the battery during daytime. A light sensor
automatically turns the lights on at night.
NOTE:
The lights should be installed in a place where the best sunlight is available and the surface of the
solar panel placed in the best direction to accept the maximum sunlight. The light source is a super
bright LED which can work up to 8hours at night after a full sunny day charging.
Please make sure that there are no other bright lights nearby. The solar panels will light up and
decorate your house and garden as shown in Diagram 1.
1. INSTALL ATION
Please read the manual completely before installing the solar lights.
When using the solar lights for the first time, set them in direct sunlight and charge for one complete
day (minimum of 6hours).They will be automatically charged in daytime and light up when dark.
1. Take out the parts from inner box with care.
2. Turn on the switch (You can find the switch mark on the product body.
3. Assemble the parts together.
4. Find a suitable location for your solar lights so that they are able to receive sunlight throughout
the day. IMPORTANT, to avoid shaded areas, or plants that might obstruct the solar panel
2. GETTING TO KNOW YOUR SOLAR LIGHTS
1. You can check the operation of the lights by simply covering the upper surface of the solar panel
completely to activate the light sensor.
2. Remember that the light is designed to work when it is dark. If there are bright lights nearby, the
lights may be very dim or not turn on at all.
3. Although the battery has been charged by the manufacturer, the electricity level will probably
have diminished when you receive it. Please charge it for a full day to realize maximum performance.
4. Clean the dust on the surface of the solar panel after using for a few days.
3. REPLACING THE BATTERY
If the light stops working after being used for a long time, the battery may be beyond its lifespan.
Remove the battery and replace it with exactly the same type as originally fitted.
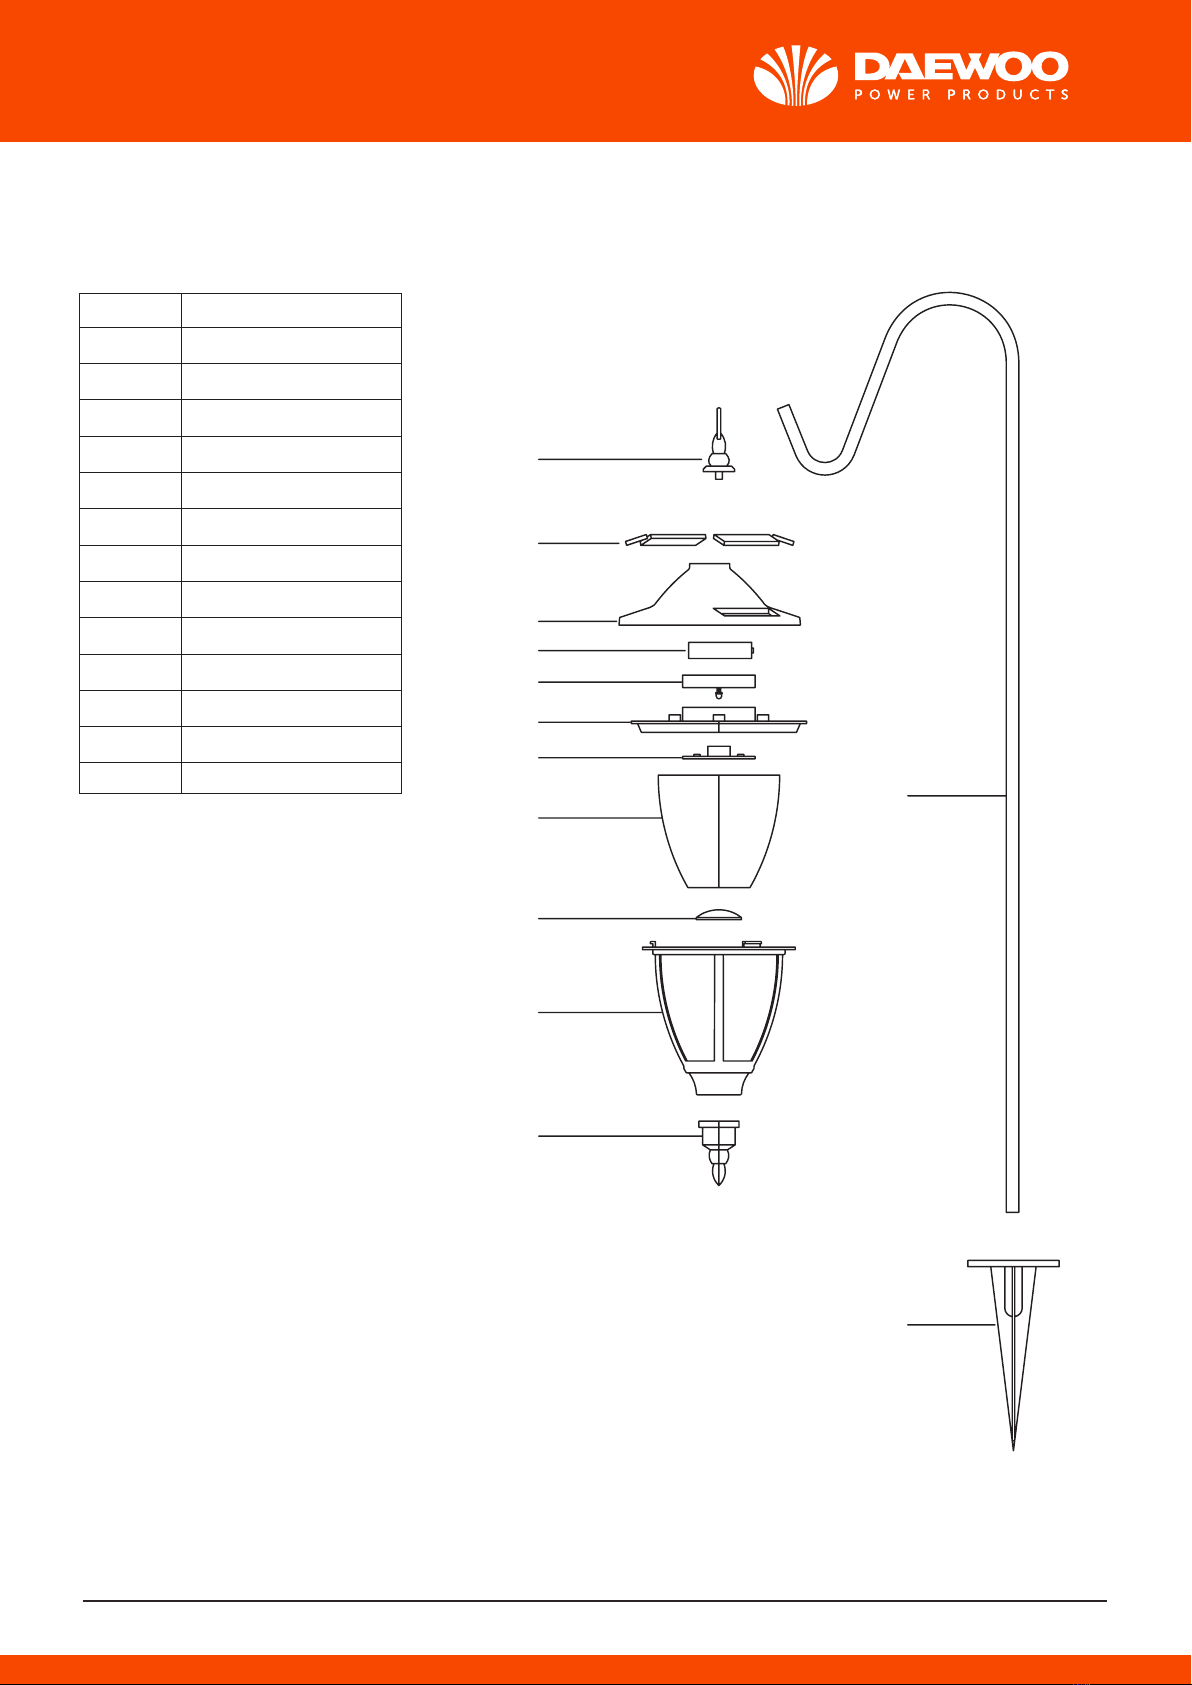
4. EXPLODED VIEW AND SPARE PART LIST
5. TECHNICAL DATA
Solar panel: monocrystal
Battery: 1*AA, 600 mAh, NI-MH batteries
Lighting source: 1*brighter white LED
DIAGRAM 1
4
Item n˚
1
2
3
4
5
6
7
8
9
10
11
12
13
Name
Swinging ring
Solar panel
Lamp lid
Battery
Panel
Circult board box
Battery box cover
Lamp cover
Reflector
Grilling
Plug
Hook
Spike
1
2
3
4
5
6
7
12
13
8
9
10
11
The lights are powered by solar energy through solar panel, and rechargeable battery. The solar
panel converts sunlight into electric energy and charges the battery during daytime. A light sensor
automatically turns the lights on at night.
NOTE:
The lights should be installed in a place where the best sunlight is available and the surface of the
solar panel placed in the best direction to accept the maximum sunlight. The light source is a super
bright LED which can work up to 8hours at night after a full sunny day charging.
Please make sure that there are no other bright lights nearby. The solar panels will light up and
decorate your house and garden as shown in Diagram 1.
1. INSTALL ATION
Please read the manual completely before installing the solar lights.
When using the solar lights for the first time, set them in direct sunlight and charge for one complete
day (minimum of 6hours).They will be automatically charged in daytime and light up when dark.
1. Take out the parts from inner box with care.
2. Turn on the switch (You can find the switch mark on the product body.
3. Assemble the parts together.
4. Find a suitable location for your solar lights so that they are able to receive sunlight throughout
the day. IMPORTANT, to avoid shaded areas, or plants that might obstruct the solar panel
2. GETTING TO KNOW YOUR SOLAR LIGHTS
1. You can check the operation of the lights by simply covering the upper surface of the solar panel
completely to activate the light sensor.
2. Remember that the light is designed to work when it is dark. If there are bright lights nearby, the
lights may be very dim or not turn on at all.
3. Although the battery has been charged by the manufacturer, the electricity level will probably
have diminished when you receive it. Please charge it for a full day to realize maximum performance.
4. Clean the dust on the surface of the solar panel after using for a few days.
3. REPLACING THE BATTERY
If the light stops working after being used for a long time, the battery may be beyond its lifespan.
Remove the battery and replace it with exactly the same type as originally fitted.
4. EXPLODED VIEW AND SPARE PART LIST
5. TECHNICAL DATA
Solar panel: monocrystal
Battery: 1*AA, 600 mAh, NI-MH batteries
Lighting source: 1*brighter white LED

GUARANTEE
WARRANTY DOES NOT COVER
Product model
Serial number
Username
Date of sale
Company
Client's signature
The warranty period starts from the date of sale of the products and covers 2 years for all power products.
During the warranty period, free failures caused due to the use of poor-quality materials in the production and
manufacturer workmanship admitted fault are removed. The guarantee comes into force only when warranty card
and cutting coupons are properly filled. The product is accepted for repair in its pure form and full completeness.
• Mechanical damage (cracks, chips, etc.) and damage
caused by exposure to aggressive media, foreign objects
inside the unit and air vents, as well as for damage occurred
as a result of improper storage (corrosion of metal parts);
• Failures caused by overloading or product misuse, use of
the product for other purposes. A sure sign of overload
products is melting or discoloration of parts due to the high
temperature, simultaneous failure of two or more nodes,
teaser on the surfaces of the cylinder and the piston or
destruction of piston rings. Also, the warranty does not
cover failure of the automatic voltage regulator due to
incorrect operation;
• Failure caused by clogging of the fuel and cooling systems;
• Wearing parts (carbon brushes, belts, rubber seals, oil
seals, shock absorbers, springs, clutches, spark plugs,
mufflers, nozzles, pulleys, guide rollers, cables, recoil starter,
chucks, collets, removable batteries, filters and safety
elements, grease, removable devices, equipment, knives,
drills, etc.);
• Electrical cables with mechanical and thermal damage;
• Product opened or repaired by a non-authorized service center.
• Prevention, care products (cleaning, washing, lubrication,
etc.), installation and configuration of the product;
• Natural wear products (production share);
• Failures caused by using the product for the needs related
to business activities;
• If the warranty card is empty or missing seal (stamp) of the Seller;
• The absence of the holder's signature on the warranty card.
WARRANTY CARD
The product is in good conditions and fully complete. Read and agree the terms of the warranty.
Product
Model
Company
Date
of sale
Product
Model
Company
Date
of sale

www.daewoopowerproducts.com
Manufactured under license of Daewoo International Corporation, Korea
Table des matières
Autres manuels Daewoo Éclairage extérieur

Manuels Éclairage extérieur populaires d'autres marques


Lindby
Lindby 9949029 Manuel utilisateur

HEPER
HEPER DOGO Side LW6048.585-US Instructions d'installation et d'utilisation

HEPER
HEPER LW8034.003-US Instructions d'installation et d'utilisation

Maretti
Maretti VIBE S 14.6080.04.A Manuel utilisateur

BEGA
BEGA 84 253 Manuel

HEPER
HEPER MINIMO Instructions d'installation et d'utilisation

LIGMAN
LIGMAN BAMBOO 3 Manuel utilisateur

Maretti
Maretti TUBE CUBE WALL 14.4998.04 Manuel utilisateur

Maxim Lighting
Maxim Lighting Carriage House VX 40428WGOB Manuel utilisateur

urban ambiance
urban ambiance UQL1273 Manuel utilisateur

TotalPond
TotalPond 52238 Manuel utilisateur

Donner & Blitzen
Donner & Blitzen 0-02661479-2 Manuel utilisateur