claber Hydro 4 Caractéristiques techniques

Hydro 4
90829
In-built prefitted water timer valve box
USE AND INSTALLATION MANUAL


EN
55
Introduction .....................................................................................56
Reminders........................................................................................57
General specifications.......................................................................58
Fitting the battery.............................................................................60
Installation.......................................................................................63
Use..................................................................................................71
- guidelines on programming.........................................................74
- setting current day and time........................................................84
- programming watering................................................................86
- test/manual watering ..................................................................92
- Reset ..........................................................................................94
- enabling programmes A and B and setting to off .........................95
- Rain Sensor RF............................................................................97
Cleaning and maintenance...............................................................98
Diagnostics ....................................................................................100
Technical specifications ..................................................................102
Disposal (WEEE).............................................................................102
Guarantee conditions .....................................................................103
Declaration of conformity ...............................................................104
additional informationimportant note
Symbols adopted in the manual
Index

EN
56
Introduction
Our thanks for the confidence shown in purchasing this product. Please
read this instruction manual carefully before programming the device, and
keep it handy for future reference: each section will provide all the neces-
sary information on how to perform the single steps correctly.
This device has been designed and manufactured exclusively for the pro-
gramming of watering time by adults with experience and knowledge. Any
use other than that described in this manual is considered improper: the
manufacturer acknowledges no liability for damages arising from improper
use, which will also void the guarantee.

EN
57
Reminders
1. Use only two AAA (LR03)1.5V Alkaline new batteries, with an expiry date
exceeding one year. Follow the instructions of the battery manufacturer.
Do not power the water timer with sources other than those specified.
2. Replace the batteries at the beginning of each season.
3. During winter and/or when not in use, always remove the batteries and
store the water timer in a dry place at a temperature no lower than 3 °C.
4. Periodically, check the integrity of the seals fitted to the transparent cov-
er and to the cap of the battery housing.
5. Periodically, check that the electrical connections of the battery are firm
and secure.
6. Do not let water freeze inside the product. At the end of each season,
it is recommended that the manual valve upstream is closed and the
system is drained using the manual opening of the control module.
7. Make certain that children and animals cannot play with the water timer
or any of its parts.
8. It is good policy — when the water timer is put into operation for the
first time — to make certain that the programmes run correctly.
9. Avoid harsh tugging of hoses and fittings connected to the water timer.
10. Do not use the water timer with operating pressures lower than 0.2 bar
(2.9 psi) or higher than 12 bar (174 psi).
11. Do not fit the water timer inside buildings.
12. Do not use the water timer with chemicals or liquids other than water.
13. Do not submerge the timer in water or other liquids.
14. Do not let the housing and the internal parts of the water timer come
into contact with chemical agents (e.g. aggressive detergents, chlorine,
fertilizers, etc.).
15. When not programming, keep the cover of the valve box closed to
protect it from atmospheric agents and moisture.

EN
58
General specifications
The water timer allows you to easily set the time, watering run time and
date of four watering lines.
The programming of the water timer allows you to satisfy the requirements
of different plants according to their species and environment.
The water timer is powered by two AAA (LR03) 1.5V Alkaline batteries that
must be replaced at the start of each season and are sufficient, for at least,
the entire watering season.
• 3/4” threaded male water intake connector
• 3/4” threaded male line connector
• Power supply: 2 AAA (LR03) 1.5V Alkaline batteries
• Programmable lines: 4
• Watering frequency:
two watering programmes, Aand B, which ope-
rate independently from each other on one or more of the 4 lines
.
• Manual function pre-set at 5 minutes, for system testing and mainte-
nance which does not alter the chosen programmes.
• Rain sensor connection (Rain Sensor RF - optional)
• Flow rate for each individual valve:
0.2 bar 4,5 l/min
1 bar 16 l/min
2 bar 22 l/min
2.5 bar 25 l/min
3 bar 27 l/min
4 bar
31 l/min
5 bar 35 l/min

EN
59
General specifications
fig.1
Legend (
fig.1
):
1. 3/4” threaded male
tap water intake
connector
2. Hydro 4 Valve Box
3. Liquid Crystal Display
4. Back key
5. Enter key
6. Forward key
7. Cover fastening
screw
8. Washer or OR for
screw securing the
cover
9. Valve box cover
10. Lines 1-2-3-4: 3/4”
threaded male
connector
11. Seal for line closing
plug
12. Line closing plug
PROG
EXIT
LINE
B
A
B
A
B
A
B
A
B
A
B
A
B
A
B
A
SMTWTFS
LOWBATT
OK
ERR
1234%
14
15
3/4
M
3/4
M
8* 9
10 11* 12*
*
3 4 5 7*621

EN
60
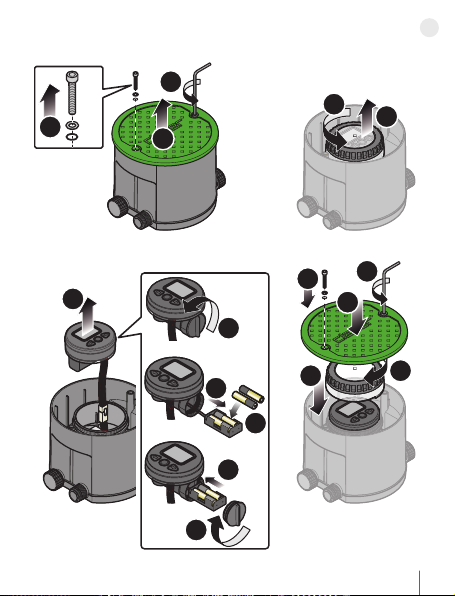
In order to operate the water timer requires two AAA (LR03)1.5V Alkaline
batteries that must be replaced with two new charged batteries at the start
of each season and are sufficient for, at least the entire irrigation.
To install or replace the battery, proceed as follows (
fig.2
):
• Unscrew the two screws on the valve box cover (
1
), remove them (
2
)
and remove the cover (
3
).
• Unscrew the plastic cover on the water timer (
4
) and lift it up (
5
).
• Take out the water time (
6
)
.
• Unscrew the battery compartment plug
(
7
), take out the bat-
tery-holder (
8
), and if present, remove the drained batteries.
• Fit the new batteries in the holder, observing the correct polarity (
9
)
• Replace the battery-holder into its housing (10) and screw down the
plug checking that the seal is correctly placed in its seat (11).
• Insert the water timer into its seat (
12
), screw the cover back on (
13
),
close the valve box with its cover (
14
) and secure it using the designated
screws (
15
) (
16
)
Notes:
• Only use new AAA (LR03)1,5V Alkaline batteries
, with an expiry date
exceeding one year and that have never been used.
• Replace the batteries at the beginning of each season.
Fitting the battery
EN
61
Fitting the battery
fig.2
1
45
6
ONLY
ALKALINE
BATTERY
AAA
+
+
+
+
+
+
ONLY
ALKALINE
BATTERY
13
10
11
16
2
7
8
9
3
12
15
14
1.5V AAA
Alkaline
LR03

EN
62
When the batteries are first fitted the display shows the first page
with the current TIME/DAY, indicating as default 12:00 and
S
Sunday.
Check the time and the day and set the current time and day if incorrect,
please refer to section “
setting current day and time
” on page
84
.
For correct disposal of the drained batteries, use the designated col-
lection bins.
BATTERY CHARGE STATUS
LOW BATT
OK
S M T W T F S
To check whether the batteries need
replacing, look at the first page
with the current TIME/DAY and
refer to the following table:
STATUS MEANING
LOW BATT
not present
Batteries charged.
LOW BATT
present with
other symbols activated
Batteries almost drained, replace as
soon as possible.
LOW BATT
flashing without
any other symbols activated
The water timer is no longer working,
replace the batteries
Fitting the battery
Autres manuels pour Hydro 4
1
Table des matières
Autres manuels claber Unité de contrôle

claber
claber meteo 8323 Manuel utilisateur

claber
claber 90826 Manuel utilisateur

claber
claber Elettra Evolution Manuel utilisateur

claber
claber 8323 Manuel utilisateur

claber
claber Aqua Wireless 8321 Manuel utilisateur

claber
claber Evolution 90821 Manuel utilisateur

claber
claber Evolution 90821 Manuel utilisateur
Manuels Unité de contrôle populaires d'autres marques

Festo
Festo Compact Performance CP-FB6-E Manuel de la liste des pièces

Elo TouchSystems
Elo TouchSystems DMS-SA19P-EXTME Manuel utilisateur

JS Automation
JS Automation MPC3034A Manuel utilisateur

JAUDT
JAUDT SW GII 6406 Series Guide rapide

Spektrum
Spektrum Air Module System Manuel utilisateur

BOC Edwards
BOC Edwards Q Series Manuel utilisateur


