CHINON DP-5 Manuel utilisateur

Chinon DP-5
On-line camera manual library
This camera is similar to the Chinon CP-5, CP-5s, CP-6 and Sears KSX-P
This camera manual library is for reference and historical purposes, all rights reserved.
This page is copyright by , M. Butkus, N.J.
This page may not be sold or distributed without the expressed permission of the producer
If you find this manual useful, how about a donation of $3 to:
M. Butkus, 29 Lake Ave., High Bridge, NJ 08829
Most other places would charge you $7.50 for a electronic copy
or $18.00 for a hard to read Xerox copy.
This will allow me to continue to buy new manuals and pay their shipping costs.
It'll make you feel better, won't it?
If you use Pay Pal, use the link below. Use the above address for a check, M.O. or cash.
Back to main Chinon site
If you wish to print this, print only 5 pages at a time or you may wait an extended period of time accessing the site for the full
set. Choose "File" then "Print", a pop up menu should appear, then choose "print pages" and type in 1 in the first box and 5 in
the second. After the first set starts to print, choose pages 6 then 10 and so on.
CONTENTS
Description of parts ........................................... 2
Specifications .......................................................4
1. Attaching the Viewfinder Cap and Strap .......... 7
2. Changing lenses ............................................. 8
3. Inserting batteries ......................................... 9
www.PayPal.me/butkus

4. Battery testing ................................................. 10
5. Inserting film ................................................... 11
6. Setting the film speed ........................................ 13
7. Viewfinder information ........................................ 14
8. I. Programmed Auto-Exposure (AK) mode ("P" mode) .. l4
8. II. Two-stage programmed AE (for advanced use) ....... 16
9. AE (Automatic exposure) photography ........................... 18
10. Manual photography ............................................................ 20
11. Shutter release and release lock ......................................... 22
12. Holding the camera ............................................................ 22
13. Focusing .............................................................................. 23
14. Rewinding the film .................................................................. 24
15. AE lock system ........................................................................ 25
16. Exposure compensation system .............................................. 26
17. B (Bulb) setting ........................................................................ 27
18. Flash photography ................................................................... 27
19. Multiple exposure photography ................................................ 31
20. Self-timer photography and use of the viewfinder cap ............. 31
21. Depth of field ............................................................................ 33
22. Infrared photography ................................................................ 33
23. Multi-Sound system ................................................................. 34
24. Special accessories ................................................................. 35
25. Proper care of your camera ................................................. 36

INTRODUCTION
Welcome to the exciting world of CHINON Photography!
Your Chinon DP-5 camera is the most sophisticated 35mm SLR available from CHINON. The DP-
5 is a true pioneer of Muti-programmed 35mm SLR cameras leads the way in Freedom of Choice
with it's versatile "Double-Program" and standard "K"- Mount design. The two-stage
programmed AE allows you to shoot fast moving or slow moving subjects to allow maximum
versatility with your creative photographic needs. Employing a full information electronic
viewfinder with variable intensity LED's, the DP-5 program camera is extremely easy to operate
even under the most adverse lighting conditions.
Your DP-5 program camera is designed with built-in electronic auto focus contacts that will
permit automatic AF operation when used with the optional Chinon 35 - 70mm AF lens. Total
unmanned automatic operation is also possible when further used with the optional Chinon power
winders and wireless remote control unit. [Mike: finding these AF lenses are next to impossible]4.butkus.org
DESCRIPTION OF PARTS
1. Manual shutter speed select button/Exposure memory button
2. Program mode selector
3. Shutter release button
4. Exposure mode select dial
5. Film advance lever
6. Exposure counter
7. Multiple exposure lever
8. Self-timer LED

9. Shoulder strap eyelet
10. Auto-Focus electronic contacts
11. Self-timer/Audible signal on-off switch
12. Power grip attachment screw
13. Lens lock release lever
14. Power grip (battery compartment)
15. Accessory flash shoe (hot shoe)
16. Film rewind knob and back opening knob
17. Film speed dial (ISO/ASA)
18. F stop window
19. Aperture ring Depth of field scale X sync socket Focusing ring
20. Depth of field scale
21. X sync socket
22. Focusing ring
23. Viewfinder eyepiece
24. Metal focal plane shutter
25. Film chamber
26. Film rail

27. Film guide rail
28. Power source contact (with power winder only, PW-610 or 600)
29. Power winder electronic contacts
30. Tripod socket
31. Sprocket teeth
32. multi-slotted film take-up spool
33. Camera back4.butkus.org
34. Film pressure plate
35. Power winder coupler
36. Auto Date electronic contacts
37. Rewind button
SPECIFICATIONS: CHINON DP-5
TYPE ....... 35mm automatic compact SLR camera with TTL full aperture programmed AE
(instant stop down re-metering), Aperture priority AK, and manual exposure system.
LENS MOUNT.......................... Universal bayonet (PENTAX "K"- type) mount with built-in
active AF lens contacts (for accessory lens).
FILM FORMAT AND FRAME SIZE ....................35mm film; 24x36mm
SHUTTER ................................ Electromagnetically controlled, vertically moving, metal focal
plane shutter, stepless speeds from 30 sec. to 1/1000 sec. on automatic, 14 speeds from 8 to
1/1000 sec. on manual exposure (Viewfinder indication to 8 sec.). Electronically controlled
automatic and manual exposure.
SHUTTER RELEASE ............... Electromagnetic type shutter release with safety lock (off) and
provision for cable release.
SELF-TIMER ........................... 10 seconds delay with LED (light emitting diode) and electronic
sound warning.
VIEWFINDER .......................... Field of view covers 92% horizontally and vertically. Viewing
Magnification 0.87X (with 50mm f/1.4 and f/1.7 lenses). 18 LED's indicate shutter speeds
(green), over/under exposure (red), slow shutter speeds warning (yellow), flash ready (red),
and program AE (green), Aperture visible in viewfinder.

FOCUSING........... Split-image spot in microprism band
EXPOSURE METER.................. TTL full open metering for center-weighted average light
reading; employing silicon blue cell.
PROGRAMMED AE MODE .......
Two stages available:
AP: The "ACTION PROGRAM" mode is designed for fast moving objects. Lens aperture
stays wide open up to a shutter speed of 1/60 sec. Between 1/60 - 1/1000 sec., the
aperture varies in accordance with the programmed shutter speed.
CP: The "CREATIVE PROGRAM" mode is designed for maximum depth of field . Lens
aperture stays wide open up to the shutter-speed of 1/8 sec. At f aster than 1/8 sec., the
aperture varies in accordance with the programed shutter speed.
Programmed AE Mode Warning:
Built-in with flashing "PROG" LED, when the aperture is set within 4 stops from full
aperture opening. Beyond 4 stops from full aperture opening, "PROG" LED will remain
"ON" at program AE mode.
Manual Shutter Speed Selector:
One-touch activation type by pressing the shutter release button half way. Depressing
the "M" button, shutter speed starts from 1/125 sec. and goes up with LED indication.
Depressing both "M" button and shutter release button, shutter speed goes down from
1/125 sec. with LED indication in viewfinder.
S.C.S.(Shutter Speed Change Signal):
Built-in with audible buzzer signal when the proper exposure is achieved by turning
aperture ring.
M.E.S.(Manual Exposure Signal):
Built-in with audible buzzer signal when the proper exposure is achieved by turning
aperture ring.
Camera Shake, Over/Under Warning:
Shutter speed slower than 1/30 see, under/aver warning with double audible signal.
EXPOSURE COUPLING RANGE .......EV +I - EV 19 (with ISO/ASA 100 film, 50mm f/1.4 Lens)
EV+ 1.5 - EV I9 (with ISO/ASA 100 film, 50mm f/1.7 lens)
FILM SPEED RANGE ............. ISO/ASA 25-3200 with 1/3 EV segment.
"X" SYNCHRONIZATION ........... "X" f lash sync at 1/100 sec.

FLASH TERMINAL .................... X sync. contact
SLOW FLASH SYNC..................1/60 sec. or slower in manual exposure mode.
ACCESSORY SHOE ..................Hot Shoe (with Flash Ready Signal Contact)
Flash Synchro contact
EXPOSURE ADJUSTMENT ....... Built-in, +I EV to - I EV in 1/3 EV increments.
Exposure memory System
FILM ADVANCE ....................... Single stroke film advance lever with 130 winding angle and
25 stand-off, Automatic winding possible by mounting Chinon Autowinder
FILM LOADING...................... Multi-slotted spool type
EXPOSURE COUNTER ............. Additive, automatic resetting
MULTIPLE EXPOSURE ............. Built-in switch which disengages film advance and film
counter
FILM REWIND .......................... Film Rewind Crank System
MIRROR ................................... Quick return mirror
BACK COVER ........................... Hinged type, opened by pulling up Film Rewind Knob
POWER SOURCE ................ 4www.but kus.org Three 1.5V "AAA" (AM-4) Alkaline batteries
AUTO-OFF POWER SYSTEM..... 30 sec. in manual exposure mode
BATTERY CHECK ........... Built-in with LED indicator
DIMENSIONS ............................5.35" (W) x 3.46" (H) x 2.01" (D) (body only)
WEIGHT ...................................18.34 oz (body only)
WEIGHT OF STD. LENSES ......... 50mm f/1.4: 7.5 OZ, 50mm f/1.7: 5.9 oz
1. ATTACHING THE VIEWFINDER CAP AND STRAP
Viewfinder Cap
For instructions on how to use the Viewfinder Cap, read the section on Self-Timer Photography
and Use of the Viewfinder Cap.
Shoulder Strap
1. Put the strap through the Strap Eyelets and adjust to the correct length.
Place the end of the shoulder strap through the eyelet ring (Fig. l ).
Place the end of the strap through plastic holder and adjust the length of the strap (Fig. 2).
Pass the strap through the metal adjustment buckle to secure (Fig. 3).
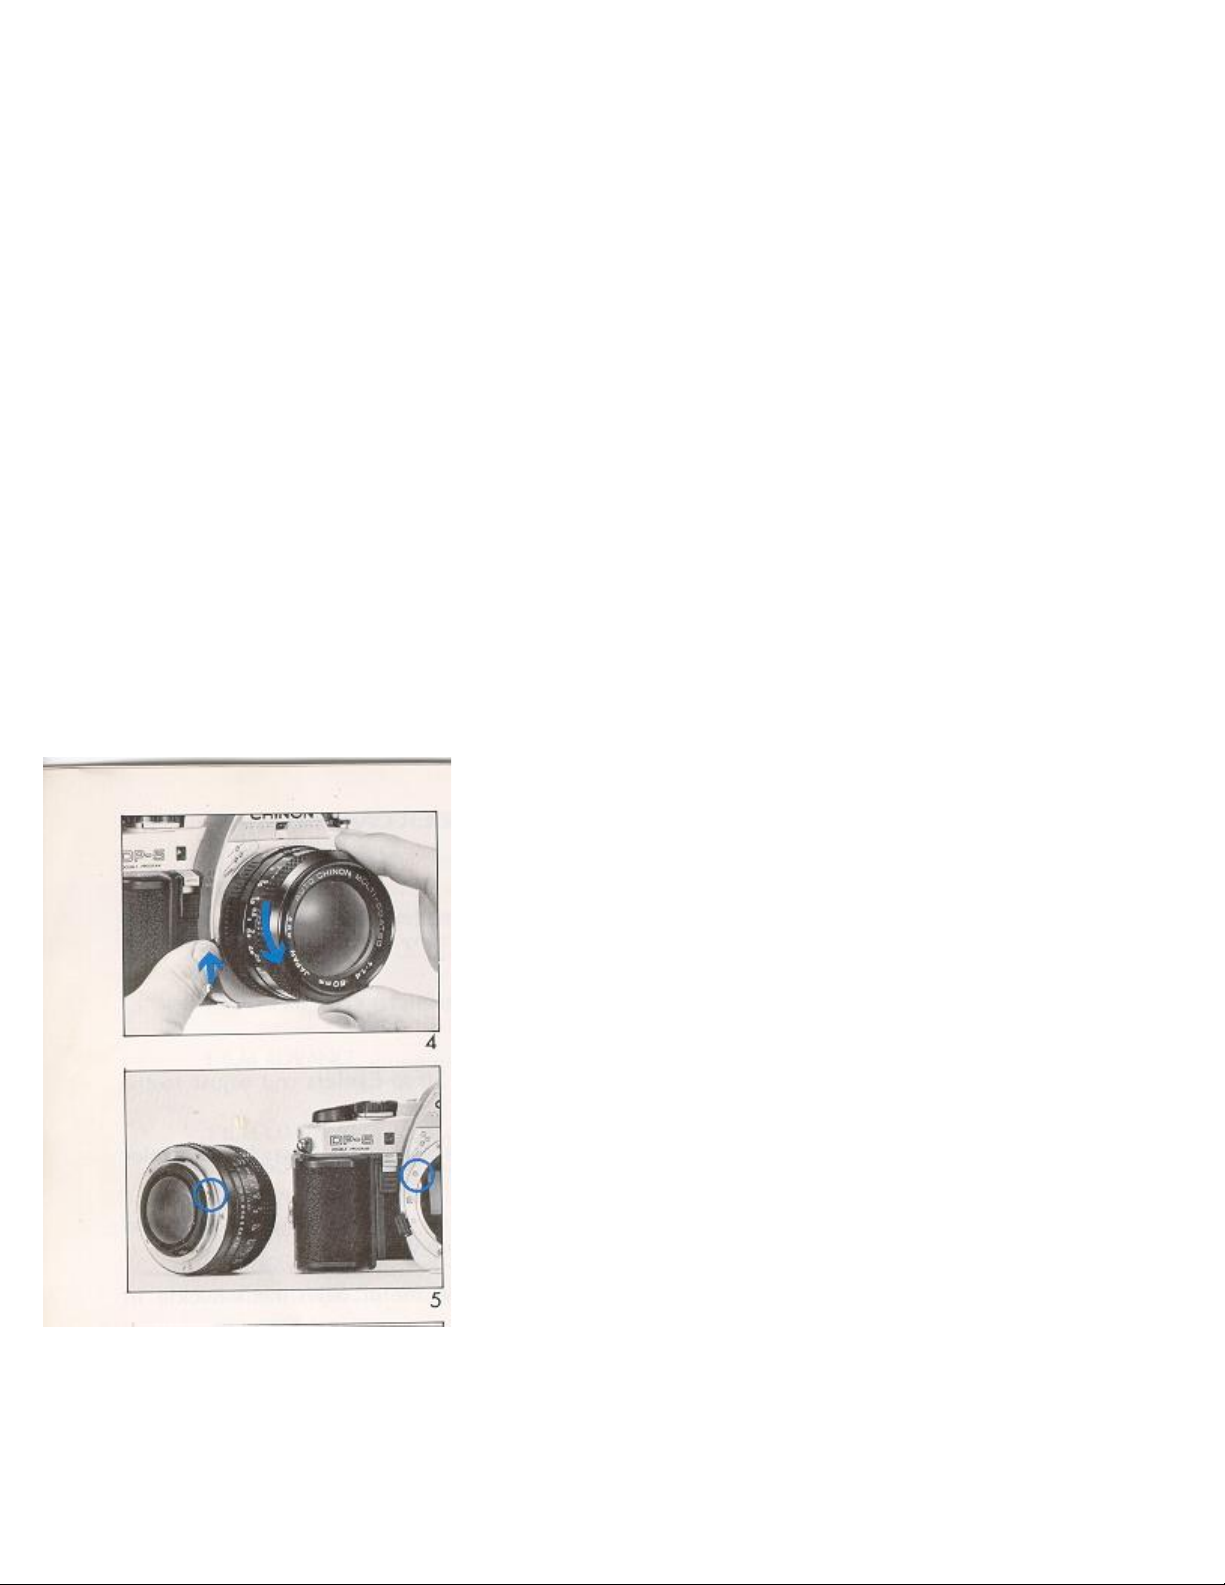
2. CHANGING LENSES
Your CHINON DP-5 program camera is equipped with a standard "K"- type bayonet mount
which accepts all interchangeable lenses with the "K" bayonet mount.

To Remove the Lens from the Camera
1. Depress the Lens Release Lever, and turn the lens in the direction of the arrow
(Fig. 4).
To Mount the Lens on the Camera
1. Line up the red dot on the lens mount with the matching red dot on the camera body
(Fig. 5).
2. When the lens has engaged, turn it in the direction of the arrow until it clicks into place.
(Fig. 6).
* Indicator (0) on the lens rim shows filter size. For example, 49 (0) indicates a 49 mm
filter. Refer to this filter size when purchasing CHINON accessory filters.
3. INSERTING THE BATTERIES
The automatic exposure metering and shutter operation of this camera are powered by
batteries, so it is important to insert the batteries correctly for proper operation.

1. Turn the screw on the side of the power grip counterclockwise to remove the power
grip from the camera body (Fig. 7). t:
Place three 1.5V "AAA" alkaline batteries (AM-4) in the power grip as indicated (Fig. 8).
3. Attach the power grip to the camera body by turning the screw clockwise to secure it.
NOTE:
1. Make sure that the batteries are inserted correctly, i.e., check polarity (+ and -). The
shutter will operate only when batteries are correctly installed and not exhausted. When
replacing batteries, replace all three batteries at the same time.
2. When your camera is not used for a long period of time, remove the batteries. If
batteries are dead or improperly inserted, the shutter release button will not operate.
3. Generally, in cold conditions, the voltage of the batteries decreases, and this will
impair the functioning of the shutter and exposure meter. In these cases, either warm up
the batteries or keep a spare set warm in your pocket ready to insert just before shooting.
4. BATTERY TESTING
1. Set the exposure mode select dial to the "P" position (Fig. 9).
2. Look through the viewfinder and depress the shutter release button halfway down to
confirm that at least one of the LED indicators in the viewfinder illuminates (Fig. 10).
3. If nothing illuminates, replace the batteries with a fresh set or check to ensure that
batteries are correctly installed.
Table des matières
Autres manuels CHINON Appareil photo numérique


