Champion CHSD410 Manuel utilisateur

CHSD410
USER MANUAL
Read this Manual carefully before use
EN - English
SV - Svenska
DA - Danske
NO - Norsk
FI - Suomi

EN
1
Safety Precautions
Please make sure to read this Operation instruction, to ensure a safe and correct usage. Keep this
Operation Instruction for future reference. The product is intended for household use only.
1. Do not place the product near to ammables (such as gasoline or natural gas) as it can lead to
malfunction or re.
2. All packaging materials should not be accessible to children to avoid suffocation.
3. Do not block on the suction inlet or the air outlet for long time during the operation of the pro-
duct.
4. Unplug the attached power supply adaptor together with the power supply plug. Otherwise, it
may lead to electric shock or malfunction.
5. Make sure to use the lter in the dust cup during application. Otherwise, it may lead to fault.
Safety Warnings
1. Do not disassemble, repair or remodel the product by yourself, as it may lead to electric shock
or re. Contact with an authorized service center or place if purchase.
2. The battery should never be dismantled, short circuited or placed against a metal surface.
3. Make sure the product does not absorb gasoline, kerosene or cigarette end with spark, and do
not absorb water or ammable powder; otherwise, it may lead to malfunction or re disaster.
4. Do not damage the charging wire, including bending, stretching, twisting, bundling, pressing
or squeezing by violence. Damage on the charging wire may lead to re disaster or electric
shock.
5. Never use the product if it has obvious damages, contact with an authorized service center or
place if purchase.
6. Please do not use the product in conditions that the charging wire or the plug is damaged.
Otherwise, it may lead to electric shock, short circuit or re disaster.
7. Children under 8 years old must be supervised by an adult when using the product. Do not pla-
ce the product in positions accessible to infants. Otherwise, it may lead to electric shock, burs
or injuries.
8. Make sure to remove the plug from the socket when not in use, except for charging.
9. Make sure that the plug is inserted into the socket in a correct way. In condition that the plug is
attached with dust, please clean it with dry cloth. Otherwise, it may lead to circuit short cut.
10.Do not connect the charging adapter of this product with other products. Otherwise, it may lead
to re disaster, electric shock or fault.
11.Do not soak the product into water or any other liquid. Otherwise, it may lead to electric shoc
12.Never vacuum sharp objects or liquids.
13.Do not place vacuum cleaner close to a heat source, such as radiator, stove etc.
14.Do not touch on the involving brush during operation as it can cause personal injury.
15.Do not insert or unplug the plug with wet hands. Otherwise, it may lead to electric shock.
16.To protect the motor, battery and electronics the product should not be stored or operated in an
ambient temperature below 5 °C or exceeding 35 °C. If the product is stored in a temperature
below 5 °C or exceeding 35°C, let the product cool down or warm up and dry for a few hours
before usage.
Technical Specication
Item: CHSD410
Battery: Lithium battery 18.5V 2200mAh
Operation: 25 min - HIGH, 40 min - LOW
Power: 100W
Noice: ≤72
Air ow: 0.6m³/min
Max. Vacuum: >5Kpa
Dust capacity: 0,5L
Rated Voltage: 100V-240V DC
Rated Frequency: 50 ~ 60Hz
Net. weight: 2,2KG
Gross weight: 4,4KG
EN
2
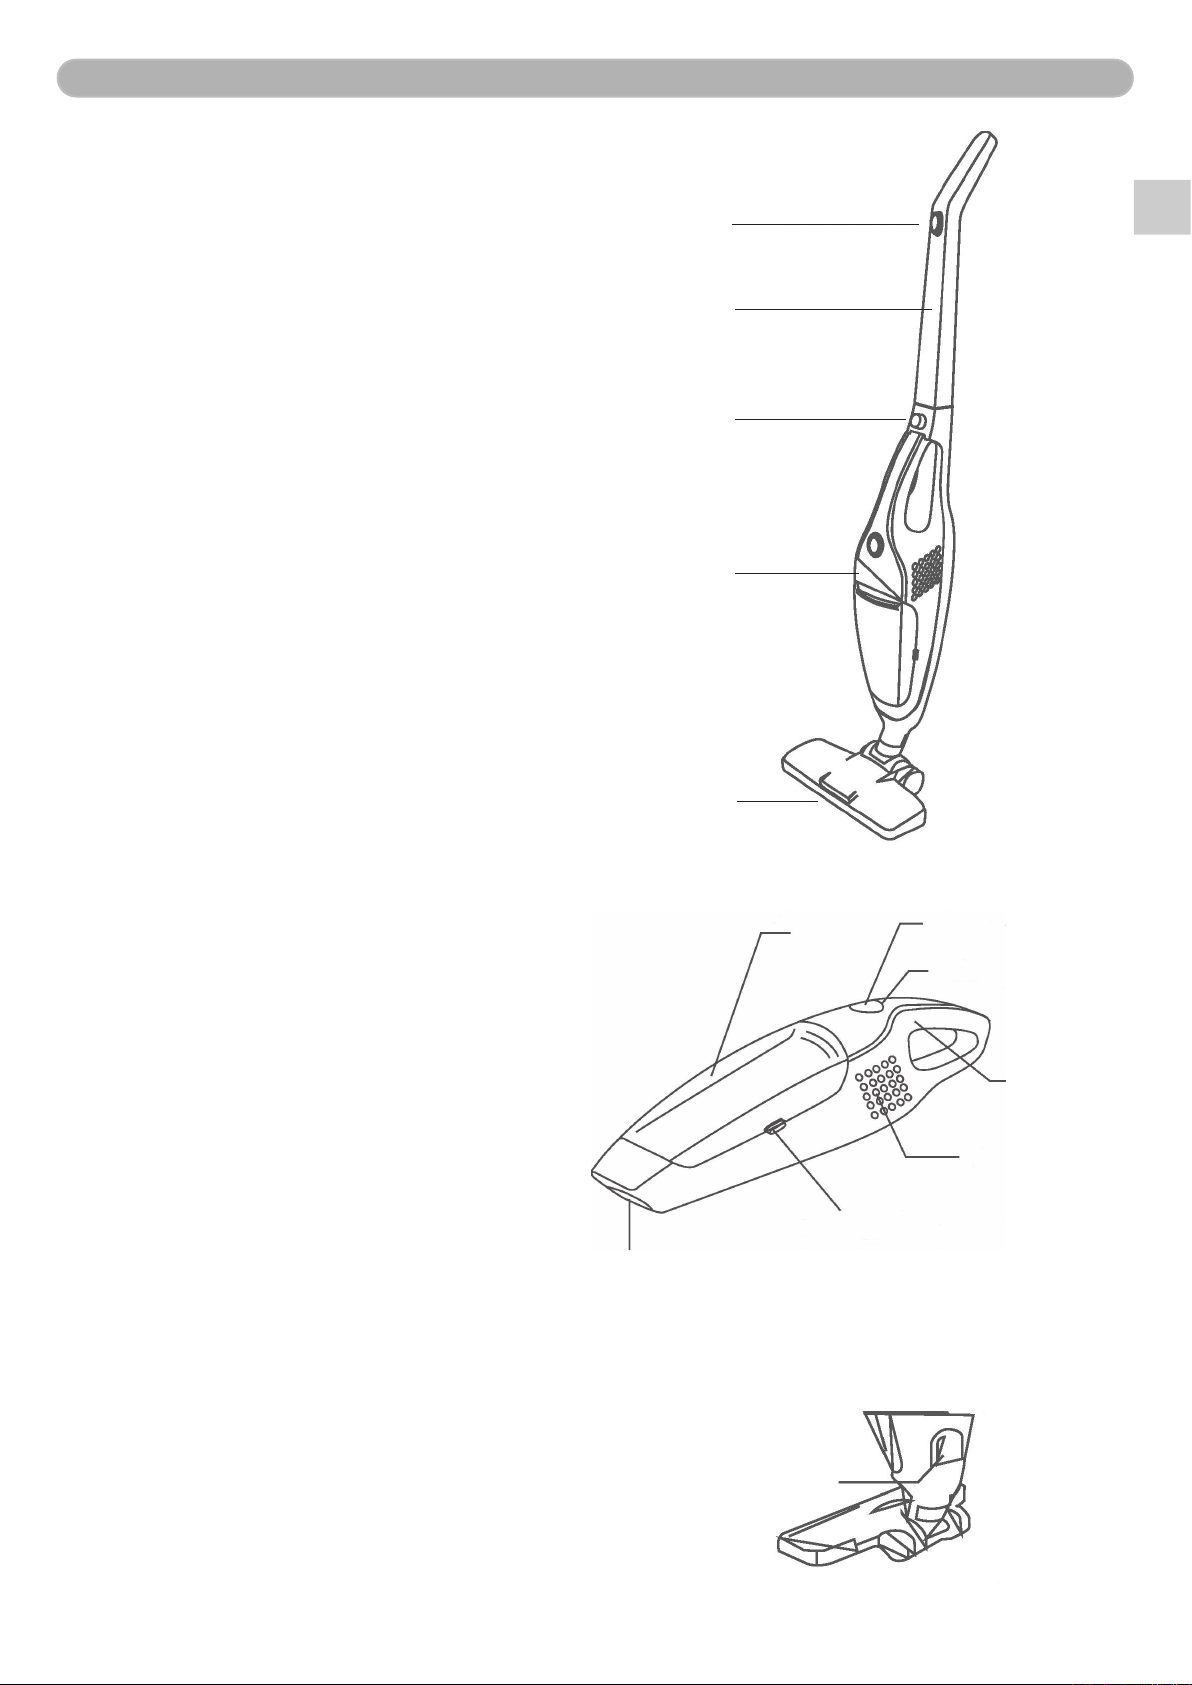
Structure Diagram
Handheld unit
1. Dust container
2. Switch
3. Charging lamp
4. Handle
5. Air outlet
6. Switch of Dust container
7. Suction inlet
12
3
4
5
6
7
1. Switch
2. Handle
3. Lock catch button
4. Motor
5. LED lamp
1
2
3
4
5
Charging dock
1. Charging port 1
EN
3
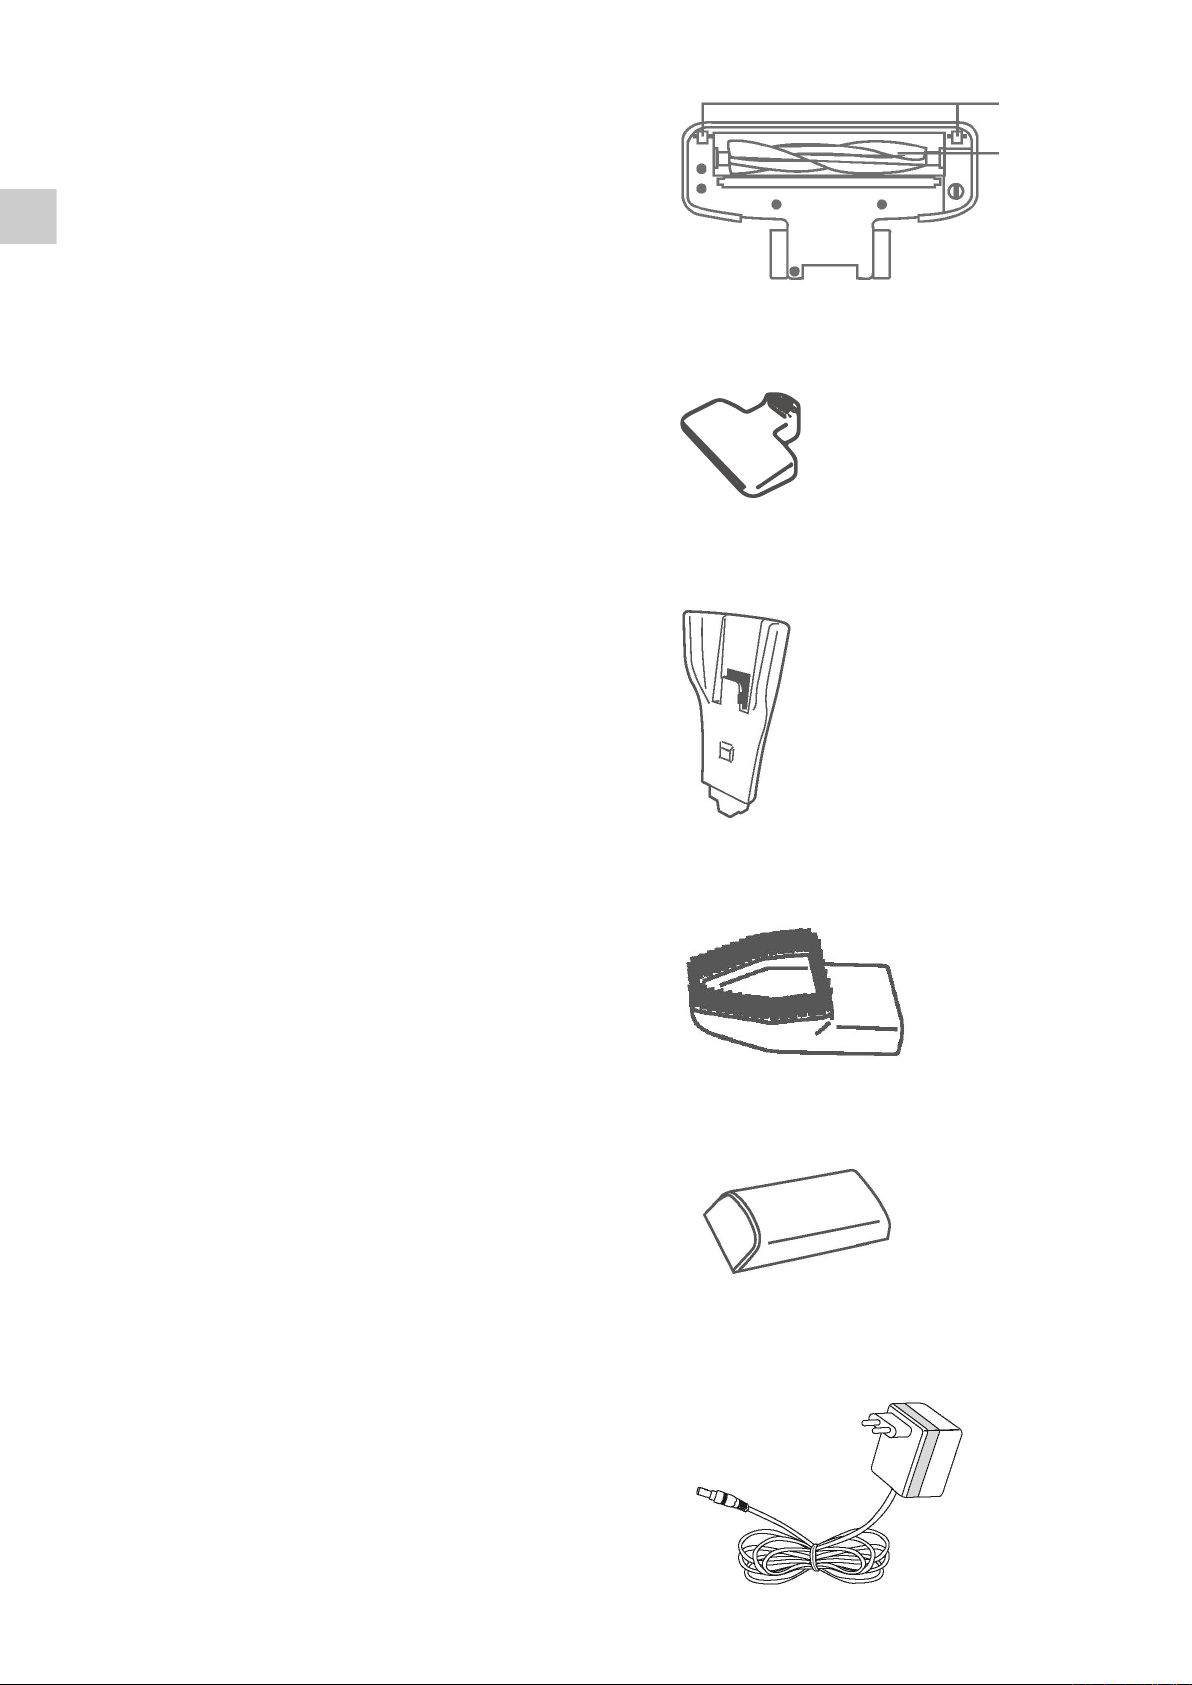
Floorbrush (bottom)
1. Rolling wheel
2. Revolving brush
1
2
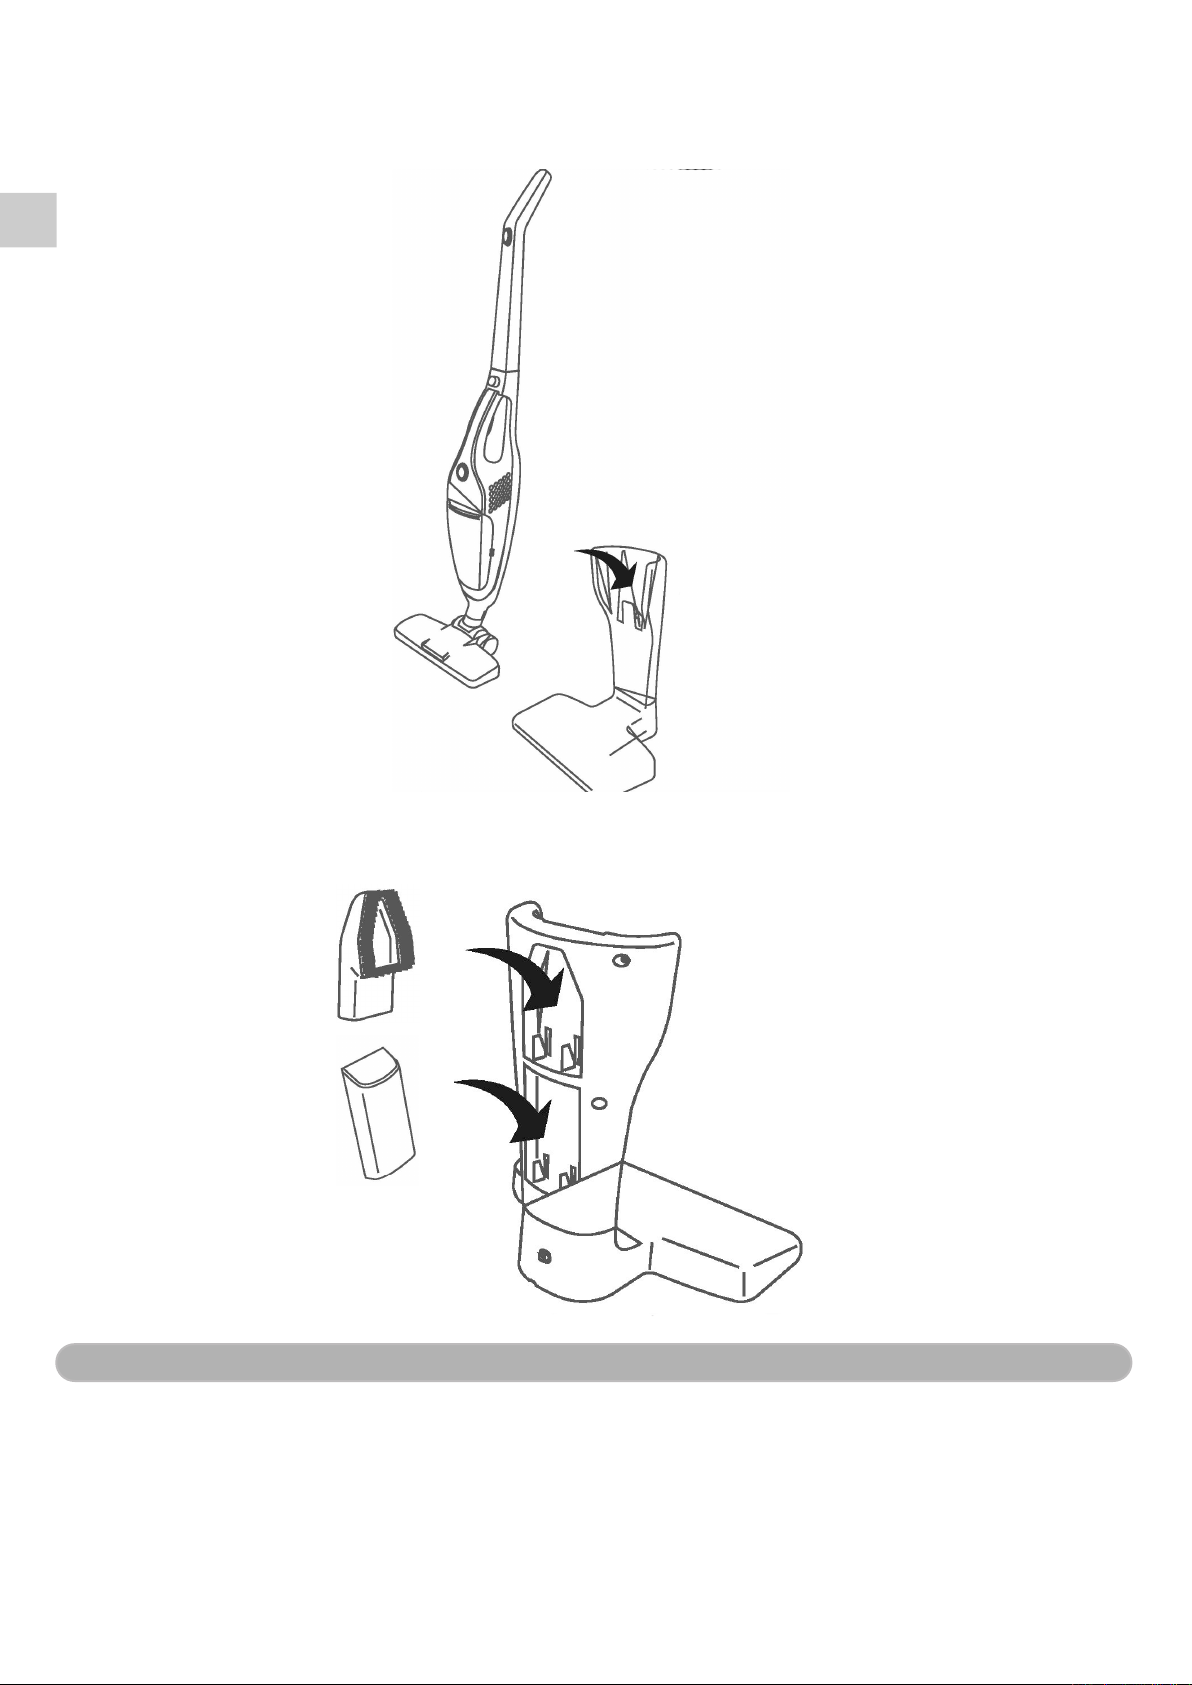
Bottom part of Charging Set
Upper part of Charging Set
Dusting brush
Flat noze brush
Charger
EN
4
Assembly
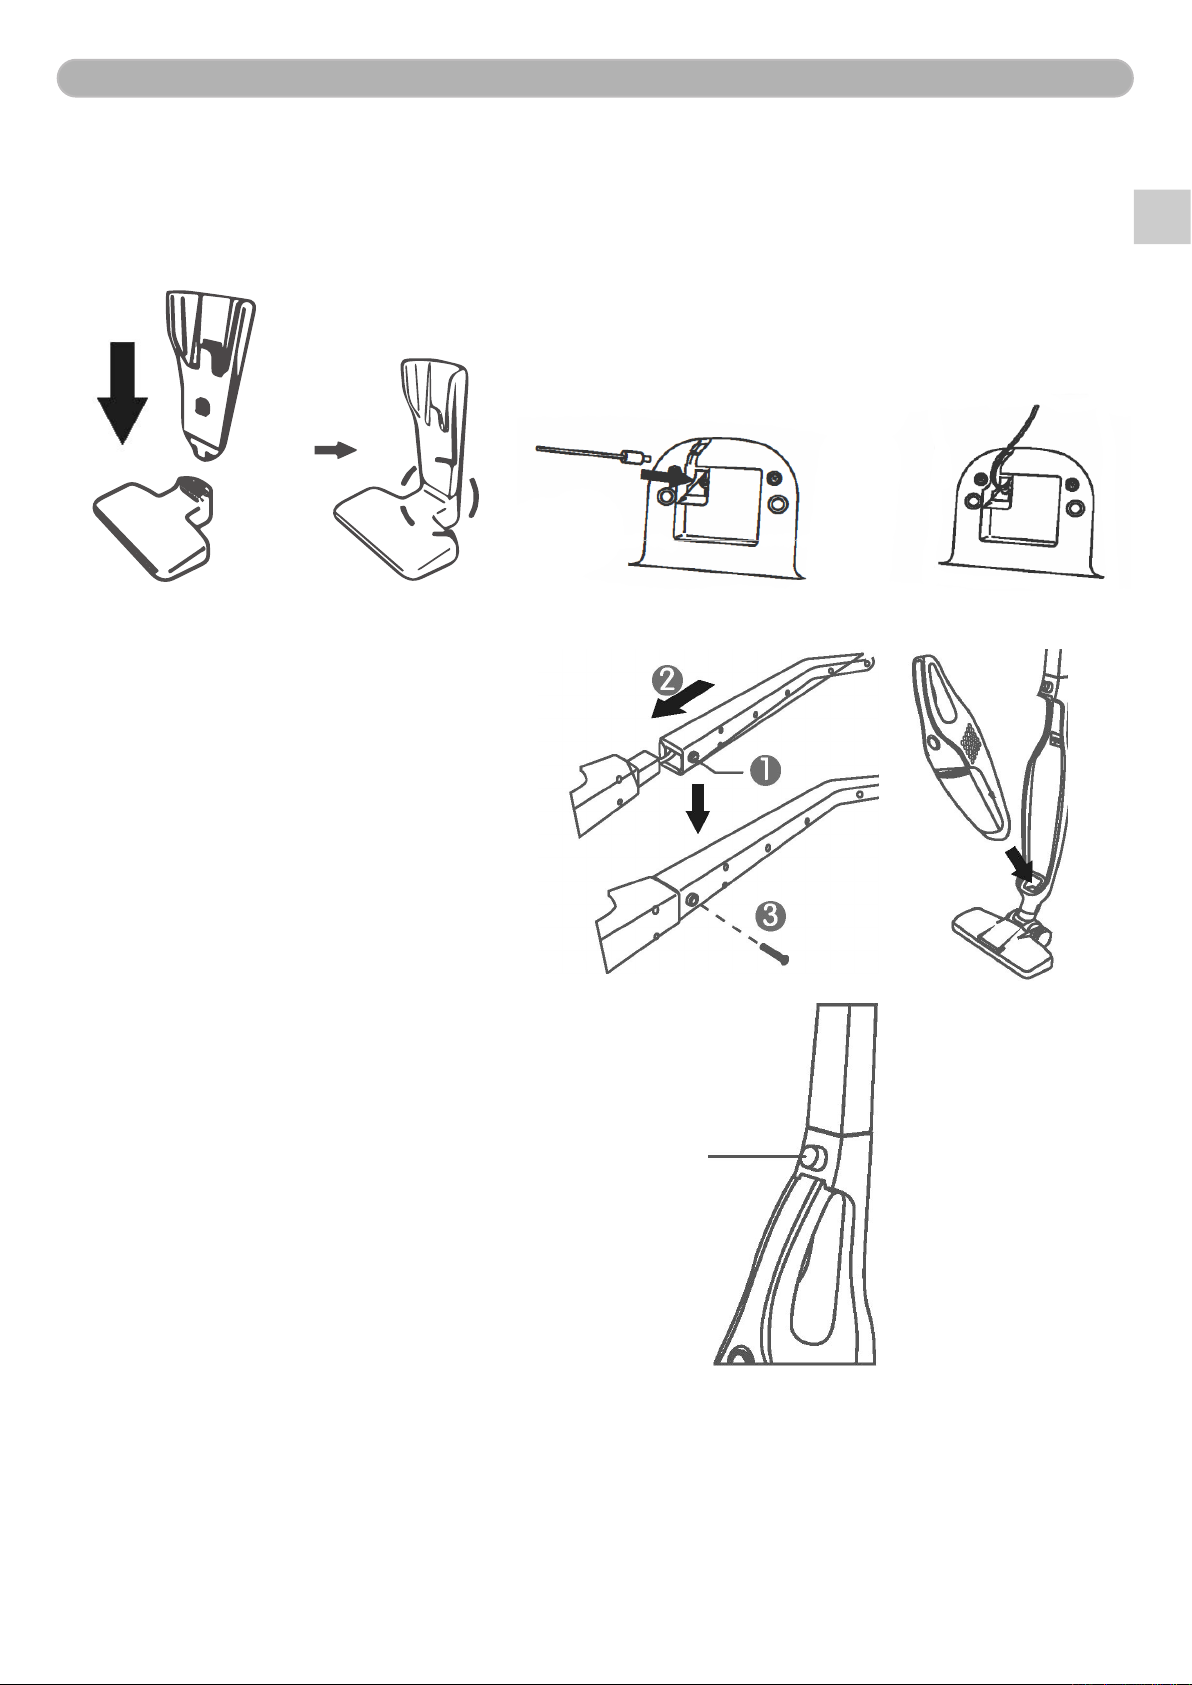
Charging Socket
Assemble the upper part and the bottom part of the charging socket together. Insert the power
supply port of the adapter into the power supply hole on the bottom plate and place the wire along
the groove.
Handle and Hand-held Unit
Installation of handheld unit:
Place the front end of the dust cup into
the base groove rstly, and then push
the hand-held vacuum cleaner into the
base, until a sound of ”click”, and the
product is installed in a correct way.
Assembly of handle:
Loosen the screw of the outer side of
the base rstly, and insert the handle
into the base, and tighten the screw
back with tools. (As shown in Step 1, 2
and 3)
Lock catch button
Preparation for Charging
1. Insert the charging port of the vacuum cleaner into the socket of the charging base.
2. Insert the power supply plug of the adapter into the socket.
3. The charging begins when the power supply indicator light of the vacuum cleaner turns to red.
4. The charging will be ended automatically about 5 hours later, the power supply light turns off.

5
EN
Tips:
• The charging will end automatically after approx. 5 hours.
• It is normal for slight heating of the product and the adapter during the charging process.
• If the vacuum cleaner stops operation suddenly and the green light is off, it indicates that it is
needed to charge for the product.
• The battery is in dormant state if the product has not been used for a long time, and it is normal
for the capacity to be lower than that of the normal value. 3-5 times of normal charging and
discharging circulations will activate the battery, to recover to normal capacity.
Use
• If cleaning with the hand-held part only, control with the switch on the hand-held part.
• The indicator light will be in constant on in green when the vacuum cleaner is in operation.
• In power off state, switch the switch for once to put in on LOW Power, and for twice to put it to
HIGH Power, and for one more time to achieve Power OFF.
ON HIGH POWER OFF
Electric oor brush: The oor brush is equipped with LED lamp on the head and suitable for
all kinds of oors, carpets etc.
Flat suction nozzle: Place the at suction nozzle into the front end of the dust cup of the
hand-held part. Suitable to clean areas such as corners of wall,
between stairs steps, gaps etc.
Dusting brush: Place the dusting brush nozzle into the front end of the dust cup of the
hand-held part, to clean the dust on surfaces such as fabrics on sofa,
curtains etc.
Electric oor brush
LED Light
Flat suction nozzle Dusting brush nozzle
6
EN
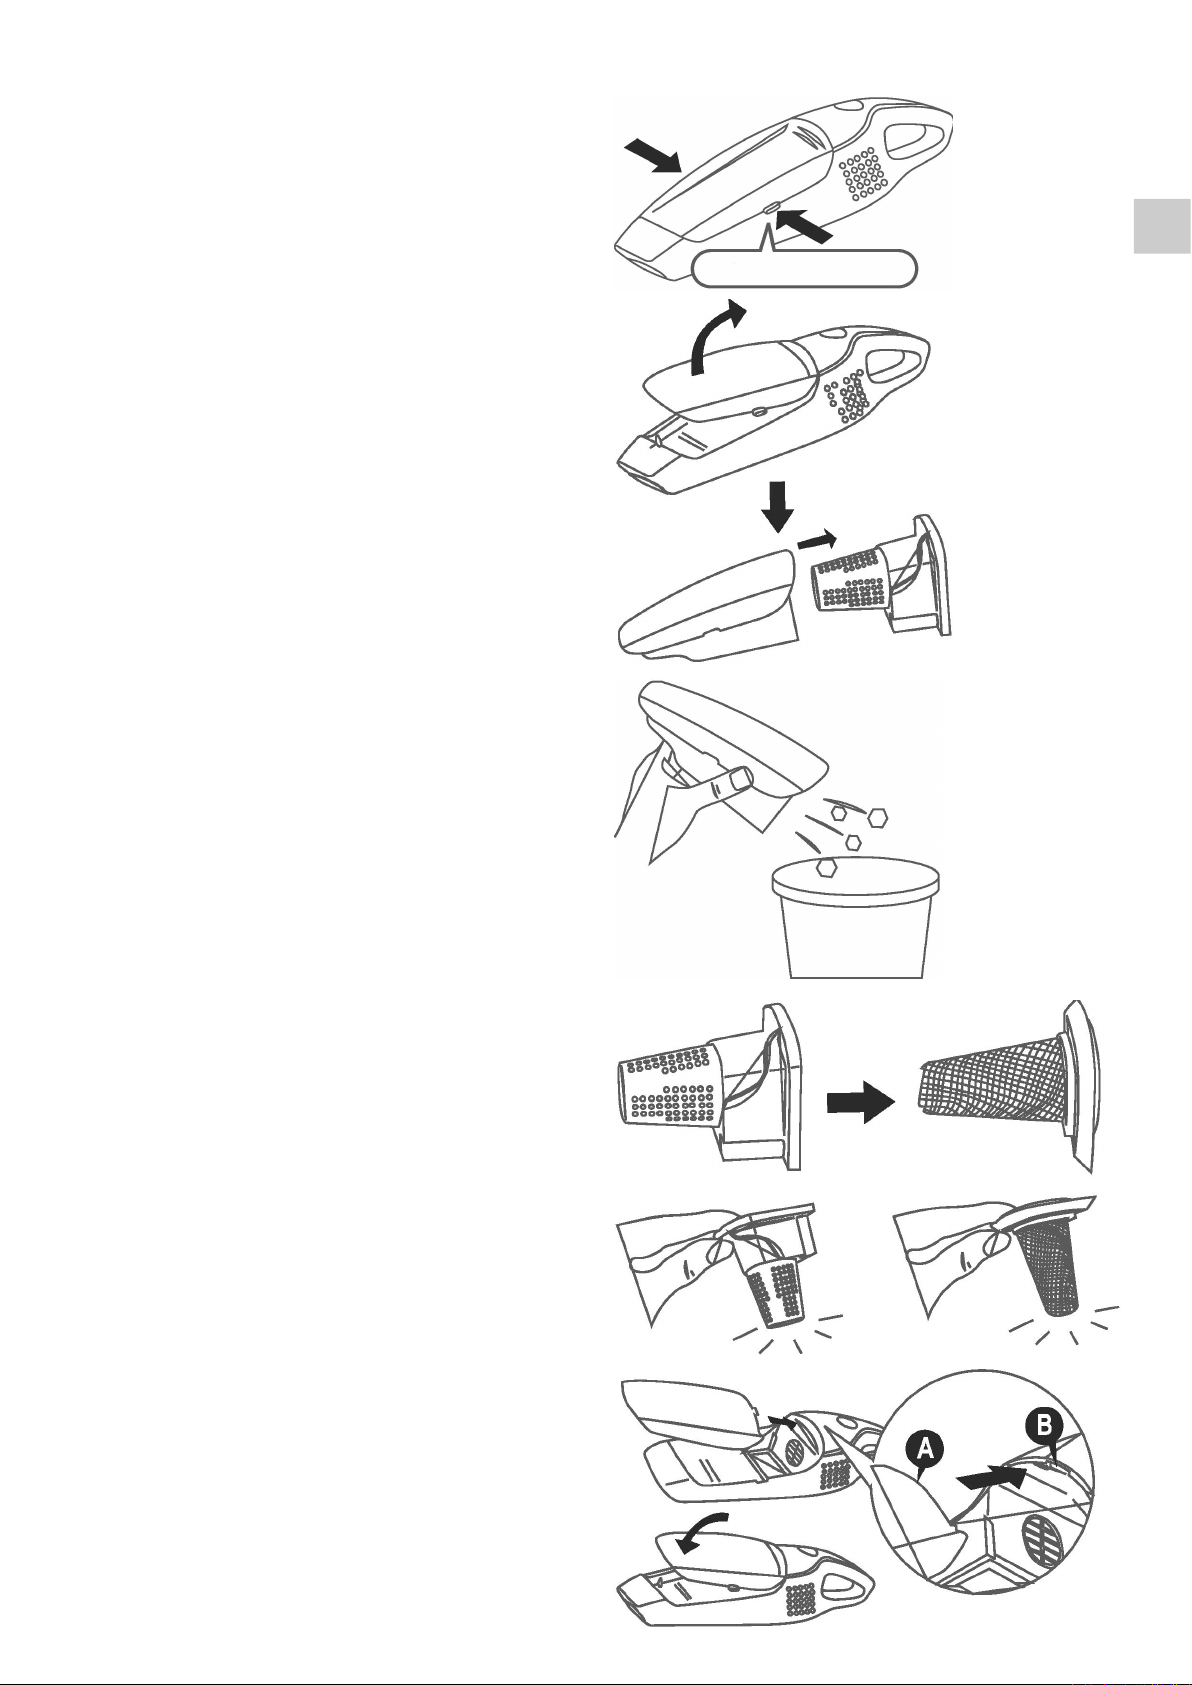
Emptying the dust container
1. Press the button down to take out the
dust container.
2. Take out the lter.
3. Empty the rubbish from the dust
container.
4. Take out the lter element from the
lter screen.
5. Clean the rubbish in the lter element
and the lter screen by carefully by
knocking it.
6. Assemble back according to the dis-
assembly procedures. A ”click” sound
after pressing ensures a proper install-
ation for the places between the dust
container and the hand-held unit.
Note: It is required to use both lter screen and
the lter, otherwise it may lead to
malfunction of the vacuum cleaner.
Switch of the dust container.
EN
7
When nished cleaning
Place the vacuum cleaner back to the charging base.
The accessories of the suction nozzle mouth can be placed on the back side of the charging base
for storage.
Cleaning and Maintenance
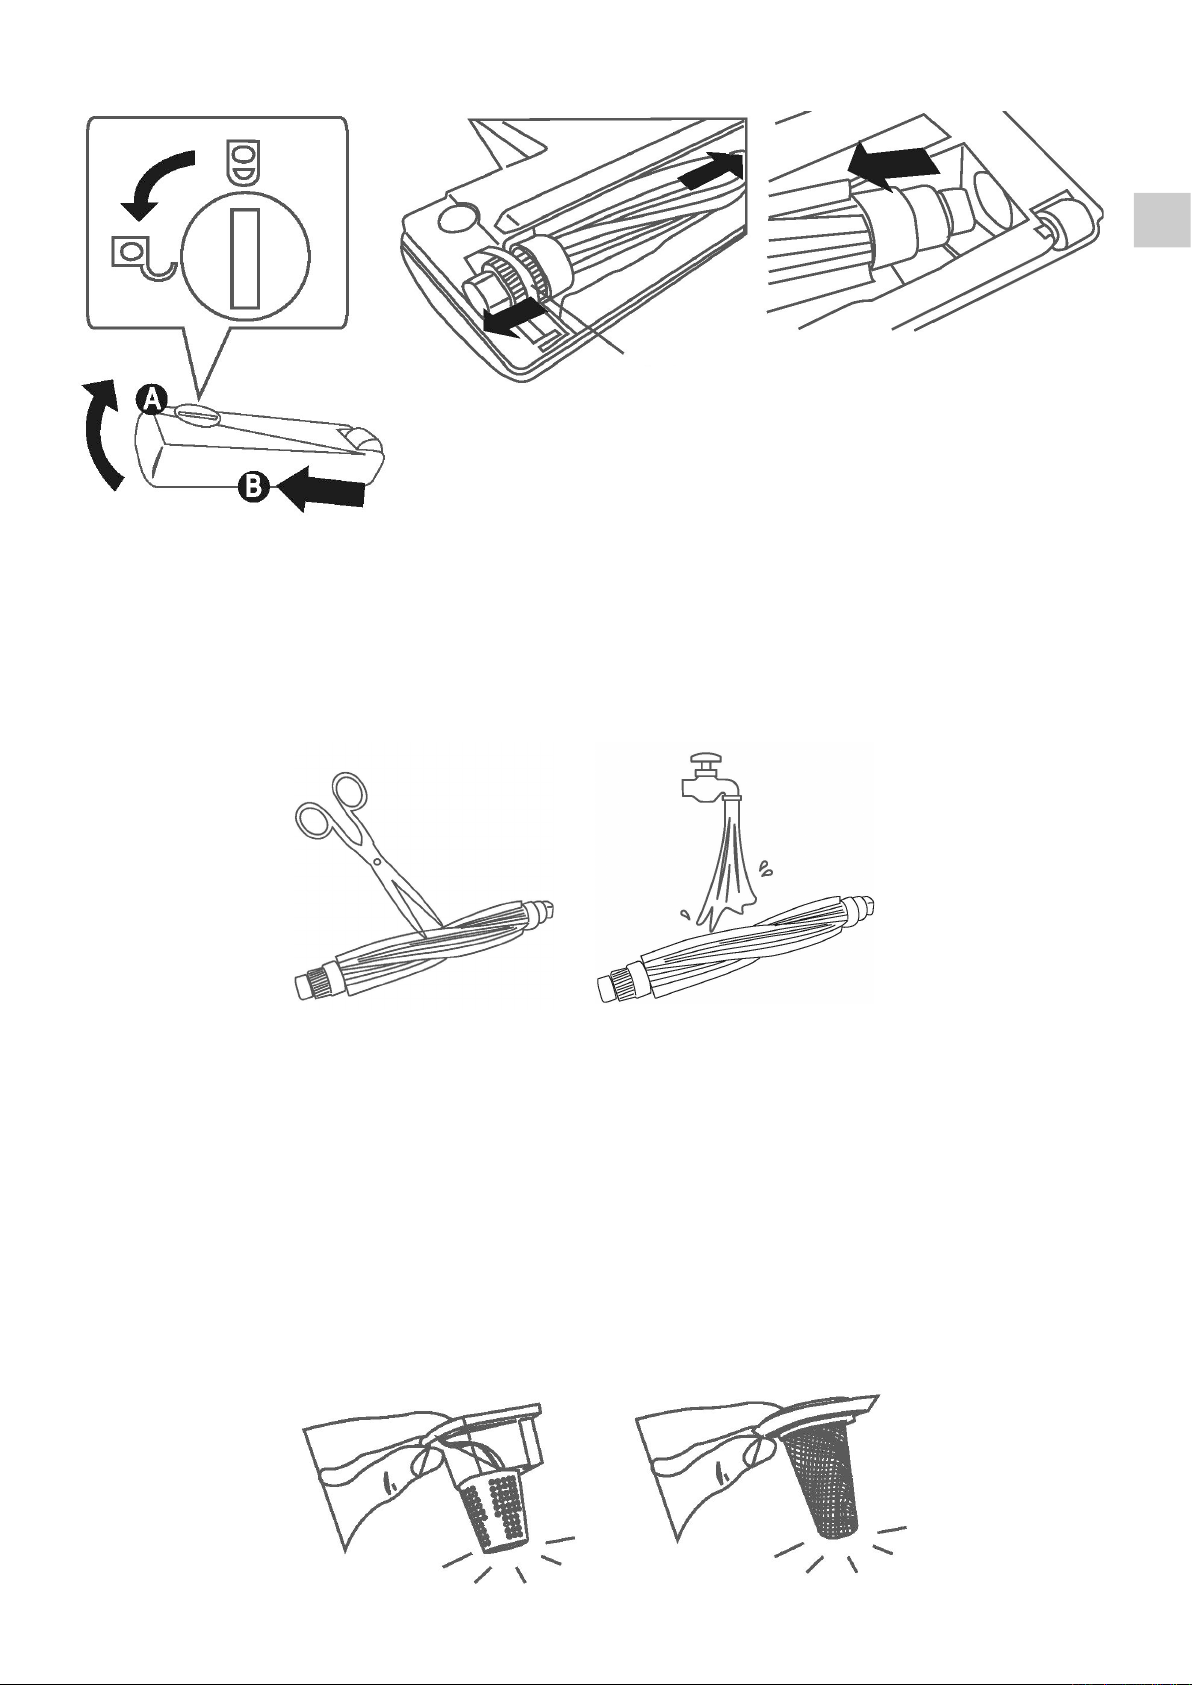
Revolving Brush
1. Open the lock with tool, for example a coin, and disassemble the cover plate. (1)
2. Take off one end of the revolving brush from the driving belt. (2)
3. Take off the whole revolving brush from the direction of the suction nozzle. (3)
EN
8
1 32
4. Clean off the hair/dust of the long strip entanglements on the revolving brush with scissor.
(4)
5. If necessary, ush the revolving brush with water, and place it back into the oor brush after
drying.
6. Remove the rubbish accumulated on the suction nozzle or the surface.
7. Ensure that the driving belt has been assembled correctly with the motor and the brush.
The brush will not revolve if the belt is placed in incorrect position.
4 5
Driving belt
Dust Container
Remove the rubbish/dust attached with a dry cloth. Wash with water if necessary.
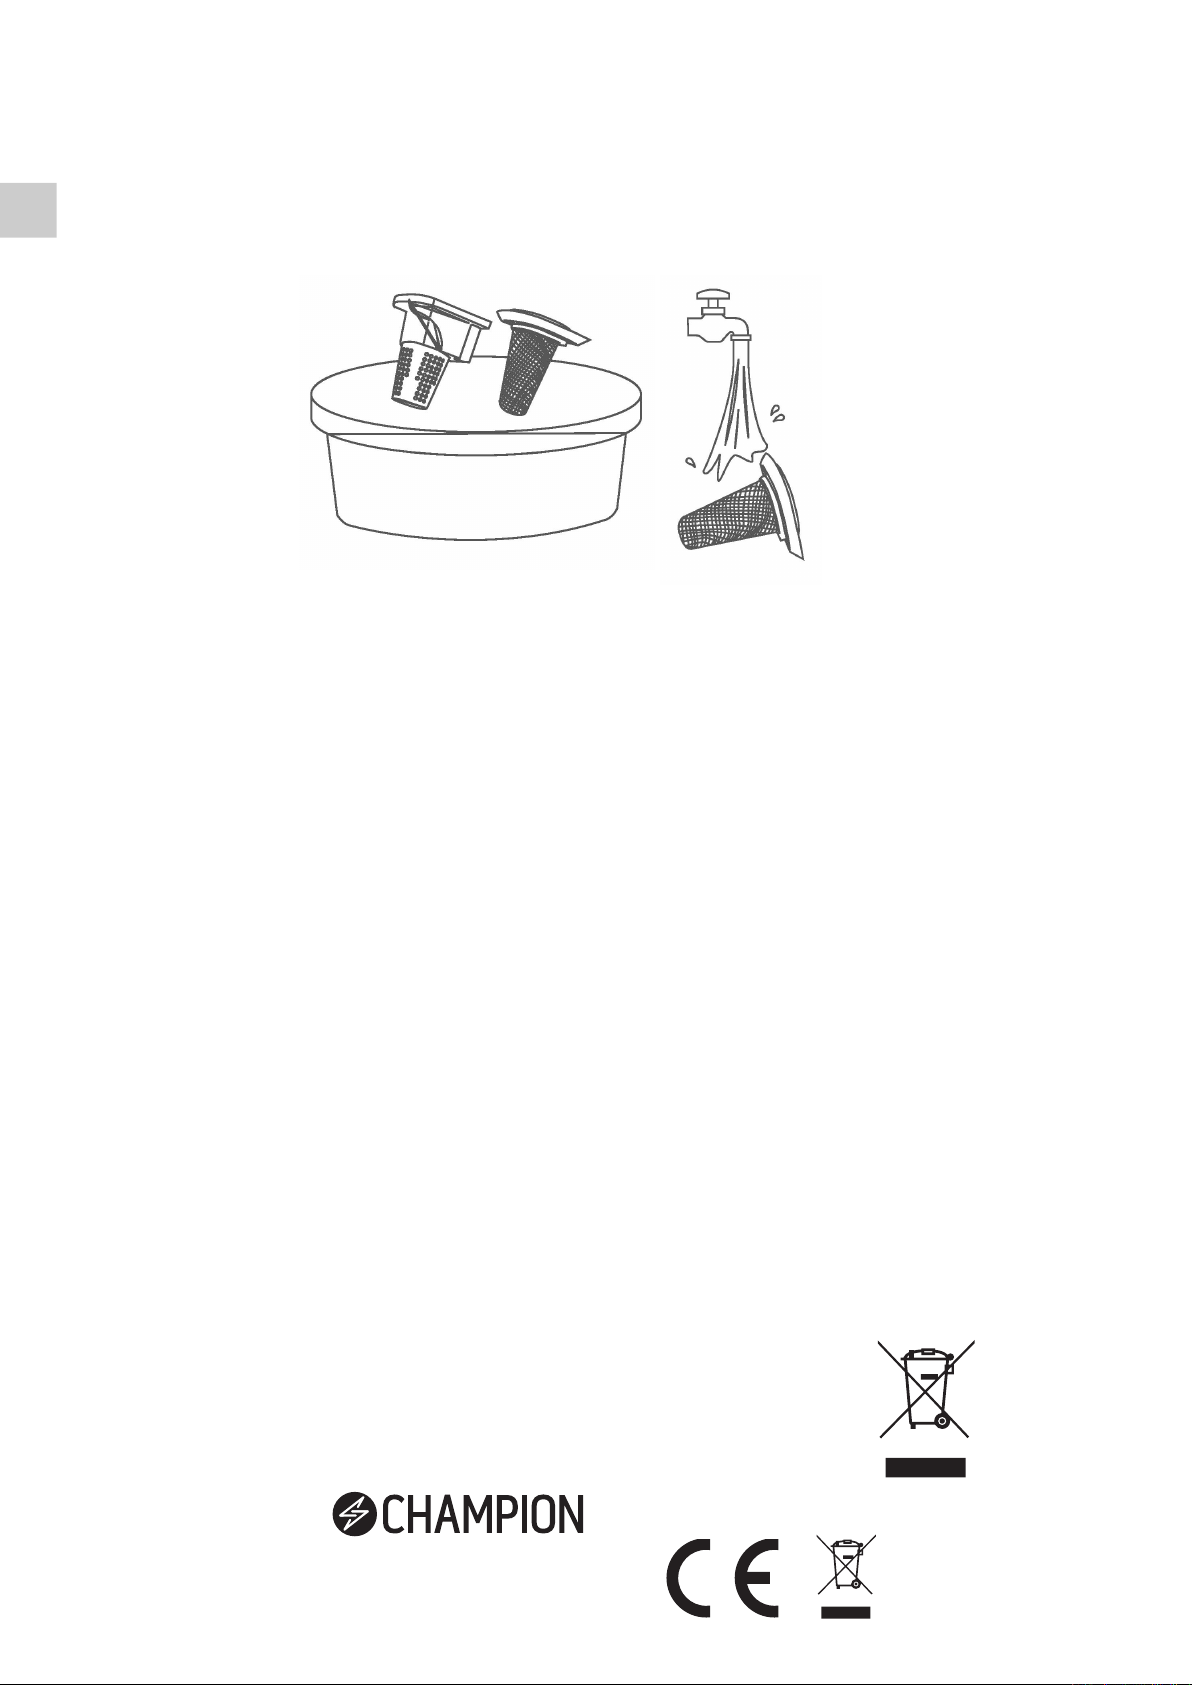
Filter
1. Clean the rubbish/dust in the lter element and the lter screen by carefully knocking it.
EN
9
Correct Disposal of this product
This marking indicates that this product should not be disposed with other
household wastes throughout the EU. To prevent possible harm to the
environment or human health from uncontrolled waste disposal, recycle it
responsibly to promote the sustainable reuse of material resources.
Warranty
Champion Nordic guarantees that this product is free from manufacturing defects in
terms of materials and workmanship during a period of 2 years in Sweden, Norway,
Denmark and Finland. This warranty period begins on the day the product is purchas-
ed or delivered. Champion Nordic has no obligation to repair or replace products that
are not accompanied by a valid proof of purchase. This warranty applies only to pro-
ducts purchased and used for home use and does not cover damage resulting from
abuse, failure to comply with the instructions from Champion Nordic, cases in which
the product has been modied or subjected to unauthorized repair, improper packa-
ging on the part of the owner, normal wear and tear, or improper handling on the part
of a transport company.
2. Clean in water with a small amount of neutral detergent.
3. Wash it with a soft brush and ush the inside of the lter under tap to remove the pollutants.
4. Install it back after sufcient drying. If not dry, it may cause blocking.
Note: Make sure that the lter is completely dry. Otherwise, it may lead to absorption degradation
or fault. If the lter is blocked and the dust/rubbish cannot be removed - replace it with a
new one.
Champion ®
Makadamgatan 14 I 254 64 Helsingborg I Sweden
Table des matières
Langues :
Autres manuels Champion Aspirateur

Champion
Champion CHDS310 Manuel utilisateur

Champion
Champion CHVJ220 Manuel utilisateur

Champion
Champion CHDS210 Manuel utilisateur

Champion
Champion CHDS050 Manuel utilisateur

Champion
Champion CHDS150 Manuel utilisateur

Champion
Champion CHDS310 Manuel utilisateur

Champion
Champion CHDS210 Manuel utilisateur


