Blue Maestro Tempo Anywhere Manuel

TEMPO ANYWHERE
INSTRUCTION GUIDE
Version 2.0.1

Tempo Anywhere Instruction Guide 2.0.1
BLUE MAESTRO’S STANDARD LICENSE AND DISCLAIMER
Copyright ©2017 Blue Maestro Limited. All Rights Reserved. The copyright in the software to which this document relates and in this
document belong exclusively to Blue Maestro Limited and no permission to use, copy, modify, and distribute this software or this doc-
umentation is permitted unless with the express prior written authorisation of Blue Maestro Limited. The license to use the software
to which this document relates is granted so long as such software resides in hardware provided by Blue Maestro Limited.
IN NO EVENT SHALL BLUE MAESTRO BE LIABLE TO ANY PARTY FOR DIRECT, INDIRECT, SPECIAL, INCIDENTAL, OR CONSEQUENTIAL
DAMAGES, INCLUDING LOST PROFITS, ARISING OUT OF THE USE OF BLUE MAESTRO SOFTWARE, HARDWARE, CLOUD SERVICES
AND ANY DOCUMENTATION, EVEN IF BLUE MAESTRO HAS BEEN ADVISED OF THE POSSIBILITY OF SUCH DAMAGE.
BLUE MAESTRO SPECIFICALLY DISCLAIMS ANY WARRANTIES, INCLUDING, BUT NOT LIMITED TO, THE IMPLIED WARRANTIES OF
MERCHANTABILITY AND FITNESS FOR A PARTICULAR PURPOSE. THE SOFTWARE AND ACCOMPANYING DOCUMENTATION, IF ANY,
PROVIDED HEREUNDER IS PROVIDED “AS IS”. BLUE MAESTRO HAS NO OBLIGATION TO PROVIDE MAINTENANCE, SUPPORT, UP-
DATES, ENHANCEMENTS, OR MODIFICATIONS UNLESS IT CONTRACTS TO DO SO.

Tempo Anywhere Instruction Guide 2.0.1
What is included
1. a Blue Maestro Tempo Anywhere, being based on a Raspberry Pi 3 or Raspberry Pi Zero W.
2. an SD Card (this should already be in the SD Card slot of the Tempo Anywhere)
3. a power cable.

Tempo Anywhere Instruction Guide 2.0.1
SET-UP GUIDE
STEP 1: Create your account for Blue Maestro Cloud
This needs to be your first step since you need your account email and password to set up your Tempo
Anywhere.
Visit www.bluemaestro.com and then select “Cloud Sign In” at the very top of the screen. Then select
create account.
Once you have successfully created your account keep your email and password in a safe place.

Tempo Anywhere Instruction Guide 2.0.1
STEP 2: Plug in your Tempo Anywhere into a power source
Simply plug your Tempo Anywhere into a power source. If the SD card is not already in the Tempo Any-
where, insert the SD card. The SD card is inserted upside down (gold connectors facing up).
STEP 3: From a computer or mobile connect to the WiFi network “bluemaestrocloud”
The first time you turn on your Tempo Anywhere you need to provide it credentials to enable it to connect
to your WiFi router and the Blue Maestro Cloud and be associated with your account. You do this by con-
necting to it via WiFi temporarily. From a computer or mobile, select the WiFi network “bluemaestrocloud”.
If it asks for a password, the password is “bluemaestro” and the security protocol is WPA.
NOTE: It may take a minute or two for the WiFi network “bluemaestrocloud” to become available from
power-up of the Tempo Anywhere.
STEP 4: Open up the Tempo Anywhere web page in your browser
Once you have connected to the WiFi network “bluemaestrocloud” open up your web-browser and type in
the search bar “http://172.24.1.1:8080” and hit Enter. This will bring up the local credentials page of Tempo
Anywhere.

Tempo Anywhere Instruction Guide 2.0.1
STEP 5: Enter your WiFi and Blue Maestro Cloud credentials
Once this page appears (see image below) enter your WiFi SSID and password. This is the name of the
WiFi router that your Tempo Anywhere is going to use to connect to the Blue Maestro Cloud. SSID is es-
sentially the name of the WiFi as you see it in your WiFi settings for your computer or mobile. The pass-
word is the password for the WiFi router. PLEASE TAKE CARE IN ENTERING THE SSID AND PASSWORD.
Enter your email and password for your Blue Maestro Cloud account. Again please take care in entering
these details.
Once you are satisfied your details are correct, select the “Submit” button. Your Tempo Anywhere will now
restart and will attempt to connect to the Blue Maestro Cloud using the WiFi SSID and password you pro-
vided. Please note once you hit “Submit” it may not be obvious anything has happened except the boxes
will go blank. At this point Tempo Anywhere is now attempting to connect to your WiFi router and then
the Blue Maestro Cloud.
STEP 6: Rejoin your usual WiFi network
At this point, select your normal WiFi network and leave the bluemaestrocloud WiFi network.

Tempo Anywhere Instruction Guide 2.0.1
STEP 7: Log into your Blue Maestro Cloud account
If everything has gone smoothly when you log into your account your Tempo Anywhere should appear list-
ed as a Gateway in your Dashboard with a green connection dot next to it. Note, it may take two or three
minutes once you select the “Submit” button for your Tempo Anywhere to appear. Refresh your browser
until you see the green connection dot appear.
STEP 8: TROUBLE SHOOTING - You do not see a green dot
If after three minutes you do not see a green dot, reboot your Tempo Anywhere but unplugging it, count-
ing to 10 and then plugging it back in.
Next bring up your Blue Maestro Cloud Dashboard and look for the green dot. This may take two or three
minutes. If the green dot still does not appear, go to your list of WiFi networks and see if bluemeastrocloud
appears.
If it does and you can connect to it, this means either your WiFi SSID, password, Cloud email or Cloud pass-
word is incorrect and Tempo Anywhere could not connect to the Blue Maestro Cloud. Follow the follow-
ing steps:
1. Check carefully the credentials. All capitals and lowercases and symbols need to be entered correctly.
2. Double check ‘0’ and ‘O’. Often ‘0’ (zero) can look like ‘O’ (letter). This is a common error when entering
in router SSIDs.
3. Ensure the WiFi network SSID you are entering is connected to the internet. If there is no internet con-
nection Tempo Anywhere will not connect to the Cloud.

Tempo Anywhere Instruction Guide 2.0.1
ARCHITECTURE ARMv8
SYSTEM ON CHIP Broadcom BCM2835
1.2 Ghz 64-bit quad-core ARM
Cortex A52
MEMORY 512 MB onboard 16 GB external
FLASH SD card
PROCESSOR ARM Cortex M4 32-bit
POWER 200 mA (1 W) from a 5 V via Mir-
coUSB external power plug
BLUETOOTH Version 4.1
WIFI 802.11n
ETHERNET 10/100 Mbit/s Ethernet
HARDWARE FEATURES Polycarbonate external enclo-
sure with rubber feet
ROHS COMPLIANT Yes
DEVICE FIRMWARE UPGRADE Over the air available
REGULATORY EC compliant,FCC
COUNTRY OF MANUFACTURE United Kingdom
Specifications
The following is the specification for your Tempo Anywhere.
Compliance Information
Tempo Anywhere complies with the relevant provisions of the RoHS Directive for the European Union.
WEEE DIRECTIVE
In common with all Electronic and Electrical products Tempo Anywhere should not be disposed of in house-
hold waste. Alternative arrangements may apply in other jurisdictions.
The following EMC compliance standards are also met:
European Union (EU) Electrogmatic Compatibility Directive - Compliance with Class B Information Technolo-
gy Eqipment according to the Eurioean Standard EN 55022
Federal Communications Commission (FCC) Emissions Compliance Statement - The equipment has been
tested and complies with the limits for a Class B digital device, pursuant to Part 15 of the FCC Rules. These
limits are designed to provide reasonable protection against harmful interference when the equipment is
operated in a commercial environment.
The device complies with Part 15 of the FCC Rules. Operation is subject to the following two conditions. (1)
this device might not cause harmful interference, and (2) this device must accept any interference received,
including interference that might cause undesired operation.

Tempo Anywhere Instruction Guide 2.0.1
Warning: Operation of the equipment in a residential area is likely to cause harmful interference, in which
case the user will be required to correct the interference at their own expense.
Industry Canada Class B Emissions Compliance Statement
The Class B digital apparatus complies with Canadian ICES-003.
Under Industry Canada regulations, this radio transmitter may only operate using an antenna of a type and
maximum for lesser gain approved for the transmitter by Industry Canada. To reduce potential radio inter-
ference to other users, the antenna type and its gain should be so chosen that the equivalent isotropically
radiated power (e.i.r.p) is not more that necessary for successful communication.
This device complies with Industry Canada licence-exempt RSS standard(s). Operation is subject to the fol-
lowing two conditions: (1) this device may not cause interference, and (2) this device must accept any inter-
ference, including interference that may cause undesired operation of the device.
Australia and New Zealand Class B Emissions Compliance Standards
Warning: This is a Class B product. In a domestic environment this product may cause radio interference in
which case the user may be required to take adequate measures.
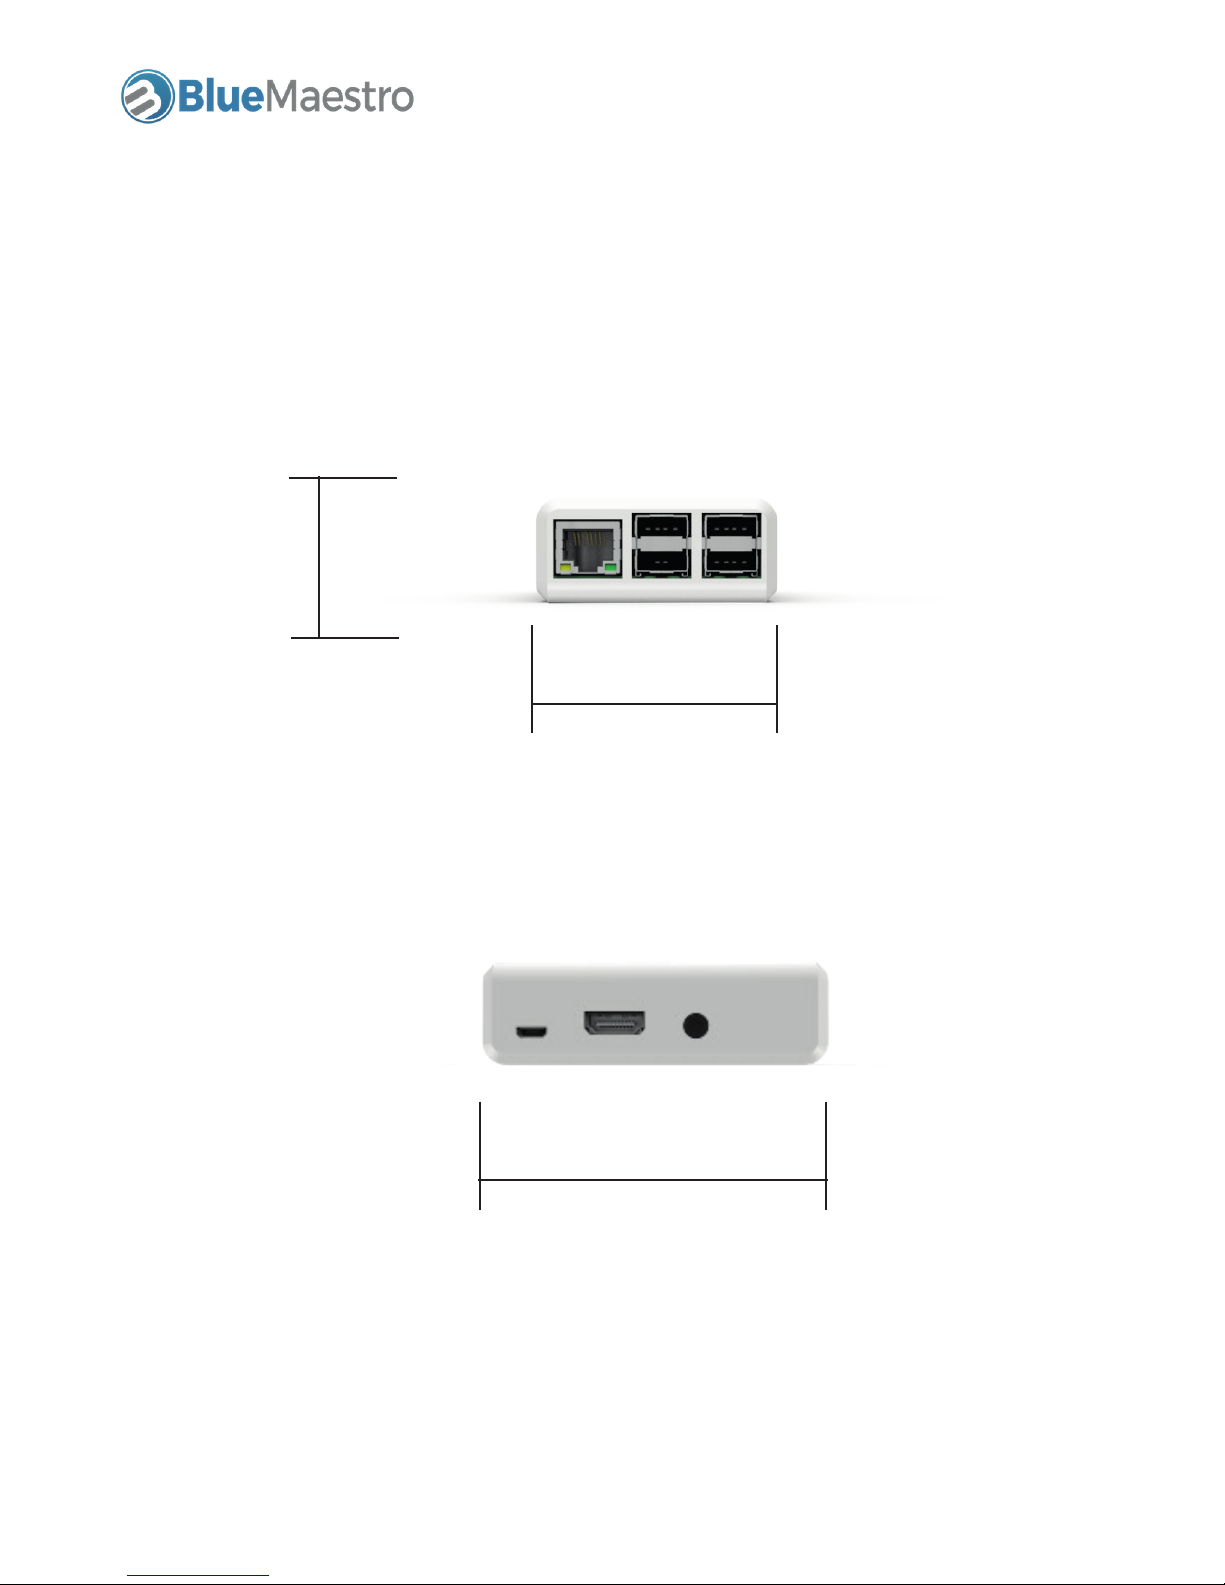
Tempo Anywhere Instruction Guide 2.0.1
90 mm
3.54 inch
30 mm
1.18 inch
60 mm
2.36 inch
Dimensions and form
The following represents the dimensions and form of the Tempo Anywhere Gatway for Bluetooth devices.
Please note dimensions and appearance of the enclosure may vary depending on the type of enclosure
evailable, but these dimensions and images provide a guide.
Table des matières
Autres manuels Blue Maestro Porte

Manuels Porte populaires d'autres marques

LST
LST M500RFE-AS Manuel utilisateur

Kinnex
Kinnex Media Gateway Manuel utilisateur

2N Telekomunikace
2N Telekomunikace 2N StarGate Manuel utilisateur

Mitsubishi Heavy Industries
Mitsubishi Heavy Industries Superlink SC-WBGW256 Manuel utilisateur

ZyXEL Communications
ZyXEL Communications ZYWALL2 ET 2WE Manuel utilisateur

Telsey
Telsey CPVA 500 - SIP Manuel utilisateur


