Atag One Manuel utilisateur

Handleiding voor de installateur
Installation manual
Montageanleitung für den Installateur
Instructions de l’installation
Istruzione d’installazione
NL
One
GB
D
F
I
Welkom bij ATAG One, dé thermostaat.
U heeft een verpakking ontvangen bestaande uit 1 of 2
doosjes:
- Doosje 1: - ATAG One thermostaat
- Grondplaat
- Batterij
- Schroeven en pluggen
- Handleiding voor de Installateur
- Handleiding voor de Gebruiker
- Veiligheids- en Garantiedocument
- Doosje 2*: - ATAG BCU ketelaansluit-unit
- Montage- en aansluitmaterialen
- Een aansluitschema
* Doosje 2 kan optioneel zijn.
Installeert u ATAG One voor de eerste keer?
a Maak eerst een installateursaccount aan.
Ga naar portal.atag-one.com
Kies REGISTREER en vul alle velden in.
Let op: Kies bij Accounttype: Installateur
b Download One-app op uw smartphone en/of tablet.
Ga naar de Playstore/Appstore en zoek op: atag one.
Ga door naar 1 als u een installateursaccount heeft aan-
gemaakt en One-app heeft gedownload.
REGISTEER
Reset
Herinner mij
Email
Wachtwoord
INLOGGEN
Als u nog geen account hebt
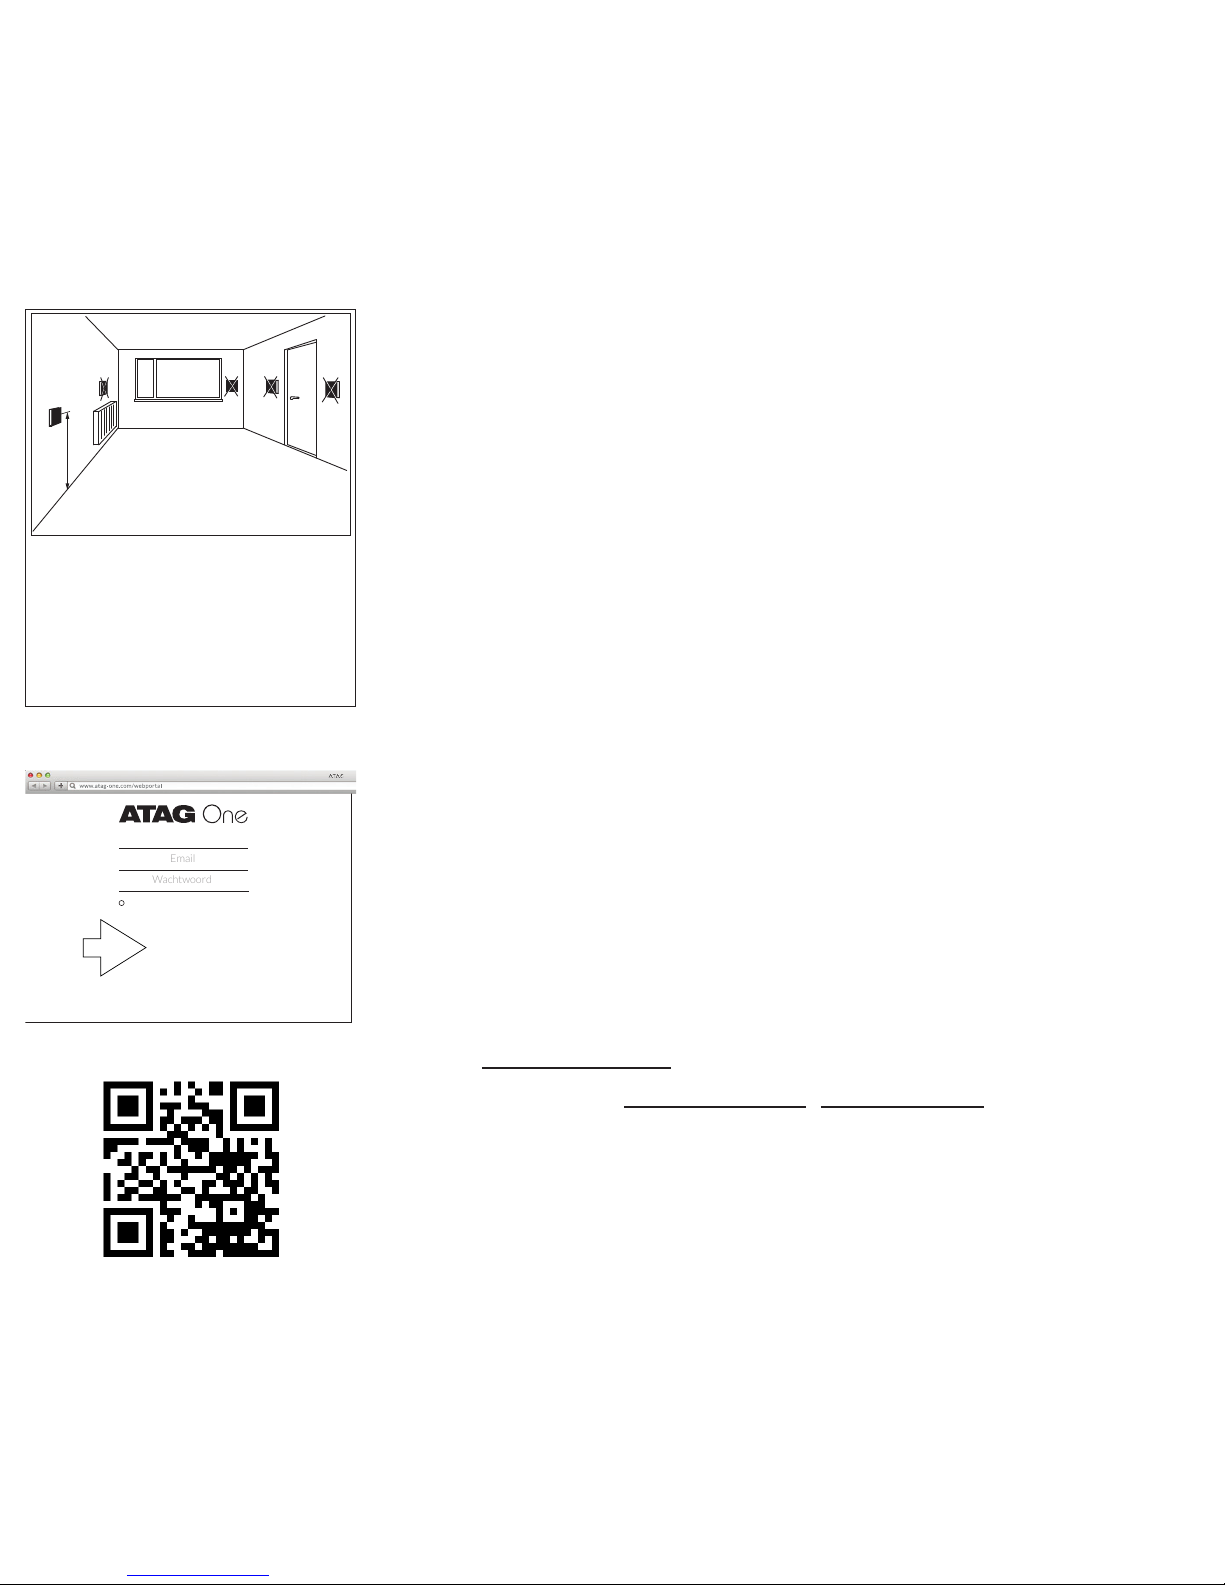
150cm
Plaatsing
De thermostaat mag niet
beïnvloed worden door zonlicht,
een kunstmatige lichtbron, warm-
tebron of door sterk variërende
luchtstromen.
Bekijk de instructielmpjes op
het ATAG Verwarming Youtube-
kanaal
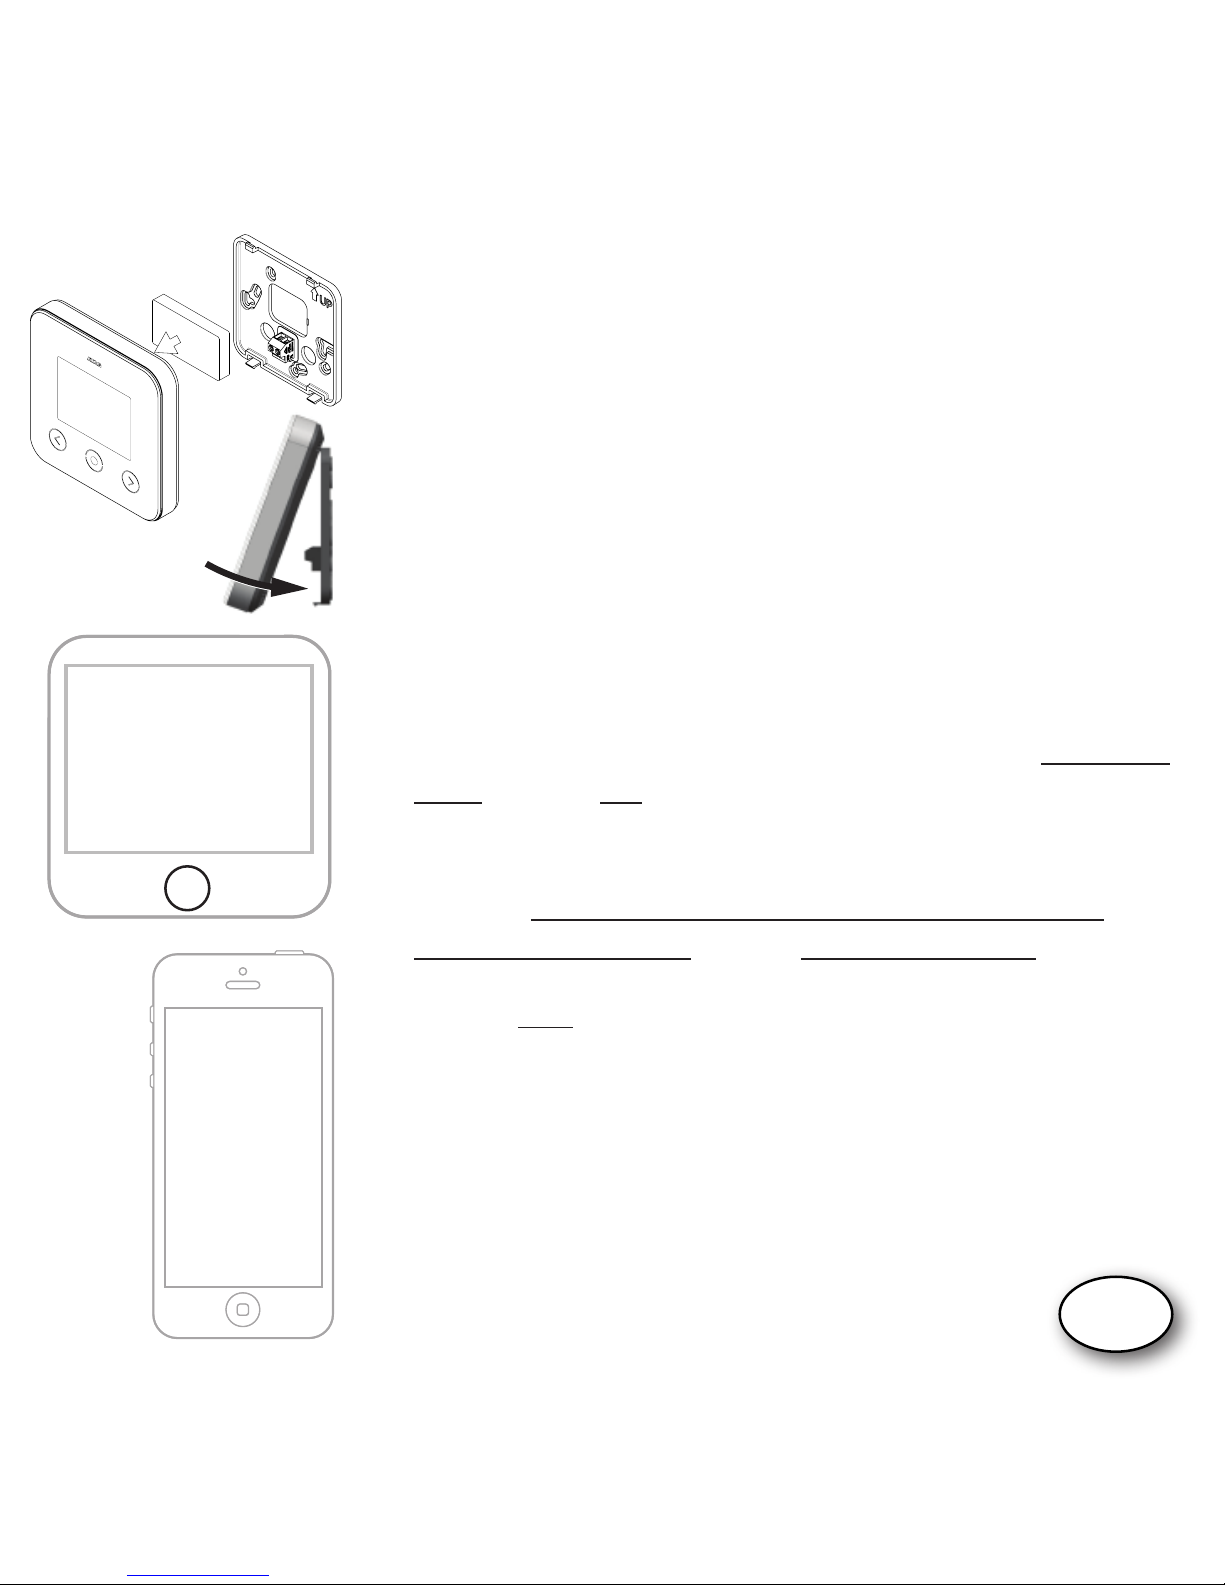
1. Installeer ATAG One:
- Schroef de grondplaat van de ATAG One (op de plaats
van de oude thermostaat) tegen de muur.
- Schakel de netspanning naar de cv-ketel uit.
- Sluit de ATAG One aan op de ketel. Indien van toepas-
sing: zie hiervoor het aansluitschema bij de BCU voor
voeding en thermostaataansluiting.
- Druk de batterij op zijn plaats. Haak en klik de ATAG
One vast op de grondplaat en schakel daarna de
netspanning naar de cv-ketel in.
2. ATAG One thermostaat:
Bij eerste opstart:
Kies de gewenste taal en volg de stappen tot VERBIN-
DEN en kies: JA*.
(Bij reeds aangesloten One en u wilt P-nummer en
installateursgegevens invoeren of controleren:
Ga naar INSTELLINGEN/CONFIGURATIE/WI-FI
RECONFIGURATIE en kies VERBINDEN: JA).
*Kiest u NEE dan volgen een aantal stappen voor het instel-
len van de datum en tijd. De One wordt dan niet verbonden
met het Wi-Fi netwerk en functioneert ofine als kamer-
thermostaat.
3. Start One-app.
- Voer het emailadres met wachtwoord van uw installa-
teursaccount in.
- Druk op INLOGGEN NL
VERBINDEN
Wilt u nu met uw
One app verbinden?
Ja Nee
Onthoud inloggegevens
E-mailadres
Wachtwoord Reset
Inloggen
Gebruiker registreren
Wi-Fi conguratie
Inloggen overslaan

4. Ga naar INSTELLINGEN-WIFI van uw smartphone/
tablet.
Selecteer ATAG One XXXXX en wacht tot het vinkje
wordt getoond.
5. Ga terug naar One-app:
- Druk op ZOEKEN;
- Selecteer: “ONE xx-xx-xxx-xxx”
(xxxxxx is het serienummer van de One thermostaat)
- Druk op VERBINDEN
6. De blauwe toets op de One thermostaat licht op en
vraagt om bevestiging.
- Druk op de blauwe toets om de vraag op het scherm
te bevestigen.
7. Ga naar Instellingen ( ) op One-app
- Druk op Service Menu
- Druk op Verander het P-nummer voor het controle-
ren of invoeren van het P-nummer van de aangesloten
cv-ketel.
- Druk op VERSTUUR CONTACT INFO indien u de
contactgegevens van uw bedrijf wilt achterlaten (Dit
is de rmanaam en het telefoonnummer die u reeds
bij het aanmaken van uw account in de portal hebt
ingevoerd).
- Druk op UITLOGGEN en sluit de app.
VERBINDEN
VERBINDEN
UwXXX
probeert
verbinding tot stand te
brengen. Toestaan?
JA NEE
XX:XX
Instellingen
Instellingen voor uw One
Algemeen >
Verwarming >
Warm water >
Account >
Service Menu >
UITLOGGEN

- Druk op de blauwe toets van de One thermostaat:
‘Verbindingsproces afgebroken. Opnieuw proberen?’
- Kies NEE
- Druk nogmaals op de blauwe toets om terug te keren
naar het standaard uitleesscherm.
Controleer op de One thermostaat of alle gegevens aan-
wezig zijn en of alles functioneert:
- Ga naar INSTELLINGEN/INFORMATIE/SYSTEEM
Bij P-# moet het (ingevoerde) P-nummer van de ketel
staan.
Bij INSTELLINGEN/INFORMATIE/ONDERSTEU-
NING treft u uw bedrijfsnaam en telefoonnummer
aan.
- Zet de One thermostaat weer in het standaard uit-
leesscherm door TERUG te kiezen.
De batterij bevindt zich achter op de ATAG One. Indien nodig is
de batterij te vervangen. Volg daarvoor onderstaande aanwij-
zingen:
1. Trek de ATAG One aan de onderzijde naar voren en til deze
van de haken aan de grondplaat. (NB: niet recht van de
muur trekken. Dit kan de grondplaat beschadigen!)
2. De batterij zit op de achterzijde van de ATAG One. Plaats
uw vinger in de half ronde uitsparing, duw het klemmetje
naar buiten en til tegelijk de batterij uit de behuizing.
3. Plaats de nieuwe batterij door deze eerst onder een hoek
onder de uitsparingen te schuiven en vervolgens bij
het klemmetje in de behuizing te klikken.
Batterij vervangen
INFORMATIE
.............................
........................
ONDERSTEUNING
SYSTEEM
..............
NL

Welcome to ATAG One, the thermostat.
You have received a package which contains 1 or 2 boxes:
- Box 1: - ATAG One thermostat
- Base plate
- Battery
- Screws and plugs
- Manual for the Installer
- Manual for the User
- Safety and Warranty Document
- Box 2*: - ATAG BCU boiler connection unit
- Mounting and connection materials
- A connection scheme
* Box 2 can be optional.
Do you install ATAG One for the rst time?
a First create an installers account.
Go to portal.atag-one.com
Select REGISTER and ll out the questionnaire.
NOTE: Choose Installer at Account type
b
Download One-app on your smart phone and/or tablet.
Go to Playstore/Appstore and search for: atag one.
Proceed at position 1 when you already have an installer
account and downloaded One-app.
150cm
Placement
The thermostat may not be
affected by sunlight, articial
light, heat or by widely varying
air currents.
REGISTER
Forget Password
Remember
Username
Password
LOGIN
If you don’t have an account yet
Watch the instructions video on
Youtube.

GB
1. Install ATAG One:
- Screw the base plate of the ATAG One against the wall
(at the place of the old thermostat).
- Turn off the power supply to the boiler.
- Connect the ATAG One to the boiler. When necessary:
see the connection scheme of the BCU for connecting
the power supply and thermostat cables.
- Place the battery in ATAG One. Hook and click the
ATAG One to the base plate and switch on the power
supply to the boiler.
2. ATAG One thermostat:
At rst start:
Select your language and follow all steps until
CONFIGURE and select: Yes*.
(In case ATAG One is already connected and you want
to leave or check the P-number and installer data:
Go to SETTINGS/CONFIGURATION/WI-FI
RECONFIGURATION and select CONFIGURE: YES).
*In case you select NO a few steps have to be done to adjust
time and date. The ATAG One is not connected to the Wi-Fi
network and will function ofine as a room thermostat.
3. Start One-app.
- Enter the email address and the password of your
installer account.
- Press LOGIN
CONFIGURE
Would you like to connect
your One app now?
Yes No
Remember me
E-mail address
Password Reset
Login
Registrer user
Wi-Fi conguration
Skip login

4. Go to SETTINGS-WIFI of your smart phone/tablet.
Select ATAG One XXXXX and wait until the check
mark is displayed.
5. Return to One-app:
- Press SEARCH;
- Select: “ONE xx-xx-xxx-xxx”
(xxxxxx is the serie number of the One thermostat)
- Press CONNECT
6. The blue button on the One thermostat will light up
and ask for conrmation.
- Press the blue button to conrm the prompt on the
screen;
7. Go to Settings ( ) on One-app
- Press Service Menu
- Press Set the P-number to check or to enter the
P-number of the connected boiler.
- Press SEND CONTACT INFO to leave behind the
contact information of your company (This is the
company name and phone number you already
entered when you created your account in the portal):
- Press LOGOUT and close the One-app.
- Press the blue button on the One thermostat:
‘Conguration cancelled. Retry?’
SEARCH
CONFIGURE
Device XXX
is trying
to connect. Allow?
YES NO
XX:XX
Settings
Settings for your One
General >
Heating >
Hot water >
Account >
Service Menu >
LOGOUT

- Select NO
- Press the blue button again to return to the default
readout screen.
Check the ATAG One thermostat if all data are available
and everything is working:
- Go to SETTINGS/INFORMATION/SYSTEM)
At P-# the (entered) P-number of the boiler should be
visible.
At SETTINGS/INFORMATION/SUPPORT you will
nd your company name and phone number.
- Set the thermostat back to the default readout by
selecting BACK.
The battery is situated on the back side op the ATAG One.
When necessary the battery can be replaced. Following the
instructions below:
1. Pull the ATAG One at the bottom towards you and lift it
from its hooks of the base plate. (NOTE: Do not pull strait-
wards from the wall. This will damage the base plate!)
2. The battery is on the back side of the ATAG One. Place
your nger in the half round spacing, press the clamp to the
outside and lift the battery from its place.
3. Place the new battery under an angle in its spacing and slide
it in its place by clicking it into the clamp.
Battery replacement
INFORMATION
.............................
........................
SUPPORT
SYSTEM
..............
GB

Willkommen bei ATAG One, Ihrem Thermostaten.
Sie haben eine Verpackung erhalten, die aus 1 oder 2 Karton(s)
besteht:
- Karton 1: - ATAG One Thermostat
- Grundplatte
- Batterie
- Schrauben und Dübel
- Montageanleitung für den Installateur
- Gebrauchsanweisung für den Endgebraucher
- Sicherheits- und Gewährleistungsdokument
- Karton 2*: - ATAG One BCU Kesselanschluss-Einheit
- Montage- und Anschlussmaterialien
- Anschlussschema
* Karton 2 kann optional sein.
Installieren Sie einen ATAG One zum ersten Mal?
a Dann erstellen Sie zunächst ein Installateurkonto.
Besuchen Sie die Website portal.atag-one.com
Wählen Sie REGISTRIEREN und füllen Sie alle Felder aus.
Achtung: Wählen Sie bei Kontotyp: Installateur
b Laden Sie die ATAG One-App auf Ihr Smartphone und/oder
Ihren Tablet-PC.
Besuchen Sie den Google Playstore/Apple Appstore und
geben Sie den Suchbegriff atag one ein.
Fahren Sie mit dem Schritt 1. fort, nachdem Sie ein
Installateurkonto angelegt und die ATAG One-App
heruntergeladen haben.
150cm
Platzierung
Der Thermostat darf nicht durch
starkes künstliches oder Sonnen-
licht, große Wärme sowie stark
wechselnde Luftströmungen
beeinträchtigt werden.
REGISTRIEREN
Reset
Passwort speichern
E-Mail-Adresse
Passwort
LOGIN
Wenn Sie noch keinen Account haben
Sehen Sie sich die
Instruktionslme auf dem
YouTube-Kanal von ATAG
Heizung an
Autres manuels pour One
5
Table des matières
Langues :
Autres manuels Atag Thermostat

Atag
Atag CT200001 Manuel utilisateur

Atag
Atag EaZy Manuel utilisateur

Atag
Atag MadQ Comment utiliser

Atag
Atag One Manuel utilisateur

Atag
Atag One Manuel utilisateur

Atag
Atag WIZE Manuel utilisateur

Atag
Atag NEOZ Manuel utilisateur

Atag
Atag One Manuel utilisateur

Atag
Atag One Zone Manuel utilisateur

Atag
Atag One Manuel utilisateur


Manuels Thermostat populaires d'autres marques

EWELLY
EWELLY EW-181 Manuel utilisateur

Prolon
Prolon T1100 Instructions d'installation

Computherm
Computherm Q20 Manuel utilisateur

Heatmiser
Heatmiser neoStat Manuel utilisateur

Aube Technologies
Aube Technologies TH111GFCI-NP 240 VCA Manuel utilisateur

Mars
Mars HEAT CONTROLLER IR Wireless Thermostat Manuel utilisateur


