Zorlu VAD 955 TXS Manuel utilisateur

COOKER HOOD
USER MANUAL

2
r product.

33

5
0
0
598,898
250
262
Min675 Max1055
83
20400
600
2080
1)
2)
3)
5)
Internal Chimney
External Chimney
Control Panel
Cooker Lighting
Aluminum Cassette Filter
4)
2580
400
500
262
250
20
32
Max 895 Min 512
495
598,898
898
500
80
250
262
80
400
600
20
25
Min 667 Max 1047
500
598,798,898
250
Min 635 Max 915
2080
500
400
20
40
262
4
1
2
3
4
5
1
2
43
5
1
2
3
45
1
2
3
INTRODUCTION OF DEVICE
MODELS
ADB-9010
ADX-9005
VAD 955 TXS
ADX-6005
VAD 655 TXS
ADX-9007
ADX-7007
ADX-6007
ADX-9006
ADX-6006
ADW-9010

*Before you take pot, fry-pan etc. from the hob,
put their lids on.
*Do not leave hot oil on the hob. Pots that have
hot oil in them may cause selfignition.
*Pay attention to curtains and covers during
cooking of meals like frying because oil may
flare up.
*Make sure that filters are changed in
convenience. Filters that are not changed at
appropriate time has risk of causing fire due to
oil that will be gathered on them.
*Do not use filter materials that are not flame
resistant instead of filter.
*Do not operate your product without aluminum
filter; do not remove filters when the product is
on.
*In case of flame, cut power of the product and
the cooking appliances. (Cut power of the
product by plugging it off the socket).
*Your product may cause fire risk if cleaning is
not applied periodically.
*Cut power of the product before maintenance
process. (Cut power of the device by unplugging
it)
*When chimney hood and the appliances
working with energy other than electricity are
operated at the same time, negative pressure in
the room should not be more than 4 Pa (4 x 10
bar)
*If there is an appliance working with fuel or
gaseous fuel at the same place with your hood,
this appliance's exhaust should be isolated from
its volume totally and the appliance should be
hermetic type.
*When chimney connection is applied to your
product, use ducts of 150mm or 120mm
diameter. Duct connection should be as short as
possible and should include few bends.
*This product is designed for usage at home.
*Your products usage voltage is 220-240
Volts~50Hz
*Grounded plug is used at your product's
electric network cable. This cable should
definitely be plugged in a grounded socket.
*All electrical networks should be set by a
qualified electrician.
*Installation applied by unauthorized people
may cause the product to operate at low
performance, damage of the product and
accidents.
*Power supply cable should not be exposed
to press or smash during montage. Network
cordon should not be placed near the
cookers; it may cause fire if it melts.
*Do not plug into the socket before
installation of the product is completed.
*Keep the plug at a reachable place so that
you can unplug it in case of any danger.
*Do not touch the lamps when they are on for
long time. Lamps may hurt your hand as they
will be hot.
*Kitchen cooker hoods are designed for
usage during normal and home-style
cooking. If it is used for other purposes,
failure risk occurs and it will be out of
warranty.
*Follow applicable rules and directions for
passing out outlet air. (This warning is not
valid for usage without chimney.)
*Flaming foods should not be cooked under
the product.
*Start your product after you put pot, fry-pan
etc. on the hob. Otherwise high temperature
may cause some parts of your product to get
deformed.
-5
5
WARNINGS AND SAFETY PRECAUTIONS

*Keep package materials away from
children as they may be dangerous for
them.
*Be sure that your child does not play with
the product. Do not allow kids to use your
product.
*If power supply cable is damaged, this
cable should be changed by its producer or
its service agency or a personnel who is a
specialist at the same level in order to
prevent a dangerous situation.
Warning about Transportation and Carriage
*All the materials used at package of your product are suitable for recycling.
*Please comply with the signs on the product's box during transportation.
*Hold the holders placed at sides of the box in order to carry your product.
If you need transportation;
*Keep the original box.
*Carry your product in its original box; comply with the carrying signs on the product's box.
If there is no original package;
*Do not put heavy material on the chimney hood.
*Keep the external surface from bash.
*Pack your product to avoid damages.
Installation, taking off your product from its package:
*Check if there is any deformation on your product.
*Transportation damages and failures should immediately be reported to the transportation
responsible.
*If you notice any damage please report to the seller.
*Do not allow children to play with packing material!!!
*In case of flame, cut power of the cooker
hood and the cooking appliances, cover the
flame. Never use water in order to
extinguish it.
Use “MAX 6 A” fuse at cooker hood
installment for your security.
“CAUTION: Accessible parts may become hot when used with cooking appliances”
''The appliance is not to be used by children or persons with reduced physical,
sensory or mental capabilities, or lack of experience and knowledge, unless they have
been given supervision or instruction''
6

Standard Accessories
Plastic Outlet (Figure 1)
Plastic outlet mounted to air outlet of the cooker hood
Min.65 cm
Min.75 cm
Place of the Product:
After installation of your product, distance between
range hood and electrical hob should be at least 65
cm and gas hobs at least 75cm. Figure 2
Installation, taking off your product from its package:
*Check if there is any deformation on your product.
*Transportation damages and failures should immediately be reported to the transportation
responsible.
*If you notice any damage please report to the seller.
*Do not allow children to play with packing material!!!
Installing Hanging Bar
There are 2 L shaped hanging bars in to install your product,
provided with screws. Fix bars on product body via M5 x 35
screws into M5 turn screws (Figure 3).
M5 x 35 Ysb
Screws
Hanging bar
Figure 1
Figure 2
Figure 3
7

Installing Plastic Outlet
Install plastic outlet to top of motor cabin via 3,5x9,5 screws
(Figure 4).
3,5 x 9,5 RYSB
Screws
Ø 8 mm
Ø 6 mm
Drilling Mounting Holes
Attach mounting schemeon the wall and drill holes on points
marked as A,B,C via Ø8 mm driller. To install chimney part, use
Ø6 mm driller by taking reference of min./max. height
dimensions .
WARNING : During drilling the hanging holes , please pay attention to the diameter of the
holes to be used for hanging the hood.
If the diameters of hanging holes are not as pointed , the hood can not be assembled properly.
Hood Hanging
Holes
Ø 8 mm
Outlet Connection
Holes
Ø 6 mm
A
B
C
D
E
Nailing Dowels
Nail Ø10 mm dowels into A,B,C holes drilled as Ø8 mm.
Place Ø6 mm dowels on two holes, drilled as Ø6 mm
(Figure 5)
for 60-70-90cm models, drill holes on points marked as
G,H and nail Ø10 mm dowels into it.
10 mm Plastic
dowel
6 mm Plastic
dowel
Figure 4
Figure 5
8

A
B
C
D
E
Chimney Fixing Bar Screws;
Drill holes on the wall via Ø6 mm driller. Fix the chimney fixing
bar via 3,9 x 22 Ysb screws on Ø6 mm plastic dowels.
Drill holes on the wall via Ø10 mm driller. Fix 2 pcs of 5,5 x 60
Ysb screws onA,B points on Ø10 mm plastic dowels.
The distance between the wall and screw top should be 5mm.
Figure 6
5,5 x 60 Ysb
Screw
3,9 x 22 Ysb
Screw
Placing Range Hood on The Wall
Hang L shaped hanging bars on Aand B points (Figure 7)
A
B
DE
DE
A
B
Note: You may fine tune parallelism by easing M5 screws on
the top.
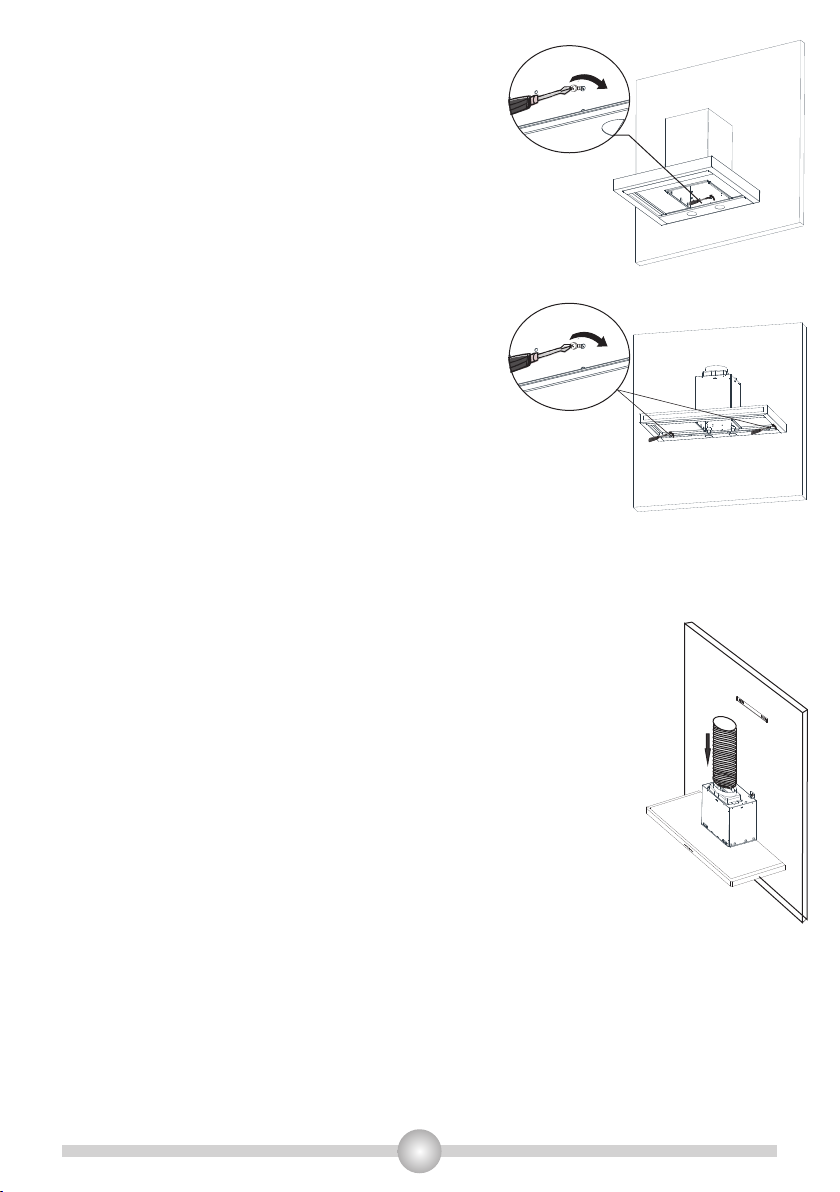
Tighten the Hanging Screws:
Tighten screws after hanging to fix your product via
screwdriver. You may use the M5x40Ysb screws to have fine
tune parallelism of hood. Figure 8
Figure 6
Figure 7
Figure 8
9
C
C
Tighten the Hanging Screws:
Fix product onto wall from point C with 5,5x60 Ysb screw in
order to ensure your product is safely installed. Figure 9
Installing Aluminum Flexible Pipe:
Connect aluminum flexible pipe to outlets on the product
and kitchen wall.
Please make sure that this connection is strong enough not
to break when the hood is on in the highest level. Figure 11
Figure 9
Figure 11
Fix product onto wall from point G,H with 5,5x60 screws
in order to ensure your product is safely installed. Figure
10
G - H
Figure 10
10
3112-3125-3130-3178 models / 60-70-90cm models;
Ce manuel convient aux modèles suivants
8
Table des matières
Autres manuels Zorlu hotte de ventilation


