Yotobike Leopard Manuel utilisateur

Yoto Leopard
Electric Mountain Bike
Owner's Manual

Content
About This Manual ······························································································ 1
6
7
8
16
17
20
25
25
2
Yoto Leopard Specifcations ·····················································································
5
Yoto Leopard Assembly Instructions ··············································································
Recommended Torque Values ····················································································
Assembly Instructions ···························································································
Front Wheel Fork Installation ····················································································
Post-Assembly Registration ·····················································································
Safety Checklist ·································································································
LCD Display Functions Overview ·················································································
Status Codes List ·······························································································
Quality & Warranty ······························································································
31
Riding Modes ···································································································
33
Safety and Bike Care Instructions ················································································

Welcome to your Yotobike experience. Inside this manual, you'll find comprehensive information on the product's features, operational guidelines,
maintenance tips, and important safety instructions. To guarantee your safety and maintain your bike's longevity, please review this manual
thoroughly before riding. Keep this manual handy for future reference, as it's your go-to resource for all things Yotobike.
For your safety, pay close attention to sections marked with "Caution" (in orange) and "Warning" (in red):
Riding Safety & Limitations
Caution: Orange alerts indicate potential moderateto
serious injury risks if instructions are disregarded.
Warning: Red notices signify critical safety risks that
could result in severe injury or even death if ignored.
Additionally, sections beginning with "NOTICE"
contain essential information that requires your attention.
Please be aware that while this manual provides extensive safety and operation guidance, it can't cover all possible riding scenarios. Riding a bicycle
always involves unforeseen risks and situations that are the rider's responsibility. Always keep this manual and any related documents for reference.
The recommended rider age for this bike is 16 to 70 years. Riders should be able to sit comfortably on the Yotobike. For those who require assistance,
we advise the service of a processional bike trainer.
Manual Updates
Please note that the content of this manual might be updated or withdrawn at any time, For the most recent version, visit Yotobike com.
1
About This Manual

Rear Derailleur
Rear Hydraulic Brakes
Seat Battery
LED Headlight
Front Hydraulic Brakes
Motor
Head Tube
Rear Shock
Front Suspension Fork
2
Controller
Yoto Leopard Specifications
Handle
Throttle
LCD Display
Power Button
Shimano Shifter
Brake Lever

A - Total Length 82.6 Inch
B - Handlebar Height 46.5 Inch
C - Wheelbase 55.1 Inch
D - Min Seat Height 32 Inch
E - Max Seat Height 37 Inch
F - Chain Stay Length 20.8 Inch
G - Standover Height 31.4 Inch
H - Top Tube Length 24 Inch
I - Wheel Diameter 28.7 Inch
J - Head Tube Length 6.3 Inch
K - Handlebar Length 27.6 Inch
I
I
I
3

US Standard 3.0A Smart Charger
60-80
48V 20Ah Battery with Samsung Cells
miles 48V/25A
1000W Brushless Gear Hub Motor LCD Display with USB Charging
400 lbs 70 lbs
5'3" - 6'5" 0-5 Level Pedal Assist
26" x 4.8" CST Fat Tires Thumb Throttle
Aluminum Alloy Comfort Grip Levers with
Motor Cut OffSwitch
Alloy Front Suspension Fork with Lockout and
Adjustment
Battery-Powered Taillight Alloy Pedal with Reflectors
Shimano 7 - Speed Gear Shift System 6061 Aluminum Frame
180mm Hydraulic Brakes 48V LED Light
SR Saddle
ProMax MA-400 SSABK
φ31.8 mm*300 mm Alloy Seatpost
Heavy-Duty Aluminum
170mm Forged Alloy
Shimano 14-28 T BROWN/ BK
Battery
Range
Motor
Total Payload
Capacity
Rider Heights
Tires
Brake lever
Taillight
Freewheel
Brake
Stem
Crankset
Gearing
Charger
Controller
Display
Weight
Pedal Assist
Intelligent
Throttle
Front Fork
Pedal
Bike Frame
Headlight
Saddle
Seatpost
Kickstand
13 Gauge Front / 12 Gauge Fear
Spokes
4
NOTICE: 1. Please Retain the original packaging for a minimum of 15 days for potential returns or warranty claims.
2 . We recommend removing the battery prior to bike assembly for the following reasons:
• To verify if there was any battery discharge or damage during shipping.
• To lessen the bike’s weight for easier handling during assembly.
• To prevent any accidental damage to the battery.
Bike Assembly Guide
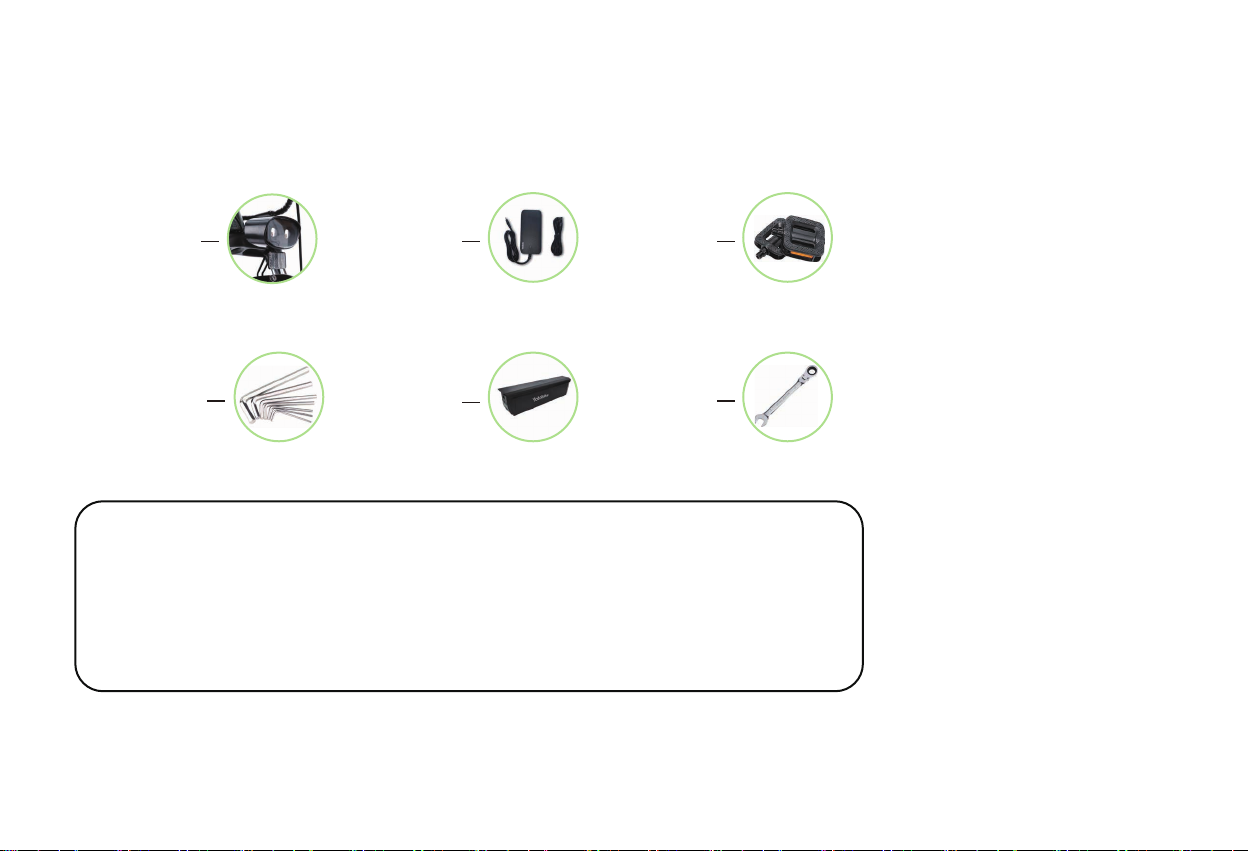
Assembly Preparation Checklist
◆
5
Headlight Charger
Mounting Toolkit
Pack
Battery
Footrest
Repair Tools

Location Recommended Torque (Nm)
Handlebars 12-18
Stem 12 -18
Bike Saddle (Seat) 12-18
Front Wheel (For Bikes with Bolts on Front Wheel)
15-22
Rear Wheel 30-38
Bottom Bracket Parts 30-50
Pedals 28-33
Disk Mounting Bolts 3-5
Disk Caliper Mount 6-8
Crank Bolts 32-36
Rear Derailleur Cable Pinch 3-5
Front Derailleur Clamp 3-6
Saddle Post Clamp 3-6
NOTICE:Do not use an impact driver to set the torque, as it may cause damage. For precise adjustments, we recommend using the provided wrench
set to manually adjust nuts and bolts.
6
Recommended Torque Values for Yoto Leopard E-Bike

◆Handlebar Installation (Requires a 4mm Hex Wrench)
7
Assembly Instructions
Step 1: Gently loosen the bolts on your bike's stem.
Step 3: Partially tighten the bolts on the handlebar stem, leaving enough slack for adjustments. Fine-tune the angle and check the positioning by testing it out.
Once satisfied with the handlebar's angle, securely tighten all bolts on the stem.
Step 2: Align your handlebars to the central marking as indicated in the image provided below.
IMPORTANT NOTICE:
While adjusting the angle, you may also modify the
handlebar height by adding or removing headset
spacers. If you're not familiar with this process,
we highly recommend seeking a professional's
assistance for safety reasons.

8
Front Wheel / Fork Installation
Step 1: Remove the black protective guard from the front fork. Then, extract the red pad designed to safeguard the hydraulic brake caliper.
Step 2: Position the wheel between the forks. Carefully align the wheel hub's axle with the fork dropouts, ensuring that it is completely seated. Additionally,
confirm that the brake rotor is correctly engaged with the brake caliper.
Step 3: Get the quick-release skewer ready for installation by detaching the thumb nut and one cone spring.
Sa fet y
Table des matières
Manuels Scooter populaires d'autres marques


First Choice Mobility
First Choice Mobility Roma Medical Corella S741 Manuel utilisateur

Carrera
Carrera impel Manuel utilisateur

Afikim
Afikim Superlight SL-3 Manuel utilisateur

CareCo
CareCo ZOOM Manuel utilisateur

Douglas
Douglas Vespa G.S. Manuel utilisateur

Gazelle
Gazelle with BOSCH System Manuel utilisateur