BAnff eProdigy series Manuel utilisateur

ASSEMBLY MANUAL
Banff
eProdigy™

TABLE OF
CONTENTS
Introduction
1
General Warnings
4
The Total Package
5
Owner’s Identication
6
Recommended Tools
7
Assembly
8
Handlebar + Stem Installation
Front Fender + Light Installation
Front Wheel Installation
Pedals Installation
Pump Tires
About the Battery
17
General Overview
Maintenance
Storage
Charging and Handling
Inserting and Removing Battery
Charging Procedure
Checking State-of-Charge

Thank you for choosing eProdigy Bikes. It is our mission to provide you with the latest in electric propulsion
technology, and inspire the joy of riding worldwide one cyclist at a time. Your Banis designed with some of the
most innovative industry thinking to provide you with the safest, most ecient and thrilling experience. Should
there be any time you are unsure about the maintenance or service process please contact your dealer for
immediate assistance. We hope you enjoy your new electrical assist bicycle, as much as we love to ride ours.
IMPORTANT: This document is meant to be used in conjunction with the eProdigy User Manual please read
this BanAssembly Manual together with the User Manual carefully to protect yourself, your bike and to
ensure you can safely enjoy the full performance of the product.
Note: It is strongly recommended to have your bicycle examined by a professional mechanic prior to riding.
eProdigy Technical Support can be reached by email at support@eProdigyBikes.com or by phone at 1-888-
928-9328 ext. 2
Hello

GENERAL
WARNING
This manual contains numerous “cautions” and“warnings”, please pay attention to these as they directly impact
either the proper use of the bicycle, avoiding potentially hazardous situations, or general safety. The WARNING
labels must be paid special regard to, failure to do so may result in serious injury or death.
t5IFDPNCJOBUJPOPGUIFTBGFUZBMFSUTZNCPMBOEUIFXPSEWARNING indicates a potentially hazardous
situation which, if not avoided, could result in serious injury or death.
t5IFDPNCJOBUJPOPGUIFTBGFUZBMFSUTZNCPMBOEUIFXPSECAUTION indicates a potentially hazardous
situation which, if not avoided, may result in minor or moderate injury, or is an alert against unsafe practices.
t5IFXPSECAUTION used without the safety alert symbol indicates a situation which, if not avoided, could
result in serious damage to the bicycle or render your warranty void.
t%POPUBEEBNPUPSUPUIFQSPEVDU
t%POPUUPXUIFQSPEVDU
t%POPUNPEJGZUIFQSPEVDU
t3FQMBDFXPSOPSCSPLFOQBSUTJNNFEJBUFMZ
t*GBOZUIJOHEPFTOPUPQFSBUFQSPQFSMZEJTDPOUJOVFVTF
04
GENERAL WARNING
www.eProdigyBikes.com

Check that your eProdigy package is correct, complete,
and undamaged.
Your eProdigy package should contain the following:
THE TOTAL
PACKAGE
05 THE TOTAL PACKAGE www.eProdigyBikes.com
Note
The Li-Ion battery & charger is shipped separately for safety
purposes.
If you ordered Baskets or other accessories, they will shipped
to you in a separate parcel as well.
eProdigy Bicycle frame
with a Coaxial Bottom Bracket Motor™ installed
Rear wheel
Rear-rack battery mount
with 2 keys installed
Handlebars with control panel display
throttle, shifter, and grips installed
Front wheel
with front Dynamo Hub installed
Seat post
with saddle installed
Headlight
Pedals
Front + Back fenders
1
2
3
4
5
6
7
8
9
1
2
3
4
4
5
6
7
8
9
9

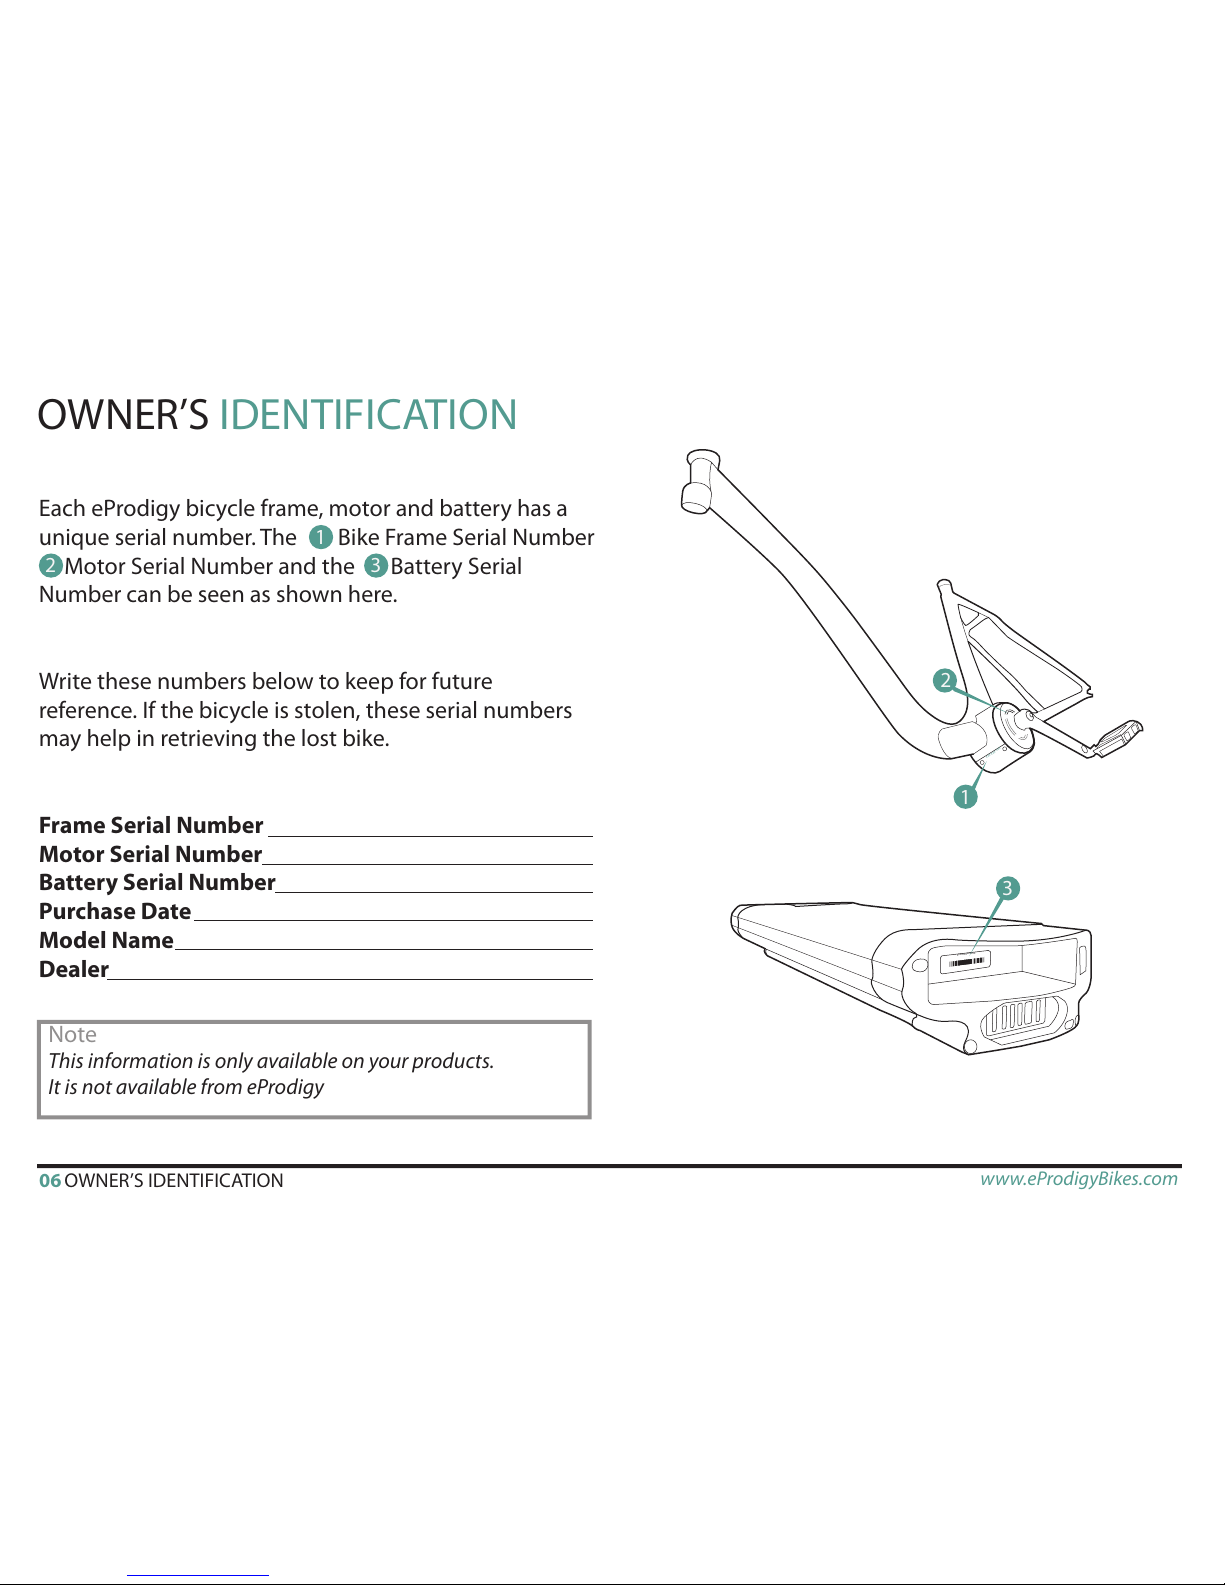
Each eProdigy bicycle frame, motor and battery has a
unique serial number. The Bike Frame Serial Number
Motor Serial Number and the Battery Serial
Number can be seen as shown here.
Write these numbers below to keep for future
reference. If the bicycle is stolen, these serial numbers
may help in retrieving the lost bike.
Frame Serial Number
Motor Serial Number
Battery Serial Number
Purchase Date
Model Name
Dealer
Note
This information is only available on your products.
It is not available from eProdigy
OWNER’S
*%&/5*'*$"5*0/
06 08/&34*%&/5*'*$"5*0/ www.eProdigyBikes.com
xxx-xxx-xxx
1
3
2
xxxxxxxxxxxxx
1
2
3

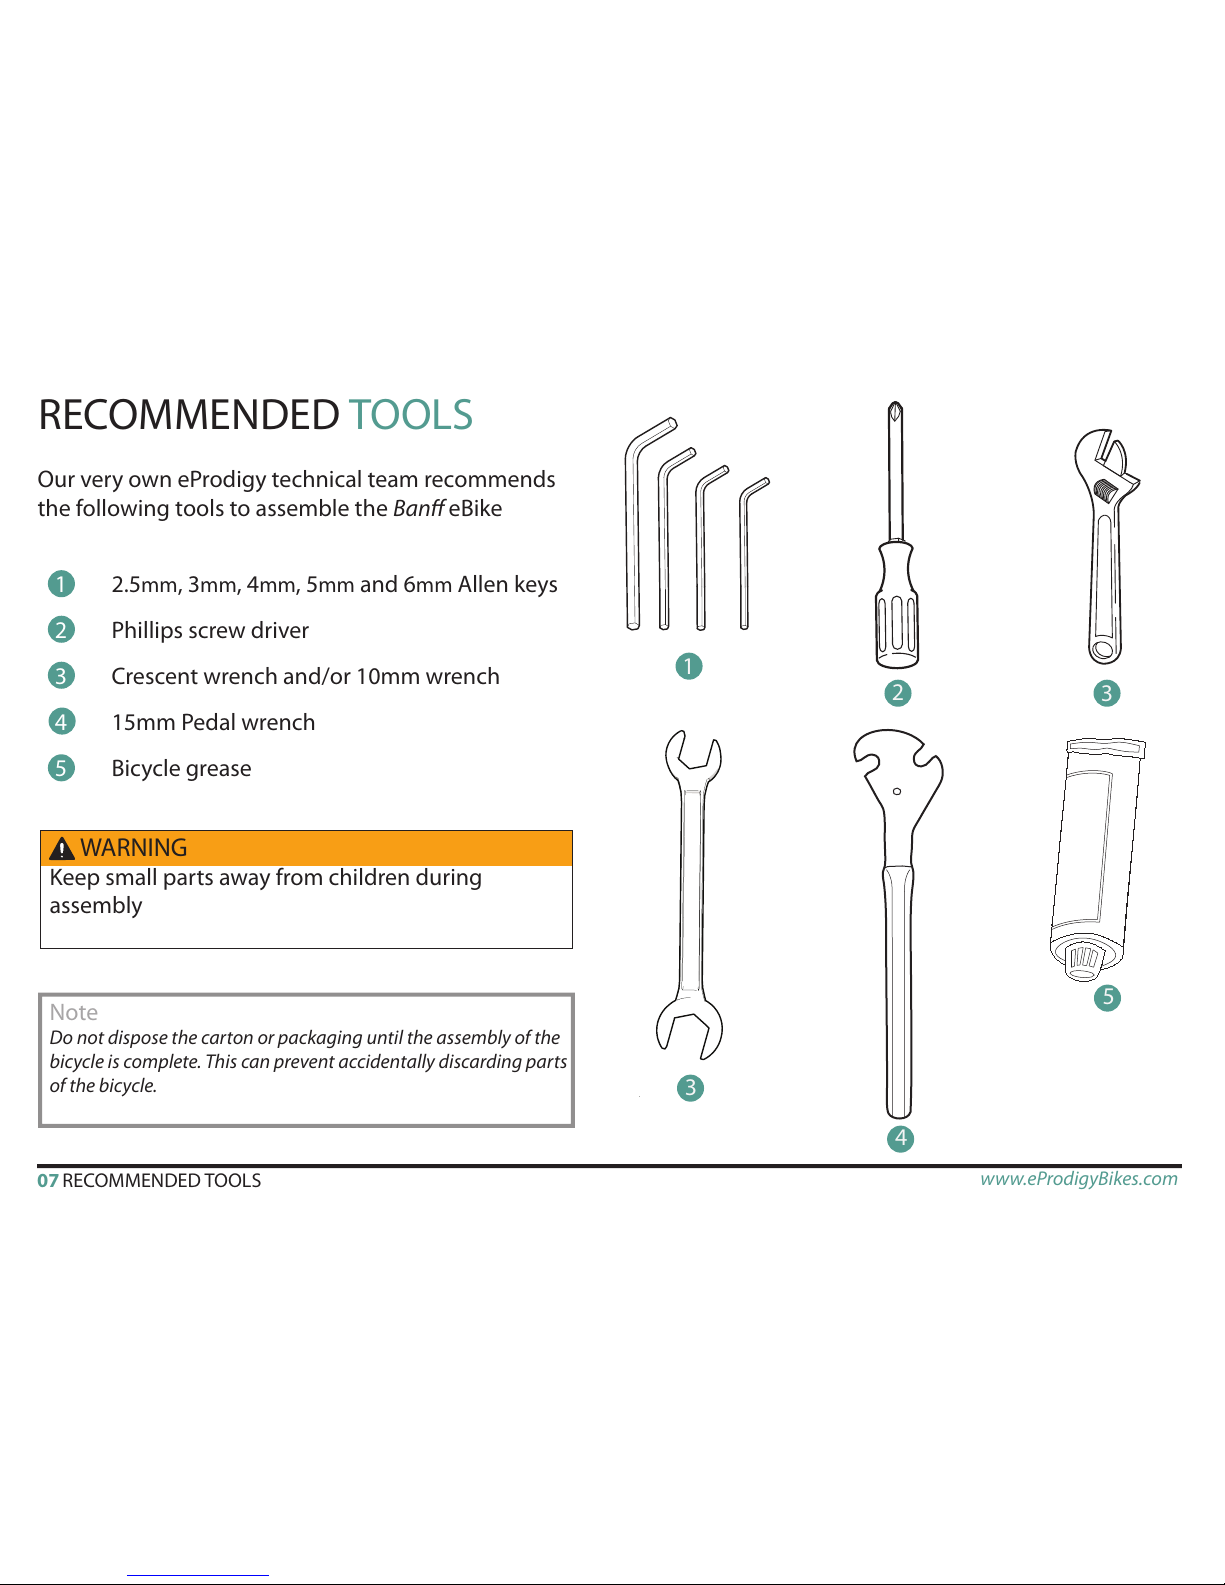
1 2.5mm, 3mm, 4mm, 5mm and 6mm Allen keys
2Phillips screw driver
3 Crescent wrench and/or 10mm wrench
415mm Pedal wrench
5Bicycle grease
3&$0..&/%&%
TOOLS
Note
Do not dispose the carton or packaging until the assembly of the
bicycle is complete. This can prevent accidentally discarding parts
of the bicycle.
07 3&$0..&/%&%500-4 www.eProdigyBikes.com
WARNING
Keep small parts away from children during
assembly
1
23
3
4
5
Our very own eProdigy technical team recommends
the following tools to assemble the BaneBike

)"/%-&#"345&.
INSTALLATION
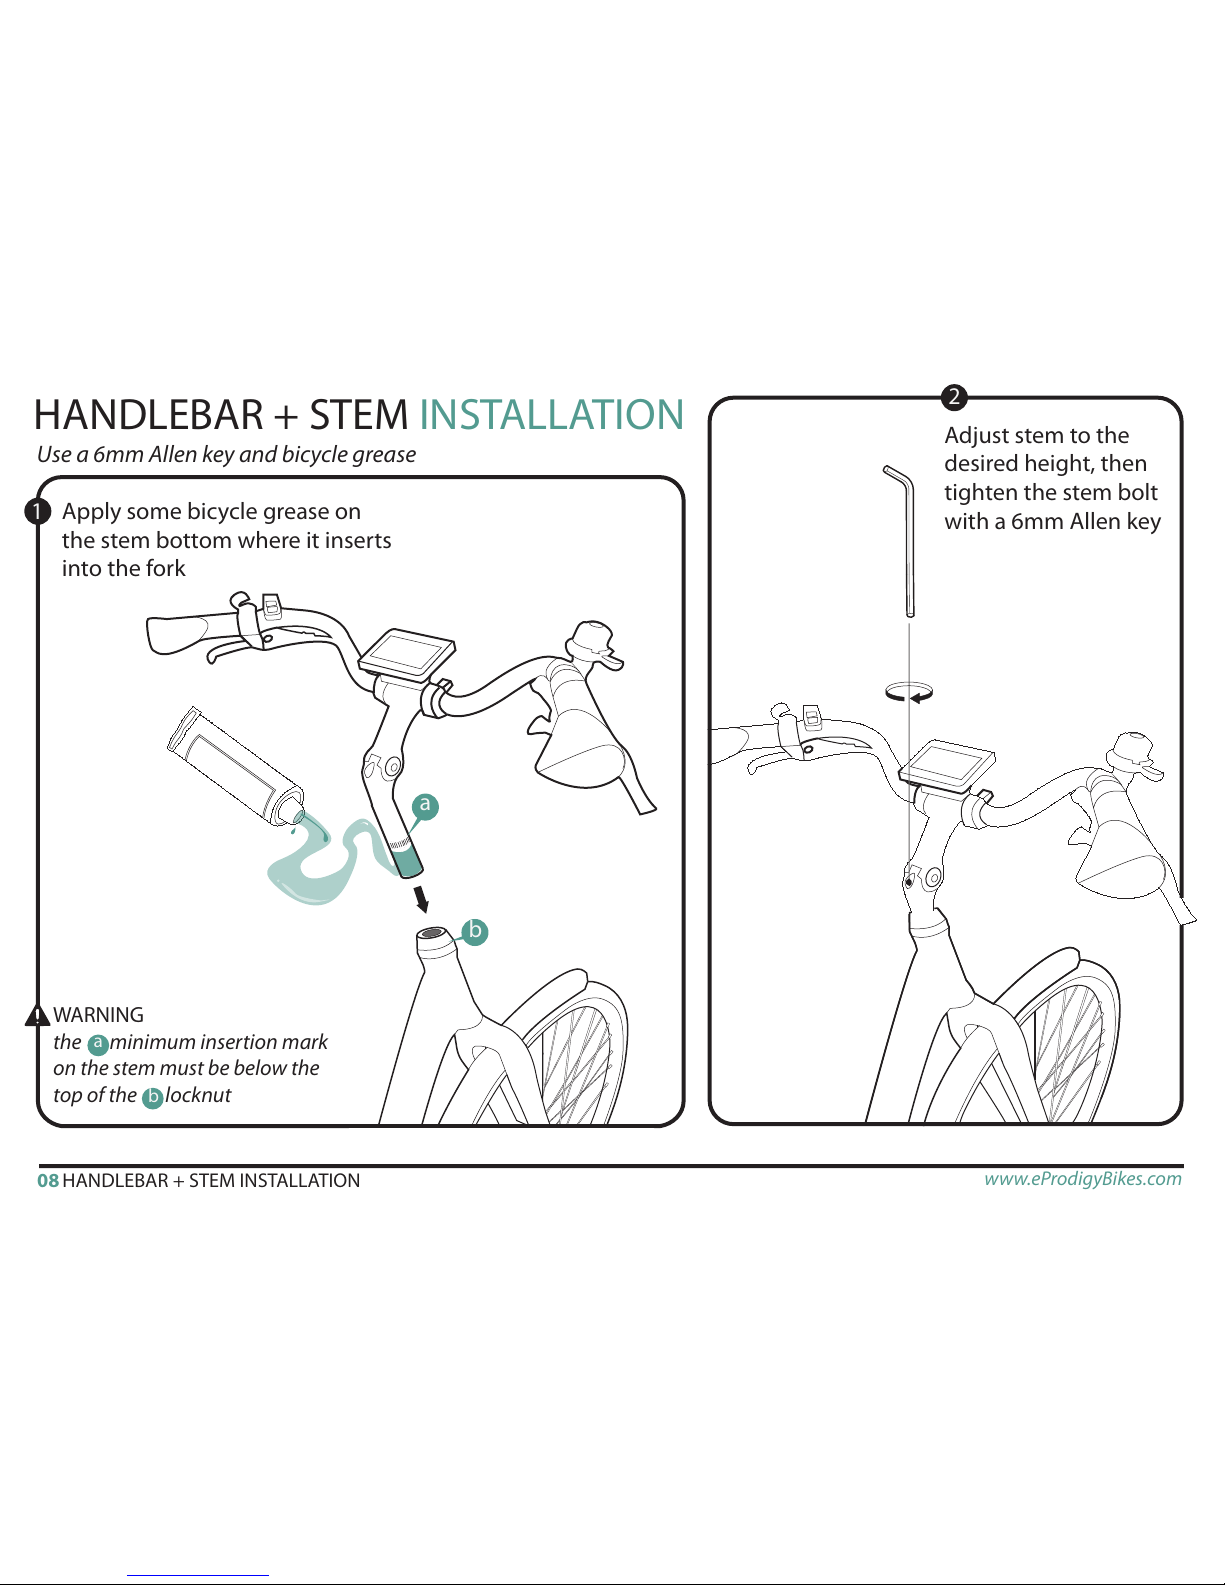
Apply some bicycle grease on
the stem bottom where it inserts
into the fork
Adjust stem to the
desired height, then
tighten the stem bolt
with a 6mm Allen key
WARNING
the minimum insertion mark
on the stem must be below the
top of the locknut
1
a
b
b
a
2
08 )"/%-&#"345&.*/45"--"5*0/ www.eProdigyBikes.com
Use a 6mm Allen key and bicycle grease

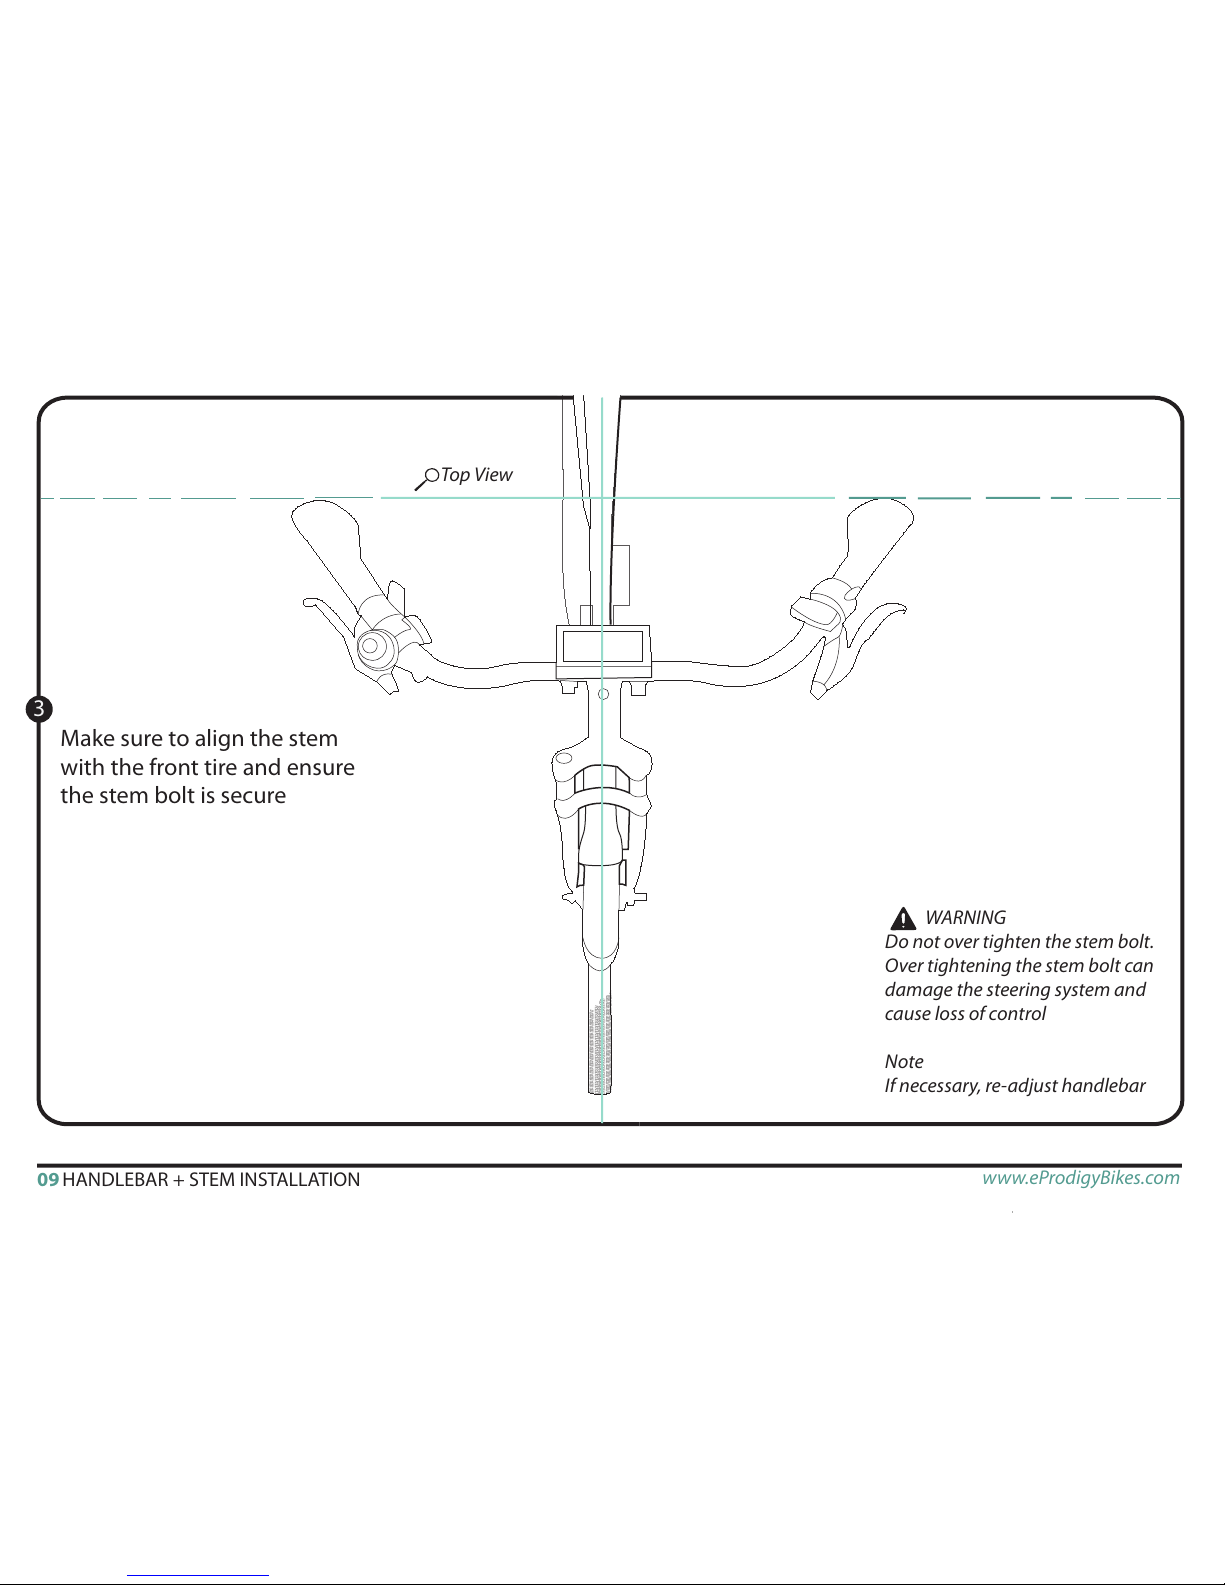
Make sure to align the stem
with the front tire and ensure
the stem bolt is secure
09 )"/%-&#"345&.*/45"--"5*0/ www.eProdigyBikes.com
WARNING
Do not over tighten the stem bolt.
Over tightening the stem bolt can
damage the steering system and
cause loss of control
Note
If necessary, re-adjust handlebar
3
Top View

10 '30/5'&/%&3-*()5*/45"--"5*0/ www.eProdigyBikes.com
'30/5'&/%&3-*()5
INSTALLATION
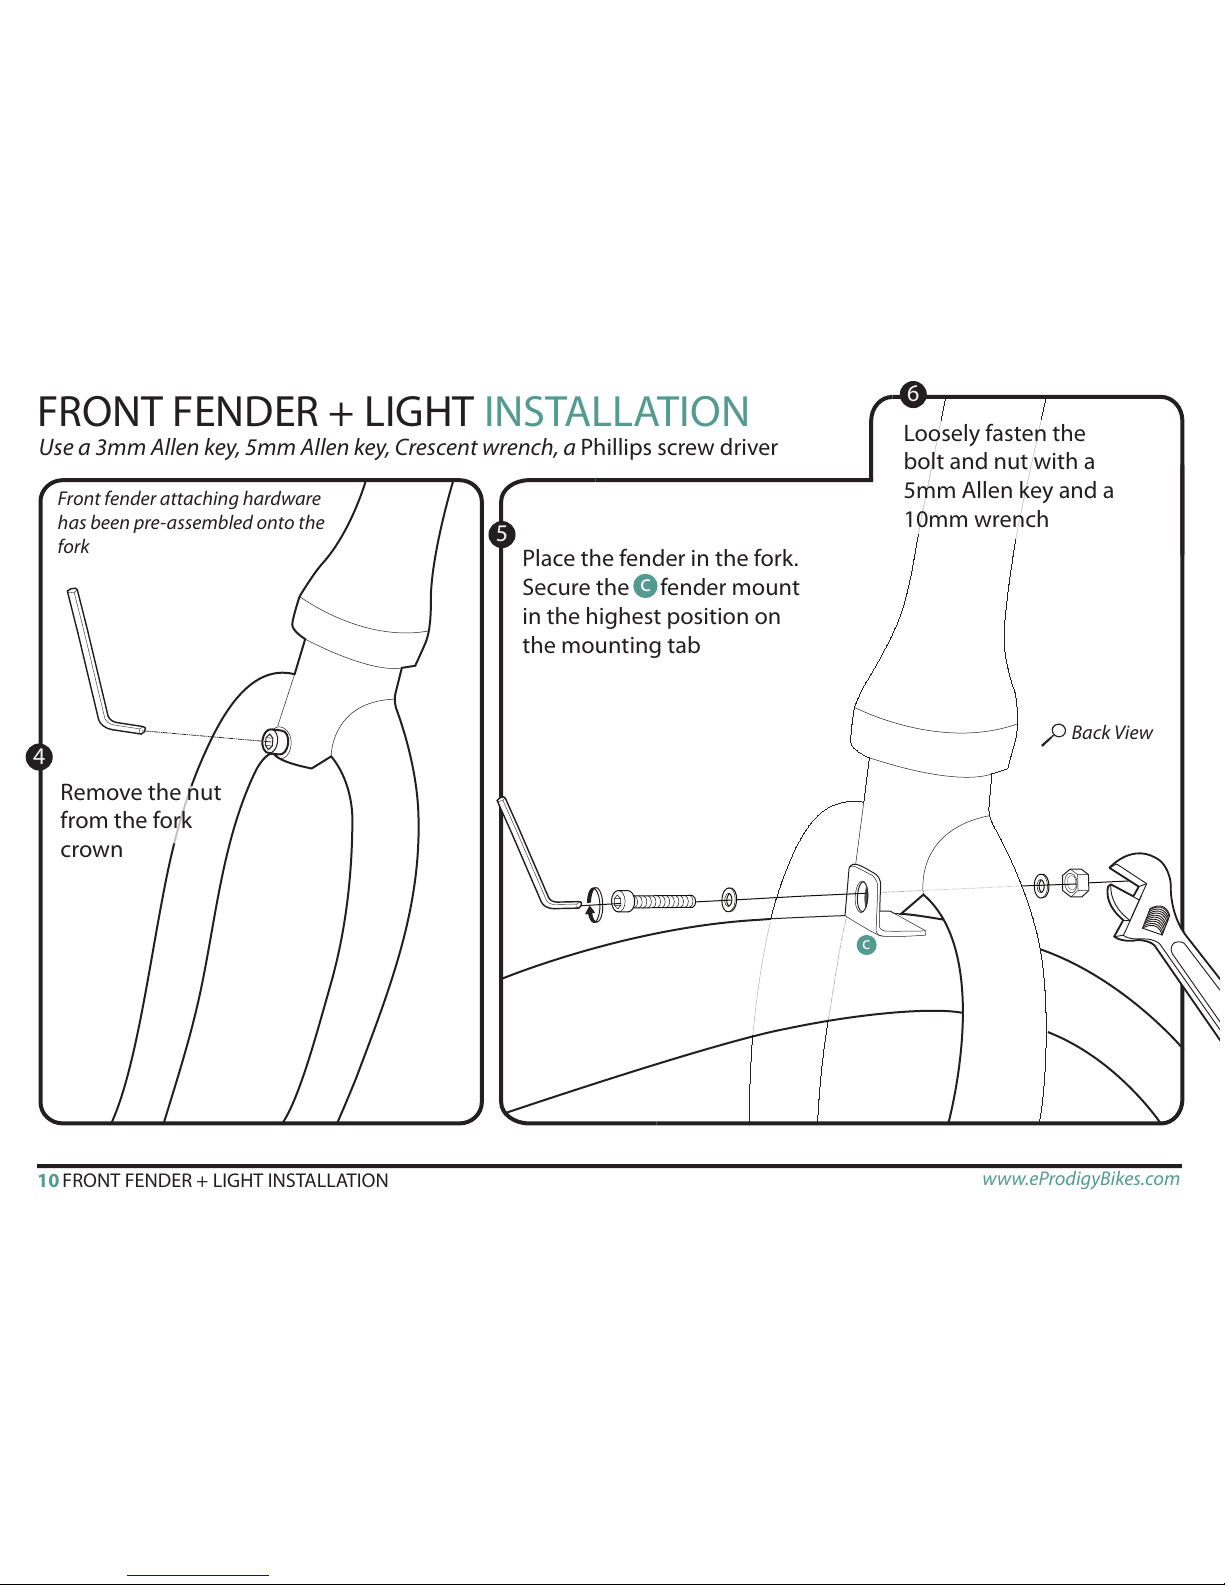
Use a 3mm Allen key, 5mm Allen key, Crescent wrench, a
Phillips screw driver
Front fender attaching hardware
has been pre-assembled onto the
fork
4
5
6
Remove the nut
from the fork
crown
c
c
Place the fender in the fork.
Secure the fender mount
in the highest position on
the mounting tab
Back View
Loosely fasten the
bolt and nut with a
5mm Allen key and a
10mm wrench
Table des matières