Wilfa E1 Manuel utilisateur

Electric Scooter
E1
User manual

1.Introduction
1.1.
Product overview
E1 electric scooter is a cool, highly efficient and economical personal commute tool. With its stylish, portable design, superb
suspension performance and powerful lithium battery, E1 electric scooter is created to give you a wonderful riding experi-
ence.
1.2.
What You Need to Know
Before you first experience your scooter, please read the USER MANUAL thoroughly and learn the basics to ensure your
safety and the safety of others.
1.3.
Signs and Words of Caution
The following descriptions are applicable all through this manual, and the "Warnings" and "Notes" deserve your special
attention.
NOTE:

2. Product Overview
E1 is a cool, highly efficient and economical personal travel tool. With its stylish and futurisc appearance,
superb shock migaon design andpowerful lithium baery, E1 is created to give you a wonderful riding
experience.
2.1.
Product Dimensions
980 mm 1095 mm
1070 mm
260mm

2.2.
Product specifications
Product model
E1
Remarks
Remarks
measured at the temperature of 25℃,
① The maximum cruising speed is
the payload of 60 kg, full electricvoltage
and flat pavement. The factors like
driving habit, environmental
temperature, road surface condition,
payload etc. will affect the maxspeed.
the temperature of 25℃, about 15km/h,
② The traveling range is measured at
the payload of 60 kg and flat pavement.
The factors like driving habit,
environmental temperature, road
surface condition, payload etc. willaffect
the continuous travel mileage.
Maximum cruising speed
20 km/h ①
Average range per charge
10-15 km②
Max. climbing angle
<10°
Net weight
10.1 kg
Load capacity
100 kg
Overall dimensions
980x432x1070mm
Battery specifications
36V/ 4.0Ah lithium ion battery
Charging requirements
100-240V 50~60Hz
Charging time
3.5-4.5 hours
Tire types
6.5 inch solid tire for the front and rear wheels.
Brake type
Electronic brake and Foot brake
Optimal operating temperature
25℃

2.3.
Product Structure&Exploded View
Display
Rubber handle
LED light Rubber handle
Handle stem
Brake button
Accelerator button
Safe lock
Folding button
Rear fender/brake
Front wheel/Motor
Kick stand
Pedal/Body
Rear wheel
WARNING!
Use of unauthorized parts and components or incorrectly installed parts and components may result in damage to E1 or
even personal injury. In order to ensure quality and safety, all parts of E1 will be subject to the approval and assured to be
correctly mounted to E1.
Please do not try to stand on an E1 that is not correctly, effectively and completely installed.
Do not disassemble, refit E1 without permission, or it will cause irreparable damage of E1 and may result in personal injury.
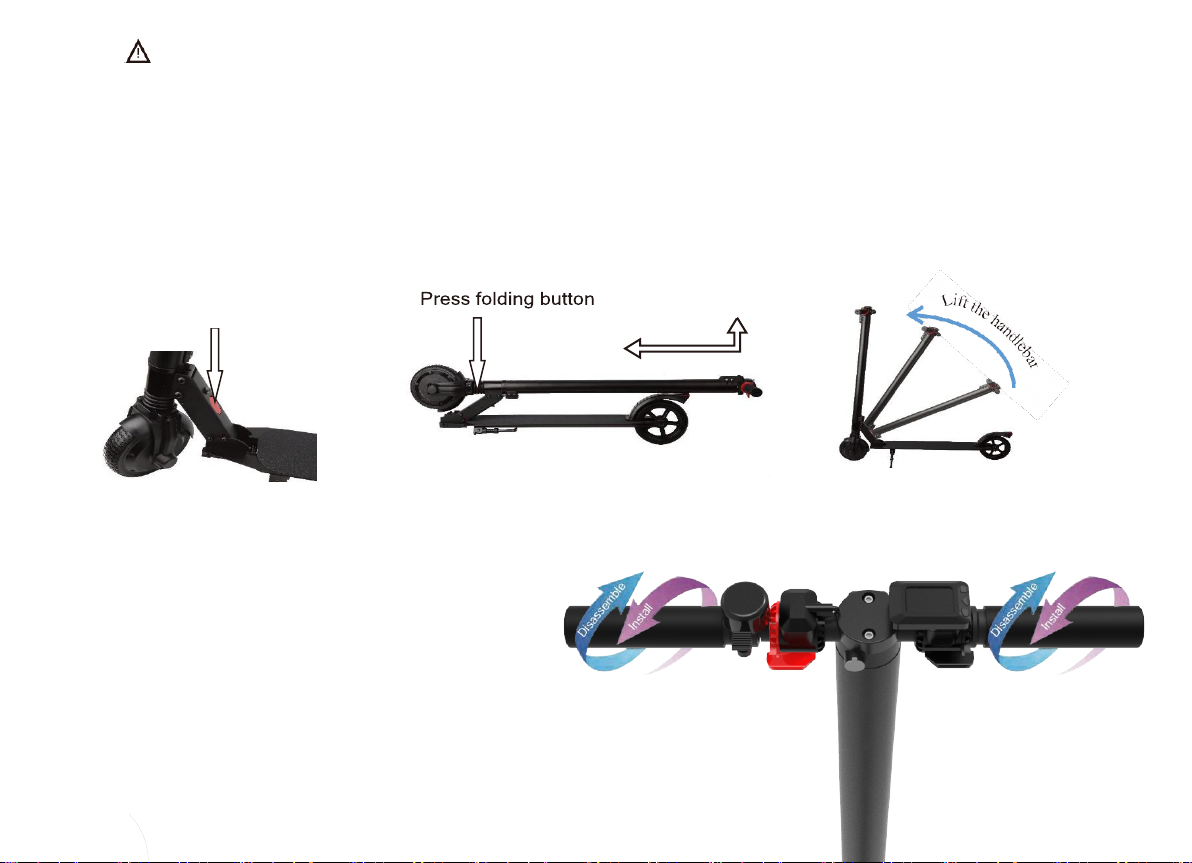
2.5. Open E1
Step1: Check and twist the “Safe lock” to the “Folding” position (each one
direction will be okay), press the folding button, hold and lift the handle stem
to the vertical position until you hear a click sound.
Step2: Mount the handles in counterclockwise direction.
Step3: Hold the handles and use the E1 scooter.
Step 2
Step 1
Folding button

2.6. Display Screen
The LCD display screen is an interface that shows the opera on status of the scooter:
Battery
Gear
Total mileage
3use this button to increase cruise speed
use this button to decrease cruise speed
2.
4. Speed + button Long press this button to turn on/off the front light
3.
use this button to power
Power button
O
n/Off
S
peed + button
Speed –
button
1.
There are three buttons on main display

2.7. Scooter Working Modes
The E1can be used in 2 different ways and below is a brief overview of the most important:
Working mode
Description
Accelerator mode
Acceleration is pressed to accelerate, the initial setting for this mode can be changed using the speed
+ and speed buttons -.
Operating mode
Description
Turning on and off
Power ON: Long press the power button until the lights on the screen light up.
Power OFF: Long press the power button until the display turns off and the system turns off
Battery Display Indicator
The battery indicator on the display shows the remaining battery capacity
Automatic shutdown
If the Scooter is not used for more than 5 minutes, it will automatically shut down to save the
battery.
Displaying data on the
display
When the scooter is on, briefly press the power button, change display data, TIME, ODO, DIS as
well as other features. When the TIME symbol appears, the run time after startup is indicated.
Time will reset after the scooter is stopped. When the DIS icon appears, the distance after start-
up is indicated, which will be reset after the scooter is turned off. When the ODO symbol appears,
the total mileage is shown, which is not deleted.
Changing cruise speed
Press speed + button or speed button - briefly to change cruising speed. In total, 3 cruise speeds
are available:
1.
Low speed - between: 1-6 km/ h
2.
Average speed - between: 1-13 km/ h
3.
High speed - between: 1-20 km/ h
Acceleration / Braking
To accelerate, press the Acceleration Button. To brake, stop the acceleration and press the brake
button.
2.8. Failure Sign
When the scooter has failure, there will be defective part sign on the display accordingly.
Controller failure : When this sign is showing on the display, it indicates that the controller is notworking,

usually for the controller failure or controller cable disconnection.
Accelerator failure : When this sign is showing on the display, it indicates that the accelerator is not working.
Brake failure : When this sign is showing on the display, it indicates that the brake is not working.
3.Battery and Charging
3.1.
Battery Specifications
Various battery parameters are described in the table below:
Parameter
E1 Remarks
①
The voltage here refers to the voltage
with moderate capacity of a lithium ion
battery
②
E1is configured with 4.0 Ah battery
Battery type
Lithium ion battery
Charging time
Approx. 3.5-4.5 hours
Voltage
36V①
Capacity
4.0 Ah ②
Battery weight
1.2 kg
Working temperature
-10℃~40℃
Charging temperature
5℃~ 45℃
Storage temperature
-10℃~45℃
3.2.
Charging
Step 1: The position of the charging port is at the top of E1, open the charging cover, and make
sure that the charging port is dry.
Step 2: Insert the charging cable to the charging port on the E1.

Step 3: When the indicator of the charger is red, it means it is charging; when the indicator
turns to green from red, it means that the battery is fully charged. Stop charging at this time, as long time of
charging will affect the service life of the batteries.
3.3.
Safety instructions for Charging
·
Please charge the battery every month or after driving each time in order to extend the service life of
batteries to the maximum extent. Please charge in the suitable temperatureenvironment.
·
Failure to charge on time may lead to battery damages. As time goes by, the battery electric capacity will be gradually used up
which will finally lead to over-discharging.
·
Please use the battery, charger and cable supplied by the original manufacturers so as to avoid over-discharging risk.
·
Please ensure that the charger uses the designated cable and with correct connection.
·
Please ensure a well-ventilated environment.
·
Please ensure that it is used in a dry environment. Never allow the charger or cable to contact with water, as this may cause
an electric shock. Do not touch with wet hands, and in process of charging, immediately pull out the power plug in occurrence
of any failure.
·
Please make sure pull out the plug, do not pull out the cable.
·
Keep charger and cable from sharp or hot object.
·
Regularly check the charger and cable, stop using the charger to avoid further impairment if it is obvious damaged. Please
contact us for solution.
·
Do not try to repair battery, charger or cable by yourselves,
please contact us for any question.
Autres manuels pour E1
1
Table des matières
Langues :
Autres manuels Wilfa Scooter


Manuels Scooter populaires d'autres marques


First Choice Mobility
First Choice Mobility Roma Medical Corella S741 Manuel utilisateur

Carrera
Carrera impel Manuel utilisateur

Afikim
Afikim Superlight SL-3 Manuel utilisateur

CareCo
CareCo ZOOM Manuel utilisateur

Douglas
Douglas Vespa G.S. Manuel utilisateur

Gazelle
Gazelle with BOSCH System Manuel utilisateur