
Westell Technologies ADSL WireSpeed Pro 36R570 Proxy Router... Manuel utilisateur
©2001 Westell, Inc.
ADSL WIRESPEED PRO
36R570 PROXY ROUTER
INSTALLATION AND USER GUIDE
36R570
PN 030-300153 Rev. A
March, 2001

ADSL WireSpeed Pro 36R570 Proxy Router
User Guide (PPPoA)
030-300153A ii
CONTENTS
ADSL WIRESPEED PRO™ PROXY ROUTER USER GUIDE ........................................................................... 4
WIRESPEED PRO™ PROXY ROUTER OVERVIEW ................................................................................................ 4
WireSpeed Pro Proxy Router Benefits........................................................................................................ 4
Minimum System Requirements ................................................................................................................. 4
ADSL Signal Filtering .................................................................................................................................. 5
Package Inspection and Contents .............................................................................................................. 5
SAFETY............................................................................................................................................................. 5
WIRESPEED PRO™ INSTALLATION ................................................................................................................ 6
Installing on Hollow Drywall Surfaces (Optional)......................................................................................... 6
Single-User Setup ....................................................................................................................................... 6
Multiple-User Setup..................................................................................................................................... 7
Cable Connectors ....................................................................................................................................... 9
LED Indicators........................................................................................................................................... 10
WEBSHARE INSTALLATION UTILITIES SOFTWARE SETUP....................................................................... 11
Running WebShare Installation Utilities .................................................................................................... 11
Running WebShare Installation Utilities for Windows Operating Systems ............................................... 11
Disabling Autodial ................................................................................................................................. 15
SETTING UP YOUR WEBSHARE ACCOUNT ................................................................................................. 16
Account Parameters.................................................................................................................................. 16
Viewing VPI/VCI Parameters ................................................................................................................ 17
Changing VPI/VCI Settings................................................................................................................... 18
Restarting WebShare................................................................................................................................ 19
CONNECTING TO AN ACCOUNT.................................................................................................................... 20
Activating a PPP Session.......................................................................................................................... 20
Disconnecting from a PPP Session .......................................................................................................... 23
CONFIGURING WEBSHARE............................................................................................................................... 24
Accessing the WebShare Management Interface .................................................................................... 24
Adding and Configuring Additional WebShare Accounts.......................................................................... 25
THE WEBSHARE MANAGEMENT INTERFACE.............................................................................................. 27
THE MANAGEMENT MENU ................................................................................................................................27
The Home Page.................................................................................................................................... 28
Home Page Main Window................................................................................................................ 28
Connections...................................................................................................................................... 28
Connect/Disconnect ......................................................................................................................... 28
Edit/New ........................................................................................................................................... 28
Status ............................................................................................................................................... 28
Building New Accounts..................................................................................................................... 29
Viewing DNS Primary and Secondary IP Addresses ....................................................................... 29
DIAGNOSTICS .................................................................................................................................................. 30
Accessing the Main Diagnostics Page .............................................................................................30
Test All.............................................................................................................................................. 30
Self-Test ........................................................................................................................................... 31
ADSL Modem ................................................................................................................................... 31
PPP Connection ............................................................................................................................... 31
IP Remote Router............................................................................................................................. 32
PING................................................................................................................................................. 32

ADSL WireSpeed Pro 36R570 Proxy Router
User Guide
030-300153A iii
THE NEW SOFTWARE INSTALLATION PAGE ....................................................................................................... 33
THE LAN ADVANCED PAGE.............................................................................................................................. 34
Accessing the LAN Advanced Configuration Dialog Box ................................................................. 34
IP Address ........................................................................................................................................ 35
Subnet Mask..................................................................................................................................... 35
Domain Name System (DNS) Primary ............................................................................................. 35
Domain Naming System (DNS) Secondary ..................................................................................... 35
Dynamic Host Configuration Protocol (DHCP)................................................................................. 35
DHCP Base Address ........................................................................................................................ 35
DHCP End Address.......................................................................................................................... 35
Inactivity Timer Timeout ................................................................................................................... 36
FIREWALL........................................................................................................................................................ 37
Inbound/Outbound Traffic................................................................................................................. 37
Firewall Security........................................................................................................................................ 37
Security Levels...................................................................................................................................... 38
Setting the Security Level ..................................................................................................................... 38
Custom Settings ............................................................................................................................... 38
Saving Changes.................................................................................................................................... 38
Firewall Port Forwarding ........................................................................................................................... 39
Additional Protocol Support .................................................................................................................. 39
Enabling/Disabling Port Forwarding...................................................................................................... 39
Deleting a Service................................................................................................................................. 40
Adding a Service................................................................................................................................... 40
Firewall Custom Access Security.............................................................................................................. 42
The Advanced Access Panel................................................................................................................ 42
Access Lists.......................................................................................................................................... 43
The Universal List ................................................................................................................................. 43
Creating a New Access List .................................................................................................................. 44
Adding a Service................................................................................................................................... 44
Deleting a Service................................................................................................................................. 45
Optional Access Restrictions ................................................................................................................ 45
Turning the Firewall Off............................................................................................................................. 46
THE WEBSHARE ABOUT PAGE......................................................................................................................... 47
WEBSHARE HELP............................................................................................................................................ 47
TROUBLESHOOTING....................................................................................................................................... 48
WebShare Error Messages....................................................................................................................... 48
Resetting to Factory Default...................................................................................................................... 49
PRODUCT ASSISTANCE AND GENERAL INQUIRIES .............................................................................................. 50
Product Return .......................................................................................................................................... 50
PRODUCT SPECIFICATIONS .............................................................................................................................. 51
APPENDIX......................................................................................................................................................... 53
MAC AND LINUX SUPPORT................................................................................................................................53
FIREWALL SERVICES SUPPORTED .................................................................................................................... 53
Medium Security: List of Services Allowed .......................................................................................... 53
High Security: List of Services Allowed................................................................................................ 54
List of Services Supported by Port Forwarding..................................................................................... 54
LICENSING AND REGULATORY INFORMATION........................................................................................... 57

ADSL WireSpeed Pro 36R570 Proxy Router
User Guide
030-300153A 4 WireSpeed Pro Overview
ADSL WIRESPEED PRO™ PROXY ROUTER USER GUIDE
WIRESPEED PRO™ PROXY ROUTER OVERVIEW
WireSpeed Pro is the perfect solution for a low cost multi-user residential or small business network.
Westell’s WireSpeed Pro provides multiple users with reliable, high-speed, Internet access for home or
office. With Westell’s WireSpeed Pro, you won’t need additional phone or data lines. The WireSpeed
Pro converts an existing phone line into a dedicated, high-speed connection ending the inconvenience of
dial-up modems and busy signals. Unlike traditional analog modems, multiple users can share the same
phone line for simultaneous voice/fax communications and high-speed Internet access. WireSpeed Pro’s
downstream data rates of 8 Mbps and upstream rates of 800 kbps, may be up to 140 times faster than a
56K analog modem.
With WireSpeed Pro, you’ll never be out of date. WireSpeed Pro is factory-configured with Westell's popular WebShare
networking software. Our latest generation of WebShare software implements new features like an integrated firewall and
VPN support. With easy downloads from Westell’s WebStore, you’ll be able to upgrade your WebShare software to take
advantage of the latest innovations and features from Westell.
The WireSpeed Pro uses the widely popular Point to Point Protocols (PPPoA and PPPoE) to connect to your Internet
service provider (ISP). LAN network setup is a breeze with Network Address Translation (NAT) and Dynamic Host
Control Protocol (DHCP). With NAT, the Internet sees your Westell WireSpeed Pro as a single IP address. This hides the
IP addresses of the PCs on the LAN from the Internet and provides a simple form of network security. With DHCP,
WireSpeed Pro automatically assigns an IP address to each PC on the network, removing the chore of local IP address
management.
WireSpeed Pro Proxy Router Benefits
•Up to 253 users can share a single Internet connection
•No need to tie up a PC to serve as a router
•No need to pay for multiple IP addresses
•No need to load Point to Point Protocol (WebShare) on each of the networked PCs
•Retains the IP addresses of your existing LAN
Minimum System Requirements
The following requirements outline the minimum system for WebShare:
•Pentium 166 MHz processor or equivalent
•Microsoft Windows 98, Windows Millennium, Windows 2000, or Windows NT 4.0
•Internet Explorer 4.x or Netscape Navigator 4.x installed
•At least 16 MB RAM
•5 MB of free hard drive space
•Ethernet connection between upgrading PC and ADSL modem
•TCP/IP protocol stack installed
•Multi-port Ethernet 10Base-T hub (for multiple users)
•VGA monitor
•Cross over Ethernet cable for modem to Ethernet hub
•VPI/VCI values (provided by your service provider)
•PPPoA/PPPoE support (provided by your service provider)

ADSL WireSpeed Pro 36R570 Proxy Router
User Guide
030-300153A 5 WireSpeed Pro Overview
ADSL Signal Filtering
ADSL signals must be blocked from reaching each telephone, answering machine, fax machine, conventional computer
mode or any similar conventional devices. Failure to do so may degrade telephone voice quality and ADSL performance.
There are two ways to block the ADSL signal from telephone equipment:
Method 1. Microfilters. Install a microfilter at each telephone jack being used for a phone, answering machine,
fax machine or other telephone device. Microfilter installation is simple and requires no tools or telephone
rewiring. Just unplug the telephone device from the baseboard or wall mount and snap in a microfilter, then snap
in the telephone device. Contact Westell to obtain a microfilter kit (Westell part number A90-36FK201) which
contains multiple microfilters for your installation.
Method 2: POTS Splitter. Install a POTS splitter (Westell model 32RTPSGNA1) at the telephone service entry
point. Installation of a POTS splitter may require telephone rewiring, therefore, POTS splitter installation is
typically performed by your service provider. If you choose to use a POTS splitter, contact your telephone
company or service provider for installation.
Package Inspection and Contents
Upon receipt, thoroughly inspect the unit for damage. If the unit has been damaged during transit, report the damage
immediately to the Transportation Company and Westell Customer Support. The transportation carrier assumes
responsibility for safe delivery of goods.
The WireSpeed Pro Proxy Router is shipped with a power supply and straight-through Ethernet cable.
You may have to supply the following cables:
•10Base-T crossover cable with RJ-45 connectors for Ethernet hub to WireSpeed Pro Proxy Router connection
•RJ-11 modular cable for phone line to WireSpeed Pro Proxy Router connection
SAFETY
Follow these safety precautions before installing any electronic equipment:
1. Never install any telephone wiring during a lightning storm.
2. Never install telephone jacks in wet locations unless the jack is specifically designed for wet locations.
3. Never touch uninsulated telephone wires or terminals unless the telephone line has been disconnected at the
network interface.
4. Use caution when installing or modifying telephone lines.
5. This equipment is to be installed and used with approved telco terminal sockets that provide primary lightning
protection.
WARNING
Risk of electric shock. Voltages up to 140 Vdc (with reference to ground) may be present
on telecommunications circuits.

ADSL WireSpeed Pro 36R570 Proxy Router
User Guide
030-300153A 6 WireSpeed Pro Installation
WIRESPEED PRO™ INSTALLATION
The WireSpeed Pro Proxy Router operates up to 300 feet (91.4 meters) from a PC or Ethernet hub over 100-Ohm, Category
5 cable.
For installation on a wall surface, follow the instructions below. If you are not installing the unit on a wall surface, proceed
to the section on Single or Multiple-User Setup.
Installing on Hollow Drywall Surfaces (Optional)
To mount the WireSpeed Pro to a wall:
1. Obtain two pan-head screws (one #8 and one #6) and two #4 - #8 wall anchors (not provided).
2. Place the WireSpeed Pro against the wall where it is to be mounted, note and mark the upper keyhole slot and screw
location.
3. Drill a 3/16” hole for the upper anchor and insert the anchor and larger (#8) screw until the face of the screw is
approximately 3/16” from the wall.
4. Test fit the unit on the screw, and adjust the screw depth for a sliding fit.
5. With a pencil, mark the opening in lower mounting tab. Remove the unit from the wall.
6. Drill a 3/16” hole for the lower anchor and insert anchor. Hang the unit on the upper screw.
7. Insert the smaller (#6) screw through the hole in the lower mounting tab.
8. Tighten the lower screw lightly with a screwdriver. Do not overtighten.
Single-User Setup
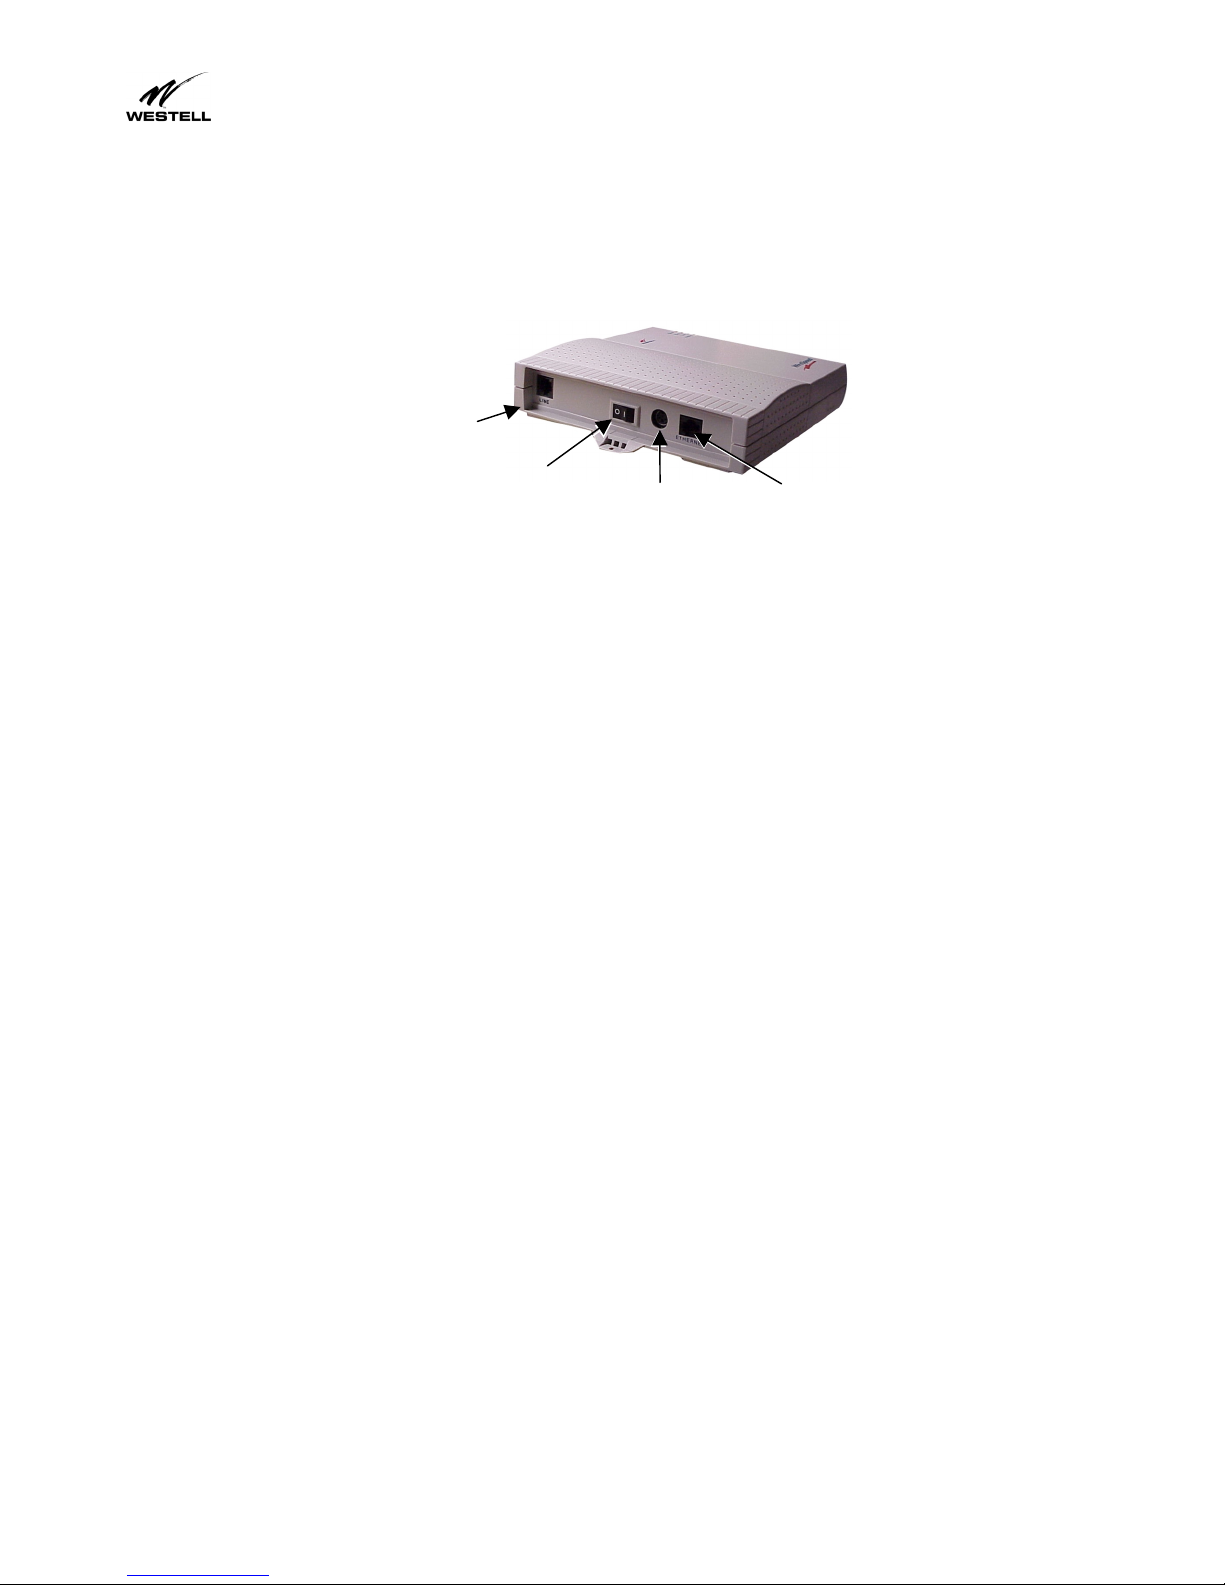
Refer to the wiring diagrams shown in Figure 1 and Figure 3.
1. Connect the power supply cord to the power connector on the side of the unit and plug it into the wall power receptacle.
2. Connect a standard RJ-11 telephone cable from the LINE connector to the ADSL-equipped phone line.
3. Connect the straight 10Base-T cable (included with this package) to the ETHERNET connector on the side of the unit
to the interface on the computer. A crossover cable may be required when connecting to other equipment, such as an
Ethernet hub. (See “Multiple-User Setup” below.)
4. Turn the power switch ON.
5. The Ready LED should be a solid green indicating that the power self-test has successfully completed and the unit is
synchronized with the ADSL line card. It may take up to 70 seconds for the unit to synchronize with the central office
ADSL unit.
ADSL WireSpeed Pro 36R570 Proxy Router
User Guide
030-300153A 7 WireSpeed Pro Installation
6. The Link LED should be solid green indicating that the CPE connection has been made.
7. During use, a pulsing yellow Activity LED indicates that data is being transmitted and received on the Ethernet
interface.
8. Proceed to page 16, “Setting Up Your WebShare Account” to configure the software.
ADSL LINE
ETHERNET
POWER
CONNECTOR
ON/OFF
SWITCH
Figure 1. WireSpeed Pro Single-User Setup Connections
Multiple-User Setup
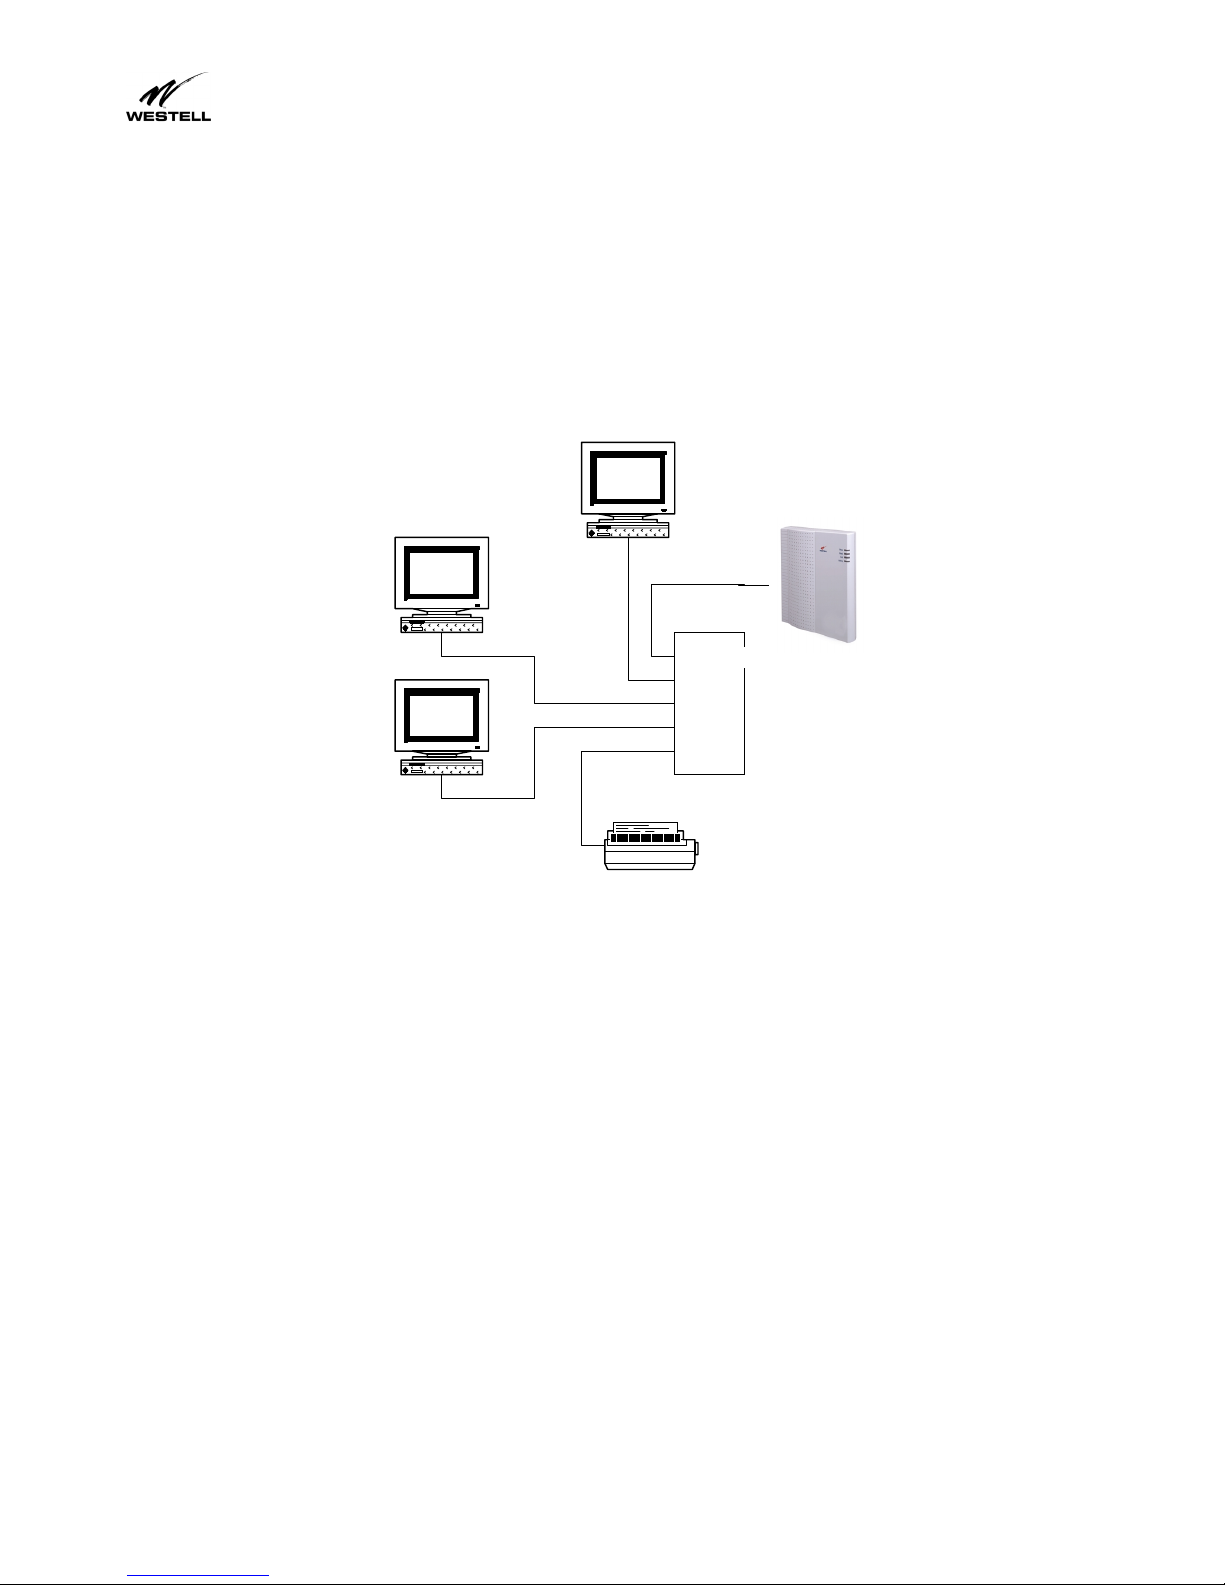
Refer to the wiring diagrams in Figure 2 and Figure 3.
1. Connect the power supply cord to the power connector on the side of the WireSpeed Pro and plug into a power
receptacle.
2. Connect a standard RJ-11 telephone cable from the LINE connector to the ADSL-equipped phone line.
3. Obtain a multi-port Ethernet Hub (available separately). Ensure that the hub includes enough Ethernet ports to
meet the requirements of the network.
4. Connect the straight 10Base-T cable (included with this package) to the jack labeled ETHERNET on the side of
the unit to the jack-designated uplink on the Ethernet Hub. With some Ethernet Hubs, a crossover cable (available
separately) may be required. Please see the documentation included with the selected Ethernet hub.
5. Connect each additional PC to the Ethernet hub.
6. Turn the power switch ON.
ADSL WireSpeed Pro 36R570 Proxy Router
User Guide
030-300153A 8 WireSpeed Pro Installation
7. The Ready LED should be a solid green indicating that the power self-test has successfully completed and the unit
is synchronized with the ADSL line card. It may take up to 70 seconds for the unit to synchronize with the central
office ADSL unit.
8. The Link LED should be solid green indicating that the CPE connection has been made.
9. During use, a pulsing yellow Activity LED indicates that data is being transmitted and received on the Ethernet
interface.
10. Go to page 16, “Setting Up Your WebShare Account” to configure the software.
PRINTER
PC
PC
PC
ETHERNET HUB
PORT 1
PORT 2
PORT 3
PORT 4
UPLINK
All connections made with
10BaseT Straight-through
cable with RJ45 plug
terminations
Figure 2. Typical WireSpeed Pro Multi-User Setup Connections
ADSL WireSpeed Pro 36R570 Proxy Router
User Guide
030-300153A 9 WireSpeed Pro Installation
Cable Connectors
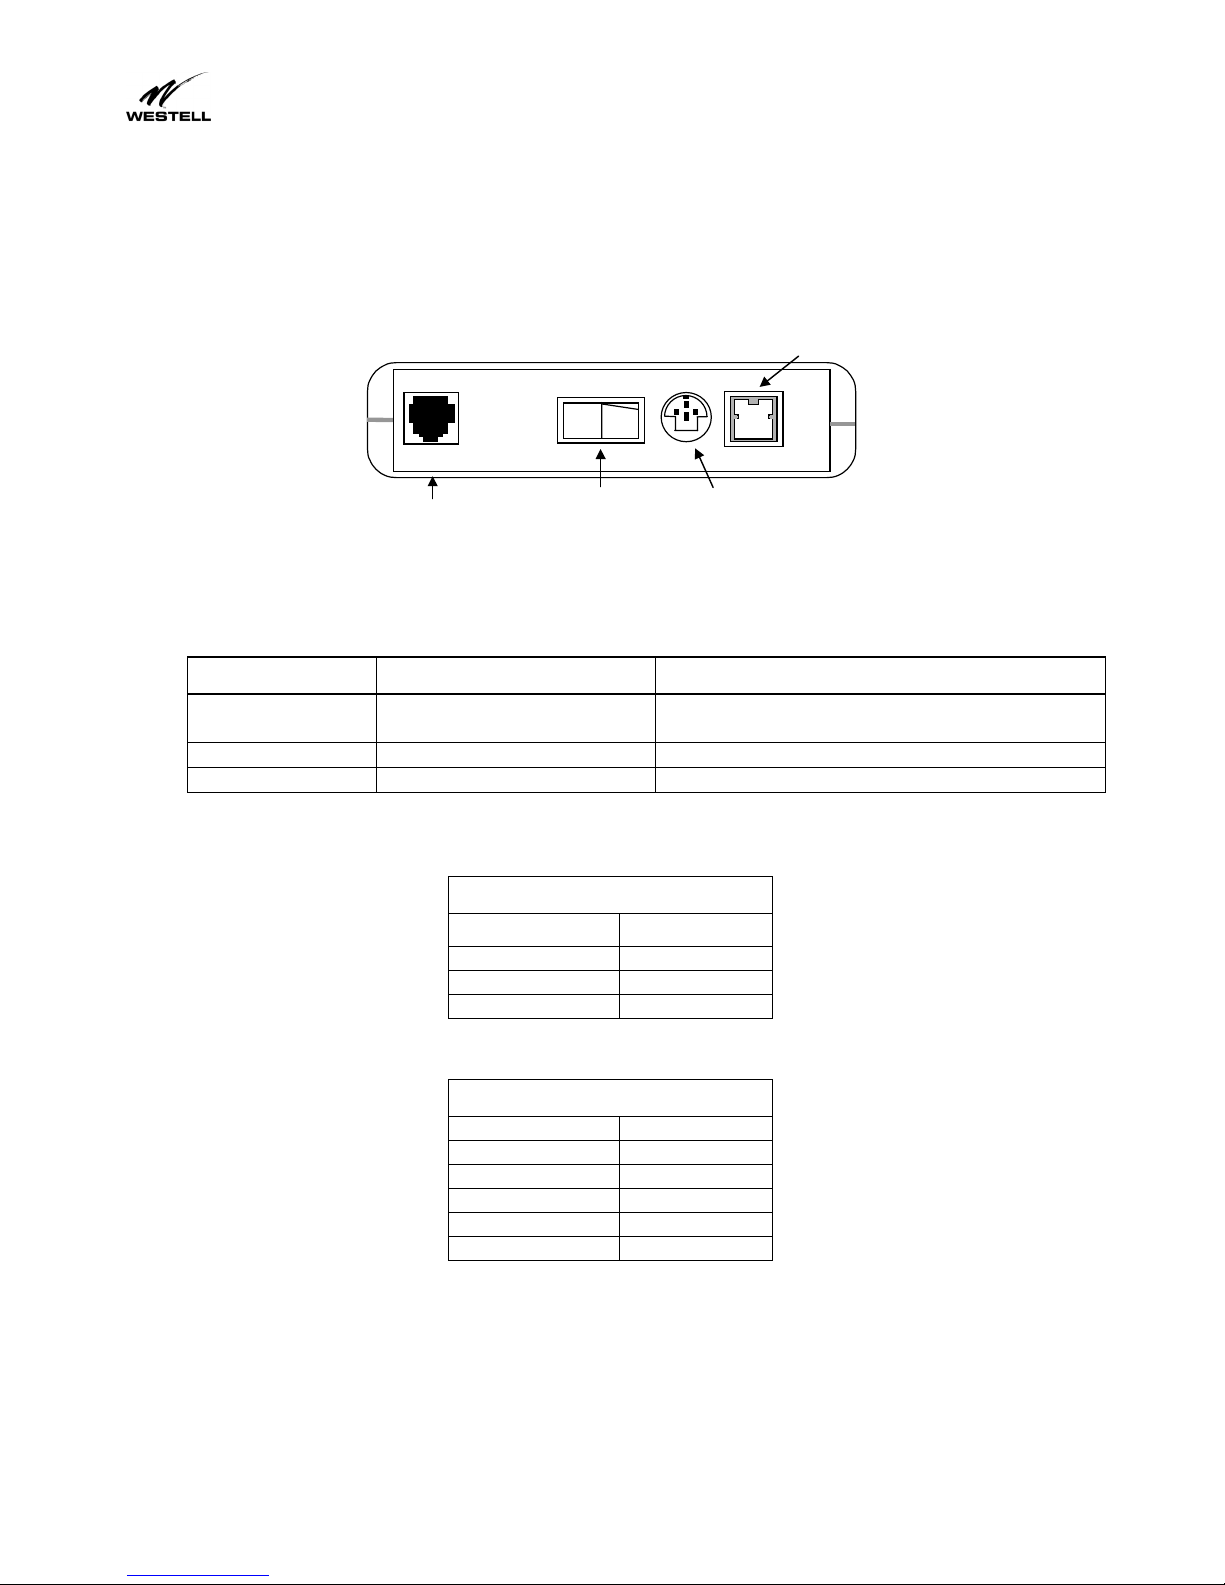
There are connectors on the side panel of the WireSpeed Pro (Figure 3) for Power, an ON/OFF switch, 6-pin RJ-11 DSL
(LINE) connector and 8-pin RJ-45 ETHERNET connector for customer terminal equipment. Tables 1-3 list the connector
types and pinout designations.
POWER
CONNECTOR
I
O
DSL CONNECTOR
10Base-T
CONNECTOR
POWER
SWITCH
LINE ETHERNET
Figure 3. WireSpeed Pro Proxy Router (Side Panel)
Table 1. WireSpeed Pro Proxy Router Connectors
Connector Name Connector Type Description
LINE 6-pin (RJ-11) modular jack POTS/DSL is used to connect the telephone jack
with ADSL
POWER 3-pin mini-DIN connector Connects power cord
ETHERNET 8-pin (RJ-45) jack Connects to PC or 10BaseT hub
Table 2. LINE Connector Pinouts
LINE Pinouts (RJ-11)
Pin #
1, 2, 5, 6 Not Used
3DSLTi
p
4DSLRin
g
Table 3. ETHERNET Connector Pinouts
ETHERNET Pinouts (RJ-45)
Pin #
1Rx+
2Rx-
3Tx+
4, 5, 7, 8 Not Used
6Tx-
ADSL WireSpeed Pro 36R570 Proxy Router
User Guide
030-300153A 10 WireSpeed Pro Installation
LED Indicators
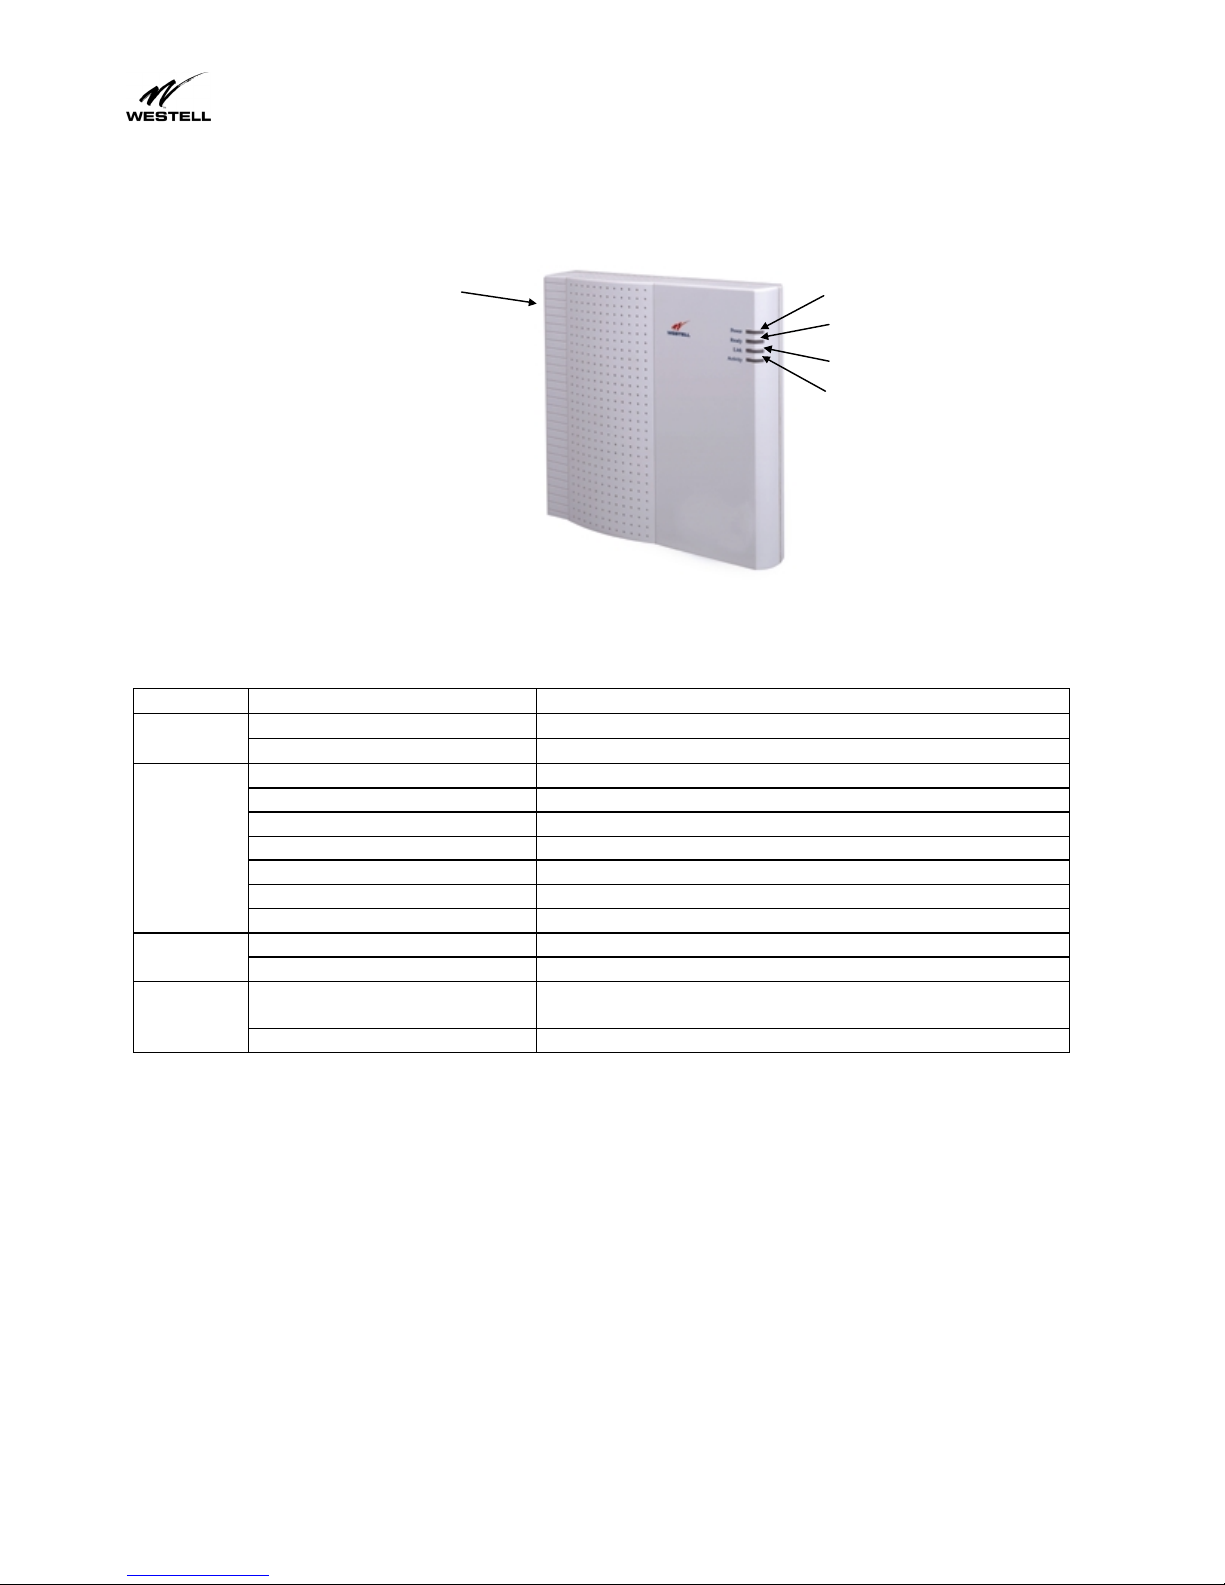
The LED indicators shown in Figure 4 are used to verify the unit’s operation and status.
Connections are
located on the side Power
Ready
Link
Activity
Figure 4. WireSpeed Pro Proxy Router (Front)
LED State Description
Solid Green Power ON
POWER
No Light No power
Slow Flashing Green Power ON and passed power-up diagnostics (1 flash/sec)
Moderate Flashing Green Power ON and attempting synchronization (2 flashes/sec)
Solid Green Power ON and synchronized with the ADSL line card
Solid Red Hardware power-up in progress
Blinking Red Unit failed power-up diagnostic
Alternating Red/Green Proxy Router diagnostic failed
READY
No Light No power
Solid Green Link established
LINK
No Light No 10Base-T link
Pulsing Yellow Data being transmitted. Pulses should match the
reception or transmission of Ethernet data.
ACTIVITY
No Light No data on Ethernet interface
Table 4. LED States
Note: Modem LEDs will flash while powering up. This intermittent flashing should not be confused with actual operation
status.
Table des matières
Autres manuels Westell Technologies Routeur réseau

Westell Technologies
Westell Technologies Westell UltraLine 7400 Manuel utilisateur

Westell Technologies
Westell Technologies Router 2400 Manuel utilisateur

Westell Technologies
Westell Technologies Wirespeed 2100 Manuel utilisateur

Westell Technologies
Westell Technologies Webshare 36R566 Manuel utilisateur
Manuels Routeur réseau populaires d'autres marques


NETGEAR
NETGEAR FS526T - Switch Manuel utilisateur

Korenix
Korenix JetNet 5710G Series Manuel utilisateur

Automated Logic
Automated Logic ZN551 Manuel du propriétaire

Cisco
Cisco ASR 1000 Series Manuel de l'opérateur

EnGenius
EnGenius ESR-9710 Manuel utilisateur

Cisco
Cisco 805 Series Instructions d'utilisation et de sécurité