Welby 7734 Manuel utilisateur

AFTER SALES SUPPORT
866-694-5085
USA
1
Adjustable
Rollator
Andador
ajustable
User Guide
Manual del usuario
English... Page 2
Español... Página 17

AFTER SALES SUPPORT
866-694-5085
USA
2
Contents
Introduction..................................................................................3
Parts List.............................................................................................4
Parts Diagram 5
SafetyPrecautions..............................................................................6
Assembly..........................................................................................7
Height Adjustment 8
Operation.....................................................................................9
Loop Lock Operation 9
Measuring 10
Preparing to Sit 11
Preparing to Stand 12
Preparing to Walk 13
Maintenance..............................................................................14
Hand Brake Adjustment 14
Warranty..................................................................................15

AFTER SALES SUPPORT
866-694-5085
USA
3
Congratulations on your purchase of an adjustable rollator. Our
rollators are a product of quality engineering and are manufactured
to meet our own highly rigid specications and will surpass all your
expectations.
In this manual, you will nd the assembly, use and safety instructions for
the adjustable rollator.
The rollator is suitable for a single user with limited mobility. The rollator
is ideal for indoor and outdoor use.
Adjustable Rollator
Adjustable Rollator Introduction

AFTER SALES SUPPORT
866-694-5085
USA
4
Parts List Adjustable Rollator
Hand Grips (2)
Loop Locks (2)
Handle Height Adjustment Knobs (2)
Backrest (1)
Folding Hinge
Seat (1)
Hanging Bag (1)
Leg Height Adjustment Knobs (4)
Rear Wheels With Locks (2)
Front Swivel Wheels (2)
1
2
3
4
5
6
7
8
9
10
Parts List

AFTER SALES SUPPORT
866-694-5085
USA
5
1
2
34
5
6
7
8
9
10
Adjustable Rollator Parts List
Parts Diagram

AFTER SALES SUPPORT
866-694-5085
USA
6
1. Please make sure the Rollator is fully opened, seat is down and the
folding bar under seat is locked in the down position.
2. Be sure that all knobs are fully tightened and are at equal heights.
Test Rollator for stability before applying full weight to hand grips.
3. Test the loop locks before operating the Rollator. When wheels are
locked, lock bar on rear wheels should prevent wheels from turning.
If the wheels turn while brakes are locked, please refer to page 14
for hand brake adjustment instructions or contact after sales support.
When locks are released, the wheels should turn freely.
4. Always lock loop locks before sitting and do not use seat when unit is
on an incline or uneven ground.
5. Replace tires when signicantly worn or damaged.
6. Do not have anyone push you while you are seated on the Rollator.
This is a walking aid only and is not to be used as a transportation
device.
7. Check that the nuts and bolts are secure, on a regular basis, before
use.
8. Do not stand on the rollator.
Do not attempt to adjust or operate Rollator without carefully reading
all instructions in this manual.
WARNING
THIS IS A WALKING
AID ONLY AND IS
NOT TO BE USED AS
A TRANSPORTATION
DEVICE.
!Warning: Do Not Move Rollator While Seated
6.5"
0.75"
22pt. Arial Font, Yellow Text, Black Background
Warning Labels
Safety Precautions Adjustable Rollator
Safety Precautions
AFTER SALES SUPPORT
866-694-5085
USA
7
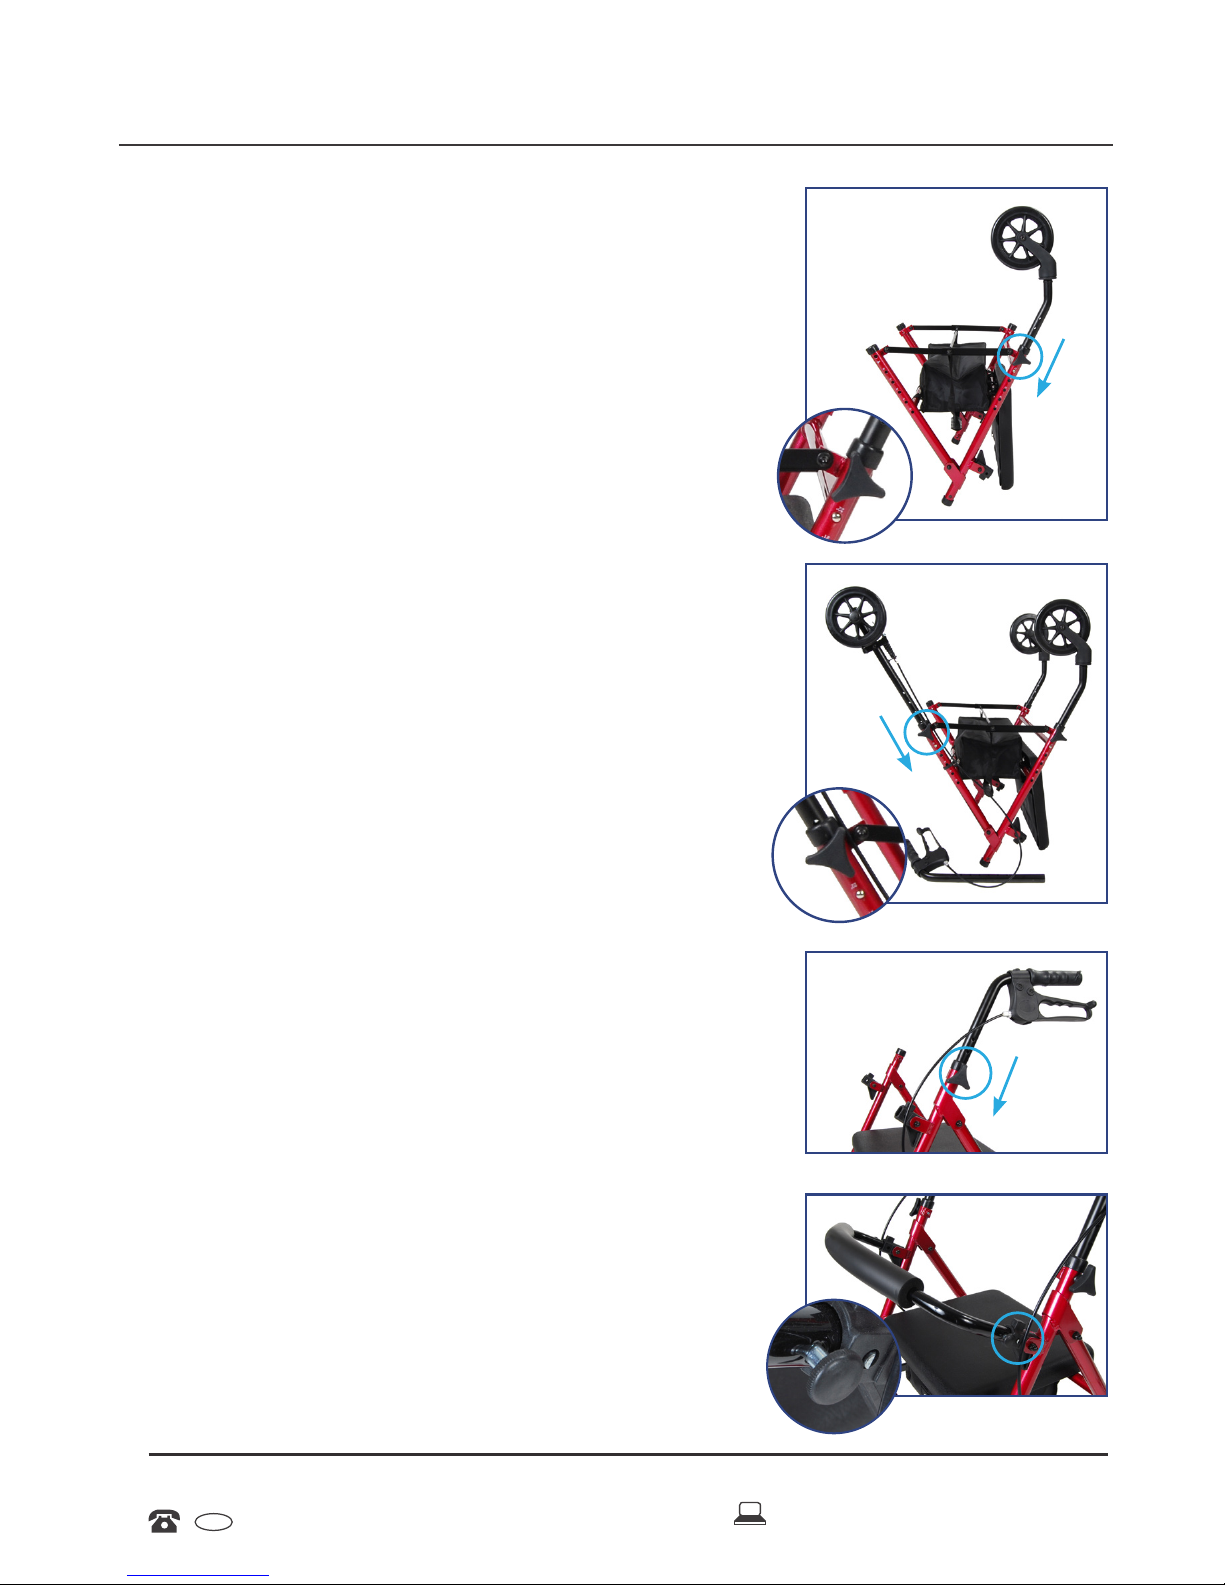
1. Remove all contents from carton.
2. Open frame and place up-side-down on the
oor. Attach legs without brakes to the front
of the rollator by depressing push pin and
sliding leg into the receptacle, making sure
to match the number on the frame with the
number on the leg. Secure in place using
the tightening knob, threading the knob in
from the outside. Repeat for second leg,
making sure both legs are set to the same
height (Figure 1).
3. Attach back legs (with brakes) using the
same process, making sure the wheels are
on the outside of the rollator and are at the
same height as the front wheels (Figure 2).
Afx brake cable to the black portion of the
leg using the “S” shaped clamp provided.
4. Insert handle tube into frame and set to
desired height. Secure in placed using
tightening knob, threading the knob in from
the outside. Repeat for second handle,
making sure both are set to the same
height (Figure 3).
5. Attach padded backrest by depressing the
black thumb buttons and sliding into the
black bracket (Figure 4). Note that backrest
can be folded up when not in use.
Adjustable Rollator Assembly
Figure 1
Figure 2
Figure 3
Figure 4
Assembly

AFTER SALES SUPPORT
866-694-5085
USA
8
The height of the rollator can be adjusted in two ways to
accomodate many different users.
Height Adjustment
Handle Height Adjustment
1. Remove tightening knob from handle.
2. Set handle to desired height.
3. Replace tightening knob into handle,
making sure to insert knob from the
outside.
4. Repeat for second handle, making sure
both handles are set to the same height
setting.
Leg Height Adjustment
1. Remove tightening knob from leg.
2. Depress push pin and slide leg to desired
height.
3. Replace tightening knob into leg, making
sure to insert knob from the outside.
4. Repeat for second, third and fourth legs,
making sure all are set to the same height
setting.
Assembly Adjustable Rollator

AFTER SALES SUPPORT
866-694-5085
USA
9
Adjustable Rollator Operation
Always engage and disengage wheel locks on both sides
simultaneously.
1. To slow down or come to a temporary stop — Pull up slowly on
the loop locks with four ngers until unit slows down or comes to
a temporary stop (Figure 5).
2. To temporarily lock wheels in position — Press down on both
loop locks with palms until you hear a “click” that will tell you
wheels are locked (Figure 6).
3. To release wheel locks — Push up on both loop locks with palms
of hand to original position (Figure 7).
Loop Lock Operation
Figure 5 Figure 6 Figure 7

AFTER SALES SUPPORT
866-694-5085
USA
10
Operation Adjustable Rollator
Measuring
• First measure the handle height. Start by
standing up straight with your shoes on.
Have a friend or family member mea-
sure from the crease in your wrist to the
ground. This measurement should be the
approximate height of the handle bars.
• Next, measure the height of a chair you
like and from which you can rise easily. If
you have difculty with a chair that is too
high or too low, keep that in mind when
setting the seat height.
• Finally, measure the width of the smallest
place you will need to t through. Most
often, that is a doorway or hallway. You
need to be sure you can get in and out
with your rollator.
Table des matières
Langues :
Autres manuels Welby Aide à la mobilité


Manuels Aide à la mobilité populaires d'autres marques


Rhythm Healthcare
Rhythm Healthcare B3800F Manuel utilisateur

AMF-BRUNS
AMF-BRUNS PROTEKTOR Manuel utilisateur

Drive DeVilbiss Healthcare
Drive DeVilbiss Healthcare OTTER Manuel utilisateur

Rhythm Healthcare
Rhythm Healthcare C500U Manuel utilisateur

Lumex
Lumex RJ4200A Manuel utilisateur

Rebotec
Rebotec Jumbo Manuel utilisateur