Vimar 46KIT.036C Manuel utilisateur

Manuale utente - User manual
Kit Wi-Fi 3Mpx con 2 tlc Bullet ob.3.6mm
3Mpx Wi-Fi kit with 2 ipc Bullet ob.3.6mm

46KIT.036C - 46242.036C
2 IT EN
1 - Caratteristiche ................................................................................. 3
2 - Installazione .................................................................................... 3
2.1 - Telecamera Wi-Fi ....................................................................... 4
2.2 - Suggerimenti per il posizionamento del registratore NVR ......... 5
2.3 - Collegare l'NVR al monitor ......................................................... 6
2.4 - Connessioni ............................................................................... 7
3 - Reset Login Password ................................................................... 8
4 - Preview ............................................................................................ 8
4.1 - Visione Live ................................................................................ 9
4.2 - Barra di navigazione della telecamera ..................................... 9
4.3 - Barra di navigazione visione Live .............................................. 10
5 - Funzione Playback .......................................................................... 10
5.1 - Playback .................................................................................... 11
6 - Configurazione ................................................................................ 12
6.1-Impostazionigeneraliecongurazionedell'ora ......................... 12
6.2 - Impostazioni Network ................................................................. 12
6.3 - Impostazioni di archiviazione HDD ............................................ 13
6.4 - Aggiunta telecamera .................................................................. 14
6.5 - Impostazioni telecamera ............................................................ 15
6.6 - Impostazione utente ................................................................... 15
6.7-Impostazionipredenite ............................................................. 15
6.8 - Impostazione di sistema .......................................................... 15
7 - Telecamere aggiuntive 46242.036C ............................................... 16
7.1 - Alimentare la telecamera ........................................................... 16
7.2 - Aggiungere una telecamera ....................................................... 16
8 - Funzione DST (ora legale) .............................................................. 18
9 - Utilizzo con App "VIEW Product" .................................................. 19
9.1 - Installare l’App sullo smartphone ............................................... 19
9.2 - Primo accesso ........................................................................... 19
9.3 - Aggiungi un NVR ....................................................................... 19
1 - Characteristics ................................................................................ 3
2 - Installation ....................................................................................... 3
2.1 - Wi-Fi camera .............................................................................. 4
2.2 - Suggestions for positioning the NVR recorder ........................... 5
2.3 - Connect NVR to screen ............................................................. 6
2.4 - Connections ............................................................................... 7
3 - Reset Login Password ................................................................... 8
4 - Preview Function ............................................................................ 8
4.1 - Live View .................................................................................... 9
4.2 - Navigation bar of selected camera ............................................ 9
4.3 - Navigation bar of live view ......................................................... 10
5 - Playback Function .......................................................................... 10
5.1 - Playback .................................................................................... 11
6 - Setting Function .............................................................................. 12
6.1 - General setting &Time setting .................................................... 12
6.2 - Network setting .......................................................................... 12
6.3 - HDD Storage setting ..................................................................13
6.4 - Camera adding .......................................................................... 14
6.5 - Camera setting .......................................................................... 15
6.6 - User setting ................................................................................ 15
6.7 - Default setting ............................................................................ 15
6.8 - System setting ........................................................................... 15
7 - Additional cameras 46242.036C .................................................... 16
7.1 - Power up the camera ................................................................. 16
7.2 - Adding a camera ........................................................................ 16
8 - DST(Daylight Saving Time) Function ............................................ 18
9 - Use with "VIEW Product" App ....................................................... 19
9.1 - Install the App on the smartphone ............................................. 19
9.2 - First access ................................................................................ 19
9.3 - Add a NVR ................................................................................ 19
IndexIndice

46KIT.036C - 46242.036C
3 IT EN
NVR
Reset
Reset
LED di stato:
- Lucerossassa:NVRsistaavviando/anomaliarete
- Lucerossalampeggiante:inattessacongurazioneinApp
- Luceblussaaccesa:NVRfunzionacorrettamente
LED HDD
Luce blu lampeggiante: dati in lettura o scrittura
Audio: per ascoltare il suono su altoparlanti o auricolari
VGA: per collegare monitor VGA
HDMI: percollegaremonitoradaltadenizione
WAN: porta Ethernet. Collegamento al cavo di rete
USB: collegamento a mouse o chiavetta USB
Power: DC12V/2A
1 - Characteristics
LED di stato
Status LED
LED HDD
HDD LED
Audio VGA HDMI WAN USB Power
1 - Caratteristiche
NVR
Telecamera Camera
LED di stato:
- Luce rossa lampeggiante: in attesa connessione di rete
- Luceblussaaccesa:latelecamerafunzionacorrettamente
- Lucerossassa:anomaliaconnessionedirete
Microfono:
Per catturare l'audio ambientale
Reset:
Tenere premuto per 5 secondi per ripristinare la telecamera.
Leimpostazionitornerannoaivaloripredenitidifabbrica.
NOTA: SD card non supportata.
Speaker
Speaker
Microfono
Microphone
LED di stato
Status light
LED IR
Status light:
- Solidredlighton:NVRisstartingup/networkanomaly
- Blinkingredlight:waitforAPPconguration
- Solid blue light on: NVR is working correctly
HDD light
Blinking blue light: Data is being read or written
Audio: Connect to speakers or earphones to hear sound
VGA: VGA video output port
HDMI:Highdenitionvideooutputport
WAN: Ethernet port. Connect to the network cable
USB: Connect to mouse, USB storage device
Power:DC12V/2A
Status light:
- Blinking red light: wait for network connection (fast)
- Solid blue light on: camera is working correctly
- Solid red light on: network is malfunctional
Microphone:
Capture sound for your video
Reset:
Pressandholdfor5secondstoresetthecamera(ifyouhavemodiedsettings,
they will return to factory defaults).
NOTE: sd card not supported.
Dati tecnici
Wi-Fi 2.4GHzWIFI(IEEE802.11b/g/n)
Range di frequenza 2412-2472 MHz
Potenza RF trasmessa < 100 mW (20dBm)
Technical data
Wireless 2.4GHzWIFI(IEEE802.11b/g/n)
Frequency range 2412-2472 MHz
Transmitted RF power < 100 mW (20dBm)

46KIT.036C - 46242.036C
4 IT EN
2.1 - Wi-Fi camera
- The series camera is in the integrated brackets structure. Please use 3 pcs
screwstoxthebasementofthecameraattheinstallationlocation.
- To loosen the camera body’s screws to adjust the three-axis. Adjust the
connection between brackets and basement by axis to implement 0º~360º
in the horizontal direction; Adjust the spherical joint of brackets can achieve
0º~90º in the vertical direction and 0º~360º in the rotational direction. Please
tighten the screws after adjusting the camera image to the right scene. All the
installationhasnished.
2 - Installazione 2 - Installation
2.1 - Telecamera Wi-Fi
-Latelecameraèdotatadistaaintegrata,utilizzarele3vitiindotazioneper
ssarlanelluogodiinstallazione.
- E' possibile regolare la telecamera su 3 assi:
0°~360° per l'asse orizzontale, 0°~90° per l'asse verticale e 0°~360° per la
rotazione. Stringere le viti dopo aver posizionato la telecamera nella direzione
desiderata. L'installazione è terminata.
0°~90°
0°~360°
0°~
360°
Viti regolabili
Adjustable screws
Sotto
Ceiling
Vitidissaggio
Install screws
0°~90°
0°~360°
0°~360°
Dopo aver regolato l'angolazione della fotocamera, bloccare la vite
After adjusting your camera angle, please lock the screw
1. Fissare la telecamera alla parete con le viti
2. Regolare l'angolazione della telecamera in base alle proprie esigenze di
ripresa(comedaguraaanco)
Montaggioasotto/Ceiling mount
Montaggioaparete/Wall mounting
1. Fix the camera to the wall with screws
2. Adjust camera angle to a suitable view (as shown in the picture)
Raccomandazioni d’uso
Questo KIT NVR è un dispositivo che utilizza la trasmissione video su segnale
WiFi. Eventuali fattori che inuiscono sulla trasmissione del segnale Wi-Fi
possono causare una cattiva esperienza nell‘uso del prodotto. Pertanto, durante
l‘installazione e l‘utilizzo, si raccomanda di seguire i seguenti consigli per ottenere
la migliore esperienza possibile con il prodotto.
Recommendations for use
This NVR KIT is a device that uses video transmission on a Wi-Fi signal.Any factors
aectingthetransmissionoftheWi-Fisignalmaycauseanegativeexperience
when using the product. Therefore, during installation and use, it is recommended
to follow these instructions to ensure the best possible experience with the product.

46KIT.036C - 46242.036C
5 IT EN
Ottimizzare la portata
Per ottenere le migliori prestazioni, le telecamere dovrebbero essere disposte a
raggiera attorno al registratore, meglio se equidistanti dall’NVR. In questo modo
è possibile utilizzare il massimo della portata del sistema.
Si raccomanda di evitare le situazioni seguenti:
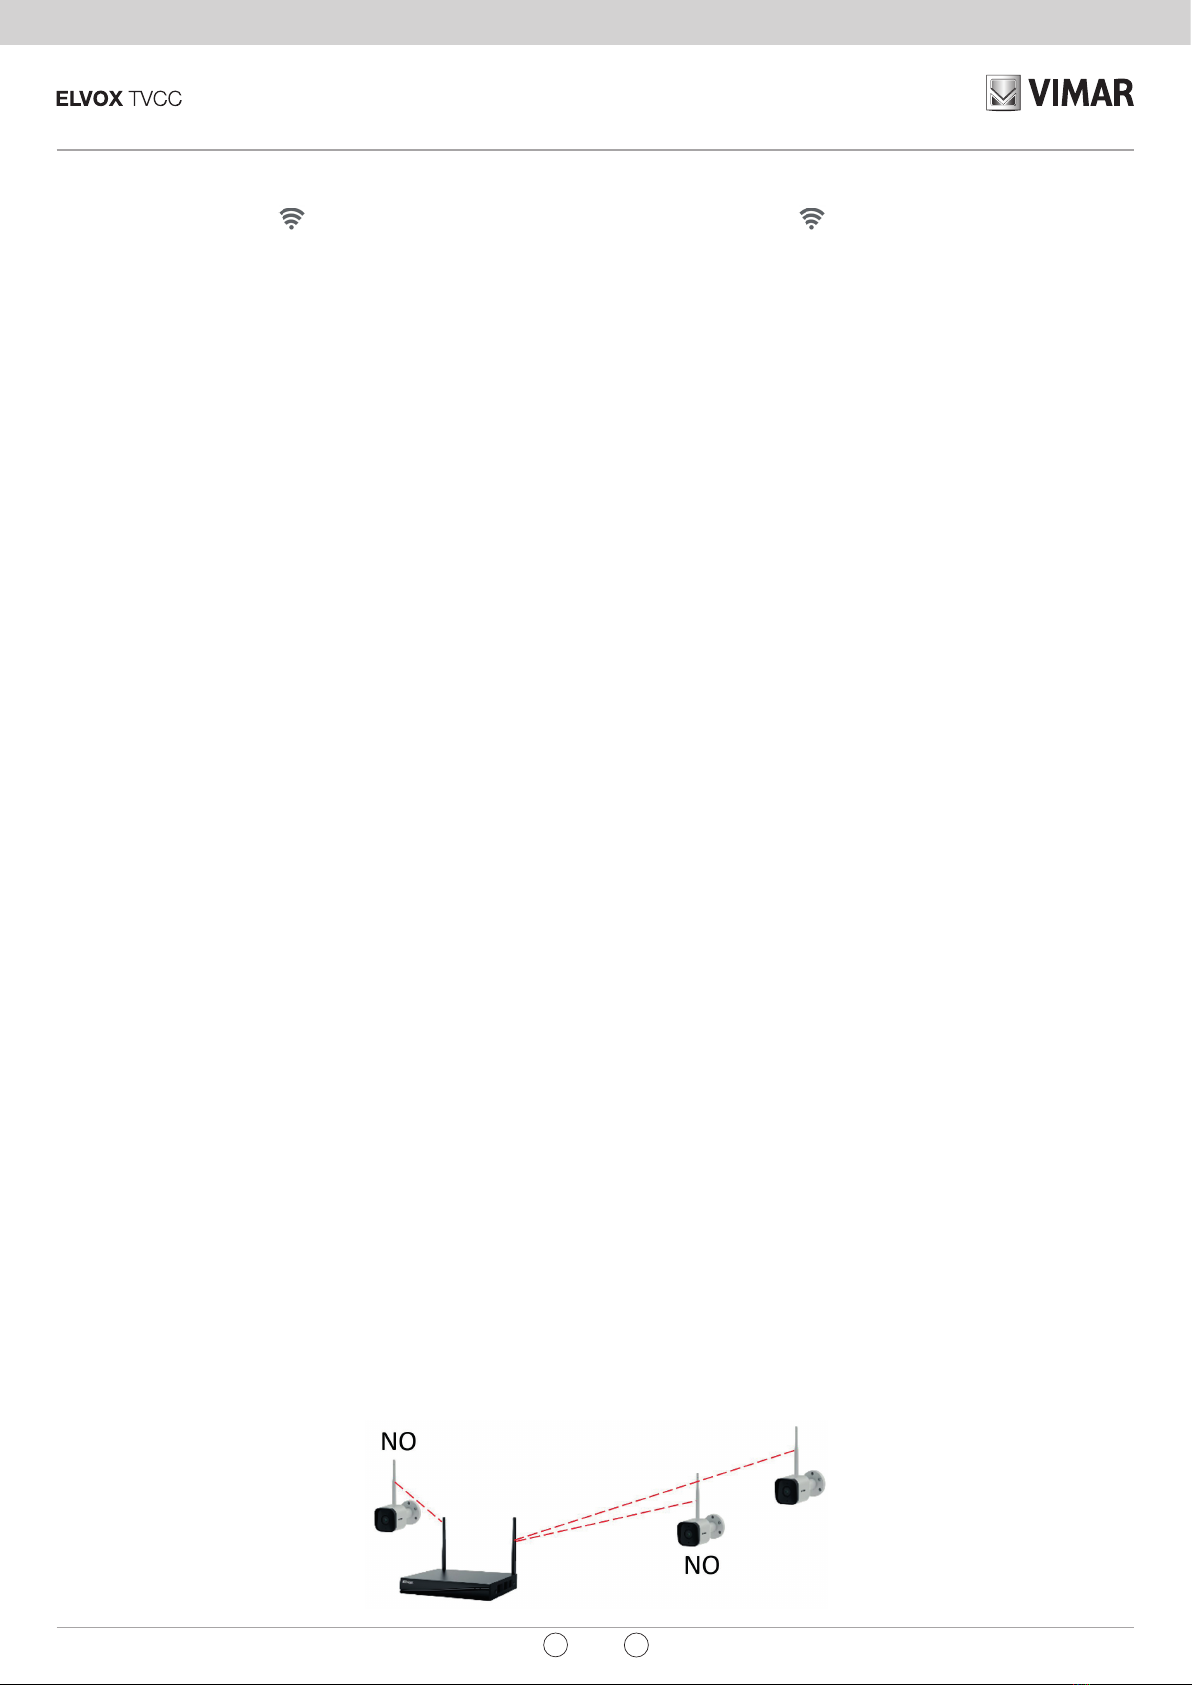
• Non posizionare due telecamere in linea
Evitare il posizionamento una dietro l’altra osservandole dal registratore.
La telecamera più vicina potrebbe interferire sul segnale proveniente dalla
telecamera più lontana.
2.2 - Suggerimenti per il posizionamento del registratore NVR
1. VericarelapotenzadelsegnaleWiFidelletelecamereamonitordell’NVR,
il numero di barre dell’icona ( ) mostra la potenza del segnale Wi-Fi della
telecamera selezionata.
Assicurarsi che le telecamere abbiano almeno tre barre di segnale
(potenza>70%) nell’area in cui si desidera posizionarle. Le telecamere
riuscirebbero a funzionare anche con una o due barre di segnale, ma
potrebbero disconnettersi frequentemente dalla rete.
2. Se la potenza del segnale risultasse scarsa, ciò potrebbe essere dovuto al
registratore NVR posizionato troppo lontano dalla telecamera o da ostacoli
presenti nell’ambiente.
3. Se possibile, provare ad avvicinare la telecamera all’NVR scegliendo
un’altra posizione.
4. Ottimizzare la posizione del registratore NVR, posizionandolo preferibilmente
al centro dell’impianto e il più possibile lontano dal suolo o dal pavimento
(almeno 50cm).
Ostacoli che inuiscono negativamente sul segnale WiFi
GliostacolicheinuenzanonegativamentelatrasmissionedelsegnaleWiFisono
quelli interposti sulla linea immaginaria che unisce l’antenna del registratore con
l’antenna della telecamera.
Per tale motivo la posizione della telecamera è molto importante e determinante
per aggirare gli ostacoli.
Laportatadelsegnaleèridottadaqualsiasiparete,sottooaltriostacolidigrandi
dimensioni interposti tra la telecamera e il registratore NVR.
Ostacoli metallici
L’unico materiale, capace di impedire il passaggio del segnale radio è il metallo. È
importante prestare particolare attenzione a cancelli metallici di grosse dimensioni,
ringhiereoallescaalaturemetalliche.Noninstallareletelecamereall’internodi
“gabbie” metalliche.
Ostacoli non metallici
Gliostacoli non metallici non hanno un vero eetto schermante econsentono
sempre il passaggio del segnale, tuttavia, introducono una certa attenuazione.
Gli ostacoli con maggiore densità e spessore, come i muri spessi in cemento o le
solettedeisotti,introduconoun’attenuazionesuperioreamaterialimenodensi
e in genere più sottili come legno, plastica etc.
Posizionare la telecamera
Tanto più gli ostacoli sono vicini al trasmettitore (telecamera) tanto più deteriorano
la trasmissione.
Installare la telecamera in un luogo il più possibile aperto verso il registratore in
modo da non avere ostacoli importanti nei primi metri di percorso.
Le altezze delle telecamere non devono necessariamente essere identiche, tuttavia
un fattore chiave è che l’installazione non dovrebbe essere inferiore a 1,8 metri
dal suolo o dal pavimento.
2.2 - Suggestions for positioning the NVR recorder
1. Check the power of the camera WiFi signal on the NVR monitor, the number
of bars on the icon ( ) shows the power of the selected camera Wi-Fi
signal.
Make sure that the cameras have at least three signal bars (power >70%)
in the area where they are to be positioned. The cameras could also work
with one or two signal bars, but may frequently disconnect from the network.
2. If the signal power is low, this maybe due to the NVR recorder being
positioned too far away from the camera or to obstacles in the area.
3. If possible, try to move the camera closer to the NVR in another position.
4. Optimise the NVR recorder position, preferably in the centre of the system
andasfaraspossiblefromthegroundoroor(atleast50cm).
Obstacles negatively aecting the WiFi signal
Obstacles negatively aecting the transmission of the WiFi signal are those
positioned along the imaginary line between the recorder antenna and the camera
antenna.
For this reason, the camera position is very important and decisive for overcoming
any obstacles.
The signal range is reduced by any walls, ceilings or other large obstacles placed
between the camera and the NVR recorder.
Metallic obstacles
The only material that can prevent the passage of the radio signal is metal. It is
important to pay close attention to large metal gates, railings or metal shelving.
Do not install the cameras inside metal “cages”.
Non-metallic obstacles
Non-metallicobstaclesdonothaveafullyshieldingeectandinanycaseallowthe
signal to pass, however they may reduce the signal. Obstacles with high density
and thickness, like thick concrete walls or ceilings, reduce the signal more than
less dense and generally thinner materials such as wood, plastic, etc.
Position the camera
The closer the obstacles are to the transmitter (camera) the weaker the
transmission.
Install the camera in a space that is as open as possible, facing the recorder,
avoidingmajorobstaclesintherstfewmetresofitspath.
The camera heights do not need to be identical, but one key factor is that they
shouldnotbeinstalledataheightoflessthan1.8metresothegroundoroor.
Optimise the range
To obtain the best performance, the cameras should be arranged radially around
the recorder, even better if at the same distance from the NVR. In this way, the
full range of the system can be used.
It is recommended to avoid the following situations:
• Do not position two cameras in a line
Do not position one behind the other when observed from the recorder.
The nearest camera could interfere with the signal coming from the camera
furthest away.

46KIT.036C - 46242.036C
6 IT EN
2.3 - Collegare l'NVR al monitor
1. Accendere l'NVR utilizzando l’alimentatore incluso.
2. Collegare l'NVR al proprio monitor tramite interfaccia VGA o HDMI.
3. Collegare il mouse all’NVR tramite porta USB.
4. Accendere la telecamera collegandola al proprio alimentatore. La telecamera
si collegherà automaticamente e sarà visibile subito a schermo.
5. Per il primo utilizzo, ci sarà una procedura guidata di avvio. Sarà necessario
impostare una password e seguire le istruzioni visualizzate sullo schermo. Si
potrà quindi iniziare a utilizzare il KIT.
Mouse
Power adapter
2.3 - Connect NVR to screen
1. Power on the NVR with included power adapter.
2. Connect the NVR with screen by VGA interface or HDMI interface.
3.Connect the NVR with mouse by USB interface.
4. Power on the camera device. The camera will connect to the screen
automatically.
5.Fortherstuse,therewillbeabootwizard.Pleasesetupapasswordand
follow the on-screen instructions. Then you can start to use the NVR kit.
NOTA: la lunghezza della password
potrà essere compresa fra un minimo
di 8 e un massimo di 62 caratteri.
Sono supportati i caratteri presenti
nella tastiera virtuale, inclusi numeri,
lettere, spazio, punteggiatura.
NOTE: The length of the password
can be between a minimum of 8
and a maximum of 62 characters.
The characters present in the virtual
keyboard are supported, including
numbers, letters, space, punctuation.
Attivare la modalità Ad-Hoc (repeater)
Per telecamere non raggiungibili dal segnale del registratore, è possibile utilizzare
una telecamera intermedia in cascata, che fungerà da ripetitore WiFi.
La telecamera scelta come ripetitore dovrà avere un segnale potente e stabile e
possibilmente avere il minor numero di ostacoli interposti all’NVR, meglio se a vista.
Interferenze di oggetti elettronici e altri dispositivi
In ambienti con la presenza di numerosi dispositivi Wi-Fi potrebbero aumentare
le situazioni di disconnessione a causa delle interferenze.
Activate the Ad-Hoc mode (repeater)
For cameras that cannot be reached by the recorder signal, it is possible to use
an intermediate camera in cascade, which acts as a WiFi repeater.
The camera chosen as a repeater must have a powerful and stable signal and
possibly the least obstacles between it and the NVR, even better if in sight of it.
Interference with electronic and other devices
In spaces with many Wi-Fi devices, interference could increase the disconnection
frequency.
• Do not position a camera too close to the recorder
A camera positioned just a few metres from the recorder could disturb the
weaker signal of those further away.
• Non posizionare una telecamera a pochi metri dal registratore
Una telecamera a pochi metri dal registratore potrebbe tendere a disturbare
il segnale più debole di quelle più lontane.

46KIT.036C - 46242.036C
7 IT EN
2.4 - Connessioni 2.4 - Connections
Internet
HDMIVGA
Router
Porta LAN per connessione a internet
LAN port to connect the internet

46KIT.036C - 46242.036C
8 IT EN
Se si dimentica la password di accesso, seguire i seguenti passaggi per
reimpostarla:
1. Nell'interfaccia di accesso, fare clic su Password dimenticata (forgot
Password)?peraccedereall'interfacciadimodicadellapassword.
3 - Reset Login Password
2. Immettere il numero di servizio dell’NVR, quindi immettere la nuova password.
Cliccare Conferma per salvare l'operazione.
Note:
Inserisci il numero di servizio che può essere ottenuto dall'etichetta applicata sul
fondo oppure interna del dispositivo (sarà necessario rimuovere il coperchio).
3.EettuareilLoginconlanuovapassword.
If you forget the login password, follow the steps to reset:
1. On the login interface, click Forgot password? to enter the interface of
password changing.
3 - Reset Login Password
2. Enter the service number of NVR, and then enter the new password. Click
Conrm to save the operation.
Note:
Please enter the service number which can be obtained from the label applied on
the bottom or inside of the device (you will need to remove the cover). It depends
on the actual devices.
3. Log in with new password.
IMPORTANTE:
In caso di etichetta illeggibile o smarrimento, Il numero di servizio può essere
recuperato anche dalla pagina di Sistema aggiornamento.
Si consiglia di salvarlo in un posto sicuro dopo il primo accesso.
IMPORTANT:
In the event of an illegible or lost label, the service number can also be retrieved
from the System upgrade page.
Itisrecommendedtosaveitinasafeplaceaftertherstlogin.

46KIT.036C - 46242.036C
9 IT EN
4 - Funzione Anteprima
* Dalla schermata di anteprima è possibile visualizzare il live delle telecamere
collegate.
* L'NVR e le telecamere sono già preimpostati e accoppiati dalla fabbrica.
Quando vengono accesi, si collegheranno tra loro automaticamente.
4.1 - Visione Live
1Elenco dei canali telecamera connessi
2Ora e data
3Stato registrazione
4Potenza segnale Wi-Fi
5Barra di navigazione della telecamera
6Barra di navigazione Visione Live
Avviare visione Live
Metodo 1: Trascinare il nome della telecamera dell'elenco dei canali (1) sullo
schermo di visualizzazione.
Metodo 2: Selezionare una telecamera dell'elenco canali (1) e fare clic
sull'icona Anteprima accanto al nome. (Clicca su Icona Modica
per cambiare il nome della telecamera.)
4 - Preview Function
* From the preview screen, you can view the live of the connected cameras.
* The NVR and cameras are paired by factory.
When they are powered on, they will connect to each other automatically.
4.1 - Live View
1Channel list of connected cameras
2Current date and time
3Whether to record or not
4Wi-Fi signal strength
5Navigation bar of selected camera
6Navigation bar of live view
Open live view
Method 1: Drag the camera name from channel list (1) onto the display screen.
Method 2: Select one camera of channel list (1), and click the Preview icon
next to the camera name. (Click Edit icon to change camera name.)

46KIT.036C - 46242.036C
10 IT EN
4.2 - Barra di navigazione della telecamera
Numero del canale selezionato
Visualizza la risoluzione corrente. Per la visualizzazione
su1o4schermate,l'impostazionepredenitaprevede
l'utilizzodelussoprincipale.Posizionareilmousesopra
l'icona per visualizzare la risoluzione.
Cliccare per capovolgere lo schermo
Cliccare per ingrandire o rimpicciolire
Fare clic per accedere ai controlli di movimentazione PT.
Funzione non disponibile per telecamere bullet.
Cliccare per commutare le modalità Giorno e Notte
Attivazione/disattivazionemicrofono
4.3 - Barra di navigazione visione Live
Attiva o disattiva l’audio e regola il volume
Cliccare per cambiare la visualizzazione delle
telecamere.
Fare clic per avviare la funzione patrol. Le singole
telecamere verranno visualizzate automaticamente
in modo ciclico
Anteprima delle telecamere
Chiudi anteprima delle telecamere
Modicavistadelloschermo
Mostra la telecamera a tutto schermo
4.2 - Navigation bar of selected camera
View the channel number of selected camera
View the current resolution. For viewing on 1 or 4 screens,
the default is to use the main stream. Hold the mouse over
the icon to view the resolution.
Clicktoipthescreen
Click to zoom in or zoom out
Click to enter PT handling controls. Function not available
for bullet cameras.
Click to switch mode between Day and Night
Turnonorturnomicrophone
4.3 - Navigation bar of live view
Turnonorovoice,andadjustvolume
Clicktodisplaydierentcamerascreens
Click to start the patrol function. The individual
cameras will automatically be displayed cyclically
Open previews of all cameras
Close previews of all cameras
Select split style of camera screens
Display the selected camera with full screen
Autres manuels pour 46KIT.036C
1
Ce manuel convient aux modèles suivants
1
Table des matières
Autres manuels Vimar Appareil photo numérique

Vimar
Vimar ELVOX TVCC Manuel utilisateur

Vimar
Vimar ELVOX TVCC 46534.037BP Manuel utilisateur

Vimar
Vimar 46523.036B Manuel utilisateur

Vimar
Vimar Elvox 2559 Manuel utilisateur

Vimar
Vimar ELVOX 46234.010E.67 Manuel utilisateur

Vimar
Vimar ELVOX 46237.040A Manuel utilisateur

Vimar
Vimar ELVOX 46239.040A Manuel utilisateur

Vimar
Vimar ELVOX 46237.040A Manuel utilisateur

Vimar
Vimar ELVOX 46322.003 Manuel utilisateur

Vimar
Vimar ELVOX 46CAM.136B.8 Manuel utilisateur


