Velleman CAMCOLMS2 Manuel utilisateur

CAMCOLMS2
3 MP HDMI DIGITAL MICROSCOPE
3 MP DIGITALE MICROSCOOP - HDMI
MICROSCOPE NUMÉRIQUE 3 MP - HDMI
MICROSCOPIO DIGITAL - 3 MP - HDMI
DIGITALES MIKROSKOP - 3 MP - HDMI
MIKROSKOP CYFROWY HDMI 3 MEGAPIKSELE
MICROSCÓPIO DIGITAL HDMI DE 3 MEGAPIXEIS
USER MANUAL 5
HANDLEIDING 15
MODE D'EMPLOI 25
MANUAL DEL USUARIO 35
BEDIENUNGSANLEITUNG 45
INSTRUKCJA OBSŁUGI 55
MANUAL DO UTILIZADOR 65
CAMCOLMS2
V. 01 –20/09/2016 2 ©Velleman nv

CAMCOLMS2
V. 01 –20/09/2016 3 ©Velleman nv
I1
I2
I3

CAMCOLMS2
V. 01 –20/09/2016 4 ©Velleman nv
F1
F2
F3

CAMCOLMS2
V. 01 –20/09/2016 5 ©Velleman nv
USER MANUAL
1. Introduction
To all residents of the European Union
Important environmental information about this product
This symbol on the device or the package indicates that disposal of the device after its lifecycle
could harm the environment. Do not dispose of the unit (or batteries) as unsorted municipal
waste; it should be taken to a specialized company for recycling. This device should be returned
to your distributor or to a local recycling service. Respect the local environmental rules.
If in doubt, contact your local waste disposal authorities.
Thank you for choosing Velleman! Please read the manual thoroughly before bringing this device into
service. If the device was damaged in transit, do not install or use it and contact your dealer.
2. Safety Instructions
Keep this device away from children and unauthorized users.
This appliance is not intended for use by persons (including children) with reduced physical,
sensory or mental capabilities, or lack of experience and knowledge, unless they have been
given supervision or instruction concerning use of the appliance by a person responsible for
their safety.
Children shall be supervised to ensure that they do not play with the appliance.
The white LEDs, which illuminate the microscope target field, are very bright. Do not stare
directly into these LEDs as it may damage your eyes.
3. General Guidelines
Refer to the Velleman® Service and Quality Warranty on the last pages of this manual.
Keep this device away from dust and extreme temperatures.
Protect this device from shocks and abuse. Avoid brute force when operating the device.
Familiarise yourself with the functions of the device before actually using it.
All modifications of the device are forbidden for safety reasons. Damage caused by user modifications
to the device is not covered by the warranty.
Only use the device for its intended purpose. Using the device in an unauthorised way will void the
warranty.
Damage caused by disregard of certain guidelines in this manual is not covered by the warranty and
the dealer will not accept responsibility for any ensuing defects or problems.
Do not switch the device on immediately after it has been exposed to changes in temperature.
Protect the device against damage by leaving it switched off until it has reached room temperature.
Keep this manual for future reference.
4. Features
ideal for checking PCBs, plants, insects, rocks, minerals...
adjustable focus and magnification
white LEDs with adjustable intensity
2 operation modes
oHDMI monitor: via HDMI output, video can be recorded on microSD card (up to 32GB)
ocomputer: via USB connector, video can be recorded on the computer
comes with PC software: Portable Capture HD

CAMCOLMS2
V. 01 –20/09/2016 6 ©Velleman nv
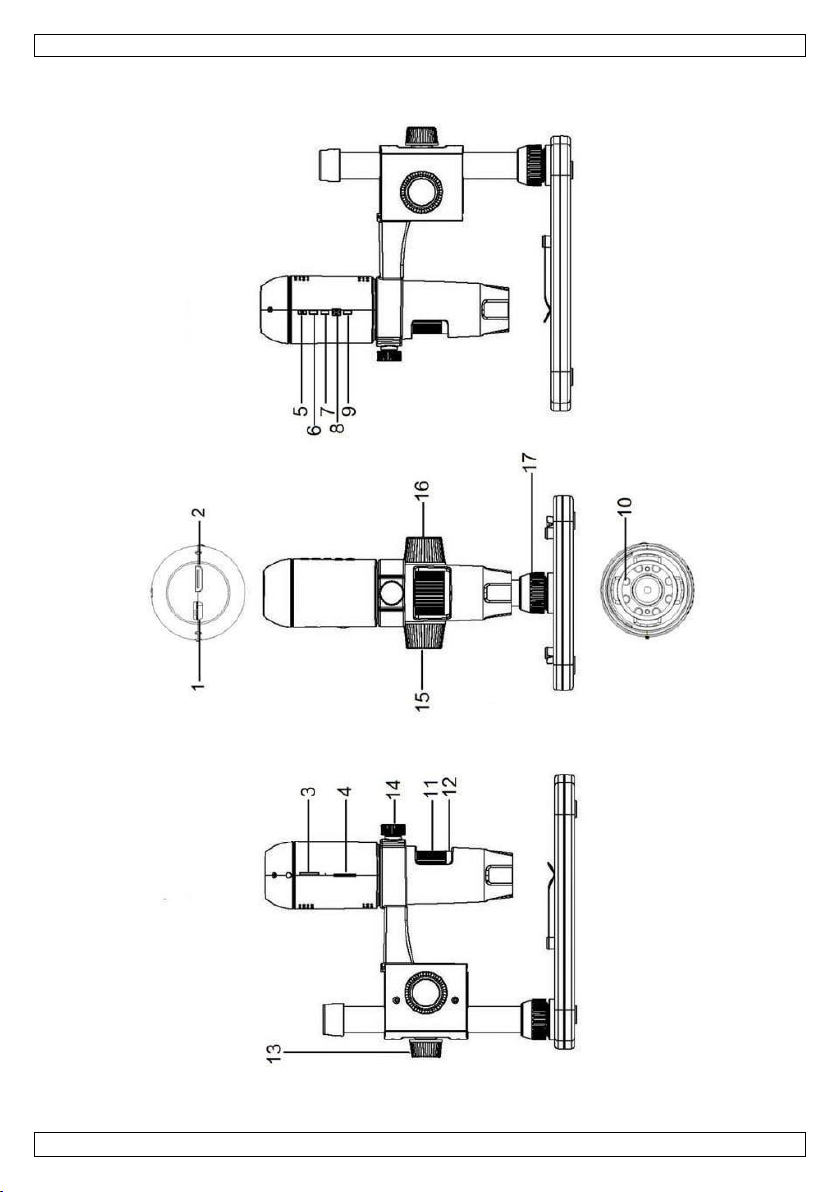
5. Overview
Refer to the illustrations on page 2 of this manual.
1
5 VDC + USB port
10
LEDs
2
HDMI port
11
fine focus wheel
3
microSD slot
12
magnification ruler
4
LED dimmer
13
locking screw
5
on-off
14
locking screw
6
mode
15
coarse focus wheel
7
menu
16
coarse focus wheel
8
capture/OK
17
locking screw
9
down
6. Installation
Refer to the illustrations on page 3 of this manual.
1. Put the base on a flat and stable non-slippery surface. Slide the frame into the base hole and
tighten with the nut (see fig. I1).
2. Slide the microscope into the frame and tighten the screw (see fig. I2).
3. Adjust the height of the microscope to the desired height (see fig. I3).
7. Adjusting the Focus
Refer to the illustrations on page 4 of this manual.
1. Rotate the coarse focus wheel to get the first focus (see fig. F1).
2. Rotate the fine focus wheel to refine the focus (see fig. F2).
3. Fix the microscope with the locking wheel (see fig. F3).
8. Using the Microscope
8.1 Connection
1. Connect the microscope to a powered USB port.
2. Connect the microscope to the TV set or monitor using the HDMI cable.
3. Switch on the TV set or monitor and select the HDMI setting.
4. Switch on the microscope
8.2 Taking a Picture
1. Insert a microSD card (max. 32 GB SDHC) into the microscope.
2. Place an object under the lens. Turn the focus wheel to focus the image of the object to its best.
3. Press the capture button to take the picture and save it onto the microSD card.
8.3 Playback
1. Make sure the microscope is loaded with a microSD card.
2. Press the mode button to switch to the playback mode.
3. Press the down button to view the previous picture; press the mode button to return to the preview
mode.
8.4 Storing
You can store all your pictures on a microSD card or on your computer. To do so, connect the microscope
to the computer and transfer the pictures from the microSD card to the computer.

CAMCOLMS2
V. 01 –20/09/2016 7 ©Velleman nv
9. Menu
Press the menu button to enter main menu I.
Press the menu button once more to enter main menu II.
Select the menu item with the down button and confirm with the capture button.
9.1 Resolution
Select a resolution between WVGA, 2M, 3M, 5M, 8M and 14M.
9.2 Time-Lapse Capture
Lapse Num: Select the number of frames to be automatically captured during the set lapse time.
Lapse Time: Select the lapse time during which the microscope will automatically take a number of
pictures.
1. Press the capture button to confirm your selection and press the menu button to return to the
preview status.
2. Start the automatic capture with the capture button. When all pictures are taken, the microscope
will return to normal preview.
9.3 Quality
Select a quality between Fine, Normal and Economy.
9.4 Sharpness
Select a value between Strong, Normal and Soft.
9.5 Exposure
Select a brightness value between +2/3, +0.0 and -1/3.

CAMCOLMS2
V. 01 –20/09/2016 8 ©Velleman nv
9.6 Date Stamp
Select whether to display the date or not.
9.7 Date/Time
Set the date and time in this window.
9.8 Auto Power-Off
Set the automatic power-off time between Off, 3M, 10M and 30M.
9.9 Language
Select your desired menu language.
9.10 TV Mode
Set the encoding mode between NTSC and PAL.
9.11 Frequency
Select the frequency between 50Hz and 60Hz.
9.12 Format
Choose this menu to format your microSD card.
Note that all the recorded files on the card will be permanently deleted.
9.13 Default Setting
Choose this menu to go back to the default factory settings.
9.14 Version
Enter this menu to display the current software version.
10. Software
10.1 Installation
Insert the CD-ROM into the CD-ROM drive of your computer. Install the software and follow the
instructions on your screen. Also, make sure the microscope is connected to your computer.
10.2 Starting the Software
Launch the software and connect the microscope to the computer. The main screen is displayed.
Note
Remove the SD card before connecting the microscope to the computer and insert only after connection.
This will avoid that the computer will recognized the microscope as a mass storage device.

CAMCOLMS2
V. 01 –20/09/2016 9 ©Velleman nv
10.3 Functions
Calibration
It is recommended to calibrate the microscope before use. First, load the XY guide onto the display.
Place the calibration ruler on the stage and fix with the stage clips. Focus the image until the picture is
clear. Take a picture when the ruler lines are parallel to the XY guide.
Double-click on the picture to enter the measurement interface.

CAMCOLMS2
V. 01 –20/09/2016 10 ©Velleman nv
Click the calibration icon and move the cursor to the picture.
Click the start and end points across a known value. Enter the exact measurement values in the dialogue
window.
The software will automatically calibrate the magnification rate. Click OK; the adjusted magnification rate
will show in the upper right corner.
Click on the angle line icon to measure the values again. The microscope is calibrated if these last values
correspond (or differ slightly) to the values entered before.
Autres manuels pour CAMCOLMS2
1
Table des matières
Langues :
Autres manuels Velleman Microscope

Velleman
Velleman CAMCOLMS1 Manuel utilisateur

Velleman
Velleman CAMCOLMS2 Manuel utilisateur

Velleman
Velleman MICROS1 Manuel utilisateur

Velleman
Velleman CAMCOLMS3 Manuel utilisateur

Velleman
Velleman CAMCOLMS1N Manuel utilisateur

Velleman
Velleman CAMCOLMS Manuel utilisateur

Velleman
Velleman CAMCOLMS4 Manuel utilisateur
Manuels Microscope populaires d'autres marques


VWR
VWR VisiScope 384 Series Manuel utilisateur

Nikon
Nikon ECLIPSE E200 POL Manuel utilisateur

Leica
Leica DI C800 Manuel

ThermoFisher Scientific
ThermoFisher Scientific Continuµm Manuel utilisateur

ThermoFisher Scientific
ThermoFisher Scientific Continuµm Manuel utilisateur

Olympus
Olympus SZ61 Manuel utilisateur