ToolPRO 603752 Manuel utilisateur

35L Wet & Dry Workshop Vacuum Cleaner
PLU 603752

1
WARRANTY
Our product is guaranteed to be free from quality and manufacturing defects for a period
of 12 months.
If your product becomes defective during this period, SRGS PTY LTD will offer you either
a replacement, credit or refund where a product is faulty; wrongly described; different
from the sample shown to you or do not do what they are supposed to do.
This warranty will not cover substantially modified product; misuse or abuse of the
product contrary to user instructions or packaging label; change of mind and normal wear
and tear.
Our goods come with guarantees that cannot be excluded under the Australian
Consumer Law. You are entitled to a replacement or refund for a major failure and for
compensation for any other reasonably foreseeable loss or damage. You are also entitled
to have the goods repaired or replaced if the goods fail to be of acceptable quality and
failure does not amount to a major failure.
To claim the warranty, take the product to the front Service Desk of your nearest store of
purchase. You will need to show receipt or other proof of purchase. Additional information
may be required to process your claim. Should you not be able to provide proof of
purchase with a receipt or bank statement, identification showing name, address and
signature may be required to process your claim.
Any expenses relating to the return of your product to the store will normally have to be
paid by you. For online store purchases, SRGS PTY LTD will pay for the return freight for
any product assessed as having a major failure.
The benets to the customer given by this warranty are in addition to other rights and
remedies of the Australian Consumer Law in relation to the goods or services to which
this warranty relates.
This warranty is provided by SRGS PTY LTD, 6 Coulthards Avenue, Strathpine QLD
4500, Australia. Phone: 1300 175 010.
IMPORTANT SAFEGUARDS
When using an electrical appliance,basic precautions should always be followed,including
the following:
READ ALL INSTRUCTION BEFORE USING THIS VACUUM CLEANER

2
GENERAL SAFETY WARNINGS
WARNING: Read all safety warnings and all instructions. Failure to follow the
warnings and instructions may result in electric shock, re and/or serious injury.
Save all warnings and instructions for future reference.
- This appliance is not intended for use by persons (including children) with reduced
physical, sensory or mental capabilities, or lack of experience and knowledge, unless
they have been given supervision or instruction concerning use of the appliance by a
person responsible for their safety.
- Children should be supervised to ensure that they do not play with the appliance.
- If the supply cord is damaged, it must be replaced by the manufacturer, its service
agent or similarly qualied persons in order to avoid a hazard.
- The plug must be removed from the socket-outlet before cleaning or maintaining the
appliance

3
SYMBOLS
Warning
Read the operator’s manual
Double insulation
Wear ear protection
Wear dust mask
RCM marking
ABN: Australian Business Number. By this number, business information such as entity
type, status, business location etc. can be found at website http://abr.business.gov.au.
ABN of Positec Australia Pty Limited is 14 101 682 357

4
PARTS NAME
Carry handle
On board storage / holders
Flexible hose outlet - Blower
Power cord
Foam filter
Paper dust bag
Appliance head
Filter basket
HEPA filter
Filter basket
Floating safety valve
Carry handle
Appliance head
On board storage / holders
Side locking handle (x2)
Extension tubes (x3)
On board storage / holders
Castor wheels (x4)
Base
ON/OFF switch
AC outlet socket
Flexible hose outlet - Suction
Tank
Extension tubes (x3)
On board storage / holders
Drain screw
Flexible hose Crevice tool Floor tool

5
ASSEMBLY
1
2
3
4
Remove the appliance head from the tank by
unlocking the 2 x side locking handles pulling
them outwards, then upwards.
Then turn the tank upside down.
Fit the 4 x castor wheels by inserting the mounting
pin on the castor wheel into the designated
mounting hole on the underside of the base.
Firmly push the castor wheels into the mounting
holes.
When all 4 x castor wheels are tted, turn
the product the right way up, and re-attach
the appliance head ensuring you align the
notches on the ridge of the tank lip with the
side locking handles, and secure the 2 side
locking handles in position.
1. Place the carry handle in the grooves on the
top of the appliance head so that they are tted
and align correctly.
2. Using a phillips screwdriver, insert and secure
the screws through each side of the handle
until secure.
WARNING: To prevent serious injury from accidental operation, turn
the power switch of the vacuum off and unplug the appliance from its
electrical outlet before performing any procedure in this section.

6
ASSEMBLY
5
6
7
8
9
1. Remove the appliance head from the tank by
unlocking the 2 x side locking handles pulling
them outwards, then upwards.
Place the appliance head upside down onto
a at surface, or on its side (if the carry
handle is already assembled).
2. Remove the HEPA lter (installed upon
purchase) by pulling it away from the
appliance head.
Slip the foam lter over the lter basket.
Ensure the foam lter covers the full lter basket.
Re-assemble the appliance head back onto the
tank, and secure the 2 x side locking handles.
Connect the exible hose to the Flexible Hose
Outlet – Suction by inserting into the outlet and
aligning the arrow and locking pin on the end
of the exible hose, with the arrow and ridge on
the top of the Flexible Hose Outlet – Suction.
This should ensure the locking pin on the
exible hose aligns with the ridge in the Flexible
Hose Outlet – Suction. Rotate the exible hose
to the left to secure the hose into position.
Connect the exible hose to the Flexible
Hose Outlet – Blower by inserting into the
outlet and aligning the arrow and locking pin
on the end of the exible hose, with the ridge
on the top of the Flexible Hose Outlet – Blower.
Rotate the exible hose to the left to secure the
hose into position.
7
ASSEMBLY
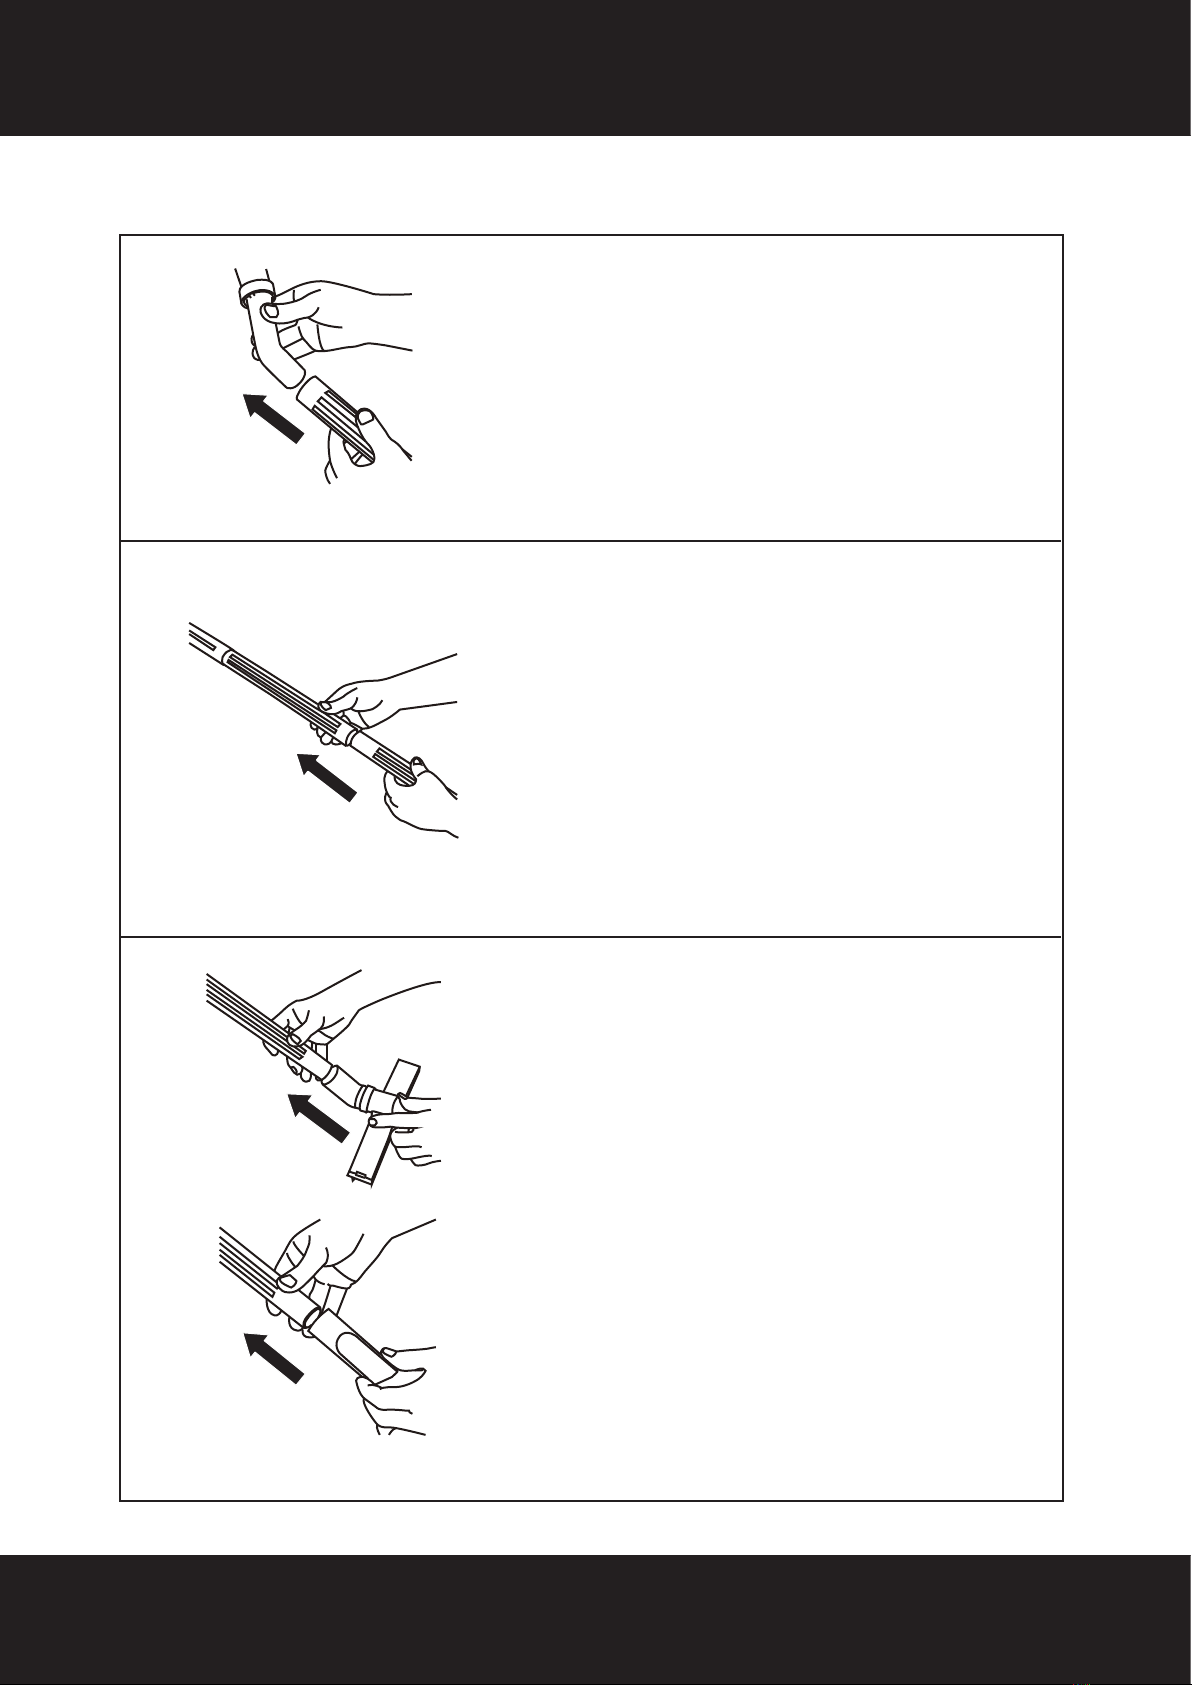
10
11
12
To t an extension tube to the end of the exible
hose, apply the larger opening end of an
extension tube over the end of the exible hose.
To add an additional (2 or 3) exible tube/s,
apply the larger opening end of the extension
tube/s over the rst extension tube until
secure.
For vacuuming, either the oor tool, or crevice tool
can be added to the end of the last extension tube
by simply pushing it onto the extensions tube.
8
OPERATION METHOD
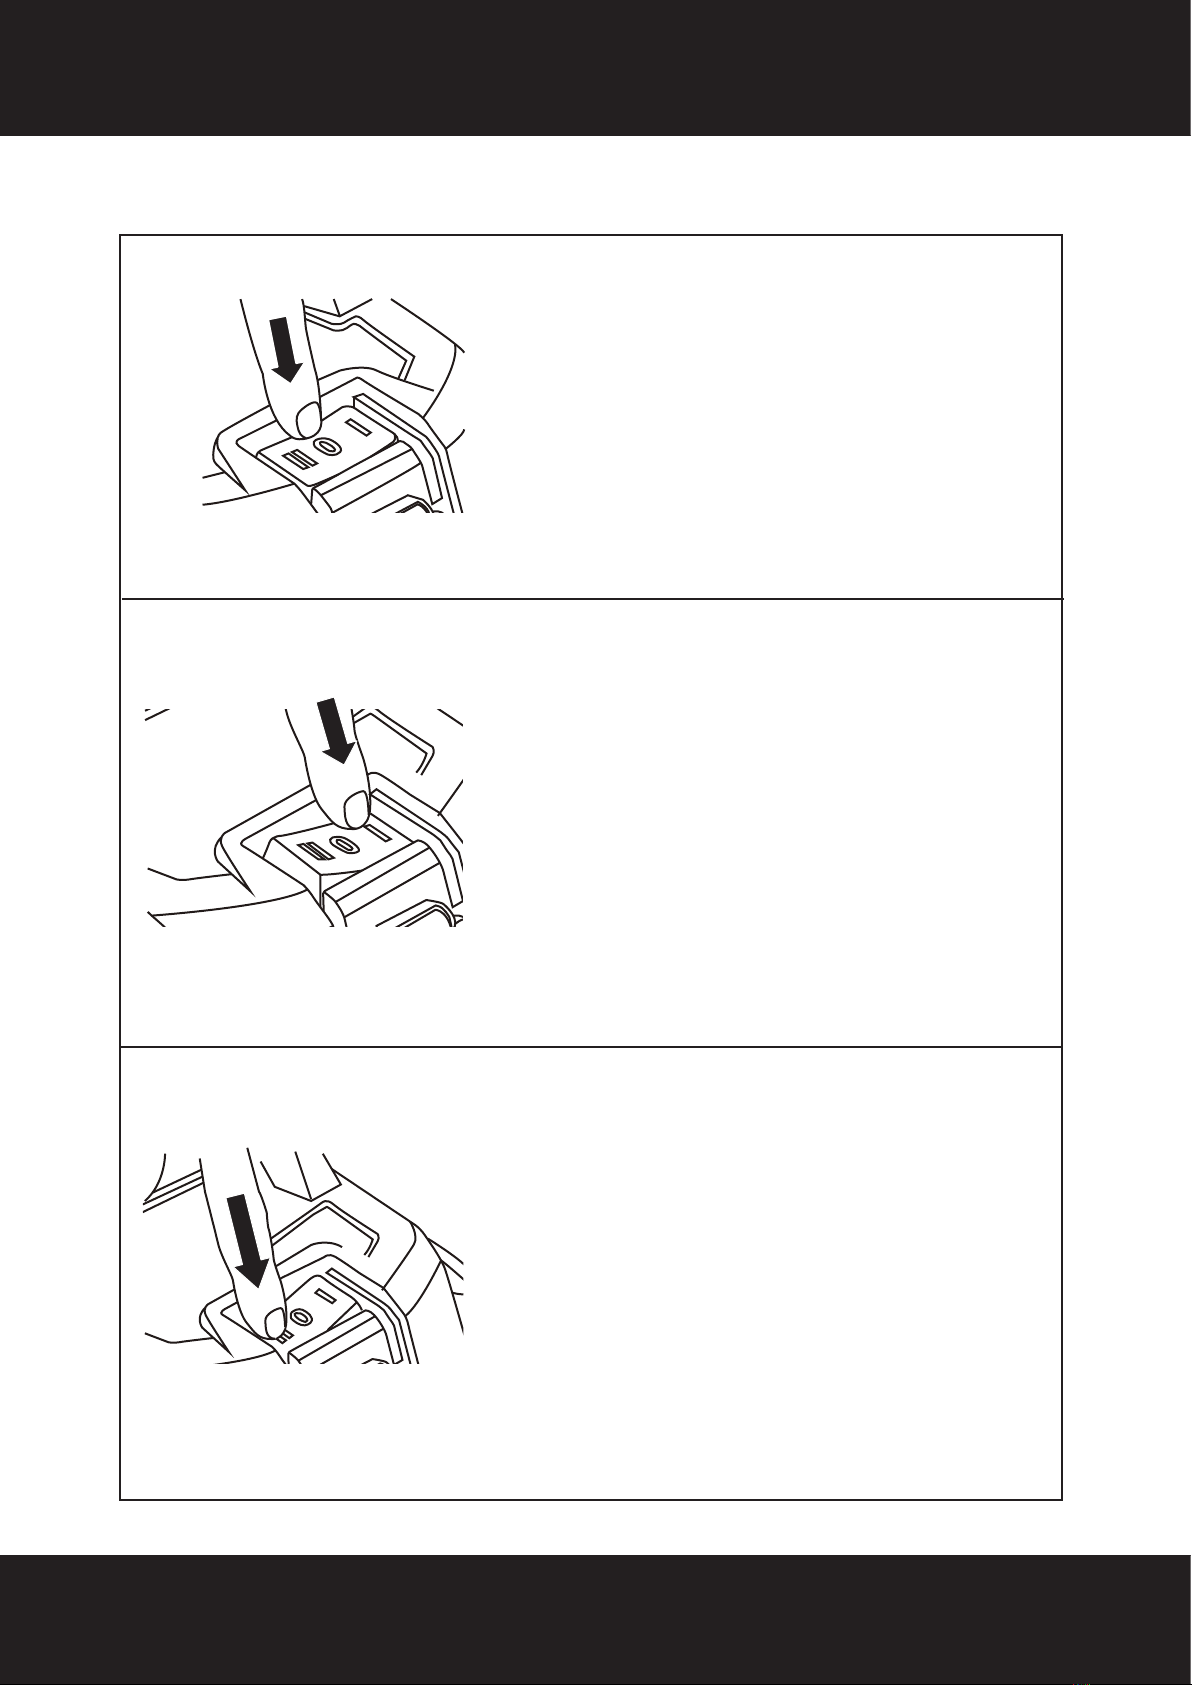
13
14
15
Switch Position 0: OFF (All operations shut off)
Switch Position I: For normal vacuuming
operation (wet or dry)
Switch Position II: Automatic Mode for Power
Tool operation. The vacuum motor will only turn
ON when a power tool, which is plugged into
the AC outlet socket is switched ON. The
vacuum motor will turn OFF when the power
tool is switched OFF.

9
OPERATION METHOD
17 Wet Vacuuming
1. Ensure the tank is completely dry and free
from dust and dirt.
2. Only use the foam lter for wet vacuuming
applications. Ensure you have already tted
the exible hose, extension tubes, and if
required, the oor tool or crevice tool for wet
vacuuming applications.
IMPORTANT: Ensure the foam lter is securely
tted before starting the Wet and Dry Vacuum.
3. Plug the power cord into the mains power
outlet and turn on.
4. To commence vacuum mode operation, press
the “I” on the ON/OFF switch.
5. To turn off vacuum mode, press the “O” on
the ON/OFF switch.
16 Dry Vacuuming
1. Ensure the tank is completely dry and free
from dust and dirt.
2. Only use the HEPA lter for dry vacuuming
applications. Ensure you have already tted
the exible hose, extension tubes, and if
required, the oor tool or crevice tool for dry
vacuuming applications.
IMPORTANT: Ensure the HEPA lter is securely
tted before starting the Wet and Dry Vacuum.
3. Fit the paper dust bag in the tank if required.
NOTE: The paper dust bag is only for dry
vacuum-cleaning.
4. Plug the power cord into the mains power
outlet and turn on.
5. To commence vacuum mode operation, press
the “I” on the ON/OFF switch.
6. To turn off vacuum mode, press the “O” on the
ON/OFF switch.
WARNING: Never use the vacuum without a lter. Check that the lter is
securely tted at all times.
WARNING: DO NOT use the foam lter for dry vacuuming applications.
WARNING: DO NOT use the HEPA lter for wet vacuuming applications.
Table des matières
Autres manuels ToolPRO Aspirateur


