
Thomson Power Systems TS 870 ATS Manuel utilisateur

Part ID 013191
QUICK START GUIDE
TS 870 ATS
100A – 800A (OPEN TRANSITION)
TSC 7320 Controller Firmware Version R0
DANGER
HAZARD OF ELECTRICAL SHOCK, EXPLOSION, OR ARC FLASH
Read and understand this quick start guide before installing and operating the transfer switch
The installer is responsible for compliance with National Electrical Code (NEC) or Canadian Electrical Code (CEC) requirements with respect
to installation of this equipment.
Many components of this equipment operate at line voltage. DO NOT TOUCH. Use only electrically isolated tools.
Install and close all covers before applying power to this equipment.
Do not open covers to equipment until ALL power sources are disconnected.
This equipment must be installed and serviced only by qualified electrical personnel utilizing safe work practices and appropriate Personal
Protective Equipment (PPE).
Failure to do so may cause personal injury or death
PAGE
A. Introduction ........................................................................................................................... 2
B. Check Equipment Delivery ................................................................................................... 2
C. Check Line Voltage/Amperage ............................................................................................. 2
D. Installation Requirements..................................................................................................... 2
E. Service Entrance Rated ATS (US Market Only) .................................................................. 3
F. Typical Interior Component Layout Drawing ...................................................................... 4
G. Power Conductor Installation ............................................................................................... 5
H. Power Conductor Insulation Resistance Testing ............................................................... 5
I. Engine Start Wiring Connections ........................................................................................ 6
J. Remote Input Wiring Connections ....................................................................................... 7
K. Programmable Output Contacts .......................................................................................... 7
L. TSC 7320 Factory Default Programming ............................................................................. 8
M. Transfer Switch Operation .................................................................................................... 9
N. Equipment Energization Procedure ................................................................................... 13
O. TS 870 System Voltage Change Procedure ...................................................................... 15

PM 173 Rev 0 23/02/10 2 Thomson Power Systems
TS 870 with TSC 7320 Quick Start Guide
A. Introduction
Thank you for purchasing a Thomson Power Systems product. This quick start guide applies to open transition TS 870 Industrial Transfer Switch 100A-
800A models with TSC 7320 Controller. For other model types including Closed Transition, Dual Source, please contact Thomson Power Systems.
NOTE: Rev 0 of this Quick Start Guide applies to TSC 7320 with firmware revision R0.
This quick start guide contains all the information you typically need to install and set up a Thomson Power Systems TS 870 Transfer Switch.
To conserve our natural resources, the transfer switch does not include printed O&M manuals. O&M manuals containing complete information about
operating the transfer switch is available at our Web site. Go to www.thomsonps.com and download applicable TS 870 and TSC 7320 O&M manuals.
NOTE:
All information contained in this quick start
guide
is for reference only and is subject to change without notice.
B. Check Equipment Delivery
Upon delivery of the transfer switch, remove the product packaging and verify the product has not been damaged.
WARNING: Damaged Transfer Switch equipment: Do not install or operate the transfer switch if it appears damaged. Failure to
follow these instructions can result in death, serious injury, or equipment damage.
Check that the model number printed on the equipment label on the door of the transfer switch is the same as on the delivery note corresponding to the
purchase order.
C. Check Line Voltage/Amperage
Verify the line voltage and amperage of the transfer switch product labeling matches the site requirements.
NOTE: All TS 870 transfer switches are equipped with Multi-Voltage field change feature capability. The TS 870 transfer switch can be configured for
operation on different nominal voltage levels by way of TSC 7320 software configuration and control transformer tap change. Refer to Section O of this
guide for detailed voltage change procedure.
NOTE: For applications utilizing single phase high-leg/red-leg delta systems, refer to detailed instructions provided in the TS 870 O&M manual for voltage
phasing connections or damage may result.
WARNING: Do not install the transfer switch if either voltage or amperage does not match. Failure to follow these instructions can result in
death, serious injury, or equipment damage.
D. Installation Requirements
Before installing the transfer switch, review the following requirements:
Installation Codes/Permits: Suitable permits are required by local authorities having jurisdiction prior to installing standby generator sets and
automatic transfer switches.
Installation Location: The standard TS 870 transfer switch is designed for indoor wall mounting or outdoor wall mounting with NEMA 3R
rating. The transfer switch must be installed in an environment where the temperature range is within +5° to +122° Fahrenheit (-15° to +50°
Celsius) and humidity range not exceeding 5%-95% non-condensing.
Power Cabling: All power cabling entering/exiting the enclosure must be installed in suitably sized conduit per NEC/CEC requirements.
Ampacity, type and voltage rating of current carrying conductors must also comply with NEC/CEC requirements and local authorities having
jurisdiction.
Control Wiring: All control wiring for engine start, load shed, alarm and remote test must be installed in separate conduits from all power cabling
and must utilize suitably sized conduits per NEC/CEC requirements. All control wiring shall be sized for minimum #18 AWG. Control wiring type
and voltage rating must also comply with NEC/CEC requirements and local authorities having jurisdiction.
NOTE: All field wiring/communication cabling that maybe field installed directly onto any ATS door mounted components must be suitably routed
and protected across the door hinge to prevent possible mechanical damage upon door opening and/or door closing.
Generator Set Automatic Operation: The TS 870 transfer switch operates in conjunction with any generator set with remote automatic starting
capabilities utilizing a 2 wire, remote start control contact input. A dry contact is provided for remote generator starting control (contact closes
to start generator and opens to stop generator).
Load Types: The standard TS 870 is suitable for control of motors, electric discharge lamps, tungsten filament lamps, and electric heating
equipment where the sum of motor full-load ampere ratings and the ampere ratings of other loads do not exceed the ampere rating of the switch
and the tungsten load does not exceed 30 percent of the switch rating.
Upstream Overcurrent Protection: Standard TS 870 transfer switch models do not contain any integral over current protection and require
upstream over current protection devices for both Utility and Generator sources.
Application: The TS 870 Transfer Switch is Listed by Underwriters Laboratories (UL) to Safety Standard UL 1008 for Transfer Switches for
Emergency Standby applications. This product is intended for installation and operation on legally required standby applications for emergency
power systems as defined by the National Electrical Code (NEC).
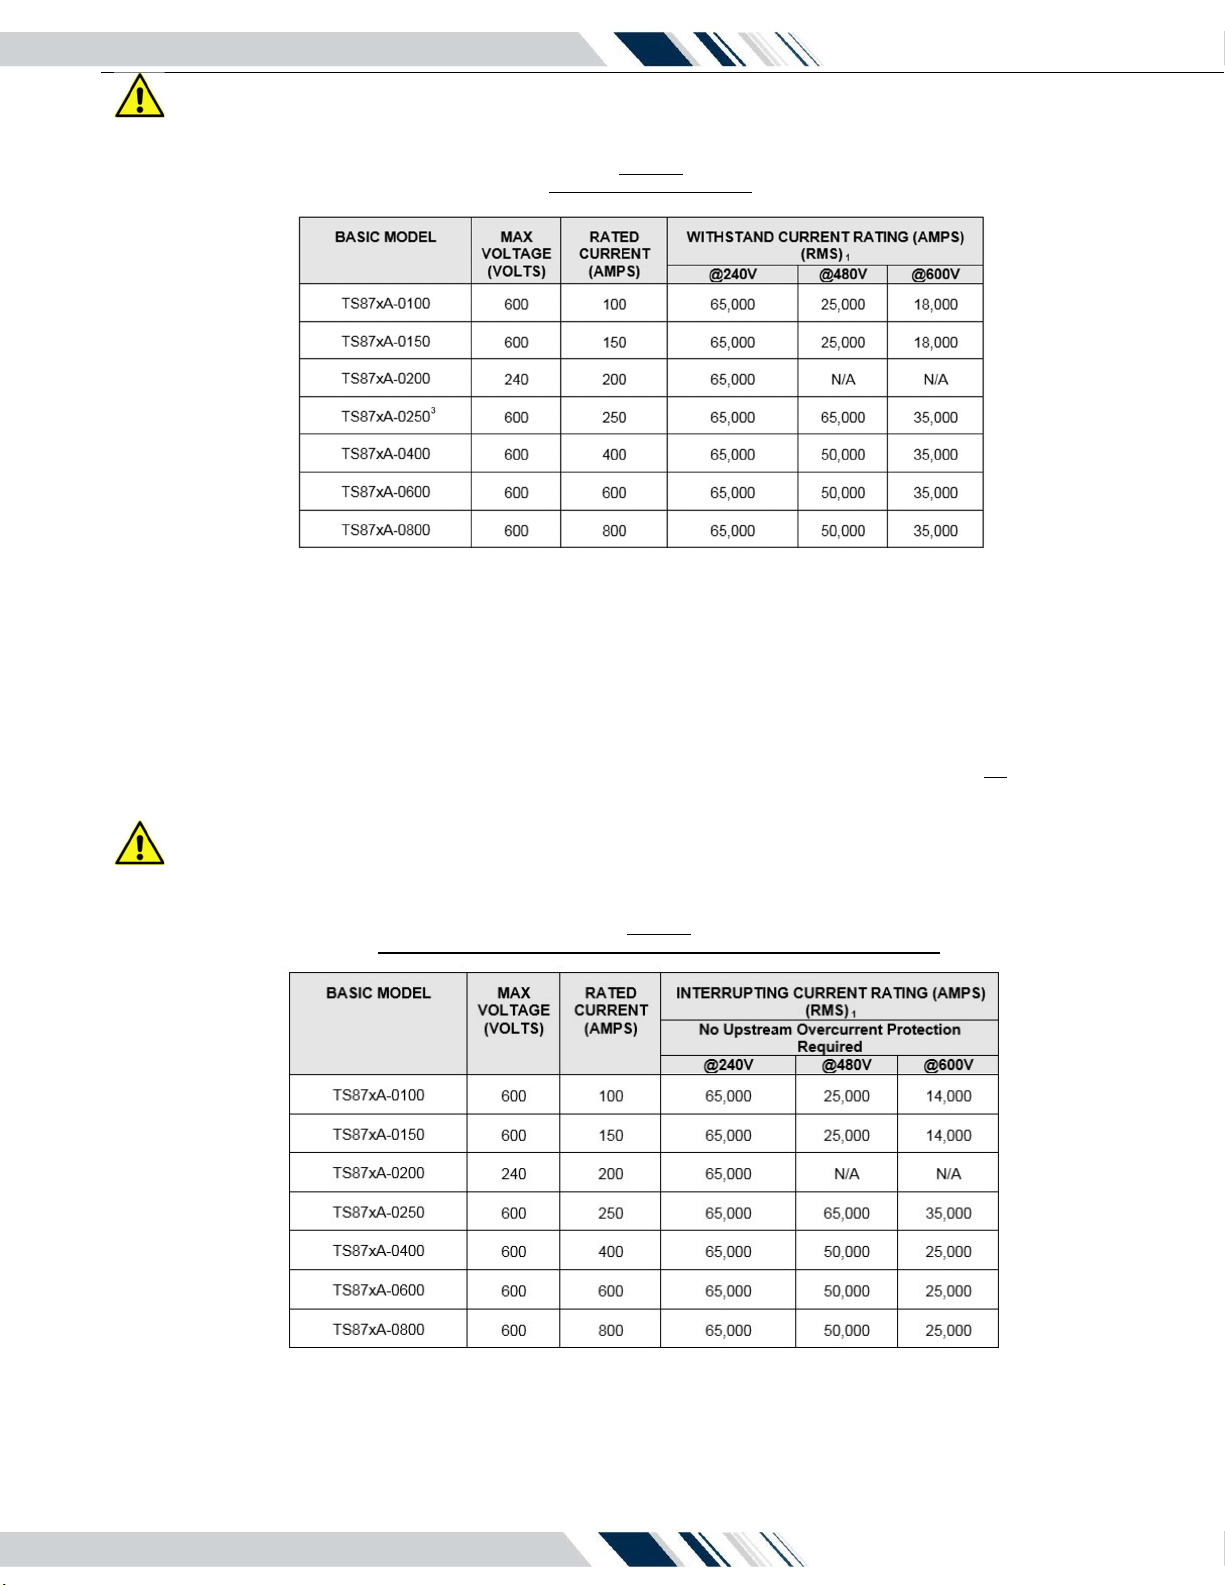
Withstand/Interrupting Current Ratings: Refer to electrical ratings shown on Table #1 below for withstand current ratings on Standard TS
870 type transfer switches. Refer to electrical ratings shown Table #2 for interrupting ratings for Service Entrance type ATS or ATS’s supplied
with power switching devices with integral trip units.
PM 173 Rev 0 23/02/10 3 Thomson Power Systems
TS 870 with TSC 7320 Quick Start Guide
WARNING: Do not install the transfer switch on systems with higher available short circuit current levels than listed in Table #1. Failure to
follow these instructions can result in death, serious injury, or equipment damage.
Table #1
Withstand Current Ratings
1. Standard ratings only are shown. Consult Thomson Power Systems for versions with higher withstand current ratings.
2. For other model types not shown, contact Thomson Power Systems for further information.
3. Withstand rating specified is for 250A, 3P. For 250A, the 4P rating are 65KA@240V, 35KA@480V and 22KA@600V
E. Service Entrance Rated ATS (US Market Only)
The following information pertains only to Automatic Transfer Switches supplied for the US Market with Service Entrance rated option or ATS models
with integral overcurrent protection option.
Upstream Overcurrent Protection (Service Entrance Rated TS 870): Service Entrance rated TS 870 transfer switch models contain integral
over current protection for the Utility source as standard. Service Entrance rated TS 870 transfer switches do not contain any integral over
current protection for the generator source and requires upstream generator source over current protection. The Service Entrance rated TS
870 is rated for 80% maximum continuous loading of load types as described above.
WARNING: Do not install the transfer switch on systems with higher available short circuit current levels than listed in Table #2. Failure to
follow these instructions can result in death, serious injury, or equipment damage.
Table #2
Interrupting Current Ratings (for ATS with Internal Overcurrent Trip Units)
1. Standard ratings only are shown. Contact Thomson Power Systems for versions with higher interrupting current
ratings.
2. For other model types not shown, contact Thomson Power Systems for further information.

PM 173 Rev 0 23/02/10 4 Thomson Power Systems
TS 870 with TSC 7320 Quick Start Guide
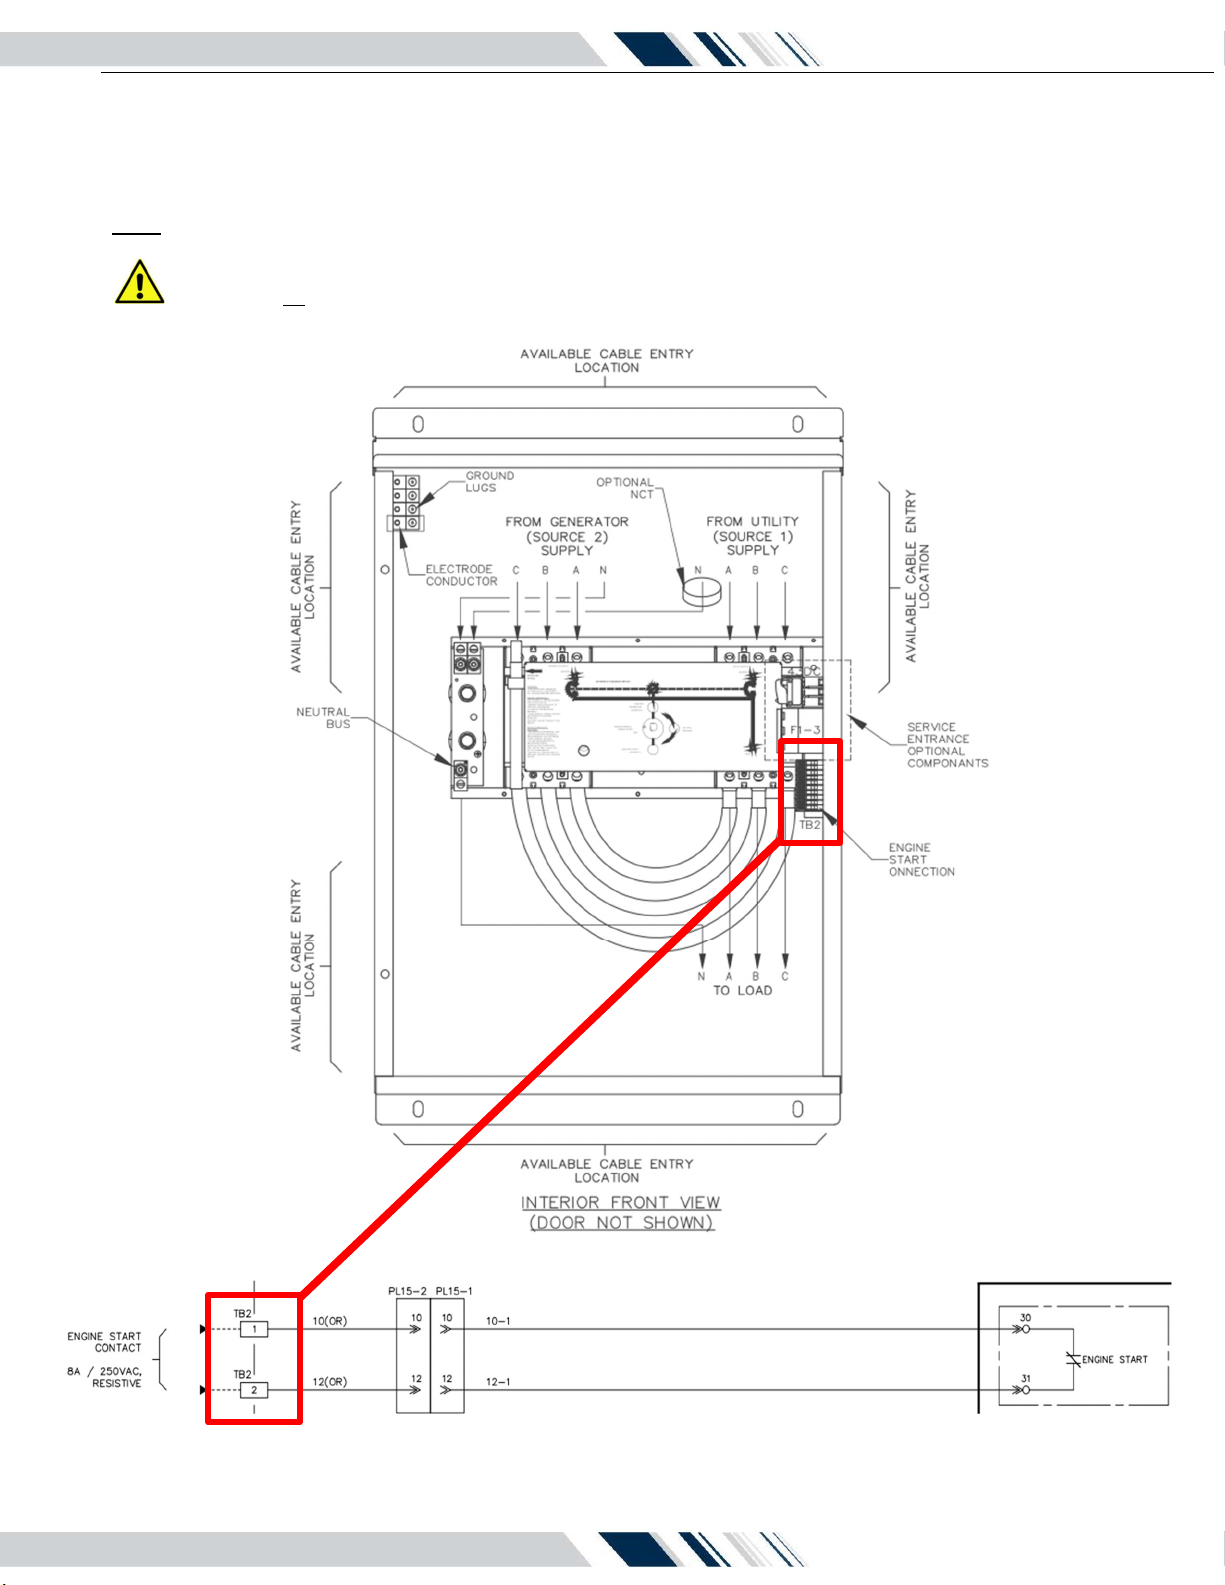
F. Typical Interior Component Layout Drawing
3 Pole Model, 100A—200A Shown

PM 173 Rev 0 23/02/10 5 Thomson Power Systems
TS 870 with TSC 7320 Quick Start Guide
G. Power Conductor Installation
The transfer switch is provided with power cable lugs for line, load and neutral block as per sizes indicated in Table #3 below. All Power cables are to
be installed and torqued on the lugs per values indicated on Table #3. Refer to ATS Physical Layout drawings as supplied with the ATS for Power
Cable entry/exit locations on the enclosure.
WARNING: Failure to properly install and adequately tighten power cable connections can result in equipment malfunction and/or damage.
TABLE #3
H. Power Conductor Insulation Resistance Testing
NOTE: Before insulation resistance testing is conducted, the Transfer Switch electronic Controller (TSC 7320) must be isolated from the
power wiring by unplugging ATS wiring plugs PL12 & PL15 located on the inside of the ATS door. Next isolate the 24VDC section by opening all fuses
on the Potential Transformer plate and disconnecting any 24VDC auxiliary power source connected to the B+ and B- terminals. Refer to drawing
shown below. Failure to isolate the TSC 7320 controller for insulation resistance testing can result in equipment malfunction and/or damage.
Following power cable installation, and isolating the TSC 7320 controller, all power cables shall be appropriately insulation resistance tested to
ensure no cross-phase connections or conduction to ground.
Once insulation resistance testing is complete, re-insert PL12 & PL15 isolation plugs, and close all the fuses on the Potential Transformer plate.
PM 173 Rev 0 23/02/10 6 Thomson Power Systems
TS 870 with TSC 7320 Quick Start Guide
I. Engine Start Wiring Connections
The Engine start wiring connection is located on the inside of the ATS Enclosure on the right-hand side wall as highlighted on the drawing below.
The engine start circuit works in conjunction with any generator set with remote automatic starting capabilities utilizing a 2 wire, remote start control
contact input. A dry contact is provided for remote generator starting control (contact closes to start generator and opens to stop generator).
Connections are made to TB2 terminals #1 & #2 per drawing shown below. Note: the contacts are rated for 8 amps @ 250VAC with a resistive load.
NOTE: if control power is de-energized to the TSC 7320 controller, the engine start contact will automatically close to start the generator set, following
the engine start delay time setting.
WARNING: Do not apply a resistive load greater than 8A @ 250VAC across the engine start terminals #30 & #31 as this will cause damage
to the TSC 7320 controller.
Change

PM 173 Rev 0 23/02/10 7 Thomson Power Systems
TS 870 with TSC 7320 Quick Start Guide
J. Remote Input Wiring Connections
The TSC 7320 is provided from the factory with 14 programmable inputs with default settings per table shown below. 8 of the inputs are digital inputs,
and the other 6 are analogue inputs that can also be programmed to be more digital inputs. Refer to the TSC 7320 Manual for further information on
programming changes as required.
NOTE: All control wiring required for any remote input connection must be made directly to the door mounted TSC 7320 as per drawing below. All
input wire cabling that may be installed must be suitably routed and protected across the door hinge to prevent possible mechanical damage upon
door opening and/or door closing.
WARNING: Do not apply any voltage across the input terminal and DC common as this will cause damage to the TS 7320 controller.
Connect only a dry (i.e. voltage-free) contact.
K. Programmable Output Contacts
The TSC 7320 is provided from the factory with 8 programmable digital outputs and 2 programmable dry contact outputs with default settings per the
table shown below. Refer to the TSC 7320 Manual for further information on programming changes as required. The Digital outputs are rated 2A @
24VDC resistive. Dry output contacts are rated at 8 amps @ 250Vac resistive. One of the dry contacts are normally closed and the other contact is
normally open.
NOTE: All control wiring required for any programmable output connections must be made directly to the door mounted TSC 7320 controller as per
drawing below. All output wire cabling that may be installed must be suitably routed and protected across the door hinge to prevent possible mechanical
damage upon door opening and/or door closing.
WARNING: Do not apply any voltage across the output contacts as this will cause damage to the TSC 7320 controller. Connect a load in
series with applicable voltage/current as specified.

PM 173 Rev 0 23/02/10 8 Thomson Power Systems
TS 870 with TSC 7320 Quick Start Guide
L. TSC 7320 Factory Default Programming
The TSC 7320 is factory programmed with default settings as shown as per the following table. NOTE: This table is applicable for firmware version
R0. Refer to the TSC 7320 O&M Manual for programming instructions to change any default setting.

PM 173 Rev 0 23/02/10 9 Thomson Power Systems
TS 870 with TSC 7320 Quick Start Guide
M. Transfer Switch Operation
a. TSC 7320 Display Password Security Description/Login (User Administration)
There are two different areas to change the controller settings, one of the requires entering a pin to change the settings, and the other are does
not require a pin.
The following settings can be changed in the non-restricted area:
- Enable Elevator Timers - Elevator pre-timer - Elevator post-timer - Neutral delay timer
With the transfer switch energized, follow the procedure below to access the above settings:
Put the Transfer Switch into the “STOP” mode, by pressing the red button in the lower left corner of the controller.
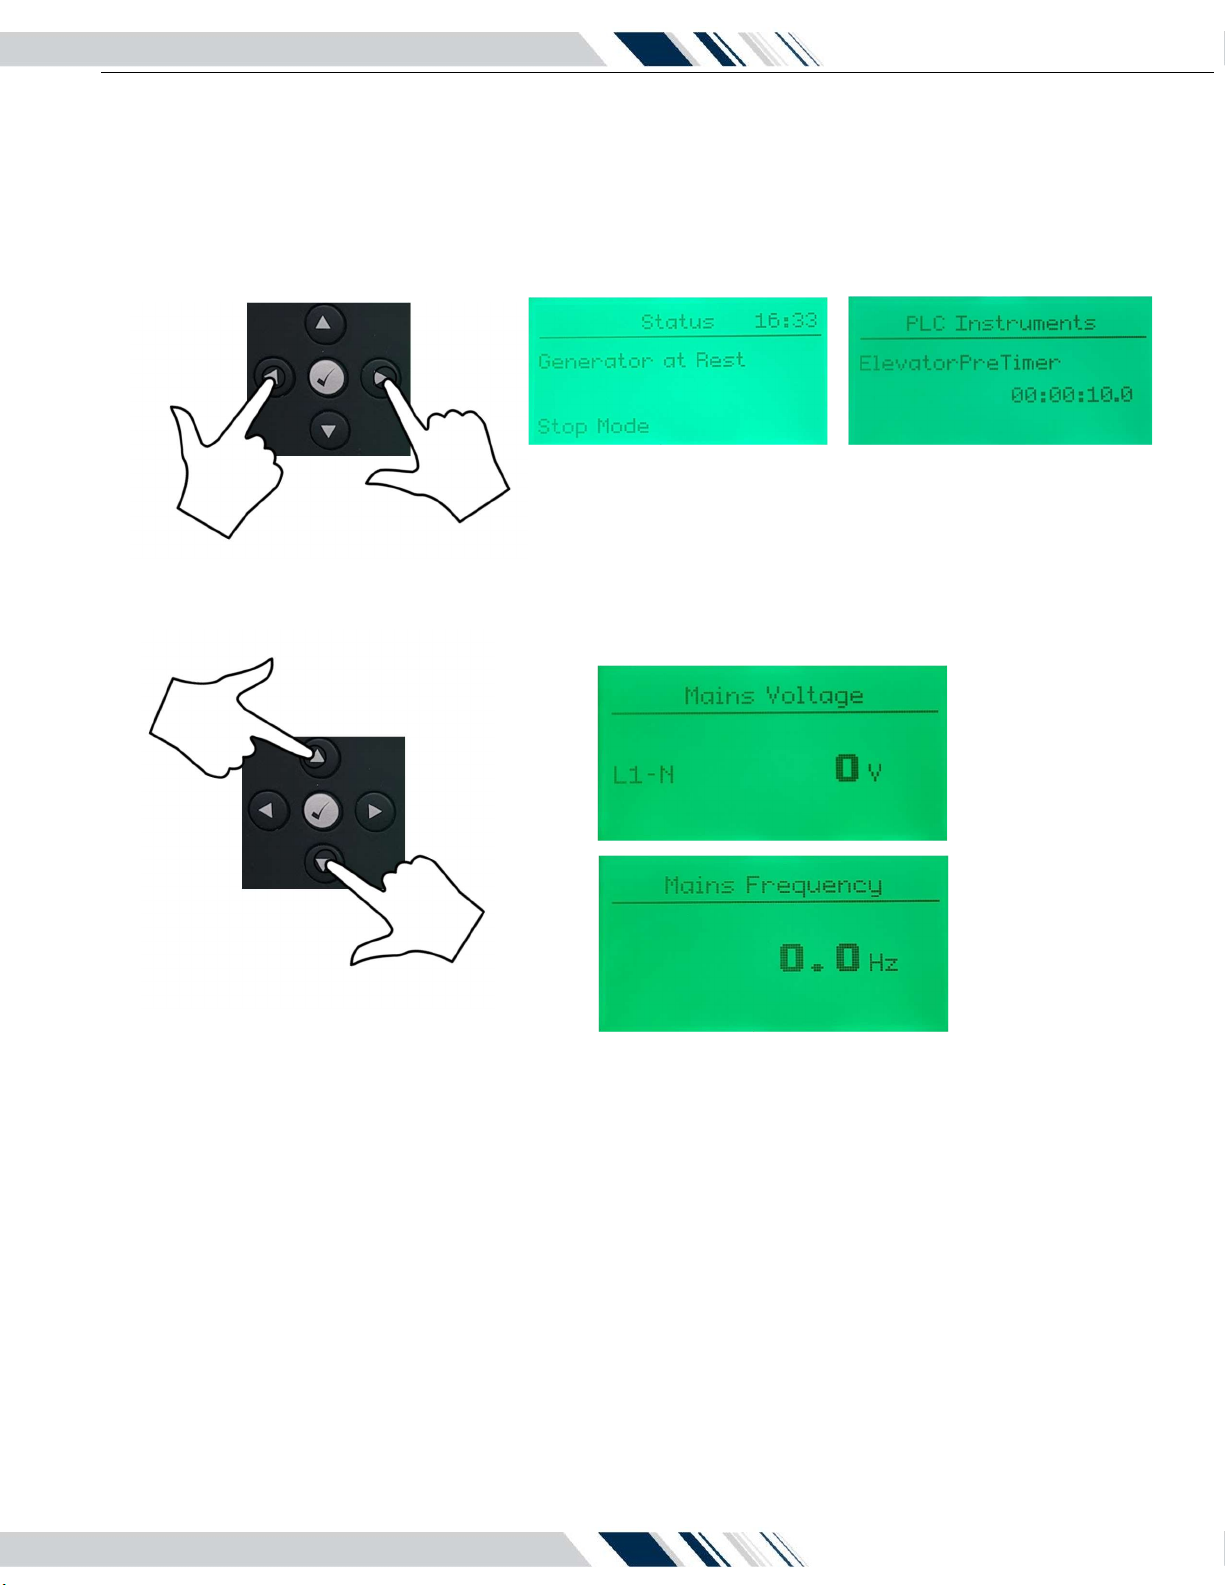
Use the left or right navigation keys to find the “PLC Instrumentation Page”
Use the up or down navigation keys to find the setting to be adjusted
Press and hold the center checkmark button until the header changes to “PLC Editor” (about 1 second)
The timer on the screen will now begin to flash. Use the up or down navigation buttons to change the value of the timer
When the desired value is set, press the center checkmark to save the timer and exit.
If more settings need to be adjusted, repeat the above procedure.
Exiting the editor will automatically return the controller to auto mode.
To prevent un-authorized access, all the other transfer switch settings can only be changed in the restricted area.
With the transfer switch energized, follow the procedure below to login to the TSC 7320 controller:
Put the Transfer Switch into the “STOP” mode, by pressing the red button in the lower left corner of the controller.
Press the stop button AND the center checkmark button (middle of navigation buttons) at the same time.
The screen’s header will read “Editor” and the screen will ask for a 4-digit pin number.
Use the navigation buttons to enter the default PIN “1 1 1 1”. The up and down buttons will change the value, and the left and right buttons
will let the user cycle between the 4 digits.
After the pin has been entered, press the center checkmark button to confirm and login to the restricted area.
The left or right navigation keys can now be used to cycle between different groups of settings, and the up and down buttons can be used
to cycle between the settings for that group
Once the screen shows the desired setting, press the center checkmark button and the value will start to flash
Use the up and down buttons to change the value, and the center checkmark button to confirm that value
Find and change all settings as desired
To exit the editor mode, hold the center checkmark button for 5 seconds while not editing any settings.
PM 173 Rev 0 23/02/10 10 Thomson Power Systems
TS 870 with TSC 7320 Quick Start Guide
b. Display Screen Navigation
The TSC 7320 controller has pre-programmed display pages which are selected manually using the buttons on the front of the controller,
by pushing the left and right navigation buttons.
The display pages are organized into the following order and can be continuously cycled through left or right:
Status – Engine – Generator – Mains – Alarms – Event Log – Communications – Schedule – PLC Instruments – About
More information can be found by using the up and down buttons for a given display page (voltage and transfer switch state, etc.).
Table des matières
Autres manuels Thomson Power Systems Changer


