TerraMaster U12-412 Manuel utilisateur

TerraMaster NAS
Model: U12-412
Fundamentals and Preliminaries
Copyright © 2019 TerraMaster All Rights Reserved.
Data Storage Master

Contents
2. Hardware Installation
3. Software Installation
4. Initialisation
1
2
5
7
1. Overview 2
5. Getting Started 10
Model:U12-412

2. Hardware Installation
1. Overview
A TNAS product includes hardware, operating systems (OS), and other auxiliary applications. Therefore, you
should carefully read the instructions prior to operation. For any questions, please visit the “Help”
section at TerraMaster's official website, or contact our technical support team at [email protected].
Once you receive your new TNAS, please check to ensure that the package includes the items detailed
below. If any items are missing, please contact the reseller immediately.
Once you receive your new TerraMaster TNAS product, please install and set up your TNAS according to the
“Quick Installation Guide”.
Please note that given our commitment to the continuous improvement of our products, their
appearances, designs, and specifications may be subject to change without prior notification.
Finally, the images and illustrations in this instruction manual may be slightly different from the actual
product, and so please always refer to the actual product.
2.1 Package List
2
Model:U12-412
TNAS unit X 1 Power core X 1 crosshead screwdriver Several screws
Installation guide X 1 Network core X 1
Product brochure
(optional)
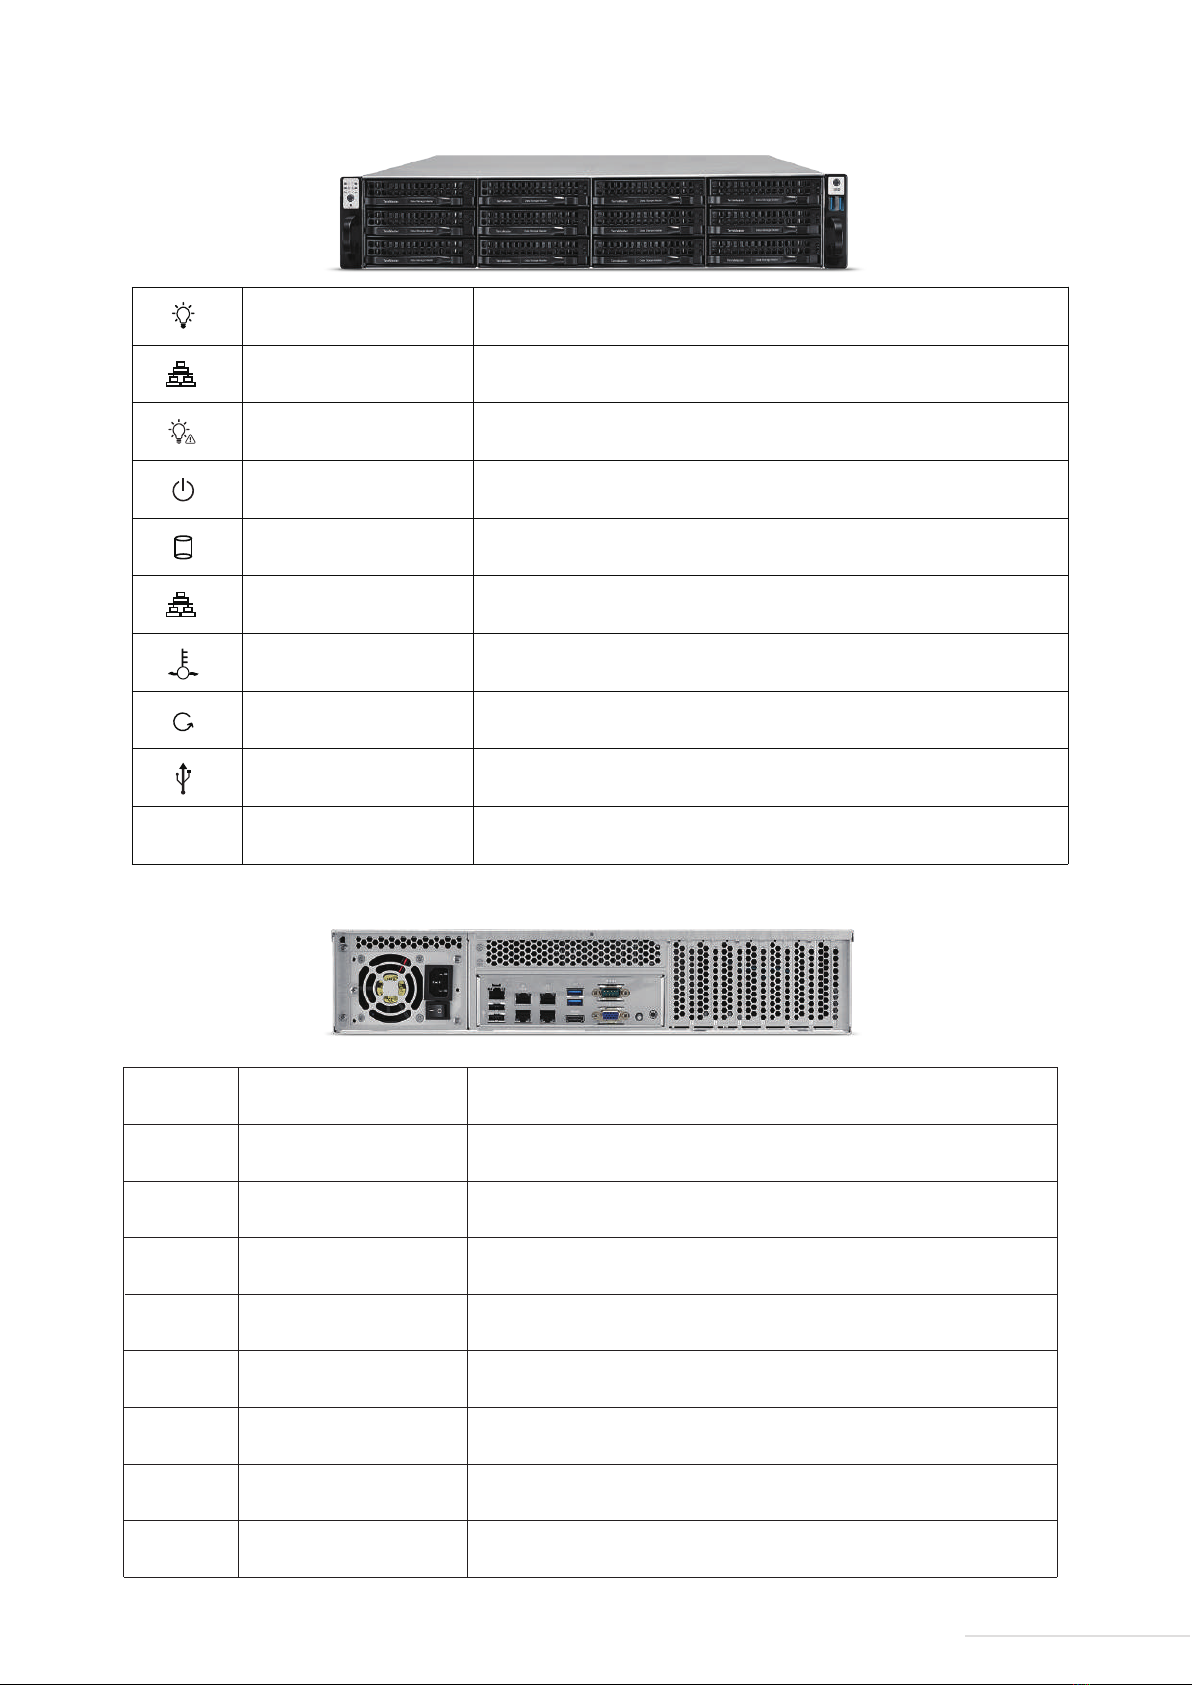
2.2 Appearance
3
Model:U12-412
Rear Cover Illustration
Panel Illustration
Hard Drive Indicator
UID Information Indicator
Power Indicator
Network Indicator 1
Network Indicator 2
Reset
Flickering: Hard drive mounted normally Off: Hard drive undetected
On: UID is activated
Indicator on when powered on
Short press to power on. Press again to power off.
Management port (MGMT) is activated
On: Network is connected Flickering: Data transmission in progress
Short press to restart
Connect USB storage device or USB wireless card
USB port
No function for now
UID Button and Indicator
Power Button
UID
2
1
Standby Indicator On: Standby
①
②
③
④
USB2.0 port
MGMT port
HDMI port
RJ45 port
Connect USB storage device or USB wireless card
Remote management port
Connect to display device(default no output)
⑤USB3.0 port Connect USB storage device or USB wireless card
⑥ VGA port Connect to display device
⑦ COM port COM (serial)communication interface
⑧ UID button and indicator After pressing the UID button to activate UID, the UID indicator will turn on
⑨ Reset Short press to restart
1000M/100M/10Mbps network port

A TNAS may be installed with or without a hard drive, since different models are available for purchase. If
you purchase a TNAS without a hard drive, you should purchase a hard drive separately. Only after hard
drives have been installed and initialised can the TNAS be used.
Please refer to the “Quick Installation Guide” to complete hard drive installation.
Therefore, to complete the connection, please follow the instructions below:
Step 1:
Connect TNAS to the network using a network cable. The possible network devices that TNAS can connect
to can be routers, hubs, network switching.
Step 2:
Connect TNAS to a power supply using the supplied power adapter (Warning: Please do not use a third-party
power adapter. If you do, the device may sustain severe damage, and in extreme cases, damage to the
physical body can occur).
Step 3:
Press the power button to power on TNAS.
Step 4:
If the hardware indicator is always red, this indicates that the hard drive is functioning abnormally. The
hard drive may be damaged, or the hard drive may not be compatible with the TNAS device. If this
happens, please re-install or replace the hard drive and try again.
Step 5:
If the hard drive indicators and network indicators display a normal connection, your TNAS hardware is
ready.
TNAS should be installed with hard drives of the following type: firstly, 2.5/3.5 inch SATA hard drive; or
secondly, 2.5 SATA SSDs. TNAS is a durable storage device, which means that in order to operate for long
periods of time, high-quality hard drives are required. Therefore, please visit TerraMaster’s official
website to read our “Hard Drive Compatibility” guide, and then select the correct hard drive for your
TNAS.
2.3 Hard Drive Installation
Before it can function properly, your TNAS device needs to be connected to the network and powered on.
2.4 Connection
4
Model:U12-412

Search:
You can access your TNAS device only after it has been found on the network. To search for your TNAS
device, click the “Search” button (Note: You can only search when TNAS and your computer are on the
same sub-network).
Login:
To log in to TNAS's advanced settings menu (TOS), select your TNAS and click “Login” (Note: Only users
with administrator privileges can use TOS’s advanced features).
To ensure that TNAS functions properly, please install some necessary software.
The following are the core features of TNAS PC
TNAS PC is a desktop application designed for TNAS devices. It helps you to quickly search, log in, or set up
your TNAS. The application is available in both Mac OS and Windows OS versions.
1. Visit www.terra-master.com and click “Download”
2. Select your TNAS model
3. Locate TNAS PC using the download checklist
4. Choose a version that works for you and click “Download”
5. Install the TNAS PC application you just downloaded onto your computer
Please follow the instructions below to download the TNAS PC application:
3.1 TNAS PC
3. Software Installation
5
Model:U12-412

File Browser:
If you need to browse files in TNAS or write data to the device, select your TNAS in the menu and click “File
Browser” (Note: At this point, you need to have a username and password).
Map Drive:
By mapping your drive, you can simplify file management by creating a shortcut to frequently used folders.
To create a mapped drive, select your TNAS and click “Map Drive” (Note: The Mac OS version of TNAS PC
does not have this feature).
Change IP:
You can use the “Change IP” option to manually change your TNAS IP address. You may need to do this if
your TNAS IP address conflicts with the network IP address segment. Otherwise, TNAS will be inaccessible.
TerraMaster's Operating System (TOS) was specially developed for TNAS.
To access files via mobile devices (e.g., iOS or Android devices), please download the TNAS mobile app to
your mobile device.
Newly purchased TNAS devices must be initialised prior to use. In the process of initialisation, TOS will be
installed onto your TNAS. Please see the section on “Initialisation” for an operation guide to TOS
installation. You can also update your TOS software at any time after completing initialisation.
3.2 TOS
3.3 TNAS Mobile App
6
Model:U12-412

Step 1: Search for TNAS Devices
Before initialising your device, you need to find your TNAS device on the network. To find your TNAS, open the
TNAS PC desktop application on your computer and click “Search”.
To download the iOS and Android versions of TNAS mobile, you can search for "TNAS mobile" in the App
Store and Google Play, respectively. Alternatively, visit the “Download” on TerraMaster’s official website
to download the app of android version for free (Note: Your username and password are required to use our
app, so please remember to obtain these details from your TNAS administrator).
Scan the QR code to download the TNAS mobile app
Your newly purchased TNAS must be initialised prior to use. However, before you initialise your device, please ensure the
following: (1) That your TNAS hardware is installed properly; and (2) That you have installed the TNAS PC desktop application
on your computer.
4.Initialisation
7
Model:U12-412

Step 2: Start Initialisation
Select your TNAS from the search list and click “Login”. If your TNAS is not initialised, you will be redirected
to the initialisation page. Please Click “Start” to initiate the initialisation process.
8
Model:U12-412
Step 3: Hard Drive Detection
If the installed hard drive is detected by TNAS, bootstrap initialisation will automatically proceed to the next
step. If the hard drive is not installed, please install the hard drive and click “Recheck”. Since TNAS
supports hard drive hot swap, the hard drive can be directly installed without having to turn the power off.
Step 4: Hard Drive Check-Up
Your TNAS will assess the health status of the hard drive. If the health status is good, please click “Next”. If
the test results indicate a risk, we recommend that you replace the abnormal hard drive.

After TOS installation is complete, TNAS will take several minutes to restart. Please wait patiently for this
process to finish. Once TNAS has restarted successfully, you will be guided to the next step.
Step 6: Basic Settings
Complete the basic settings for TNAS according to the instructions. This will involve setting a password,
inputting device name, selecting your time zone, and clicking “Next”.
Step 5: Install TOS
Follow the page prompts to install TOS. If your TNAS is connected to the Internet, we recommend that you
choose the “Online Install” option. Otherwise, choose the “Manual Install” option. If you select
“Manual Install”, please visit TerraMaster's website to download the TOS software package from the
“Download” before you process the installation.
9
Model:U12-412
Table des matières
Autres manuels TerraMaster Serveur de stockage réseau


Manuels Serveur de stockage réseau populaires d'autres marques

HP
HP NetStorage 6000 Manuel utilisateur

Seagate
Seagate U10 ST320423A Manuel utilisateur

Synology
Synology RackStation RS816 Manuel

D-Link
D-Link ShareCenter Pro DNS-1200-05 Manuel utilisateur

Avid Technology
Avid Technology VideoRAID ST Guide de sécurité

Western Digital
Western Digital My Cloud Home Duo Manuel utilisateur

PrimeArray
PrimeArray 4xxx Manuel utilisateur

Buffalo
Buffalo TeraStation WSS WSH5010N6 Manuel utilisateur

Planex
Planex MZK-NAS01SG Manuel utilisateur

Intel
Intel SS4000-E - Entry Storage System NAS Server Manuel utilisateur

Synology
Synology RS2212+ Manuel utilisateur

Allnet
Allnet ALL69000 Manuel utilisateur


